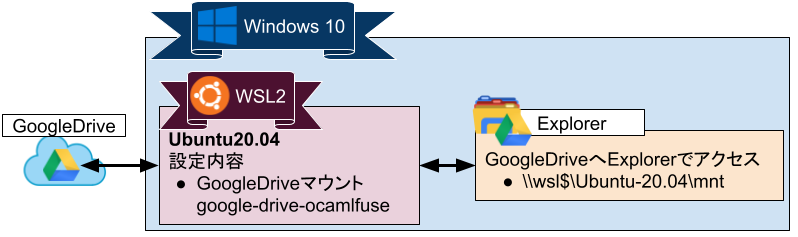
概略
Linuxではgoogle-drive-ocamlfuseというツールでGoogleドライブをマウントできます。Windowsの「バックアップと同期」ツールでもGoogleドライブのファイルにアクセスできますが、下記の違いがあります。
| 違い | バックアップと同期 | google-drive-ocamlfuse |
|---|---|---|
| ストレージ容量 | 同期なのでGoogleドライブ内の容量と同じだけ必要。 | マウントなのでほとんど使用ない。 |
| 一時ファイル | Windowsの一時ファイルを大量に吐き出す(未確認)。あっという間にストレージ容量がなくなるので定期的にディスクのクリーンアップを実施する必要がある。 | マウントなので一時ファイルは出力されない。 |
| パフォーマンス | ローカルにコピーされているので同期時に重くなるがそれ以外は通常のファイルを操作するのと変わらない。 | 常にネットワークを介して反映されるので重い。 |
| 複数起動 | Googleドライブの複数アカウント同時同期数は3つまで。また、複数アカウントの同期を行うとWindowsの起動が遅くなる。 | マウント数に制限はない(3つまで可能なことは確認済み)。WSL上でのマウントなのでWindowsの起動に影響が出ることはない。 |
| 信頼度 | Googleドライブとの同期に失敗することがしばしばあり、その再同期を手動で実施する必要がある。 | ネットワークが切断されない限り問題ないが、突然ネットワークが切れると固まる可能性がある。 |
google-drive-ocamlfuseを使用してマウントし、Windows側からネットワークドライブの割り当てを行えばローカルのストレージと同様に使用できるようになります。
下記のようなイメージになります
google-drive-ocamlfuseインストール
WSL上に下記手順でgoogle-drive-ocamlfuseをインストールします。
1.apt実行
aptにリポジトリを登録してインストールします。
$ sudo apt install software-properties-common
$ sudo add-apt-repository ppa:alessandro-strada/ppa
$ sudo apt update
$ sudo apt -y upgrade
$ sudo apt install google-drive-ocamlfuse
2.Browser偽装ファイル作成
google-drive-ocamlfuseを使用するために下記の認証作業が必要です。XWindow(LinuxのWindowシステム)がインストールされている場合は問題ありませんが(直接Chromeなどを利用できない)CLI環境ではブラウザによる認証ができないため、Windows側のブラウザで認証を通します。
ブラウザの起動Shellに見せかけた偽装ファイルを作成します。
$ sudo vim /bin/firefox
下記内容を記載してください。
# !/bin/sh
echo $* > /dev/stderr
作成後、ファイルの権限を調整します。
$ sudo chmod 777 /bin/firefox
これでgoogle-drive-ocamlfuseを起動したときにアクセストークンの取得URLがコンソールに吐き出されます。
実行
google-drive-ocamlfuseを使用するために下記の作業が必要です。
ここでは例としてGooglePrivate、GoogleBusinessの2つのGoogleドライブについてマウントします。
1.Read/Write許可設定
google-drive-ocamlfuseではLinuxでユーザ側のアプリケーションレイヤーでファイルシステムを実現する仕組みとして、FUSE(Filesystem in Userspace)を使用します。
google-drive-ocamlfuseコマンドは後でfstabに設定するためrootユーザで実行します。
そのファイルシステムでWindowsユーザ(root以外のユーザ)が読み書きを自由に行うために下記設定をします。
$ sudo su
# vim /etc/fuse.conf
ファイル末尾の下記コマンドのコメントを外してください。
user_allow_other
2.マウントポイントの設定
GooglePrivate、GoogleBusinessの2つのGoogleドライブについてのマウントポイントを作成します。
# mkdir -p /mnt/GooglePrivate
# mkdir -p /mnt/GoogleBusiness
# chmod 777 /mnt/GooglePrivate
# chmod 777 /mnt/GoogleBusiness
3.初回GooglePrivateマウントコマンド実行
まず、GooglePrivateのGoogleドライブについてマウントします。
#(プロンプト)行のコマンドを実行するとURLが表示されるのでURLをコピーしてください。
コマンド実行中の状態になります。
# google-drive-ocamlfuse -o allow_other -label GooglePrivate /mnt/GooglePrivate
/bin/sh: 1: xdg-open: not found
https://accounts.google.com/o/oauth2/auth?client_id=0123456789.apps.googleusercontent.com&redirect_uri=https%3A%2F%2Fgd-ocaml-auth.appspot.com%2Foauth2callback&scope=https%3A%2F%2Fwww.googleapis.com%2Fauth%2Fdrive&response_type=code&access_type=offline&approval_prompt=force&state=xxxxxxxxxxxxxx
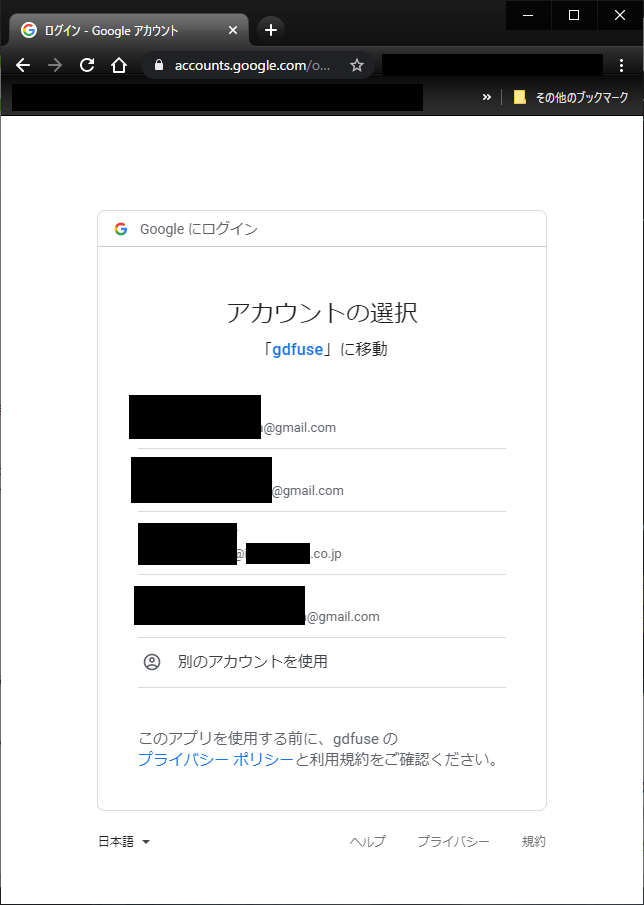
4.アカウント選択
Windows側のブラウザを開き、「3.」でコピーしたURLにアクセスします。
複数対象アカウントがある場合はアカウント選択画面が表示されるので対象のGoogleドライブのアカウントを選択します。
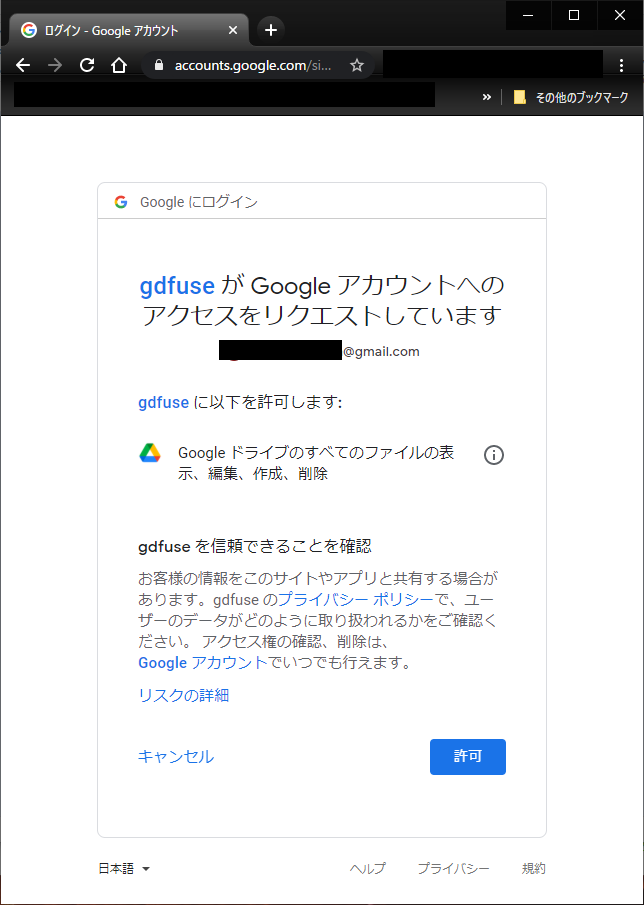
5.Googleドライブへのアクセス許可
許可ボタンを押下します。
成功すると下記画面に遷移します。
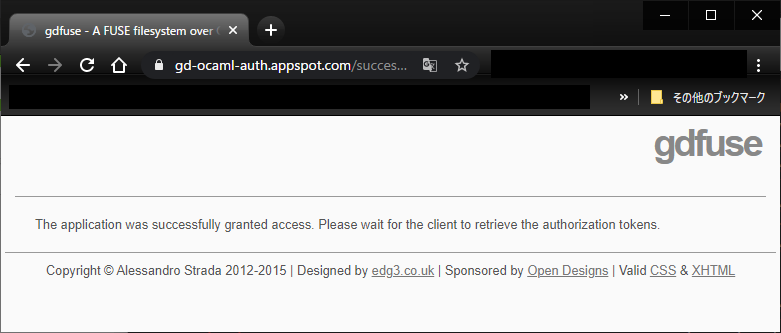
その後、WSL側では下記のようにAccess token retrieved correctly.が表示され入力プロンプトに戻ります。※1分程度待つ場合があります。
# google-drive-ocamlfuse -o allow_other -label GooglePrivate /mnt/GooglePrivate
/bin/sh: 1: xdg-open: not found
https://accounts.google.com/o/oauth2/auth?client_id=0123456789.apps.googleusercontent.com&redirect_uri=https%3A%2F%2Fgd-ocaml-auth.appspot.com%2Foauth2callback&scope=https%3A%2F%2Fwww.googleapis.com%2Fauth%2Fdrive&response_type=code&access_type=offline&approval_prompt=force&state=xxxxxxxxxxxxxx
Access token retrieved correctly.
#
6.初回GoogleBusinessマウントコマンド実行
GooglePrivateをGoogleBusinessに変更して「3.」-「5.」を実施してください。
7.失敗時の対応
下記の通り、アンマウントを行い、設定ファイルを削除後、「3.」-「6.」を実施してください。
# fusermount -u /mnt/GooglePrivate
# fusermount -u /mnt/GoogleBusiness
# rm -rf ~/.gdfuse
WSL起動時マウント設定
2度目以降の起動時は認証がいらないので下記設定をしておき、自動でマウントするようにします。
1.gdfuseコマンド作成
fstabに設定するためのマウントコマンドshellを作成します。
# vim /usr/bin/gdfuse
下記の通り記載してください。
# !/bin/bash

/usr/bin/google-drive-ocamlfuse -label $1 $*
exit 0
権限を設定します。
# chmod 755 /usr/bin/gdfuse
2.fstab設定
# vim /etc/fstab
下記をファイル末尾に追記してください。
gdfuse#GooglePrivate /mnt/GooglePrivate fuse uid=0,gid=0,allow_other,user,_netdev 0 0
gdfuse#GoogleBusiness /mnt/GoogleBusiness fuse uid=0,gid=0,allow_other,user,_netdev 0 0
3.確認
一度アンマウントしてマウントしてみてください。
# exit
$ sudo fusermount -u /mnt/GooglePrivate
$ sudo fusermount -u /mnt/GoogleBusiness
アンマウントされていることを確認
$ ls -la /mnt/GooglePrivate
$ ls -la /mnt/GoogleBusiness
マウント
$ sudo mount -a
マウントされていることを確認
$ ls -la /mnt/GooglePrivate
$ ls -la /mnt/GoogleBusiness
1.3.Windowsドライブマウント設定 < 前 **1.4.Google Driveマウント設定** 次 > 1.5.WSLでのsystemctl設定