1. 目的
はじめてBootstrapを使ってWEBページをつくってみようとしました。
- CSSをカスタマイズのためにはコンパイルが必要ということに気づく
- lessって何?
- コンパイルできて、カスタマイズできる環境にまで ←ここまで
環境は、MacOSX 10.9.5
2. Bootstrapを使う準備
公式サイトからソースコードのダウンロード。
ディレクトリ構造は以下のとおり。
/User/hogehoge/
bootstrap/
├── less/
├── js/
├── fonts/
├── dist/
│   ├── css/
│   ├── js/
│   └── fonts/
└── docs/
    └── examples/
前もってコンパイルされたCSSがはいっています。
Getting StartedにあるBasicテンプレートをindex.htmlとしてコピーして
__/User/hogehoge/bootstrap/dist/__に置きましょう。
__/User/hogehoge/bootstrap/dist/__をApacheのドキュメントルートにして、
apacheを起動して、表示を確認してみましょう。
Hello Worldが表示されたらOKです。
3. lessファイルをコンパイル
さて、ここからです。
cssをカスタマイズしたい場合、cssを直接修正するのではなく、lessフォルダにあるファイルを修正していきます。
lessって何?
lessを使うとcssをプログラム的に実装することができます。
まずはドットインストールのless入門講座をみてみましょう。理解が体感できます。
less公式サイトもチェック
lessファイルをコンパイルする環境を設定します
Gruntを使います。
Bootstrap uses Grunt for its build system, with convenient methods for working with the framework. It's how we compile our code, run tests, and more.
bootstrapのソースコードをダウンロードして解凍すると
-
Gruntfile.js
-
package.json
の2ファイルが含まれています。これらを使います。
Grunt.jsは、サーバーサイドJavaScriptのNode.jsを使用したCUIのビルドツールです。 タスクを設定しておき、それらを自動化します。
npm, node.jsのインストール
すでに導入済みであれば問題ないです。
node.jsの公式サイトから、パッケージをダウンロードしてインストールします
grunt-cli のインストール
npm install -g grunt-cli
依存パッケージのインストール
__/User/hogehoge/bootstrap/__ディレクトリで実行します。
npm install
npm は同じディレクトリにある package.json を参照して、自動的に必要な必要な依存プラグインをインストールします。
package.jsonを参照すると、以下のものがインストールされるようです。
 "devDependencies": {
    "btoa": "~1.1.2",
    "glob": "~4.0.2",
    "grunt": "~0.4.5",
    "grunt-autoprefixer": "~0.7.6",
    "grunt-banner": "~0.2.3",
    "grunt-contrib-clean": "~0.5.0",
    "grunt-contrib-concat": "~0.4.0",
    "grunt-contrib-connect": "~0.8.0",
    "grunt-contrib-copy": "~0.5.0",
    "grunt-contrib-csslint": "~0.2.0",
    "grunt-contrib-cssmin": "~0.10.0",
    "grunt-contrib-jade": "~0.12.0",
    "grunt-contrib-jshint": "~0.10.0",
    "grunt-contrib-less": "~0.11.3",
    "grunt-contrib-qunit": "~0.5.1",
    "grunt-contrib-uglify": "~0.5.0",
    "grunt-contrib-watch": "~0.6.1",
    "grunt-csscomb": "~2.0.1",
    "grunt-exec": "~0.4.5",
    "grunt-html-validation": "~0.1.18",
    "grunt-jekyll": "~0.4.2",
    "grunt-jscs-checker": "~0.6.0",
    "grunt-saucelabs": "~8.1.0",
    "grunt-sed": "~0.1.1",
    "load-grunt-tasks": "~0.6.0",
    "markdown": "~0.5.0",
    "npm-shrinkwrap": "~3.1.6",
    "time-grunt": "~0.3.2"
  },
これで、Gruntのコマンドを利用できるようになります。
4. コンパイル
以下のコマンドを実行しましょう。
grunt watch (Watch)
そしてlessファイルの編集をはじめてください。
lessファイルに変更があったら、自動的にコンパイルしてくれます。
5.注意点
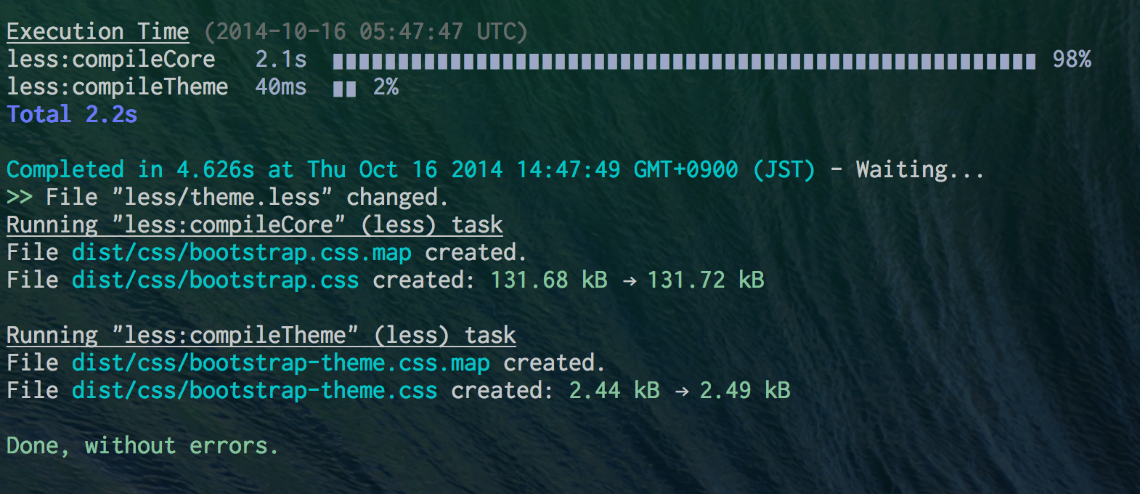
今回、Grunt.jsには何も手を加えていません。
そのため、コンパイル成功時に出力されるcssファイルは以下のとおりでした。
Execution Time (2014-10-16 05:47:47 UTC)
less:compileCore   2.1s  ▇▇▇▇▇▇▇▇▇▇▇▇▇▇▇▇▇▇▇▇▇▇▇▇▇▇▇▇▇▇▇▇▇▇▇▇▇▇▇▇▇▇▇▇▇▇▇▇▇▇▇▇▇▇ 98%
less:compileTheme  40ms  ▇▇ 2%
Total 2.2s

Completed in 4.626s at Thu Oct 16 2014 14:47:49 GMT+0900 (JST) - Waiting...
>> File "less/theme.less" changed.
Running "less:compileCore" (less) task
File dist/css/bootstrap.css.map created.
File dist/css/bootstrap.css created: 131.68 kB → 131.72 kB

Running "less:compileTheme" (less) task
File dist/css/bootstrap-theme.css.map created.
File dist/css/bootstrap-theme.css created: 2.44 kB → 2.49 kB

Done, without errors.
/dist/css/ディレクトリのうち☆がついたものだけがコンパイル、出力されます。
☆bootstrap-theme.css
☆bootstrap-theme.css.map
bootstrap-theme.min.css
☆bootstrap.css
☆bootstrap.css.map
bootstrap.min.css
そのためindex.htmlで読み込むcssはmin.cssではないほうにして実行してください。
min.cssを作成うるのは何かオプションが必要なのかもしれません。
(おまけ)連載しています
東洋経済オンラインで、「エンジニア夫婦のあるある日記」を連載中です!
■過去の連載記事はこちら
http://t.co/RzQWoQUbJ2