0
3

Delete article

Deleted articles cannot be recovered.

Draft of this article would be also deleted.

Are you sure you want to delete this article?

More than 3 years have passed since last update.

Raspberry Piセットアップ ~Raspberry Pi Imager版~

Last updated at Posted at 2020-12-17

Raspberry Piのセットアップについてのメモ書き
Windowsでのやり方メモ

今回はRaspberry Pi Imagerを使ったやり方

Etcher版

準備する物

microSDカード(64GB以上推奨)
SDカードアダプタ
カードリーダー(使用PCにSDカードスロットあればいらない)

基本的には全く変わりません。

手順

Raspberry Pi Imagerのダウンロード及びインストール
2020-10-14 (15).png 2020-10-14 (16).png
ホーム上部の『Downloads』→『Raspberry Pi Imager』を選択してダウンロードする。

ダウンロードしたファイルを開いて、インストールする。

②Raspberry Pi Imagerを起動する
スタートメニューから立ち上げる。
スクリーンショット (6).png スクリーンショット (7).png
Operating SystemからインストールするOSを選択する。
通常版で問題なければ一番上の物を選択する。

スクリーンショット (8).png
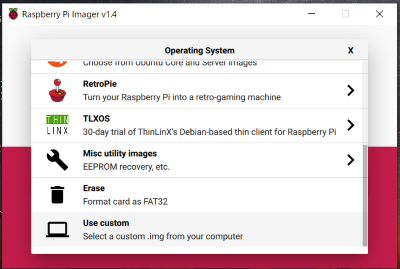
もし別でダウンロードしたVer違いの物を入れたいのであればUse customから入れたい物を選択する。

スクリーンショット (9).png
書き込みを行うメディアを選択する。

スクリーンショット (10).png スクリーンショット (12).png
writeを押すと書き込んでもえぇか?と聞いてくるので問題なければ『YES』を選択する。(左図)

暫く放置していると、書き込み終わったからカード外してと表示されるのでカードを外す。(右図)

まとめ

公式が書き込みImagerを公開した事で、結構簡単にOSディスクを作成する事が可能になりました。
Etcherでのやり方に慣れているのでどうしてもEtcherの方が楽と思ってしまうが
どちらともにRaspberry Piを立ち上げるのには問題なかったです。

以上です。

0
3
0

Register as a new user and use Qiita more conveniently

  1. You get articles that match your needs
  2. You can efficiently read back useful information
  3. You can use dark theme
What you can do with signing up
0
3

Delete article

Deleted articles cannot be recovered.

Draft of this article would be also deleted.

Are you sure you want to delete this article?