Alibaba Cloud のFunction Compute をGoのSDKで操作する
中国のアリババが展開するクラウドサービス、Alibaba Cloudの記事の第四弾です。
前回の記事はこちら
2018年06月25日に、日本でもFunction Computeサービスがリリースされました。
今回は、Function ComputeサービスをGo言語のSDKを使用して操作してみたので紹介します。
Function Computeとは
Function ComputeはAWSだとLambdaが類似サービスのFaaS(Function as a Service)です。
HTTPリクエストなどのイベント発生時に、登録した処理(関数)を実行するサービスです。
ecsインスタンスなどを管理する必要がないため、利用者は実行させたい処理に集中できる利点があります。
また、処理が呼ばれてから終了時までの課金となるため、コスト面でも優れています。
今回やったこと
指定されたURLにアクセスしたら、"hello Function Compute!"とブラウザで表示されるというものを作りました。
手順
1. 実行させたい処理のプログラムを準備する
さて、まずはURLにアクセスしたときに実行させたい処理のコードを書きます。
ここで残念なお知らせですが、Alibaba CloudのFunction Service はGo言語に対応していません!
対応している言語は以下になります。
- nodejs4.4
- nodejs6
- nodejs8
- alinode3
- python2.7
- python3
- java8
今回はPython3で書きました。
# -*- coding: utf-8 -*-


def my_handler(environ, start_response):
    HELLO_WORLD = b"<h1>hello Function Compute!</h1>"
    context = environ['fc.context']
    request_uri = environ['fc.request_uri']
    status = '200 OK'
    response_headers = [('Content-type', 'text/html')]
    start_response(status, response_headers)
    return [HELLO_WORLD]
上記のコードを書いて、main.pyという名前で保存しました。
HTMLで"hello Function Compute!"と描写するためのプログラムです。
Pythonはここまで。あとの操作はGo言語でやります。
2. fc-go-sdk
Function Computeを操作するためのGoのSDKは、fc-go-sdkが用意されています。
READMEのサンプルコードではなぜか"aliyun/serverless/lambda-go-sdk"をimportしてますが、動きません。fc-go-sdkを使いましょう。
import
今回importするのは以下のパッケージです。
import (
	"fmt"
	"github.com/aliyun/fc-go-sdk"
	"os"
)
クライアントの作成
まずは、Function Computeを操作するためのクライアントを作成します。
client, _ := fc.NewClient(endpoint, api_version, id, secret)
ここで、NewClient()に渡す引数は以下になります。
-
endpoint:コンソールでFunction Computeを選択したときに表示されているインターネットエンドポイントを使います。

-
api_version:2016-08-15 -
id,secret:以前の記事で使ったものと一緒です。
サービスの作成
サービスの作成は以下のようにして行います。
create関数の引数には上で作成したクライアントを与えてください。
func create(client *fc.Client) {
	fmt.Println("Creating service")
	createServiceOutput, err := client.CreateService(fc.NewCreateServiceInput().
		WithServiceName("test1").
		WithDescription("this is a test for go sdk"))
	if err != nil {
		fmt.Fprintln(os.Stderr, err)
	}
	if createServiceOutput != nil {
		fmt.Printf("CreateService response: %s \n", createServiceOutput)
	}
}
NewCreateServiceInput()のあとに、Withから始まるメソッドを用いることで設定を追加していく感じです。
関数の作成
func createfunc(client *fc.Client) {
	fmt.Println("Creating function1")
	createFunctionInput1 := fc.NewCreateFunctionInput("test1").WithFunctionName("f1").
		WithDescription("go sdk test function").
		WithHandler("main.my_handler").WithRuntime("python3").
		WithCode(fc.NewCode().WithFiles("./code/main.py")).
		WithTimeout(5)

	createFunctionOutput, err := client.CreateFunction(createFunctionInput1)
	if err != nil {
		fmt.Fprintln(os.Stderr, err)
	} else {
		fmt.Printf("CreateFunction response: %s \n", createFunctionOutput)
	}
}
WithHandler(): 今回はPythonプログラムのファイル名.実行関数名のように書きます。
WithRuntime():実行させたいプログラムの言語を選択します。選択可能な言語は以下のとおりです。
- nodejs4.4
- nodejs6
- nodejs8
- alinode3
- python2.7
- python3
- java8
WithCode(fc.NewCode().WithFiles("./code/main.py")):ここでは実行させたいプログラムのパスを書きます。fc-go-sdkのサンプルではzipファイルを使っていますが、それではうまく動きませんでした。普通に書いたプログラムのファイルを渡すとうまくいきました。
トリガーの作成
どんなときに処理を実行するかを設定します。今回はURLにGETリクエストでアクセスがあったときにしました。
func trig(client *fc.Client) {
	createTriggerInput := fc.NewCreateTriggerInput("test1", "f1").WithTriggerName("t1").
		WithTriggerType("http").
		WithTriggerConfig(
			fc.NewHTTPTriggerConfig().WithAuthType("anonymous").WithMethods("GET"))

	createTriggerOutput, err := client.CreateTrigger(createTriggerInput)
	if err != nil {
		fmt.Fprintln(os.Stderr, err)
	} else {
		fmt.Printf("CreateTrigger response: %s \n", createTriggerOutput)
	}
}
NewCreateTriggerInput(): 引数にはサービス名と関数名を書きます。関数名はPythonの関数とは別でいいです。
WithTriggerType():トリガーのタイプを選択します。選択可能なタイプは以下のとおりです。そのあとのWith*を使った設定はこのタイプによって違います。
osslogtimerhttp
main関数
上記で書いた関数を使ったmain関数は以下のようになります。
func main(){
    id := "aaaaa"
    secret := "bbbbb"
    endpoint := "https://------"
    api_version := "2016-08-15"
    client, _ := fc.NewClient(endpoint, api, id, secret)
    create(client)
    createfunc(client)
    trig(client)
}
実行
コンパイルして、実行してみましょう。
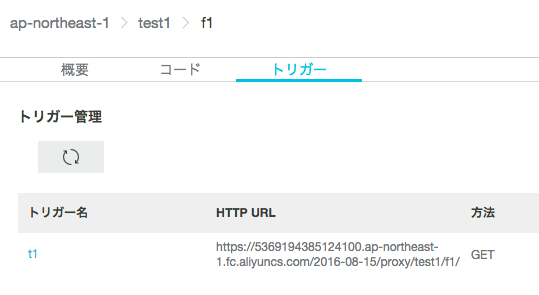
コンソールを確認してみると、サービスと関数が作成されていて、トリガーのところにURLがあります。
このURLは、ドキュメントによると以下のような構成になっています。
<account_id>.<region>.fc.aliyuncs.com/<version>/proxy/<serviceName>/<functionName>/[action?queries]
このURLにアクセスすると、Pythonで書いた処理が実行されるというわけです。
やってみましょう!

表示されました!成功です。
最後に
Go言語を使ってFunction Computeを操作する方法を紹介しました。
あちらで実行するプログラムには、Pythonで書いたものを使用しました。
今回試したhttpトリガーの他にも、 「OSSにファイルがアップロードされたら」などいろいろなトリガーを設定できるようなので、試してみてはいかがでしょうか。