全世界10億人のAMIMOTOファンの皆様こんにちは!
「AMIMOTO Advent Calendar 2015」 3日目の記事です。
WEBサイトをAMIMOTOで構築して、メールはレンタルサーバやGoogleApps、Office365などを使っている場合が多いと思いますが、AMIMOTOのおかげでec2のサーバリソースがまだまだ余っていると思うので、お金をすこしでも節約するためにAMIMOTOの中にメールサーバを突っ込んでみます。
バーチャルドメイン対応なので、1インスタンスで内の複数のドメインを運用している場合にもそれぞれのドメインにメール環境を用意できます。
環境
・AMIMOTO HTTP2 ver.0.1 (2015-10-23) ※他のタイプでも基本的には動くはずです。
・AmazonLinux2015.09
・t2.microでも動く
・postfix+dovecot+postfixadmin+mysql
・メールサーバホスト名:mail.hoge.jp
構築
とりあえず全部rootで進めていきます。
sudo su -
mysql設定
メール用のDBを作成していきます。
MySQL(Percona)がインストール済みなので、それを使います。
デフォルトでは、localhostからrootユーザーでのログインはパスワード不要です。
mysql
mysql> CREATE DATABASE postfix;
mysql> GRANT ALL PRIVILEGES ON postfix.* TO 'postfix'@'localhost' IDENTIFIED BY 'mailpasswd';
mysql> quit
postfixインストール/設定
SMTPサーバとなるpostfixをインストール/設定していきます。
yum install postfix

vi /etc/postfix/main.cf
--------------------
# 既存の設定を変更
myhostname = mail.hoge.jp
mydomain = hoge.jp
inet_interfaces = all
mydestination = localhost
mynetworks = 127.0.0.0/8
home_mailbox = Maildir


## ここからは新たに追記
# Virtual mailbox settings
virtual_mailbox_domains = proxy:mysql:$config_directory/mysql_virtual_domains_maps.cf
virtual_mailbox_base = /var/vmail
virtual_mailbox_maps = proxy:mysql:$config_directory/mysql_virtual_mailbox_maps.cf
virtual_alias_maps = proxy:mysql:$config_directory/mysql_virtual_alias_maps.cf
virtual_minimum_uid = 150
virtual_uid_maps = static:150
virtual_gid_maps = static:12

# SASL Authentication
smtpd_sasl_auth_enable = yes
smtpd_sasl_exceptions_networks = $mynetworks
smtpd_sasl_security_options = noanonymous
broken_sasl_auth_clients = yes
smtpd_sasl_type = dovecot
smtpd_sasl_path = private/auth
smtpd_recipient_restrictions = permit_mynetworks, permit_sasl_authenticated, reject_unauth_destination
-------------------------

サブミッションポート(587番)を解放します。
vi /etc/postfix/master.cf
--------------------------
submission inet n       -       n       -       -       smtpd
--------------------------

alternatives --config mta
-----------
There are 2 programs which provide 'mta'.

  Selection    Command
-----------------------------------------------
*+ 1           /usr/sbin/sendmail.sendmail
   2           /usr/sbin/sendmail.postfix

Enter to keep the current selection[+], or type selection number: 2 <=2を入力してpostfixに変更
---------
メール用のユーザー、ディレクトリを作成します。
useradd -r -u 150 -g mail -d /var/vmail -s /sbin/nologin -c "Virtual mailbox" vmail
mkdir /var/vmail
chmod 770 /var/vmail/
chown vmail:mail /var/vmail/
postfixとmysqlを連携させるための設定ファイルを作成します。
vi /etc/postfix/mysql_virtual_alias_maps.cf
-------------
user = postfix
password = mailpasswd
hosts = localhost
dbname = postfix
table = alias
select_field = goto
where_field = address
additional_conditions = and active = '1'
-----------

vi /etc/postfix/mysql_virtual_domains_maps.cf
-------------
user = postfix
password = mailpasswd
hosts = localhost
dbname = postfix
table = domain
select_field = domain
where_field = domain
additional_conditions = and backupmx = '0' and active = '1'
-----------

vi /etc/postfix/mysql_virtual_mailbox_limit_maps.cf
-----------
user = postfix
password = mailpasswd
hosts = localhost
dbname = postfix
table = mailbox
select_field = quota
where_field = username
additional_conditions = and active = '1'
-----------


vi /etc/postfix/mysql_virtual_mailbox_maps.cf
------------
user = postfix
password = mailpasswd
hosts = localhost
dbname = postfix
table = mailbox
select_field = CONCAT(domain,'/',maildir)
where_field = username
additional_conditions = and active = '1'#query = SELECT CONCAT(domain,'/',maildir) FROM mailbox WHERE username='%s' Aactive = '1'
-----------
デフォルトではsendmailが起動しているので
sendmailを停止してpostfixを起動します。
/etc/init.d/sendmail stop
/etc/init.d/postfix start
chkconfig sendmail off
chkconfig postfix on
Dovecotのインストール/設定
pop3/imap4サーバとなるDovecotをインストールします。
yum -y install dovecot-mysql dovecot
設定ファイルを変更していきます。
vi /etc/dovecot/dovecot.conf
------------------
protocols = imap pop3
------------------

vi /etc/dovecot/conf.d/10-auth.conf
--------------------
disable_plaintext_auth = no
auth_mechanisms = plain login
# !include auth-system.conf.ext
!include auth-sql.conf.ext
--------------------

vi /etc/dovecot/conf.d/10-mail.conf
--------------------
mail_location = maildir:~/

first_valid_uid = 150
last_valid_uid = 150
--------------------

vi /etc/dovecot/conf.d/10-master.conf
-------------------
  # Postfix smtp-auth
  unix_listener /var/spool/postfix/private/auth {
    mode = 0666
  }
-------------------

vi /etc/dovecot/dovecot-sql.conf.ext
-----------------
driver = mysql
default_pass_scheme = MD5
connect = dbname=postfix user=postfix host=/var/lib/mysql/mysql.sock password=mailpasswd
password_query = SELECT password FROM mailbox WHERE username = '%u' AND active = '1'
user_query = SELECT concat('/var/vmail/%d/', maildir) as home, 150 as uid, 12 as gid FROM mailbox WHERE username = '%u' AND active = '1'
----------------
dovecotを起動します。
/etc/init.d/dovecot start
chkconfig dovecot on
potfixadminのインストール/設定
ブラウザからドメインやメールアドレスの管理を行うためにpostfixadminをインストールします。
cd /usr/local/src/
wget http://sourceforge.net/projects/postfixadmin/files/postfixadmin/postfixadmin-2.92/postfixadmin-2.92.tar.gz/download
tar zxvf download
mv postfixadmin-2.92 /var/www/postfixadmin
chown -R nginx. /var/www/postfixadmin
nginxでpotfixadminを表示できるように設定を行います。
vi /etc/nginx/postfixadmin
----------------
 # postfixadmin
    location /postfixadmin {
        alias /var/www/postfixadmin;
        index index.php;
        include /etc/nginx/expires;

        location ~ ^/postfixadmin/.+\.php$ {
            alias /var/www/postfixadmin;
            fastcgi_pass   phpfpm;
            fastcgi_index  index.php;
            fastcgi_param  SCRIPT_FILENAME /var/www$fastcgi_script_name;
            include        fastcgi_params;
        }
    }
----------------


vi /etc/nginx/conf.d/default-ssl.conf
(http2タイプでない場合は、/etc/nginx/conf.d/default.confを編集)
---------
    include     /etc/nginx/postfixadmin;
---------

/etc/init.d/nginx restart
postfixadminの基本設定を行います。
vi /var/www/postfixadmin/config.inc.php
-----------------
$CONF['configured'] = true;
$CONF['database_type'] = 'mysql';
$CONF['database_host'] = '127.0.0.1';
$CONF['database_user'] = 'postfix';
$CONF['database_password'] = 'mailpasswd';
$CONF['database_name'] = 'postfix';
-----------------
足りないモジュールをインストールします。
yum install php-imap
ブラウザから設定画面へアクセスします。
・http2タイプ
https://hostname/postfixadmin/setup.php
http2タイプではデフォルトでは自己証明のため証明書のエラーが出ますが、エラーを無視して進んでください。
・それ以外のタイプ
http://hostname/postfixadmin/setup.php
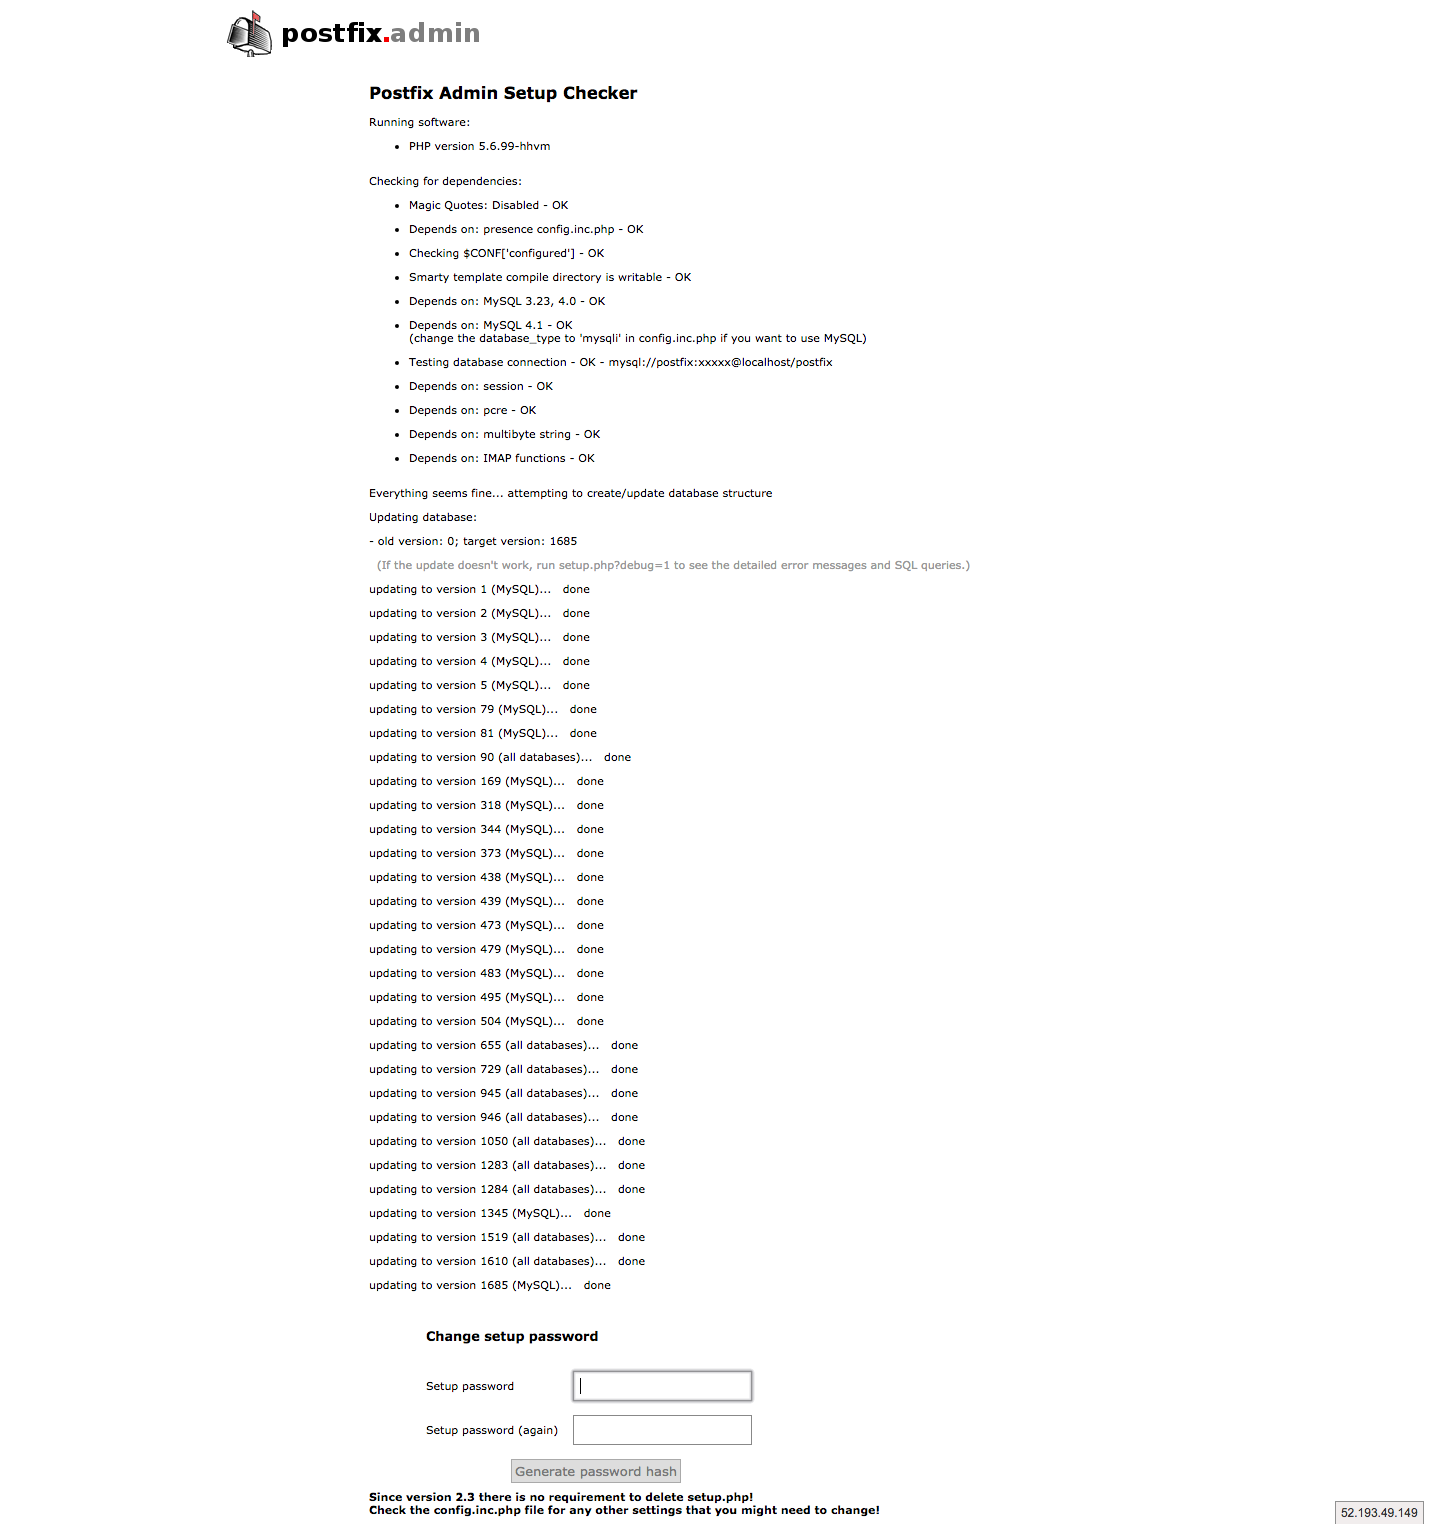
インストール環境のチェックが問題なければ、セットアップパスワード入力して進みます。
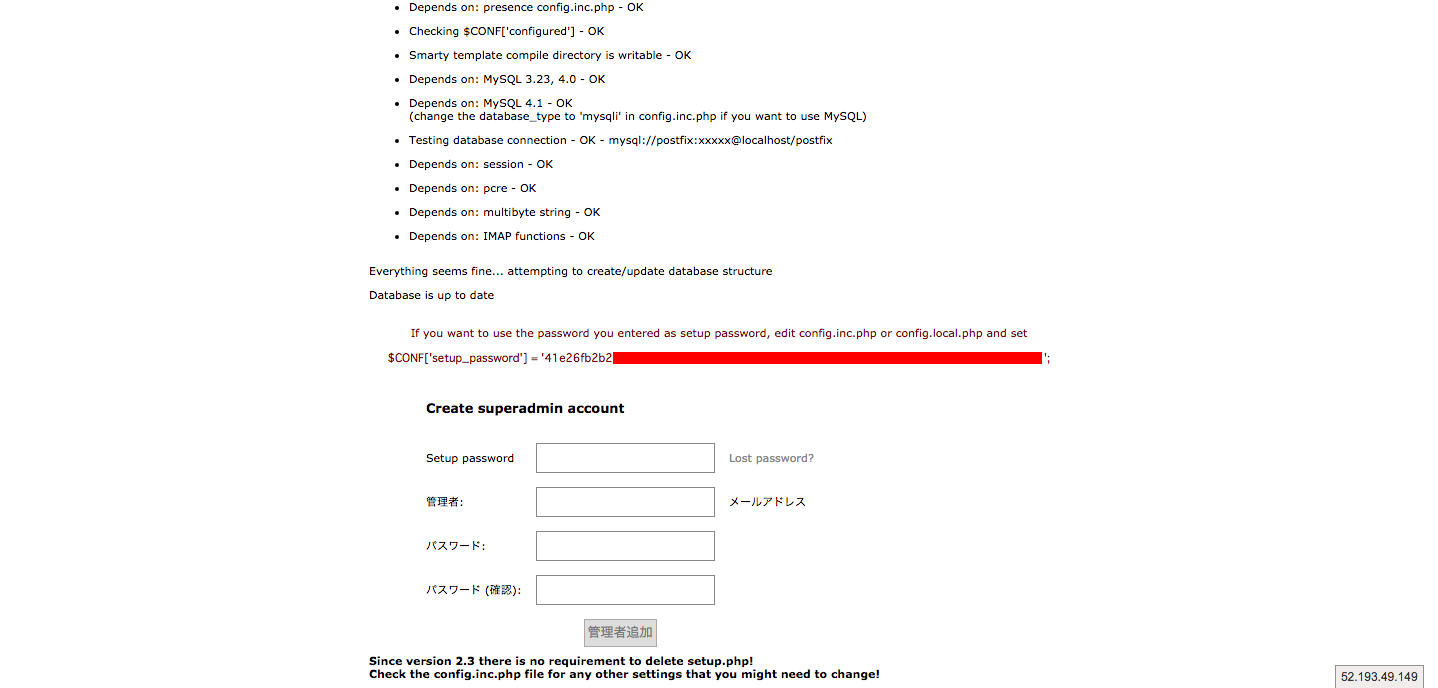
次の画面でセットアップパスワードのハッシュが表示されるので、コピーしてサーバ内の設定ファイルに記載します。
vi /var/www/postfixadmin/config.inc.php
-------------
//$CONF['setup_password'] = 'changeme';
$CONF['setup_password'] = 'xxxxxxxxxxxxxxxxxxxxxxxxxxxxxxxxxxxxxxxxxx';
-------------
再度ブラウザへ戻り、先ほど入力したセットアップパスワード、管理者のアドレス、パスワードを入力します。これで初期設定が完了です。
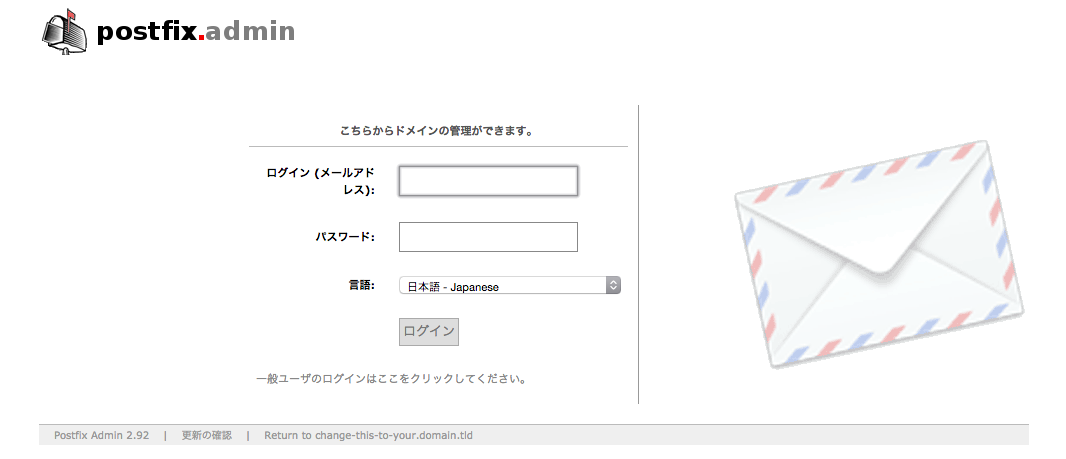
管理者のログイン画面へアクセスして、入力した情報でログインが可能になります。
https://hostname/postfixadmin/login.php
(http://hostname/postfixadmin/login.php)
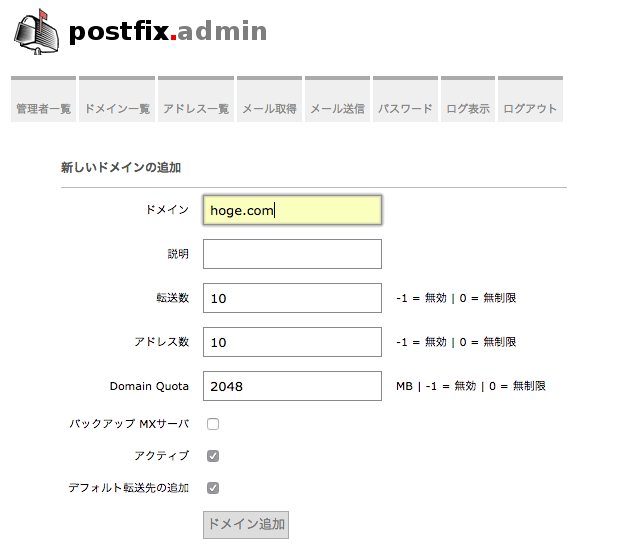
完成!
これで自由にドメインを作成したり、メールアドレスを作成して、メールサーバとして使用することができます。
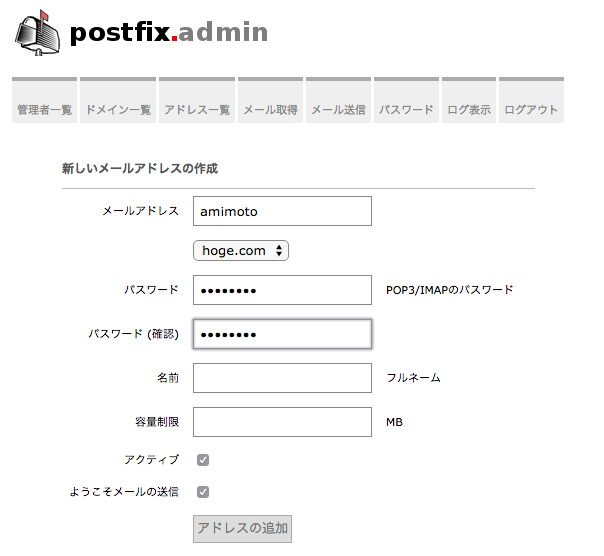
ドメイン作成
アドレス作成
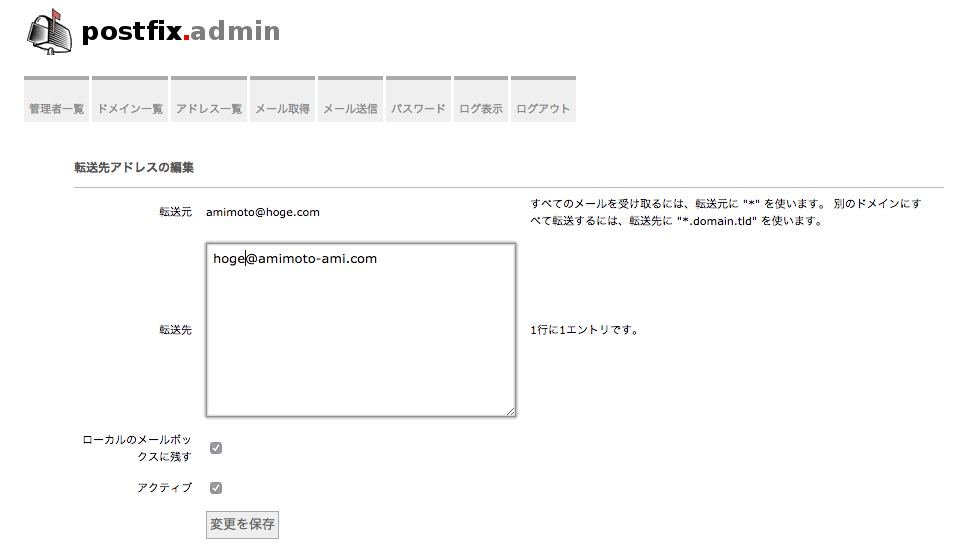
転送設定
注意点
メールの認証はSMTP-AUTHで、ユーザー名は@以降を含むメールアドレス全体となります。
また、セキュリティグループで、TCPの25/110/143/587番ポートの解放が必要です。
ec2をメールサーバとして使用する場合は、AWSヘの逆引き申請、メール送信申請などもお忘れなく。
これで基本的なメールサーバとして使用ができますが、DKIM、SPF、暗号化なども必要に応じて設定を行いましょう。
そしてメールサーバの運用は大変です。