「御託はいいからやり方だけ教えてくれ」というあなたは → 実践 - Vue.jsでSSR
この記事は
別途私が書いている実践 - Vue.jsでSSRに、割とどうでもいい私の感情を交えながら、いくつかのパートに分けて書いていく実践形式のSSR with Vue.js説明記事です。
実際の開発フローに沿って、なるべく予備知識がなくても読み進められるように心がけています。
実践1. ビルド環境
実践2. SPA
実践3. SSR ← 当記事
誰に役立つ?
私のような
- フロントエンジニアなりにSSRの実際のやり方を知りたくてググったのに概念的なものしか見つけられない
検索能力の低い人 - 意を決してサーバサイドレンダリング — Vue.jsを通してやったのに、途中から「あれ、なんか違う」ってなって結局出来なかった
理解力の低い人 - 概要をザクッと知ってあとは自分流にやっていきたい人
ゴール
SSR環境を構築でき、拡張することができる
- 極シンプルなSSR環境を構築します
- ジェネレータ的なものは使わず、全体の概要を理解しながら進めていきます
実践3. SSR
サーバーとSSRを実装していきます。
サーバー
Node.jsとフレームワークExpressを使用してサーバーを実装していきます。
必要パッケージをインストールします。
npm i -S express
app.jsを作成し、サーバーのコードを書いていきます。
app.js
const express = require('express');

const app = express();
app.use('/', express.static('public'));
app.use('/dist', express.static('dist'));

app.listen(8080);
これによりlocalhost:8080にアクセスできるようになります。
また、ディレクトリpublicに配置したファイルはパス/{fileName}で、ディレクトリdistに配置したファイルはパス/dist/{fileName}でアクセスが可能になります。
では、ディレクトリpublicを作成しindex.htmlをそこに移動しましょう。
続いてスクリプトの読み込みパスをルートパスに変更します。
public/index.html
<head>
  ...
  <script src="/dist/main.js" defer></script>
</head>
サーバーを実行しましょう。
サーバーの実行にはnodeコマンドを使用します。
node app
nodeコマンドでは拡張子.jsを省略できます。
上のコマンドは次のコマンドと同じ結果になります。
node ./app.js
localhost:8080にアクセスし、次のように表示されれば成功です。
サーバーの実行コマンドをnpm scriptsに登録しておきましょう。
現在起動中のサーバーをctrl + cで終了します。
package.jsonのscriptsに以下を追記します。
package.json
{
  ...,
  "scripts": {
    "test": "echo \"Error: no test specified\" && exit 1",

    // 以下を追加
    "start": "node app",

    "build:prod": "webpack -p",
    "build:dev": "webpack --mode=development"
  },
  ...
}
startは特別なscriptで、npm startで実行が可能です。
ctrl + cで終了します。
現在のディレクトリ構成は以下のようになっています。
root
|- /dist
  |- main.js
|- /node_modules
  |- /some_modules
|- /public
  |- index.html
|- /src
  |- /components
    |- Page.vue
    |- Top.vue
  |- App.vue
  |- index.js
  |- router.js
|- .babelrc
|- app.js
|- package.json
|- package-lock.json
|- webpack.config.js
SSR
いよいよSSRの実装に入ります。
はじめに完成形をイメージしましょう。
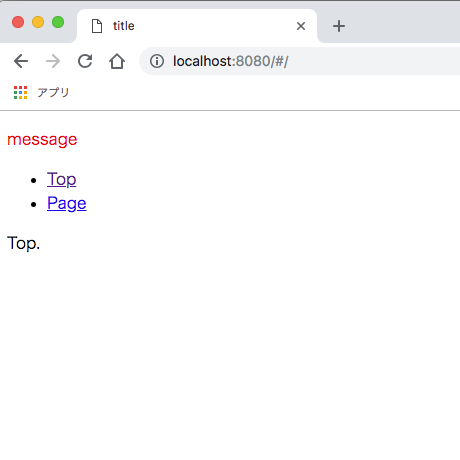
現在はvue-routerをモードhashに設定しています。
URLに/#/が付くのはこのためです。
モードhashでは下層ページにも直接アクセスが可能です。
npm startでサーバーを立ち上げ、localhost:8080/#/pageに直接アクセスしてみましょう。

問題なく表示されます。
次にモードhistoryに変更します。
src/router.jsに設定を追加します。
src/router.js
...
const router = new Router({
  mode: 'history',
  routes
});
ビルドし、サーバーを起動後、localhost:8080にアクセスしてみましょう(/pageではありません)。
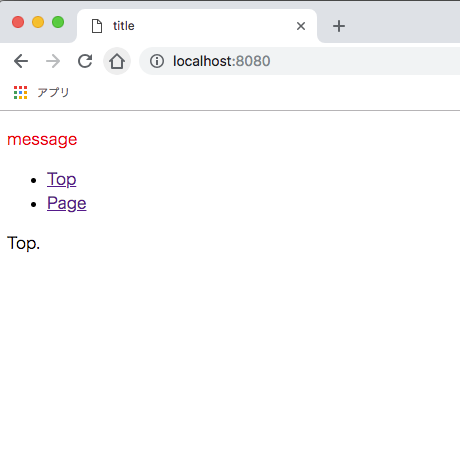
URLに/#/が付きません。
トップからアクセスした場合、下層ページへもアクセスが可能です。
リンクをクリックして動作を確認してみてください。
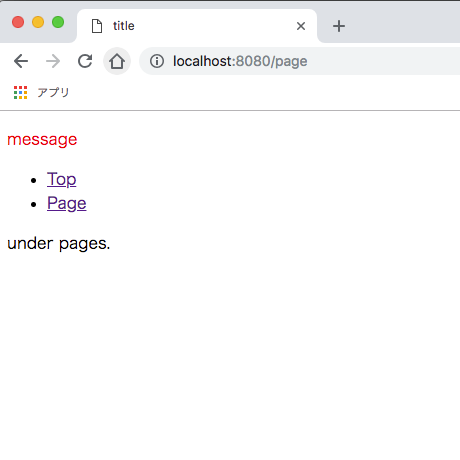
では、localhost:8080/pageに直接アクセスしてみましょう。

モードhashの時とは違い、エラーになります。
SSRを行うことでこれを正常に表示させ、またSPAのコンテンツ切り替えを可能にしていきます。
パッケージインストール
必要パッケージをインストールします。
npm i -S vue-template-compiler
パッケージvueとvue-template-compilerは同じバージョンである必要があります。
package.jsonでそれぞれのバージョンを確認しておきましょう。
...,
  "dependencies": {
    ...,
    "vue": "^2.5.17",
    "vue-template-compiler": "^2.5.17",
    ...
webpackの分割
SSRでは、クラアントとサーバーでそれぞれvueをコンパイルする必要があります。
そのためにwebpack.config.jsを以下の3つに分割していきます。
webpack.base.config.jswebpack.client.config.jswebpack.server.config.js
webpack.base.config.js
const path = require('path');
const VueLoaderPlugin = require('vue-loader/lib/plugin');

const config = {
  entry: path.join(__dirname, 'src/entry-client.js'),
  output: {
    filename: 'main.js',
    path: path.join(__dirname, 'dist')
  },
  module: {
    rules: [
      {
        test: /\.vue$/,
        loader: 'vue-loader'
      },
      {
        test: /\.m?js$/,
        exclude: /node_modules/,
        loader: 'babel-loader'
      },
      {
        test: /\.css$/,
        use: [
          'vue-style-loader',
          'css-loader'
        ]
      }
    ]
  },
  plugins: [
    new VueLoaderPlugin()
  ]
};

module.exports = config;
元のwebpack.config.jsを基準とするため、内容は同じです。
この後でエントリーファイルもクライアントとサーバー用に分割していくため、entryの設定が若干変わっています。
ソースマップの設定部分は次のwebpack.client.config.jsに移動します。
webpack.client.config.js
const baseConfig = require('./webpack.base.config');

const config = { ...baseConfig };

module.exports = (env, argv) => {
  switch (argv.mode) {
    case 'production':
      // expand config for production
      break;
    case 'development':
    default:
      // expand config for development
      config.devtool = 'inline-source-map';
      break;
  }

  return config;
};
webpack.base.config.jsの読み込みと、元のwebpack.config.jsにあったソースマップの設定を切り出したのみで、新たな記述はありません。
webpack.server.config.js
const path = require('path');
const VueSSRServerPlugin = require('vue-server-renderer/server-plugin');
const baseConfig = require('./webpack.base.config');

const config = {
  ...baseConfig,
  entry: path.join(__dirname, 'src/entry-server.js'),
  target: 'node',
  output: {
    ...baseConfig.output,
    libraryTarget: 'commonjs2'
  },
  plugins: [
    ...baseConfig.plugins,
    new VueSSRServerPlugin()
  ]
};

module.exports = config;
webpack.base.config.jsの内容をサーバー用に上書きしています。
設定内容について詳しく知りたい場合はVue SSR ガイド:ビルド設定を参照してください。
エントリーファイルの分割
エントリーファイルをクライアントとサーバー用に分割していきます。
src/index.jsを以下の3つに分割していきます。
src/entry-base.jssrc/entry-client.jssrc/entry-server.js
また、この過程でsrc/router.jsにも変更を加えます。
src/entry-base.js
import Vue from 'vue';
import App from './App.vue';
import { createRouter } from './router';

const createApp = () => {
  const router = createRouter();

  const app = new Vue({
    router,
    render: h => h(App)
  });

  return { app, router };
};

export { createApp };
単にVueインスタンスを返すのではなく、Vueインスタンスを生成するための関数を返しています。
これはサーバーではリクエストごとにVueインスタンスを生成する必要があるためです。
同様にsrc/router.jsもRouterインスタンスを生成する関数を返すように変更します。
src/router.js
import Vue from 'vue';
import Router from 'vue-router';
import Top from './components/Top.vue';
import Page from './components/Page.vue';

Vue.use(Router);

const routes = [
  { path: '/', component: Top },
  { path: '/page', component: Page }
];

const createRouter = () => {
  return new Router({
    mode: 'history',
    routes
  });
};

export { createRouter };
src/entry-client.js
import { createApp } from './entry-base';

const { app } = createApp();
app.$mount('#app');
クライアントではVueインスタンスを生成し#appにマウントするのみです。
src/entry-server.js
import { createApp } from './entry-base';

export default ctx => {
  return new Promise((resolve, reject) => {
    const { app, router } = createApp();
    router.push(ctx.url);

    const matchedComponents = router.getMatchedComponents();
    if (!matchedComponents) return reject({ code: 404 });
    resolve(app);
  });
}
リクエストに対するルーティングを解決し、エラーまたはアプリケーションインスタンスを返します。
この設定は以下の公式ドキュメントを参考に、必要な部分のみを設定しています。
ビルド
クライアント、サーバーそれぞれのビルドコマンドをnpm scriptsに登録しましょう。
package.jsonのscriptsを変更します。
package.json
{
  ...,
  "scripts": {
    "test": "echo \"Error: no test specified\" && exit 1",
    "start": "node app",

    // 以下を変更
    "build:prod": "webpack -p --config=webpack.client.config.js && webpack -p --config=webpack.server.config.js",
    "build:dev": "webpack --mode=development --config=webpack.client.config.js && webpack --mode=development --config=webpack.server.config.js"
  },
  ...
}
webpackコマンドに--configオプションで設定ファイルを指定しています。
&&で2つのコマンドを繋いでいるため、1度のscript実行で2つのビルドが行われます。
それではビルドを実行してみましょう。
npm run build:dev
ディレクトリdistに以下の2つのファイルが生成されれば成功です。
main.jsvue-ssr-server-bundle.json
vue-ssr-server-bundle.jsonのoutput設定は行なっていませんが、プラグインnew VueSSRServerPlugin()によって生成されます。
現在のディレクトリ構成は以下のようになっています。
root
|- /dist
  |- main.js
  |- vue-ssr-server-bundle.json
|- /node_modules
  |- /some_modules
|- /public
  |- index.html
|- /src
  |- /components
    |- Page.vue
    |- Top.vue
  |- App.vue
  |- entry-base.js
  |- entry-client.js
  |- entry-server.js
  |- router.js
|- .babelrc
|- app.js
|- package.json
|- package-lock.json
|- webpack.base.config.js
|- webpack.client.config.js
|- webpack.server.config.js
サーバー実装
サーバーでvueをレンダリングし、結果をhtmlとしてクライアントに返します。
app.jsを変更していきます。
app.js
const path = require('path');
const fs = require('fs');
const express = require('express');
const VueServerRenderer = require('vue-server-renderer');

const app = express();
app.use('/', express.static('public'));
app.use('/dist', express.static('dist'));

const template = fs.readFileSync(path.join(__dirname, 'src/index.template.html'), 'utf-8');
const renderer = VueServerRenderer.createBundleRenderer(path.join(__dirname, 'dist/vue-ssr-server-bundle.json'), { template });

app.get('*', (req, res) => {
  const ctx = { url: req.url };
  renderer.renderToString(ctx, (err, html) => {
    if (err) return res.status(500).end('Interval Server Error');
    res.end(html);
  });
});

app.listen(8080);
大きく分けて2つの追加を行なっています。
const path = require('path');
const fs = require('fs');
const express = require('express');
const VueServerRenderer = require('vue-server-renderer');

...

const template = fs.readFileSync(path.join(__dirname, 'src/index.template.html'), 'utf-8');
const renderer = VueServerRenderer.createBundleRenderer(path.join(__dirname, 'dist/vue-ssr-server-bundle.json'), { template });
必要モジュールの読み込みと、レンダーに使うテンプレートファイルsrc/index.template.htmlの読み込み、さらにレンダラにサーバー用にビルドしたファイルdist/vue-ssr-server-bundle.jsonのパスを渡しています。
テンプレートファイルsrc/index.template.htmlはこの後で作っていきます。
app.get('*', (req, res) => {
  const ctx = { url: req.url };
  renderer.renderToString(ctx, (err, html) => {
    if (err) return res.status(500).end('Interval Server Error');
    res.end(html);
  });
});
Expressのルーティング設定です。
全てのパス(*)でルーティングを行い、対応するURL(req.url)でレンダリング、結果のhtmlをクライアントに返しています。
続いてsrc/index.template.htmlを作っていきます。
public/index.htmlをディレクトリsrcに移動し、ファイル名をindex.template.htmlに変更します。
さらに1箇所だけコードを変更します。
src/index.template.html
...
<body>
<!--vue-ssr-outlet-->
</body>
<div id="app"></div>を<!--vue-ssr-outlet-->に変更しています。
<!--vue-ssr-outlet-->がhtmlが挿入される箇所です。
最後に、src/App.vueも1箇所だけ変更します。
src/App.vue
<template>
  <div id="app">
    ...
ルートのdiv要素に属性id="app"を追加しています。
それでは、ビルド、サーバーを起動後、localhost:8080/pageにアクセスしてみましょう。
# せっかくなのでproductionでビルドしてみます
npm run build:prod

npm start

# localhost:8080/page にアクセス!
正常に表示されたら、ソースコードを確認してみましょう。
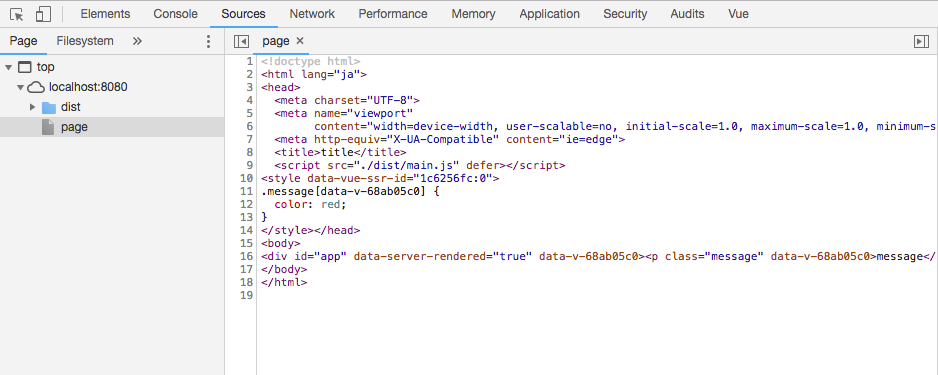
<div id="app" data-server-rendered="true" data-v-68ab05c0><p class="message" data-v-68ab05c0>message...
おめでとうございます!
無事にSSRを実装することができました!
クライアントではSPAとして動作するか、リンクをクリックして確認してみてください。
最終的なディレクトリ構成は以下のようになっています。
root
|- /dist
  |- main.js
  |- vue-ssr-server-bundle.json
|- /node_modules
  |- /some_modules
|- /src
  |- /components
    |- Page.vue
    |- Top.vue
  |- App.vue
  |- entry-base.js
  |- entry-client.js
  |- entry-server.js
  |- index.template.html
  |- router.js
|- .babelrc
|- app.js
|- package.json
|- package-lock.json
|- webpack.base.config.js
|- webpack.client.config.js
|- webpack.server.config.js
おわりに
今回は必要最低限のSSRを実装しましたが、やりたいことはまだまだあるでしょう。
- サーバーからクライアントにデータを渡したい
- Vuexを使いたい
- ルーティングをしっかり行いたい
- パフォーマンスを上げたい
- etc...
また、ジェネレータで生成された環境の上に実装したいケースや、Nuxt.jsのSSR環境を拡張したい、といったこともあるでしょう。
私もこれからこれらに挑戦していく予定ですが、基礎はすでに身につけたはずです。
この基礎の上に新しい技術を積み重ね、更に発展させていくつもりです。
次は → Vue SSR ガイド