はじめに
Railsの勉強としてgem周りを触ってみる企画です。
今回は・・・
です。
先日別記事でgemのdeviseは試したのですが、
このdeviseはあくまで認証機能のgemだったので、
今回はこのcancancanを使って権限周りを実装してみたいと思います。
どういうgemなの?
大体どのシステムにおいても、ユーザーに「権限」ってありますよね。
Aさんはこの画面見えるけど、Bさんは見せられないよ!とか。
そういった権限を管理するためのgem。それがcancancanです。
余談としては、元々はcancanという名前のgemで開発されていたが、
プロジェクトの開発が止まってしまったため、新たにcancancanとして、
メンテナス・保守をしているというgemとのことです。
検証環境
以下の環境で実施しました。
[client]
・MacOS Mojave(10.14.2)
・Vagrant 2.2.2
・VBoxManage 6.0.0

[virtual]
・CentOS 7.6
・Rails 5.2.2
・ruby 2.3.1
ご参考までに。
cancancan導入
1.gemのインストール
事前にRails勉強用に作成したプロジェクトで進めます。
各MVCは適当に掲示板アプリを想定してPostsコントローラーなどを生成済みです。
(index,show,editの空ページが見れる程度)
$ rails g model post
$ rails g controller posts index show edit
その前提のもと、Gemfileに以下を追記。
# cancancan
gem 'cancancan'
追記したらインストール。
$ bundle install

-----------
Fetching cancancan 2.3.0
Installing cancancan 2.3.0
-----------
→無事に完了。
2.事前準備
ではインストールが完了したので、
実際に権限周りを進めていきましょう。
が、その前に事前準備からです。
gemのdevise時にusersテーブルが作られており、
mysql> show columns from users;
+------------------------+--------------+------+-----+---------+----------------+
| Field                  | Type         | Null | Key | Default | Extra          |
+------------------------+--------------+------+-----+---------+----------------+
| id                     | bigint(20)   | NO   | PRI | NULL    | auto_increment |
| email                  | varchar(255) | NO   | UNI |         |                |
| encrypted_password     | varchar(255) | NO   |     |         |                |
| reset_password_token   | varchar(255) | YES  | UNI | NULL    |                |
| reset_password_sent_at | datetime     | YES  |     | NULL    |                |
| remember_created_at    | datetime     | YES  |     | NULL    |                |
| created_at             | datetime     | NO   |     | NULL    |                |
| updated_at             | datetime     | NO   |     | NULL    |                |
+------------------------+--------------+------+-----+---------+----------------+
このような構成になっています。
ここに、新しく権限という概念を追加するために、
カラムを追加します。名前は直球でroleでいきます。
$ rails g migration add_column_role_to_users
    invoke  active_record
    create    db/migrate/20190117081130_add_column_role_to_users.rb
で、マイグレーションにカラム追加処理を書きます。
class AddColumnRoleToUsers < ActiveRecord::Migration[5.2]
  def change
    add_column :users, :role, :integer, null: false, default: 1
  end
end
型はintegerにして、ユーザーには何かしらの権限が絶対必要なので、NULLはNGとしました。
デフォルトは1で一般、99がシステム管理者のような想定でいきます。
$ bundle exec rake db:migrate

== 20190117081130 AddColumnRoleToUsers: migrating =============================
-- add_column(:users, :role, :integer, {:null=>false, :default=>1})
   -> 0.1007s
== 20190117081130 AddColumnRoleToUsers: migrated (0.1009s) ====================

Annotated (3): app/models/user.rb, test/models/user_test.rb, test/fixtures/users.yml
mysql> show columns from users;
+------------------------+--------------+------+-----+---------+----------------+
| Field                  | Type         | Null | Key | Default | Extra          |
+------------------------+--------------+------+-----+---------+----------------+
| id                     | bigint(20)   | NO   | PRI | NULL    | auto_increment |
| email                  | varchar(255) | NO   | UNI |         |                |
| encrypted_password     | varchar(255) | NO   |     |         |                |
| reset_password_token   | varchar(255) | YES  | UNI | NULL    |                |
| reset_password_sent_at | datetime     | YES  |     | NULL    |                |
| remember_created_at    | datetime     | YES  |     | NULL    |                |
| created_at             | datetime     | NO   |     | NULL    |                |
| updated_at             | datetime     | NO   |     | NULL    |                |
| role                   | int(11)      | NO   |     | 1       |                |
+------------------------+--------------+------+-----+---------+----------------+
9 rows in set (0.00 sec)
カラムも追加されたので、準備は完了。
3.cancancanを使う
ようやく本題へ。
まずはAbilityクラスを生成します。
$ rails g cancan:ability
    create  app/models/ability.rb
コマンド自体はcancancanではなくcancan。
class Ability
  include CanCan::Ability

  def initialize(user)
    # Define abilities for the passed in user here. For example:
    #
    #   user ||= User.new # guest user (not logged in)
    #   if user.admin?
    #     can :manage, :all
    #   else
    #     can :read, :all
    #   end
    #
    # The first argument to `can` is the action you are giving the user
    # permission to do.
    # If you pass :manage it will apply to every action. Other common actions
    # here are :read, :create, :update and :destroy.
    #
    # The second argument is the resource the user can perform the action on.
    # If you pass :all it will apply to every resource. Otherwise pass a Ruby
    # class of the resource.
    #
    # The third argument is an optional hash of conditions to further filter the
    # objects.
    # For example, here the user can only update published articles.
    #
    #   can :update, Article, :published => true
    #
    # See the wiki for details:
    # https://github.com/CanCanCommunity/cancancan/wiki/Defining-Abilities
  end
end
initializeだけが準備されたものが生成されました。
また、自動で付いていたコメントにサンプルがありますね。
ありがてぇ・・・。
参考にして、実際に処理を書いていきます。
class Ability
  include CanCan::Ability

  def initialize(user)
    user ||= User.new
    if user.admin?
      can :manage, :all
    else
      can :read, :all
    end
  end
end
とりあえずサンプルの書き方を見よう見まね。
ついでに、
class User < ApplicationRecord
  enum role: { general: 1, admin: 99 }

  # Include default devise modules. Others available are:
  # :confirmable, :lockable, :timeoutable, :trackable and :omniauthable
  devise :database_authenticatable, :registerable,
         :recoverable, :rememberable, :validatable
end
enumでuserモデルを調整。
(ちゃんとするなら別テーブルでロールの種類を管理しようね!)
続いて、画面の閲覧制限を入れてみます。
アプリ全体に関わるので、基底クラスのapplication_controllerで対応。
class ApplicationController < ActionController::Base
  # 各アクションで権限をチェック
  authorize_resource

  # 権限が無いページへアクセス時の例外処理
  rescue_from CanCan::AccessDenied do |exception|
    # root_urlにかっ飛ばす。
    redirect_to root_url
  end
end
権限がないページにアクセスされたら、
今回はindexページにリダイレクトさせる方法でやってみます。
動作確認
ではroleは1に設定した状態で、
早速当該ユーザーでログインしてみましょうかね。
/users/sign_inにアクセスして・・・
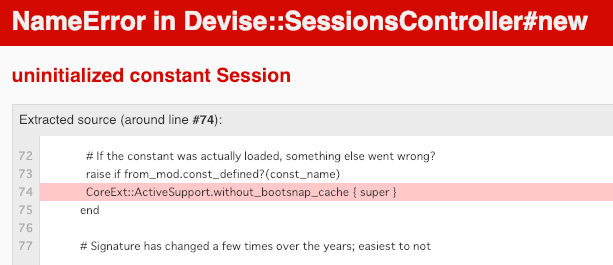
あれ!?
エラー解決
原因は
先ほど追加したこの2つ。
class ApplicationController < ActionController::Base
  # 各アクションで権限をチェック
  authorize_resource

  # 権限が無いページへアクセス時の例外処理
  rescue_from CanCan::AccessDenied do |exception|
    # root_urlにかっ飛ばす。
    redirect_to root_url
  end
end
class Ability
  include CanCan::Ability

  def initialize(user)
    user ||= User.new
    if user.admin?
      can :manage, :all
    else
      can :read, :all
    end
  end
end
設定が不足してるから。
なのでこうしました。
class ApplicationController < ActionController::Base
  # 各アクションで権限をチェック。オプションでモデル依存をfalseに。
  authorize_resource :class => false

  # 権限が無いページへアクセス時の例外処理
  rescue_from CanCan::AccessDenied do |exception|
    # root_urlにかっ飛ばす。
    redirect_to root_url
  end
end
class Ability
  include CanCan::Ability

  def initialize(user)
    # ログイン/アウトはみんな許可
    can :manage, :session

    user ||= User.new

    if user.admin?
      can :manage, :all
    else
      can :read, :all
    end
  end
end
authorize_resourceにオプションを追加して、
Abilityのほうにはcan :manage, :sessionを追加で設定。
再動作確認
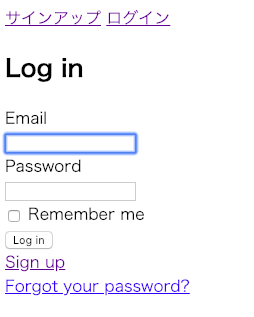
ログインページ見れました。
良かった〜。
そしてrole=1の状態なので、
/posts/editにアクセスすると、indexにリダイレクトされました!
続いてrole=99に調整後、
再度/posts/editにアクセスすると、、、
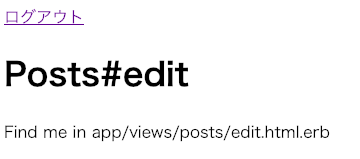
表示できた!
ミッションコンプリート!
所感
試しとして2種類のroleでやりましたが、
もっと多くの種類を取り扱っていくことになると、
設定・管理自体は結構大変そうだなと感じた。(小並感)
けどそこさえ乗り越えちゃえば、
わざわざアクセス制限の処理をガリガリと組まなくても良いし、
gem様様ですね。
2019/01/25 追記:
続き書きました。
おわりに
何かお気づきの点がありましたら、
ご指摘やアドバイス等頂けると大変助かります!