全部Gitlabや、SonarQubeを全部ローカルに立てて、好き勝手やろうと思ってましたが、Dockerのネットワークについて不勉強すぎたので、gitlab.comの力を借りて構築しました。
今回は個人的に美しくない感じがあり、『一応これでも連携しているな』レベルです。
誰かの参考になればという気持ちと、自分の振り返りのために残していこうと思います。
環境
- Windows(10, ホストマシン)
- Docker Desktop for Windows(20.10.8)
- PHP(7.4.4)
- CakePHP(4.x系)
- SonarQube(7.9.5 CE, コンテナ)
- Sonar Scanner(4.6.2.2472, Windows版)
- GitLab Runner(14.3.2)
- PowerShell(5.1.19041.1237)
事前準備
- Docker Desktop for Windowsのインストール
- Docker Desktop for Windowsインストーラー
- Sonar GitLab Pluginダウンロード
- Sonar GitLab Plugin
- Sonar Scannerのインストール(zip解凍のみ)
- Sonar Scannerのインストーラー
- GitLab Runnerのインストール(zip解凍のみ)
- Gitlab Runnerのインストーラー
- GitLab.comへ登録
https://gitlab.com/users/sign_up
『Don't have an account yet? Register now』というところから無料で登録できます。
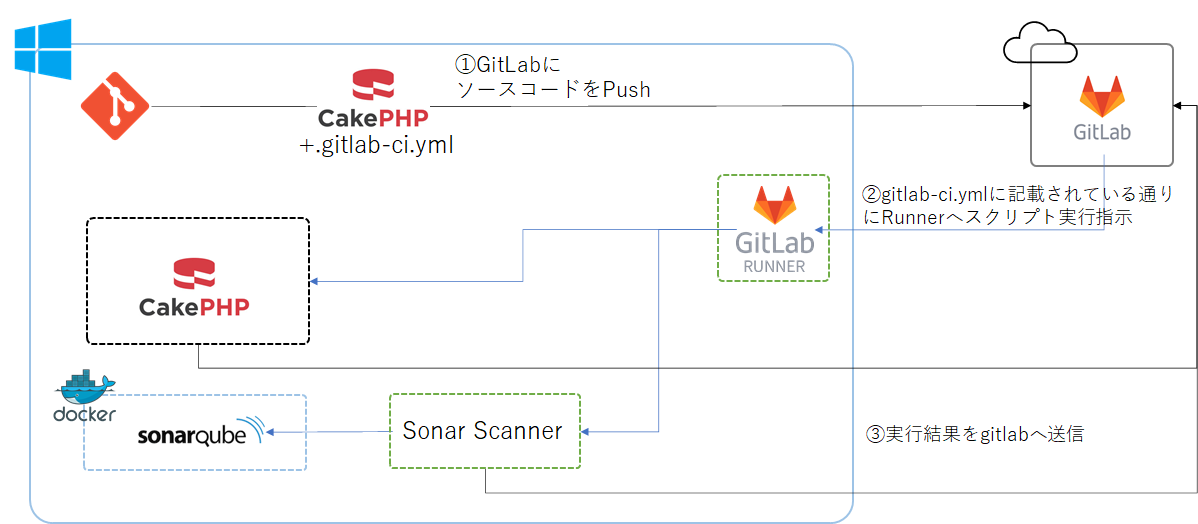
今回の構成
手順
SonarQubeの設定
1. SonarQubeコンテナを作成
まずは適当なフォルダを作成し、そのフォルダにdocker-compose.ymlを作成します。
version: "3"

services:
  sonarqube:
    container_name: sonarqube-core
    image: sonarqube:7.9.5-community
    ports:
      - "9000:9000"
    networks:
      - sonarnet
    environment:
      - sonar.jdbc.url=jdbc:postgresql://db:5432/sonar
    volumes:
      - sonarqube_conf:/opt/sonarqube/conf
      - sonarqube_data:/opt/sonarqube/data
      - sonarqube_extensions:/opt/sonarqube/extensions
    restart: always

  db:
    container_name: sonarqube-postgres
    image: postgres:11
    networks:
      - sonarnet
    environment:
      - POSTGRES_USER=sonar
      - POSTGRES_PASSWORD=sonar
    volumes:
      - postgresql:/var/lib/postgresql
      - postgresql_data:/var/lib/postgresql/data
    restart: always

networks:
  sonarnet:
    driver: bridge

volumes:
  sonarqube_conf:
  sonarqube_data:
  sonarqube_extensions:
  postgresql:
  postgresql_data:
2. WSLの設定
下記設定を行って、仮想メモリなどの上限設定を変更します。
コマンドプロンプトを開いて下記コマンドを実行します。
(『>』、『#』の後ろが実行対象のコマンドです。)
> wsl -d docker-desktop

# sysctl -w vm.max_map_count=262144
vm.max_map_count = 262144

# sysctl -w fs.file-max=65536
fs.file-max = 65536

# ulimit -n 65536

# exit
3. SonarQubeコンテナ起動
> docker-compose up
4. SonarQubeへGitlabのPluginインストール
事前準備で入手したSonar GitLab PluginプラグインをSonarQubeへコピーする。
ダウンロードした『sonar-gitlab-plugin-4.1.0-SNAPSHOT.jar』を作成したフォルダへ格納しておいてください。
docker cp sonar-gitlab-plugin-4.1.0-SNAPSHOT.jar sonarqube-core:/opt/sonarqube/extensions/plugins
まずは、SonarQubeへアクセスします。
http://localhost:9000
管理コンソールが開いたら、『Administration』>『System』>『Restart Server』をクリックします。

再起動するまで、しばし待つ・・・。
『Administration』>『Marketplace』>『Plugins』に『gitlab』と入力して、スクショのようになっていればOK。

5. SonarQubeのGitlab設定
『Administration』>『Configuration』>『GitLab』
- GitLab url:
https://gitlab.com - GitLab User Token:下記参照
GitLabアクセストークン取得(Gitlabの操作)
まずはgitlab.comへアクセス・ログインします。
※Gitlabの言語設定を日本語にしています
『ユーザーメニュー』>『Preferences』をクリックします。

『ユーザー設定』>『アクセストークン』をクリックします。

開いた画面で下記を入力し『Create personal access token』をクリックします。
- Token name:
任意 - 有効期限:
任意(試すだけならめちゃくちゃ長くてOK) - Select scopes:
api
トークンは一回しか表示されないので注意が必要です。
SonarQubeの操作
Gitlabで取得したアクセストークンをSonarQubeのGitLab User Tokenへ登録します。
6. SonarQubeのProject設定
SonarQubeのProject作成については、下記記事の『SonarQubeの設定』を参照してください。
上記に加えて、GitlabのプロジェクトIDを登録していきます。
手順通りなら『Overview』タブを表示していると思いますので、その左側にある『Administration▼』から
『General Settings』>『GitLab』をクリックしていきます。
『GitLab Project id』にGitLabのプロジェクトIDを入力し『Save』します。
GitLabの画面でいうとプロジェクトのTOP画面にある下記の箇所です。

GitLabの設定
1. GitLab Runner登録
URL・トークン取得
gitlab.comへアクセス・ログインし、対象のプロジェクトを選択します。
プロジェクトメニューから『設定』>『CI/CD』>『Runner』‐『展開』をクリックします。

- Register the runner with this URL
- And this registration token
上記2点は、Runner登録の時に使用します。
Runnerの設定
ダウンロードしたGitLab Runnerのインストーラー(もといzip)を任意のフォルダに展開します。
例)C:\GiaLab-Runner\gitlab-runner.exe
コマンドプロンプトを開き上記のフォルダまで移動します。
> cd C:\GitLab-Runner

> c:\GitLab-Runner>gitlab-runner register
Runtime platform                                    arch=amd64 os=windows pid=11512 revision=e0218c92 version=14.3.2

# Register the runner with this URLの値
Enter the GitLab instance URL (for example, https://gitlab.com/):
https://gitlab.com/

# And this registration tokenの値
Enter the registration token:
abcdefg0123456789的な

# 任意です(複数個Runnerが登録済みの場合はわかりやすいものにしましょう)
Enter a description for the runner:
[PCのホスト名]: test

# .gitlab-ci.ymlで指定するので、ユニークな感じで(笑)
Enter tags for the runner (comma-separated):
windows,test

Registering runner... succeeded                     runner=~~tokenの一部?~~

# 今回はshellで行きます
Enter an executor: docker-ssh+machine, custom, docker, docker-windows, virtualbox, docker+machine, docker-ssh, parallels, shell, ssh, kubernetes:
shell

Runner registered successfully. Feel free to start it, but if it's running already the config should be automatically reloaded!
ブラウザのgitlabに戻り、F5キーなどで画面を更新します。
『Runner』>『Specific Runner』のところに追加されていればOKです。
※更新のタイミングによっては、シグナルが緑じゃない場合がありますが、しばらく待機→画面更新で緑になれば大丈夫です。
2. .gitlab-ci.ymlの作成
CakePHPのプロジェクト直下に.gitlab-ci.ymlファイルを作成します。
- ポイント
-
sonar-qubeのscriptは『SonarQube+WindowsでPHPソースをスキャンする 』の『スキャンしてみる』を参考にスクリプトを調整してください。 -
specific-runner-test2のscriptで--log-junit report.xmlが指定され、artifactsの記載があるとUnitTestの実行結果をGitLabの画面で確認できる
# Runnerの導通確認用
specific-runner-test:
  stage: test
  # Specific Runnerを指定する
  tags:
    - windows
  script:
    - echo "test!"

# sonar qube動作用
sonar-qube:
  stage: test
  tags:
    - windows
  script:
    - c:\tmp\sonar-scanner-4.6.2.2472-windows\bin\sonar-scanner.bat -D"sonar.projectKey={SonarQubeで設定したproject_key}" -D"sonar.sources=." -D"sonar.host.url=http://localhost:9000" -D"sonar.login={SonarQubeで生成されたToken}"

# unit test動作用
specific-runner-test2:
  stage: test
  tags:
    - windows
  script:
    - composer install
    - vendor/bin/phpunit tests/TestCase/Controller/Component/CalcComponentTest.php --log-junit report.xml
  artifacts:
    when: always
    reports:
      junit: report.xml
GitLab Runnerの注意点
- powershellとGitLabRunnerのバージョンによってスクリプトが失敗するかも
Windows+GitLabRunner(executor=Shell)ではスクリプトが『.ps1』として実行されますが、
前提情報として・・・powershellコマンドの実行方法が変更されています。
PowerShell(Ver.6.0以前):
powershell ~~~~~\test.ps1
PowerShell(Ver.6.0以降):
pwsh ~~~~~\test.ps1
そして、GitLabRunnerは公式にもあるように
GitLab Runner12.0-13.12で生成されるスクリプトは
『powershell -NoProfile -NonInteractive -ExecutionPolicy Bypass -Command generated-windows-powershell.ps1』
GitLab Runner14移行で生成されるスクリプトは
『pwsh -NoProfile -NonInteractive -ExecutionPolicy Bypass -Command generated-windows-powershell.ps1』
となりますので、ホストPCにインストールされているPowerShellのバージョンによって、GitLabRunnerのバージョンを変えてやるなどの対応が必要になります。
私はめんどくさがりなこともあって、Runnerの設定ファイル『config.toml』の値をpwshからpowershellに変更して対応しました。
Pushして実行
それでは、プロジェクトをPushしてみましょう。
うまくいっていれば、
プロジェクトメニューの『CI/CD』>『パイプライン』の一覧に値が追加されていると思います。
あとがき
Gitlabのプロジェクト作成だったり、CakePHPのサンプルプロジェクトについて結構はしょってしまいましたが、今後アップデートしようかと思います。
そして、今見直してみてもSonar Qubeのスキャンに使用しているのが、ホストPCかつ実行スクリプトをゴリゴリ書いちゃっているのが美しくないと感じてしまいます。
docker-composeでsonar scannerも立ち上げたのですが、どうもscannerからhttp://localhost:9000が見えないようなエラーになるので、やはりDockerのネットワーク周りを勉強しないとダメだと思いました。
目標としては、sonar qube&sonar scannerと、UnitTest用のコンテナを用意して、ローカル汚染をなくしていきたいですね。
参考記事
- Jenkinsを使わずにGitLabとSonarQubeを連携してみた
- コード品質可視化DockerでSonarQube!WSL2で構築
- GitLab公式のRunner(powershell関連)ページ