(追記)
ちょうど空いていたので、AWS LambdaとServerless #2 Advent Calendar 2019の9日目に投稿します。
概要
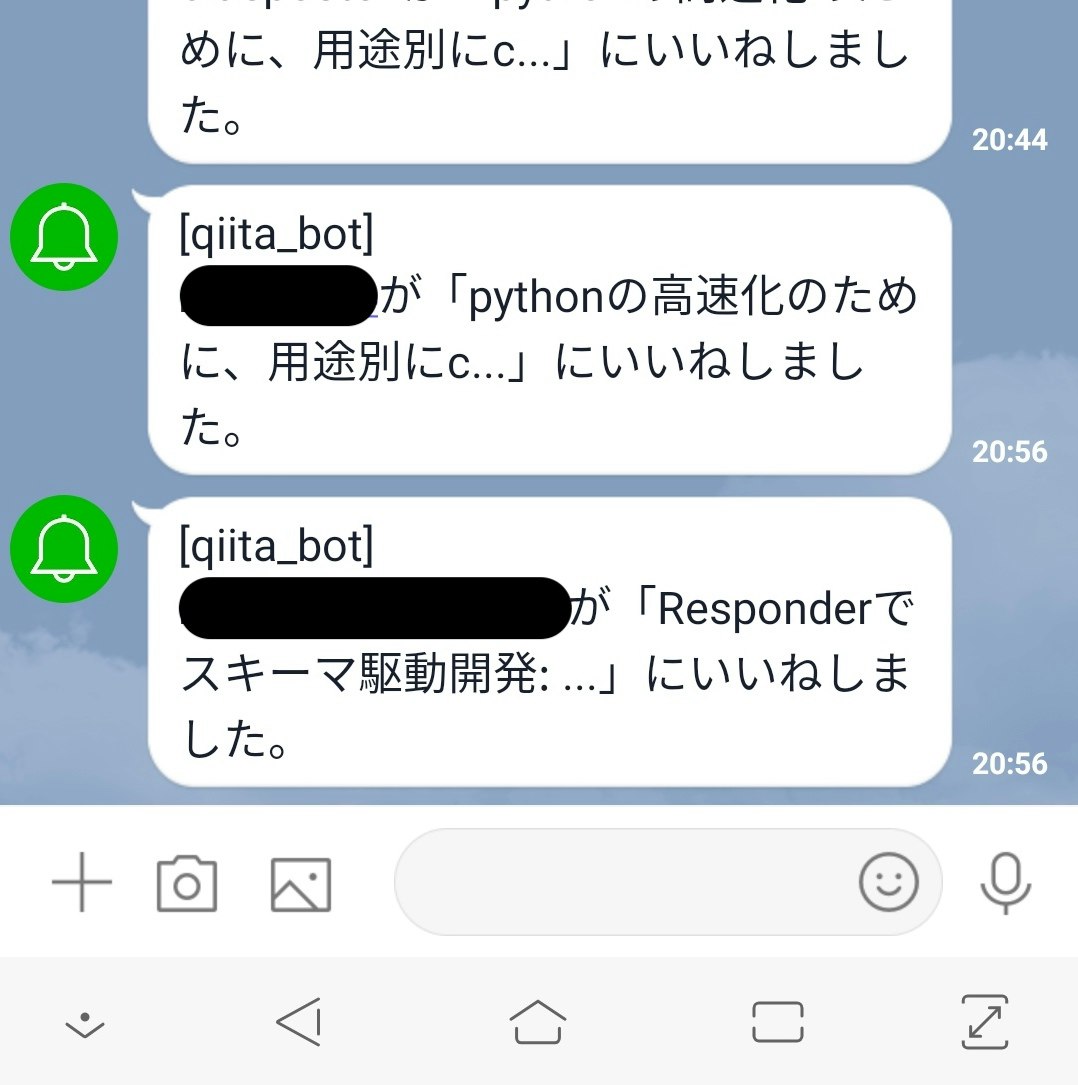
以下のようなQiitaのいいねのLINE通知がほしいなーとふと思い立ち、
関連する記事を発見!
-> Qiitaでいいねが付くとLINE通知してくれる優しい世界を構築した
構成が簡潔で(記事自体も)すごく参考になります。
今回、Lambdaを始めとしたAWSのサービスを使って、イベント駆動型のアプリケーションを作ってみたかったので少し構成を変えて真似してみました。
本記事の流れ
- 構成の概要
- 使った技術要素の紹介
- 実装の説明
1. 構成の概要
構成図

変更点
元記事は、以下のようなシンプルな構成で実装されています。
- Qiitaの通知欄をスクレイピング
- DBに保存しておいた通知欄のログと差分を取る
- 差分をIFTTTのwebhooksに送信 (IFTTTがLINEに通知)
- AWS Lambdaで上記の一連の処理を定期実行
今回、Lambdaの処理をより簡潔に、早く終えられるように以下のように構成を再考しました。
- スクレイピング -> Qiita APIを使った集計に変更
- sleepを排除して処理時間の削減
- 環境構築を容易に
- 1つのLambdaですべての処理 -> 2つのLambdaに分ける(データ収集機能と通知機能に分割)
- Dynamo DB Streamを使って過去のログとの差分をとる (スクリプトを書く必要なし)
今回はじめてLambdaやDynamo DBを使うので、色々な機能を試したい気持ちがつよいです。なので、やりすぎな感は否めません。ネタ元の記事のほうがスマートだと思っています。
2. 使った技術要素の紹介
以下を使いました。
- Qiita API v2
- Lambda + Dynamo DB Stream
- LINE Notify
Qiita API v2
QiitaはAPIが利用可能です(Qiita API v2ドキュメント)。簡単に色々な情報が取得できます。しかし、残念ながら通知を受け取れるAPIはないので、以下を組み合わせて通知を実現します。
| 機能 | エンドポイント | 利点 | 欠点 |
|---|---|---|---|
| いいね数の一覧取得 | GET /api/v2/authenticated_user/items | 1回のgetで100記事までの総いいね数が取得可 | レスポンスが本文を含むのでメモリを食う |
| いいねしたユーザIDを取得 | GET /api/v2/items/:item_id/likes | 記事毎にいいねしたユーザーを取得可 | 記事の数だけgetする必要がある |
備考
Lambdaは使った時間だけ課金されるので通知の厳密さよりも処理時間の削減を優先しています。
定期的にいいねしたユーザーIDをすべて取得し、差分をとるのが最も厳密だと思いますが、Qiita API v2は記事ごとにしかいいねしたユーザーIDの取得ができないので、記事の数だけAPIをたたく必要がでてきます。Qiitaのいいねは、、以下のような傾向があるみたいです。(参考: 直近1年のQiita記事分析で分かった7つの「驚愕」)
- 驚愕①「いいね」の平均値は8.02。半分以上は0~2
- 驚愕②「いいね」の分布はグラフ化出来ないほど偏る
なので、いいねの更新も特定の記事に偏ると考えられます。一つ一つ差分をとっていくのは割に合わなくなりそうです。
そこで、一覧取得で一気にいいね数だけを取得して、いいね数の変更があった記事だけにしぼって、いいねしたユーザーIDの取得のためにAPIを複数回たたくようにしています。
記事毎のいいねの総数しか見ないので、いいねの取り消しがあった場合に厳密性を損ないますが、そこは犠牲にします。
Lambda + Dynamo DB Stream
今回は基本的には定期的に(15分おきに1回など) 処理が走れば十分です。通常のWeb Serverを使うと、ほとんどの時間無駄に起動しているだけになってしまいます。よくある従量課金制のサービスだと損してしまいます。しかし、Lambdaの課金は実際に使用したコンピューティング時間に対してのみ発生し、コードが実行されていないときには料金も発生しません。
必要な分だけリソースを使うという性質上、処理実行のトリガーが色々選べます。以下のトリガーが今回の要件に適しています。
- CloudWatch Events: 定期実行
- Dynamo DB Stream: DBが変更されたとき、変更のあったデータを受け取って処理を実行する
LINE Notify
access tokenをヘッダーに入れてメッセージをPOSTするだけでLINEに通知できます。また、access tokenの取得も非常に簡単です。
3. 実装の説明
実装は以下のような手順になります。また、各実装の役割を理解するために構成図を再掲します。
- LambdaとDynamo DB Streamの環境構築
- いいね数の一覧取得 (②)
- Dynamo DBに差分を保存し、ストリームを流す (③, ④)
- Lambdaで定期実行 (①)
- ストリームを受け取り、いいねしたユーザーの取得 (⑤)
- LINE通知 (⑥, ⑦)
Lambdaで使用するコードは抜粋して紹介したいと思います。
こちらから実際に使っているコードが見られます。
1. LambdaとDynamo DB Streamの環境構築
本題からだいぶそれるので割愛します。
以下が非常に参考になるのでおすすめです。「Lambda上でテスト」の節まで押さえて頂ければ本記事の内容は十分です。
(参考: 初めての、LambdaとDynamoDBを使ったAPI開発)
2. いいね数の一覧取得 (②)
HTTP リクエスト
PythonではRequestsを使いたくなりますが、Lambdaではpip installは使えないので組み込み関数以外を使おうとすると面倒です。(それでも使いたい方はこちら)
なので、まず、urllibでgetとpostリクエスト用の関数を用意します。インターフェースはできるだけRequestsに近づけています。req_get関数とreq_post関数はrequests.get関数, requests.post関数と同じ引数を取ります。また、Responseオブジェクトは.bodyでjsonレスポンスの中身を取得できます。
import json
from urllib.request import Request
from urllib import request, parse, error
from http.client import HTTPResponse


class Response():
    """Http Response Object"""

    def __init__(self, res: HTTPResponse):
        self.body = self._json(res)
        self.status_code = self._status_code(res)
        self.headers = self._headers(res)

    def _json(self, res: HTTPResponse):
        return json.loads(res.read())

    def _status_code(self, res: HTTPResponse) -> int:
        return res.status

    def _headers(self, res: HTTPResponse) -> Dict[str, str]:
        return dict(res.getheaders())


def req_get(url: str, headers=None, params=None) -> Response:
    """get request. simplified request function of Requests
    :return: Response object
    """
    if params:
        url = '{}?{}'.format(url, parse.urlencode(params))

    req = Request(url, headers=headers, method='GET')

    with request.urlopen(req) as res:
        response = Response(res)
    return response


def req_post(url: str, data: Dict[str, Any], headers=None) -> Response:
    """post request. simplified request function of Requests
    :return: Response object
    """
    if headers.get('Content-Type') == 'application/x-www-form-urlencoded':
        encoded_data = parse.urlencode(data).encode()
    else:
        encoded_data = json.dumps(data).encode()

    req = Request(url, data=encoded_data, headers=headers, method='POST')

    with request.urlopen(req) as res:
        response = Response(res)
    return response
Qiita API v2でいいね数一覧取得
ドキュメントとサポートを参考にしてGET /api/v2/authenticated_user/itemsをたたきます。ここで、不必要な値を捨てる関数(IDとタイトルといいね数しか必要ない)serialize_responseを使っています。また、記事数が多い場合は、ページネーションが必要になります。そこで、ヘッダにユーザーの全記事数が入っているので、一回目のgetでページネーションの最大数を割り出して、くりかえしgetさせています。
def serialize_response(response: Response) -> List[Dict[str, Any]]:
    """serialize response of Qiita API v2"""
    keys = ['id', 'title', 'likes_count']
    return [
        {f: resp.get(f) for f in keys} for resp in response.body
    ]

def get_item(url: str, headers: Dict[str, str], **param) -> List[Dict[str, Any]]:
    """get a item by Qiita API v2 and return the list of serialized response (dictionary)"""
    response = req_get(url, headers=headers, params=param)
    return serialize_response(response)

def get_items(token: str, per_page=1, url='https://qiita.com/api/v2/authenticated_user/items') -> List[Dict[str, Any]]:
    """ページネーションして認証ユーザの全ての記事を取得する"""
    headers = {'Authorization': 'Bearer {}'.format(token)}

    response: Response = req_get(url, headers=headers, params={'page': 1, 'per_page': per_page})
    items = serialize_response(response)
    tot_count = int(response.headers['Total-Count'])
    tot_pages = ceil(tot_count / per_page)
    if tot_pages <= 1:
        return items

    for page in range(2, tot_pages + 1):
        items += get_item(url, headers, page=page, per_page=per_page)
    return items
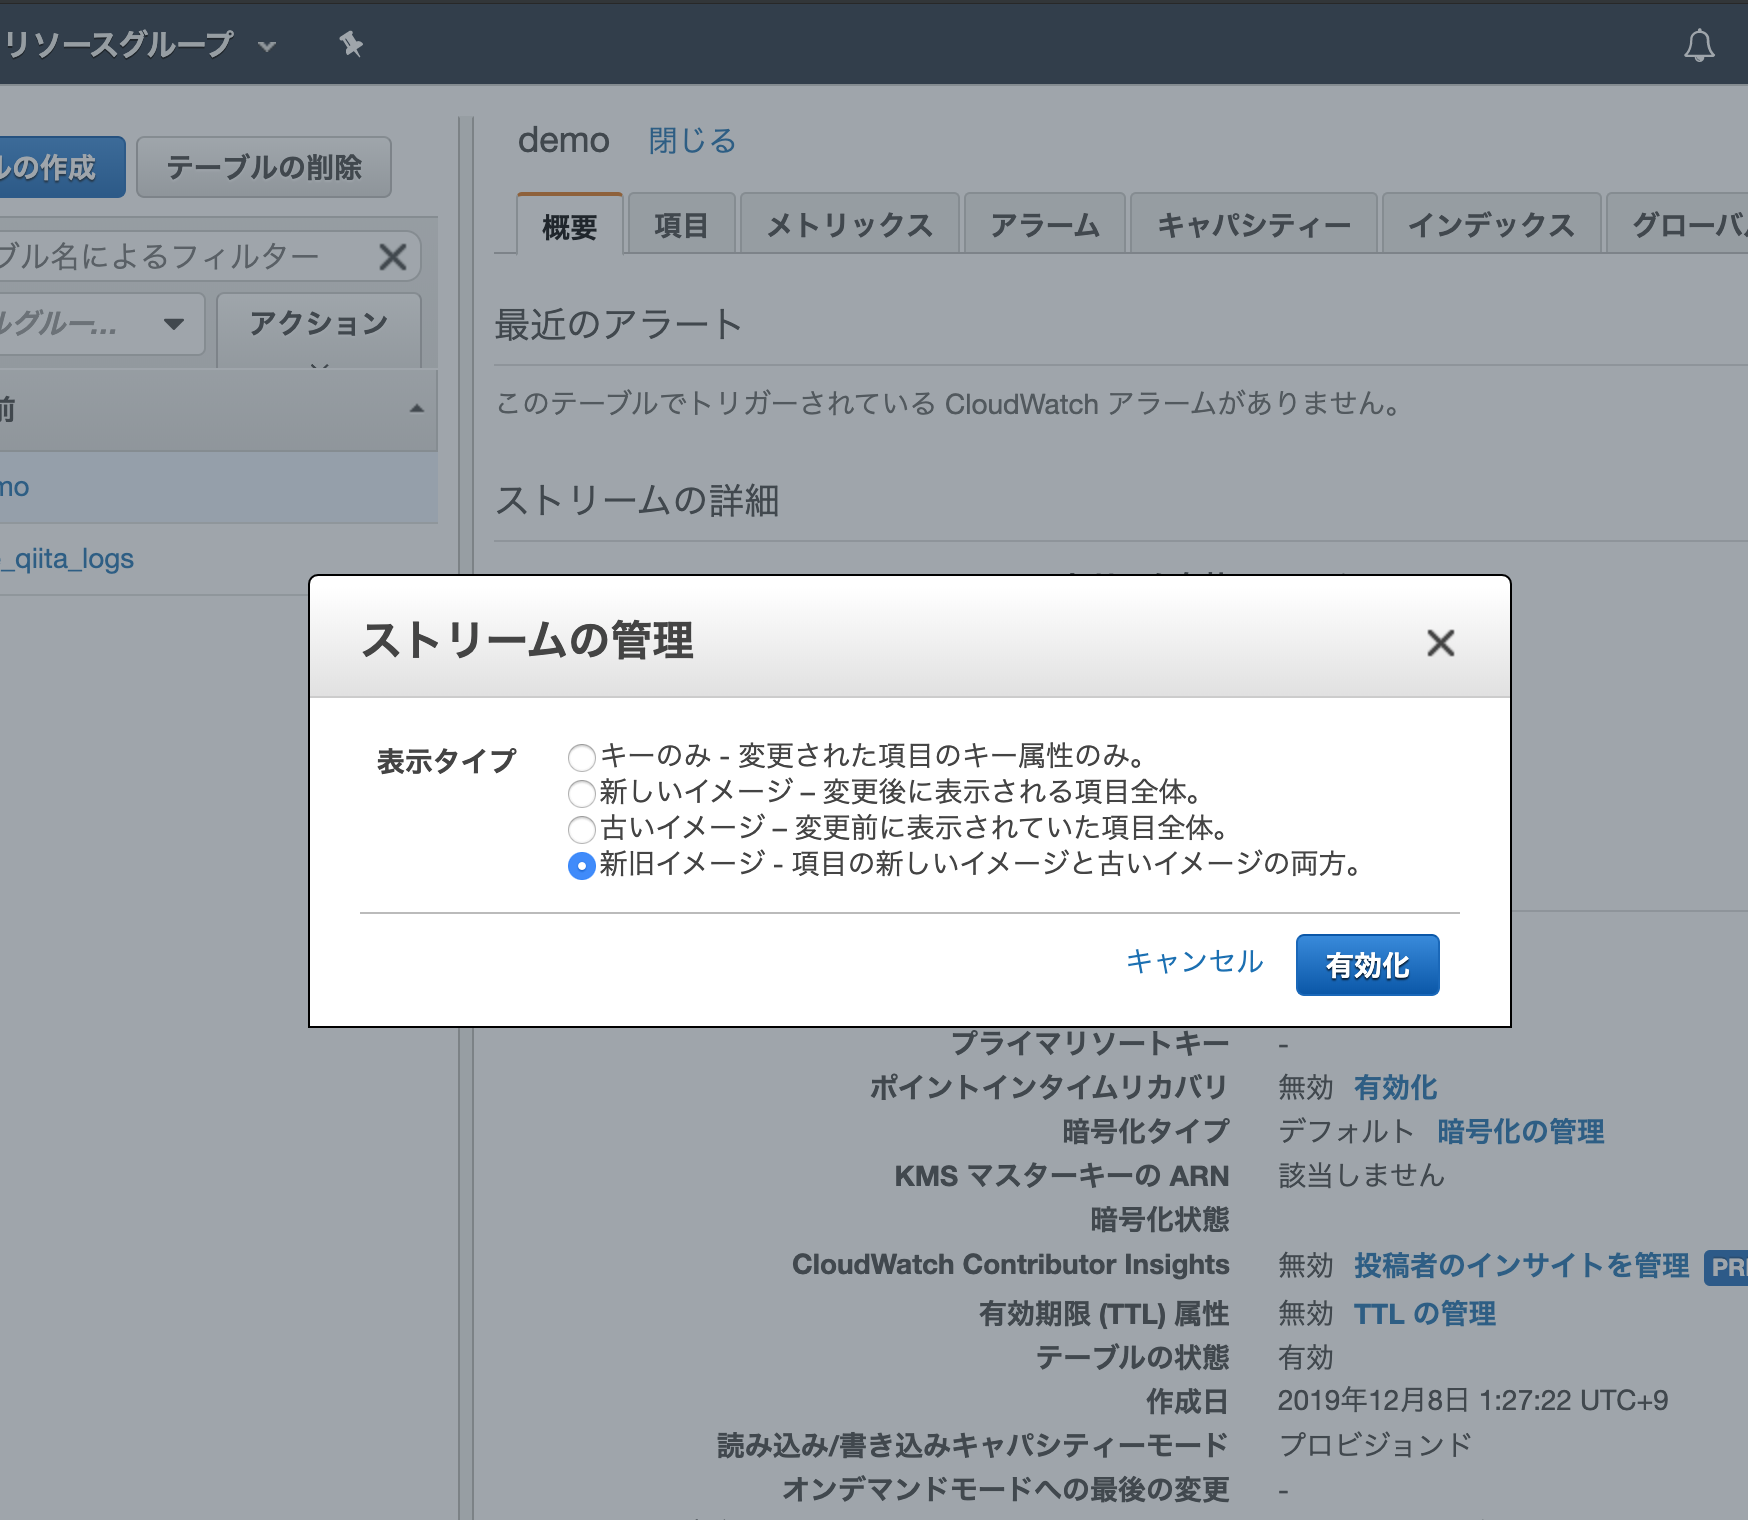
3. Dynamo DBに差分を保存し、ストリームを流す (③, ④)
Dynamo DBのテーブル概要/ストリームの詳細/ストリームの管理 を押すと、以下の様に表示されます。設定するとDynamo DBが更新されたときにストリームデータ(変更前後のデータ)を流してくれるようになります。(5. で、このストリームデータをトリガーにしてLambdaをはしらせます)
Dynamo DBの更新は以下の関数で行います。IDがDynamo DB内になければ新規作成、IDが存在した上でいいね数(iine)がかわっていれば更新、それ以外は変更なし、としています。新規作成と更新された項目のみストリームデータになります。
import boto3
from botocore.exceptions import ClientError

def update_logs(items: List[Dict[str, Any]]):
    """Update the number of iine in Dynamo DB
    If item ID do not exist in Dynamo DB, insert them in it
    """
    dynamodb = boto3.resource('dynamodb')
    table = dynamodb.Table('iine_qiita_logs')

    for item in items:
        ids = item.get('id')
        title = item.get('title')
        iine = item.get('likes_count')

        try:
            response = table.update_item(
                Key={'ids': ids},
                UpdateExpression="set iine = :newiine, title = :title",
                ConditionExpression="attribute_not_exists(ids) or iine <> :newiine",
                ExpressionAttributeValues={
                    ":newiine": iine,
                    ":title": title
                },
            )
        except ClientError as e:
            if e.response['Error']['Code'] == "ConditionalCheckFailedException":
                print(e.response['Error']['Message'])
            else:
                raise
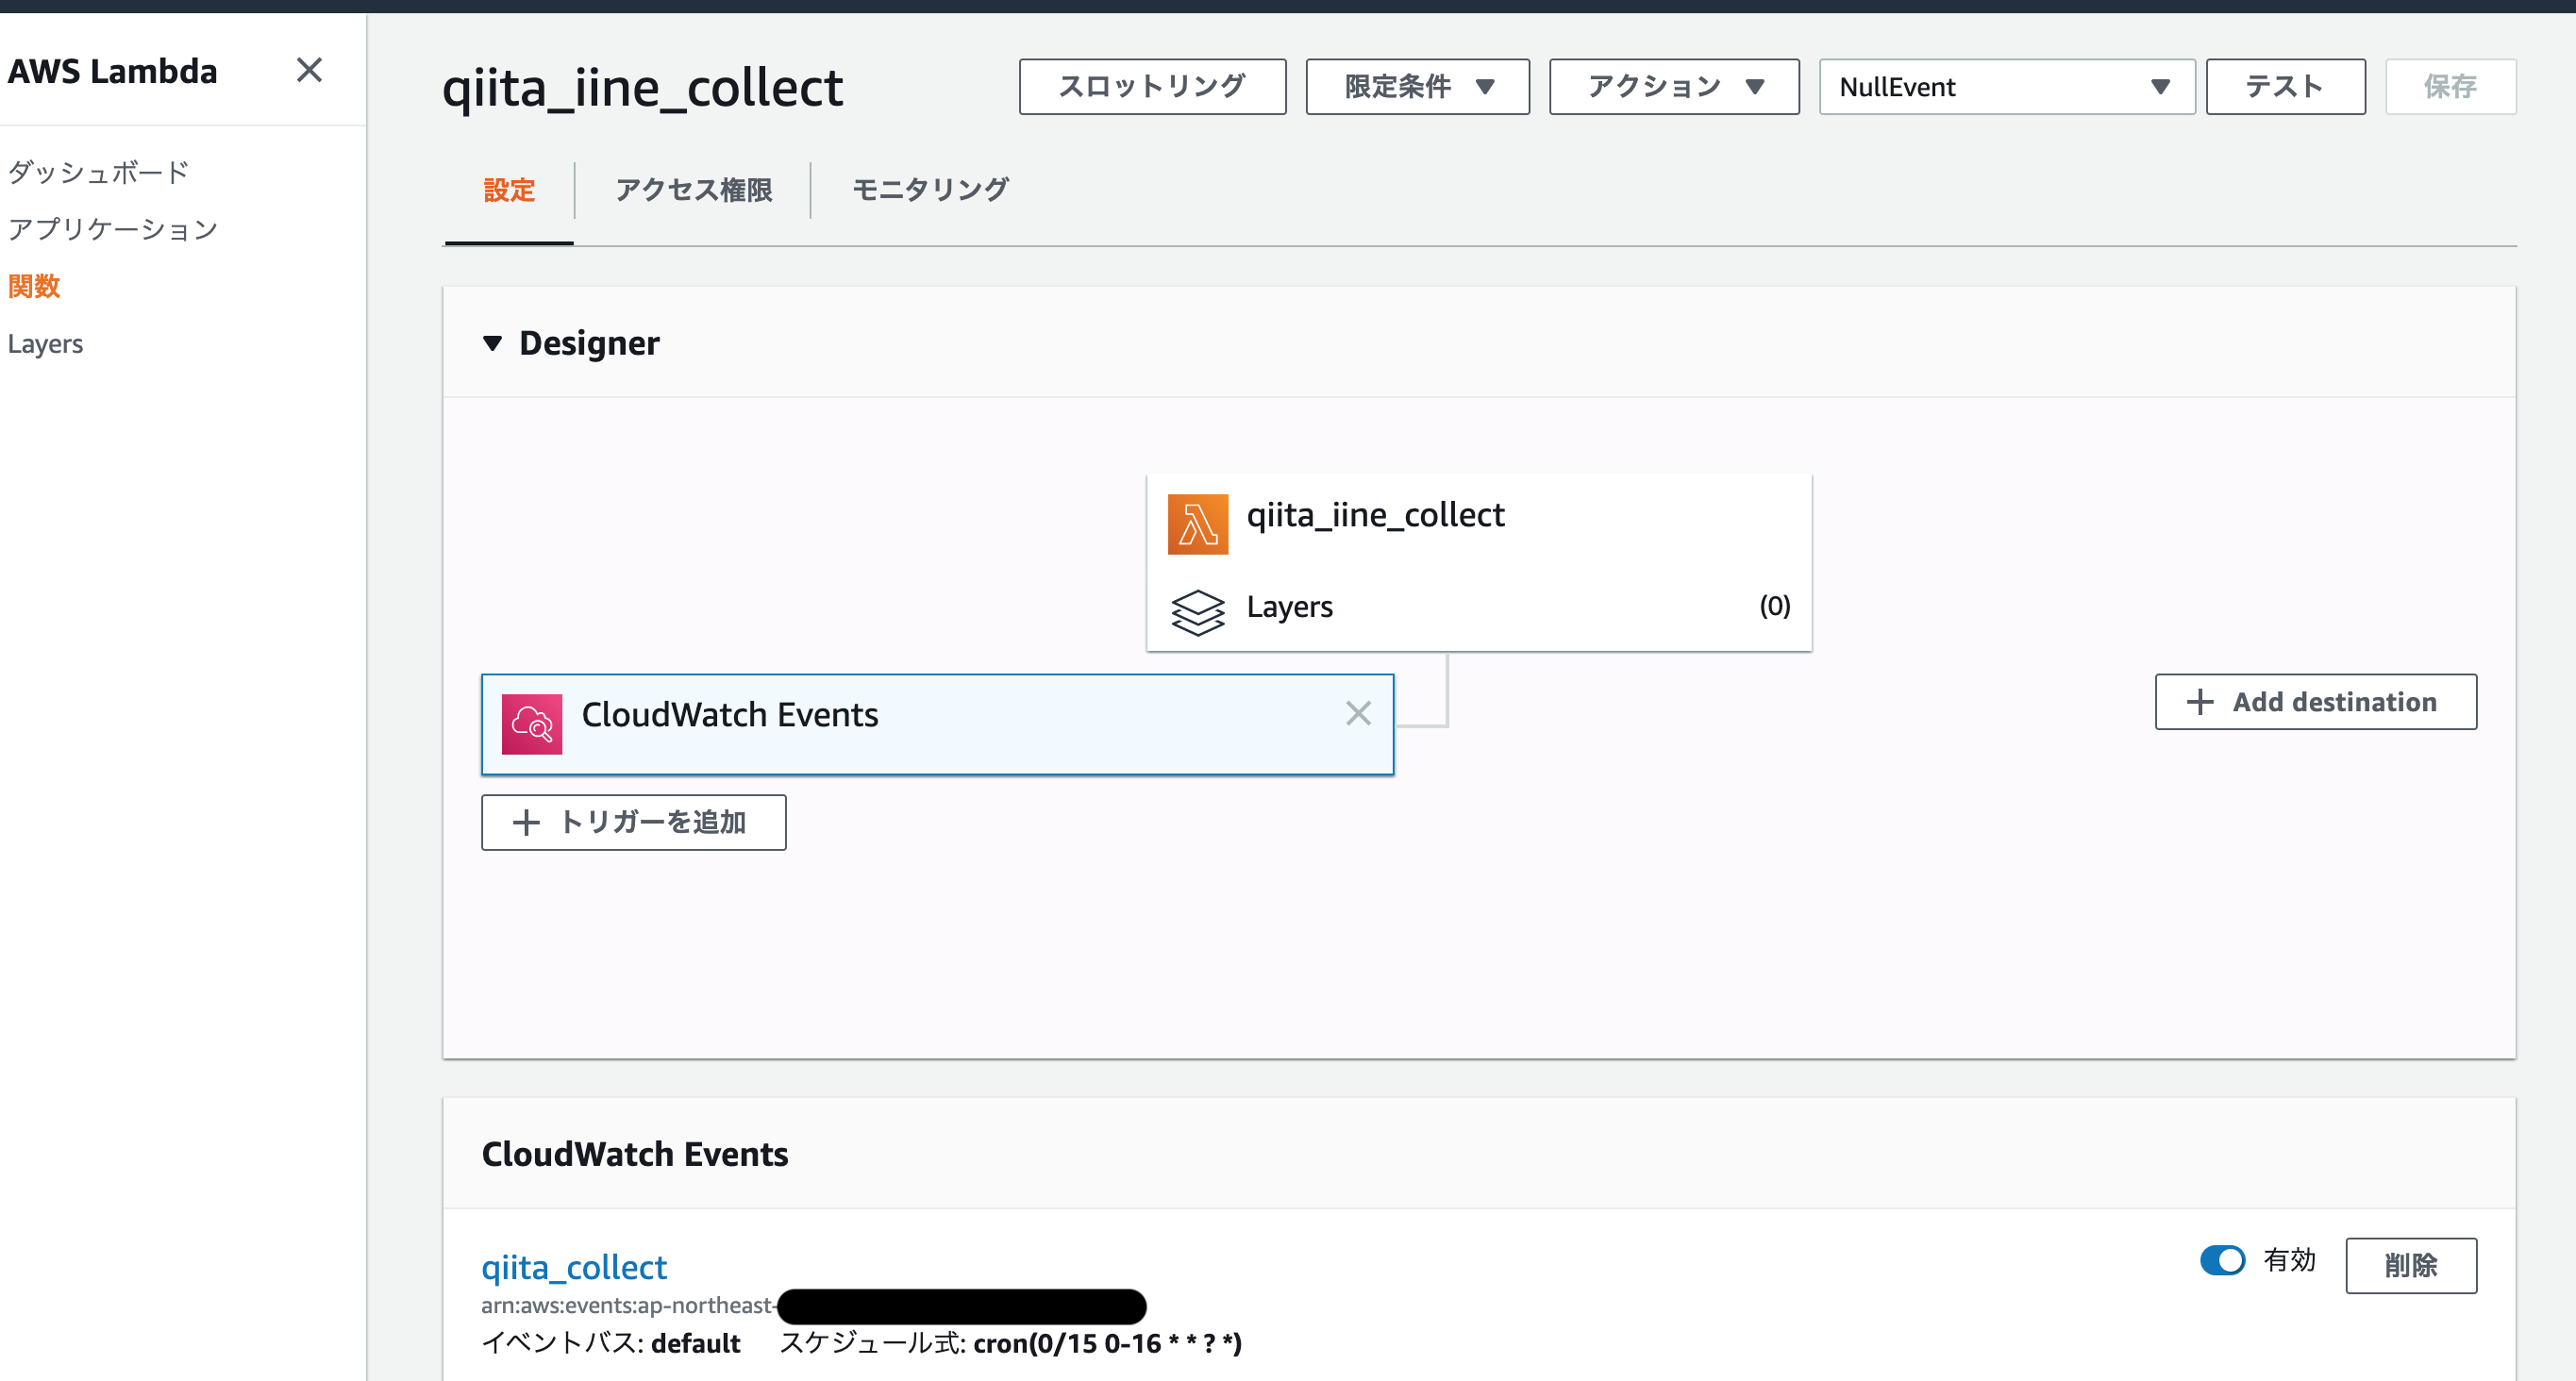
4. Lambdaで定期実行 (①)
2 ~ 3までのコードをまとめてLambdaにのせます。そして、「CloudWatch Events」をトリガーにします。(ザコゆえに明らかに頻度が高すぎますが![]() )9AM ~ 1AMまでの間、15分おきに処理がはしるようにしています。
)9AM ~ 1AMまでの間、15分おきに処理がはしるようにしています。
すると、定期的に以下の様なDynamo DBの項目を更新してストリームデータを流すようになります。

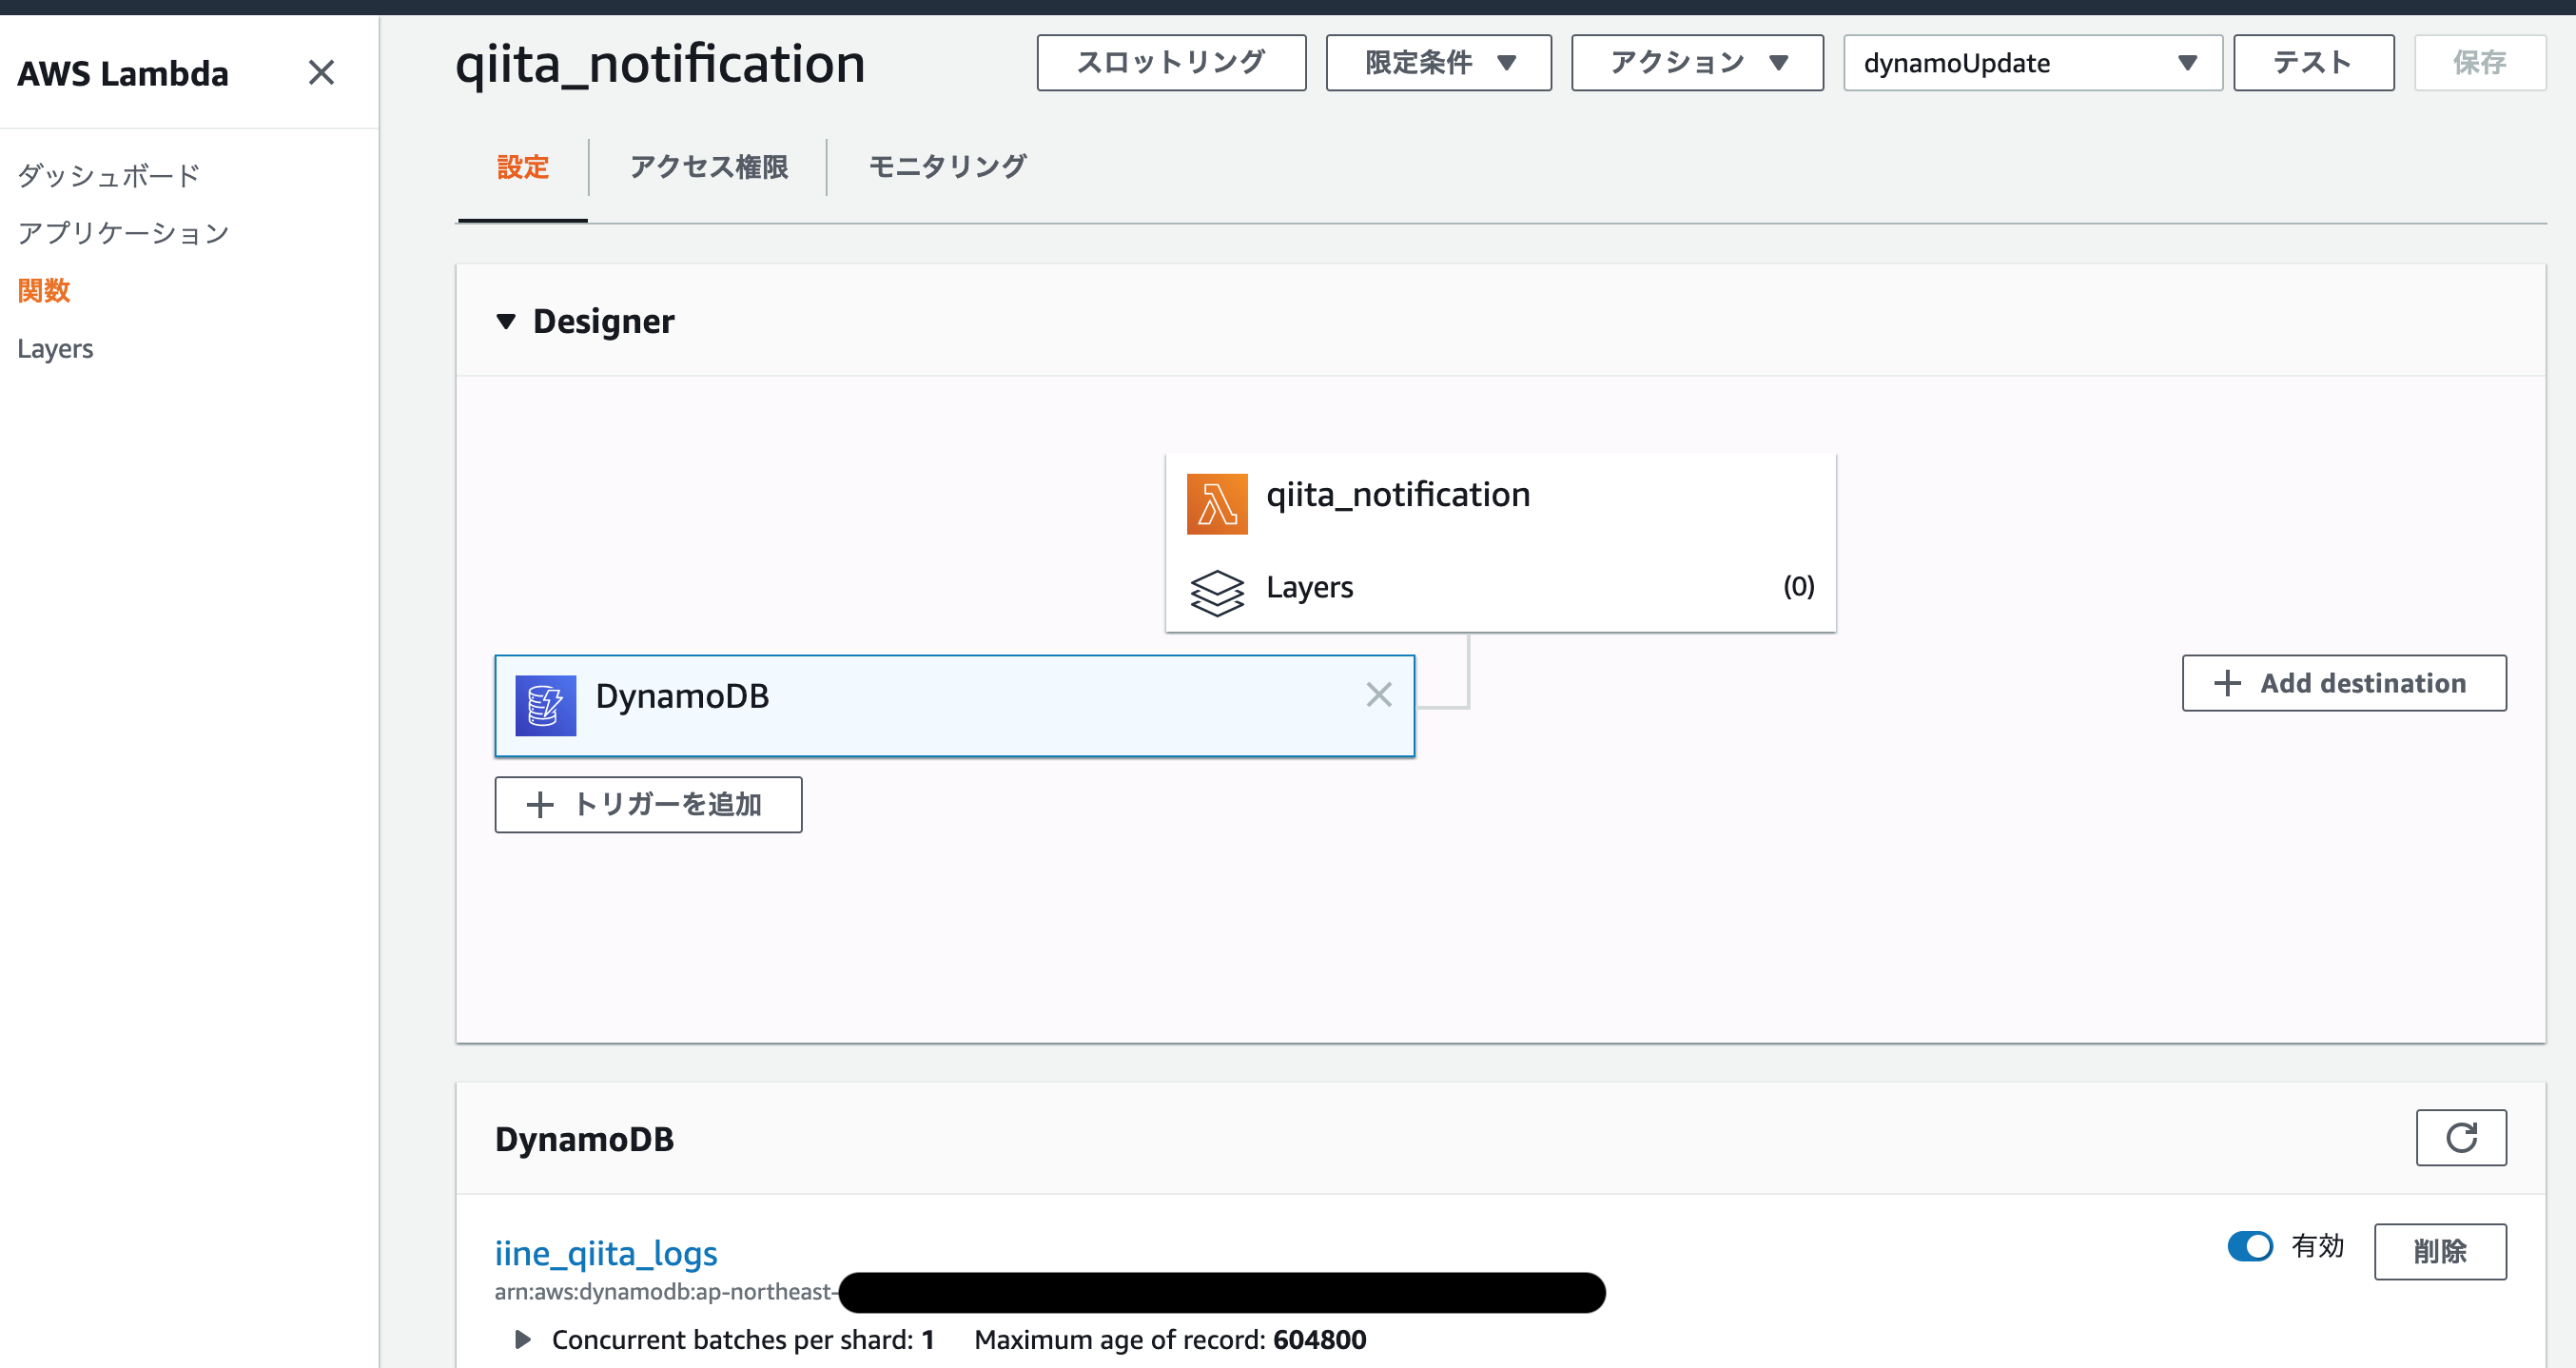
5. ストリームを受け取り、いいねしたユーザーの取得 (⑤)
通知側のLambdaを構築します。4.までで更新のストリームデータが流れるようになったので、ストリームデータを受け取って処理を実行するLambdaが必要です。以下の様にトリガーをDynamo DBにするだけです。
ストリームデータは以下の様にしてLambdaに指定したhandlerの第一引数から取得できます。
(参考: DynamoDB StreamをトリガーにしてLambdaを実行する)
def serialize_record(record: Dict[str, Any]) -> Dict[str, Any]:
    """serialize data of Dynamo DB Stream"""
    if record.get('eventName') != 'MODIFY':
        return {}

    past = record.get('dynamodb', {}).get('OldImage')
    past_iine = int(past.get('iine', {}).get('N', 0))
    ids = past.get('ids', {}).get('S', '')

    new = record.get('dynamodb', {}).get('NewImage')
    title = new.get('title', {}).get('S', '')
    new_iine = int(new.get('iine', {}).get('N', 0))

    return {
        'ids': ids,
        'title': title,
        'new_iine': new_iine,
        'past_iine': past_iine
    }

def lambda_handler(event, context):
    """main handler for Lambda"""
    records = event.get('Records', [])
    for record in records:
        serialized_data = serialize_record(record)
        ...
ここまでで、いいね数が増えていた記事のIDが取得できたので、Qiita API v2のGET /api/v2/items/:item_id/likesからいいねしたユーザーIDを取得します。
def serialize_response_name(response: Response, new_size: int, num: int, title: str) -> Dict[str, Any]:
    """serialize iine data of Qiita API v2"""
    size = new_size - num
    if size <= 0:
        users: List[str] = []
    else:
        new_iine = response.body[:size]
        users = [
            resp.get('user', {}).get('id') for resp in new_iine
        ]
    return {
        'title': title,
        'users': users
    }

def get_new_iine(item: Dict[str, Any], token: str) -> Dict[str, Any]:
    """HTTP request to Qiita API v2"""
    headers = {'Authorization': 'Bearer {}'.format(token)}
    ids = item.get('ids', '')
    past_iine = item.get('past_iine', 0)
    new_iine = item.get('new_iine', 0)
    url = f'https://qiita.com/api/v2/items/{ids}/likes'

    response = req_get(url, headers=headers)
    title: str = item.get('title', '')
    resp = serialize_response_name(response, new_iine, past_iine, title)
    return resp
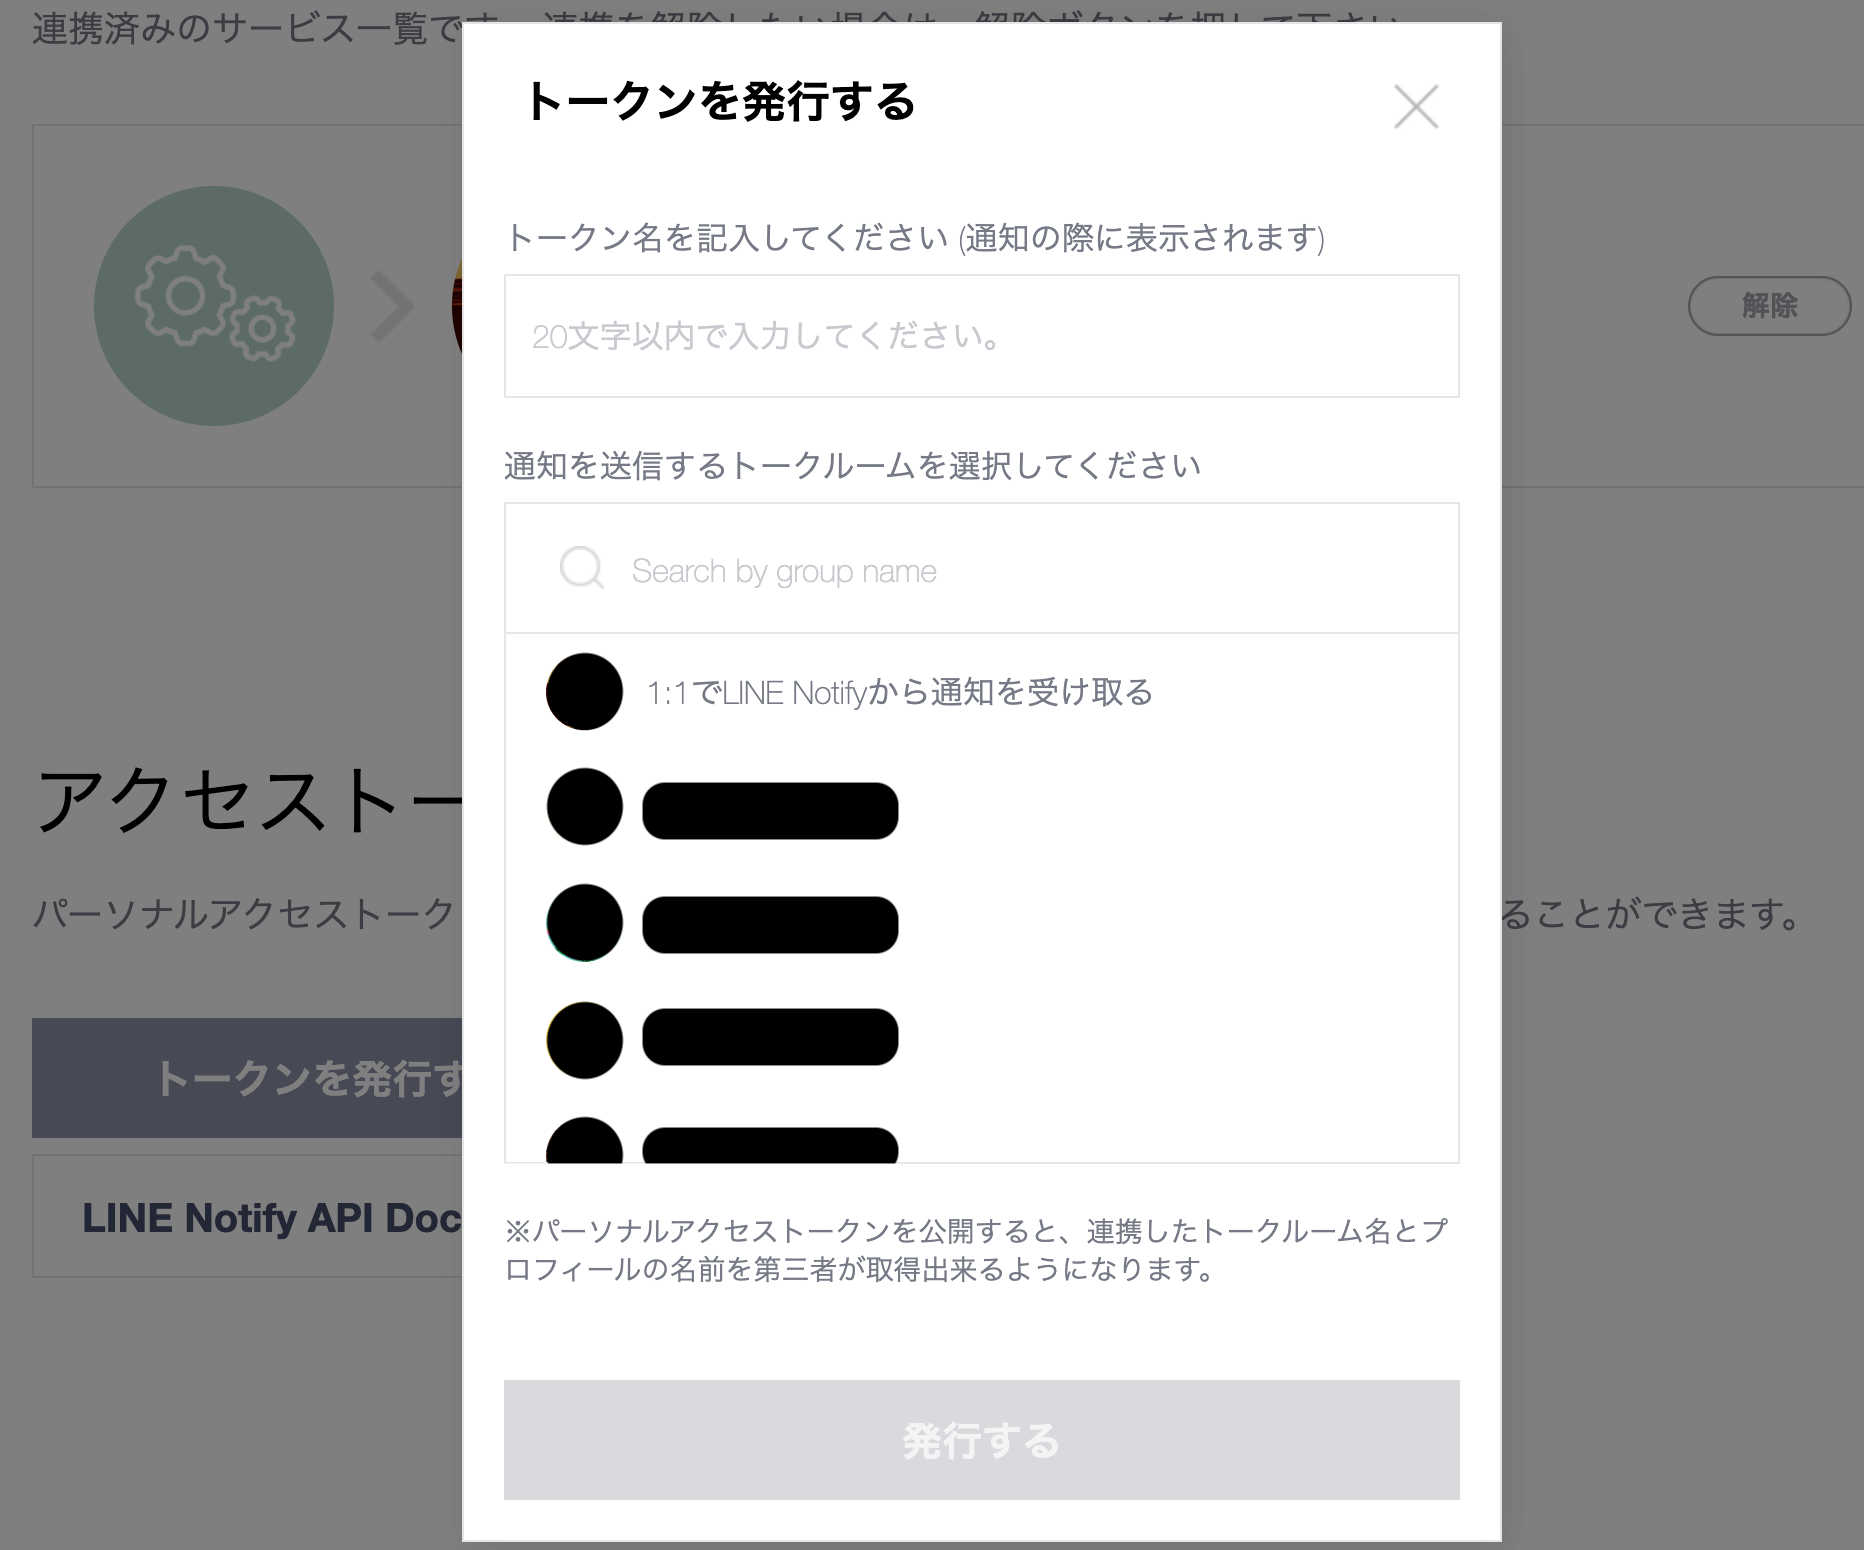
6. LINE通知 (⑥, ⑦)
ログインしてマイページからアクセストークの発行を押して、「1:1でLINE Notifyから通知を受け取る」を押し「発行」するとaccess tokenが取得できます。
あとは、適当に整形してpostするだけです。
def deserialize_response_name(response: Dict[str, Any], max_length=20) -> str:
    """deserialize text for LINE Notify
    :param max_length: max sentence length
    """
    names = ", ".join(response.get('users', []))
    title = response.get('title', '')
    title = f"{title}" if len(title) <= max_length else f"{title[:max_length]}..."
    return f"\n{names}が「{title}」にいいねしました。"

def send_notification(message: str, token: str):
    """send notification by LINE notify"""
    url = 'https://notify-api.line.me/api/notify'
    headers = {
        'Authorization': 'Bearer {}'.format(token),
        'Content-Type': 'application/x-www-form-urlencoded'
    }
    msg = {'message': message}
    response = req_post(url, data=msg, headers=headers)
    return response.body
以上で、本記事の目的が達成されます。あとは、以下の関数をハンドラーに設定すると通知が走るようになります。
def lambda_handler(event, context):
    """main handler for Lambda"""
    qiita_token = os.environ["QIITA_TOKEN"]
    line_token = os.environ["LINE_TOKEN"]

    records = event.get('Records', [])
    for record in records:
        serialized_data = serialize_record(record)
        if not serialized_data:
            continue
        new_iines = get_new_iine(serialized_data, qiita_token)
        if len(new_iines.get('users')) == 0:
            continue
        send_notification(deserialize_response_name(new_iines), line_token)

    return {
        'statusCode': 200,
    }
通知例:
まとめ
無事LINE通知が受け取れるようになりました。
また、AWSを使ったイベント駆動型のアプリケーション開発入門のためのいいテーマだと感じました。参考にさせて頂いた元ネタの作者様に感謝です。。。
最後までお読み頂きありがとうございました!何かの参考になれば幸いです!
Refs
- Qiitaでいいねが付くとLINE通知してくれる優しい世界を構築した
- Qiita API v2ドキュメント
- LINE Notify
- 初めての、LambdaとDynamoDBを使ったAPI開発
- DynamoDB全くわからない、から、ちょっとわかるようになるまでの道しるべ
- DynamoDB ストリーム を使用したテーブルアクティビティのキャプチャ
- DynamoDB StreamをトリガーにしてLambdaを実行する
- チュートリアル: DynamoDB テーブルの新しい項目の処理
- ステップ 3: 項目を作成、読み込み、更新、削除する
- Python の HTTP クライアントは urllib.request で十分