背景・目的
CCNA資格を取得後、自分の心に湧き上がってきた「勉強したことを何かアウトプットしたい!」、という強い想いを発散させる。
条件、内容
・Cisco機器は手元にないので仮想ネットワークを構築する(ip netnsを使う)。
・dockerコンテナで作業を行う。
→致命的なミスをして使用PCに影響を与えたくない。
→ubuntu:18.04のコンテナ環境で作業実施。
参考_docker
・2つの仮想ネットワークからpingを打ち、疎通確認を行う。
・PCはMac
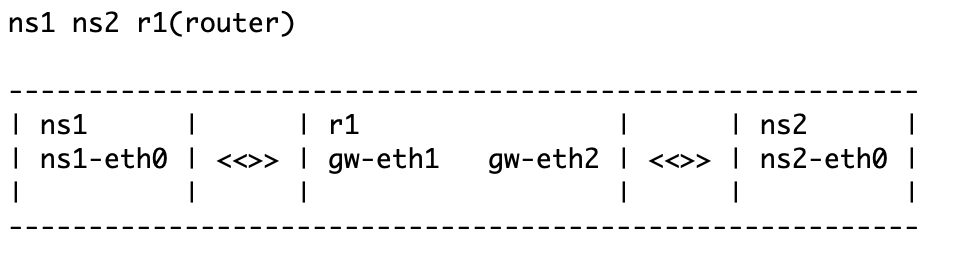
・ネットワークの簡略図
実行コマンド
ターミナルで入力したコマンド。
ターミナルで入力
# ns1とns2の間にルーター(r1)を設置し、各々設定してpingで疎通確認できるようにする

#各namespaceの作成
ip netns add ns1
ip netns add ns2
ip netns add r1

#各々のインターフェースを接続する
ip link add ns1-eth0 type veth peer name gw-eth1
ip link add ns2-eth0 type veth peer name gw-eth2

#インターフェースをnamespaceに所属させる
ip link set ns1-eth0 netns ns1
ip link set ns2-eth0 netns ns2
ip link set gw-eth1 netns r1
ip link set gw-eth2 netns r1

#インターフェースをUPの状態にする
ip netns exec ns1 ip link set ns1-eth0 up
ip netns exec ns2 ip link set ns2-eth0 up
ip netns exec r1 ip link set gw-eth1 up
ip netns exec r1 ip link set gw-eth2 up

#IPアドレスを設定する
ip netns exec ns1 ip address add 192.0.2.1/24 dev ns1-eth0
ip netns exec r1 ip address add 192.0.2.254/24 dev gw-eth1
ip netns exec r1 ip address add 198.51.100.254/24 dev gw-eth2
ip netns exec ns2 ip address add 198.51.100.1/24 dev ns2-eth0

#デフォルトルートを設定する
ip netns exec ns1 ip route add default via 192.0.2.254
ip netns exec ns2 ip route add default via 198.51.100.254

#実際にpingを打つ
ip netns exec ns1 ping -c 3 198.51.100.1 -I 192.0.2.1
所感
・実際にpingは成功した。
・netns やコマンド内容はCCNAの資格取得前に一度読んだことのある本を参考にしました。
以前はさっぱりわからなかったですが、今回はスラスラと内容がわかりました。
・内容的には初歩ですが、「資格勉強が活きている!!」と実感でき満足です。
以上