はじめに
LINE Bot Serverを作ってみる その1のつづきです。
前回はMessaging APIチャンネルを開設してEC2インスタンス上にサンプルのBotサーバーをセットアップして使ってみました。今回はサンプルのソースコードを説明するかたちでBotサーバーの作り方を解説していきます
サンプルのソースコードはこちらです
https://github.com/bathtimefish/line-bot-server-example
Botサーバーの基本
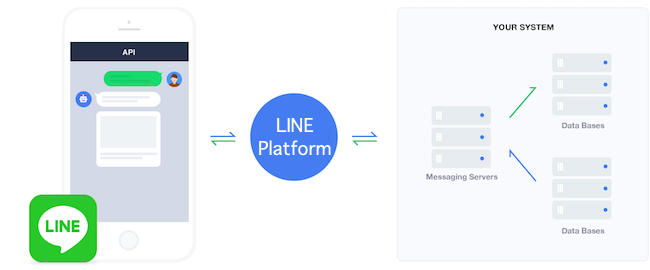
Botサーバーは要するにWebサーバーです。WebサーバーはLINE PlatformからのWebhookを受信してLINE Messaging API SDKを使ってLINE Platformにレスポンスを返すのが主要な機能です
ユーザーがLINEアプリで入力したテキストや画像等のメッセージはMessaging APIチャンネルを介してWebサーバーにPOSTリクエストされます。POSTリクエストにはメッセージデータとともにreply tokenなど返信のための情報等が含まれます。Webサーバーは受信したメッセージに応じた処理を返すように作ります。レスポンスを返すために必要な処理はLINE Messaging API SDKにラッピングされているのでSDKの各プログラミング言語バインディングを利用すると簡単に開発できます
つまりBotサーバーは以下の2点が特長を持つWebサーバーと言えます
- LINE PlatformのWebhookを受け付けるためのPOST method APIを持つ
- LINE Messaging SDKを利用している
サンプルのBotサーバーはnode.jsで動作するWebサーバーでWebサーバーFrameworkとしてFastifyを利用しています。開発言語はTypeScriptです
Fastify
Fastifyはexpress等に比べて軽量高速で知られるWeb server frameworkです。ルーターや認証等の拡張機能はプラグインとして開発するよう設計されており、リクエストデータのvalidationをJSON Schemaで記述できるなどの特長を持っています
軽量で拡張しやすいWebサーバーを開発できるのでぼくは最近ほとんどの案件でFastifyを採用しているんですが、まだあまり日本語ドキュメントが見当たらないので、ここでは少しFastifyにも触れておこうと思います
まず、index.tsを見てみます
import server from './server';

try {
  const port = process.env.APPSERVER_PORT || 443;
  server.listen(port, '0.0.0.0', (err, address) => {
    if (err) {
      console.error(err);
      process.exit(1);
    }
    console.info(`Starting LINE Bot Example Server listening at ${address}`);
  });
} catch (e) {
  console.error(e);
  process.exit(1);
}
ここではserver.tsで作成したFastify ServerオブジェクトにIPアドレスとPort番号を与えて起動することだけをやっています
import fastify from 'fastify';
import fastifyCors from 'fastify-cors';
import fastifyStatic from 'fastify-static';
import { readFileSync } from 'fs';
import path from 'path';
import config from './config';

const options = {
  logger: false,
  https: {
    key: readFileSync(path.join(__dirname, config.certFilePath.key)),
    cert: readFileSync(path.join(__dirname, config.certFilePath.cert)),
  },
};
const server = fastify(options);
server.register(fastifyCors, {
  exposedHeaders: ['X-Total-Count'],
});
server.register(fastifyStatic, {
  root: path.join(__dirname, '../public'),
  prefix: '/',
});

server.get('/', async (_, rep) => {
  rep.sendFile('index.html');
});

// routers
server.register(import('./routers/messaging'));

export default server;
server.tsではserverオブジェクトを生成し必要なプラグインを登録しています。まずオプションでhttpsを有効にしサーバー証明書を読み込んでいます。次にfastify-corsでCORSを設定しfastify-staticで静的ファイルを置くディレクトリを指定しています
ルーターはプラグインとして作成したrouters/messaging/index.tsをインポートして登録しています。このrouters/messaging/がこのBotサーバーの要です
import { FastifyInstance } from 'fastify';
import fastifyPlugin from 'fastify-plugin';
import { postHandler } from './post';

const name = 'messaging';

const router =  function (server: FastifyInstance, _: any, next: any) {

  server.post(`/${name}/event`,  {
    handler: postHandler,
  });

  next();
};

export default fastifyPlugin(router, {
  name,
  fastify: '3.x',
});
このルータープラグインでPOSTメソッドを定義しています。ハンドラは次のpost.tsに記述しています
line-bot-sdk-nodejs
import { FastifySchema, RouteHandlerMethod } from 'fastify';
import line from '@line/bot-sdk';
import { dispatchMessageEvent } from '../../lib/event';

export const postSchema: FastifySchema = {
  body: {
    type: 'object',
    required: ['destination', 'events'],
    properties: {
      destination: { type: 'string' },
      events: { type: 'array' },
    },
  },
};

export const postHandler: RouteHandlerMethod = async (request, reply) => {
    const body: line.WebhookRequestBody = request.body as any;
    const destination: string = body.destination;
    const events: line.WebhookEvent[] = body.events;
    console.log(`Destination: ${destination}`);
    console.log(`Events: ${JSON.stringify(events)}`);
    if (events.length < 1) reply.send({}); // for webhook test in developer console
    const event = events[0];
    let response;
    if (event.type === 'message') { // request body is a message event
      [response] = await dispatchMessageEvent(event);
    }
    if (!response) throw 'Server could not have a valid response message';
    console.log(`LINE Request ID: ${JSON.stringify(await response)}`);
    reply.send(response);
};
ここでLINE Messaging API SDKが登場します。node.js向けのline-bot-sdk-nodejsをインポートしています
このpostHandlerがLINE Platformから送信されたWebhook POSTリクエストを受けるための関数です。リクエストボディはdestinationとeventsというオブジェクトを持ちます。ドキュメントによるとdestinationはWebhookイベントを受信すべきボットのユーザーIDでeventsはユーザーからのテキストメッセージ等Message Eventのリストです。
eventsには複数のMessage Eventが含まれる可能性があるので複数のオブジェクトが処理できるようにする必要がありますが、このサンプルでは簡単のためにeventsの先頭のMessage Eventのみをピックアップして処理するようにしています。
ピックアップしたMessage EventをdispatchMessageEventで解析し、返信用のMessageを作成してLINE Platformに返信しています。
そのあとdispatchMessageEventが返すresponseオブジェクトをサーバーのレスポンスとして返します。
続きは次回に
最後にふれたdispatchMessageEventが実質Botのビジネスロジックを実装している関数でLINE Massaging API SDKの具体的な使い方に関係する部分なんですが長くなったので続きは次回に書きたいと思います。
本記事ではLINE Botサーバーの基本的なアーキテクチャをFastifyを使って開発する方法を紹介しました。Botサーバー開発のご参考になれば幸いです。
