Ultra96v2でVitis AIを使った、MNIST(手書き文字)の実装。
FPGAでAIをするのは、興味がある人が多いと思います。
ただ、実際の手順をどうすればいいのかがわからない人も多いです。
今回はAIのHello worldとも言われる、手書き数字文字を使って、Ultra96v2で、動作を行います。
はじめてのUltra96 AI EDGEに挑戦編。(シリーズ紹介)
第2弾になります。
Vitis AIはXILINX社から提供されている、AI向け開発環境です。
目標
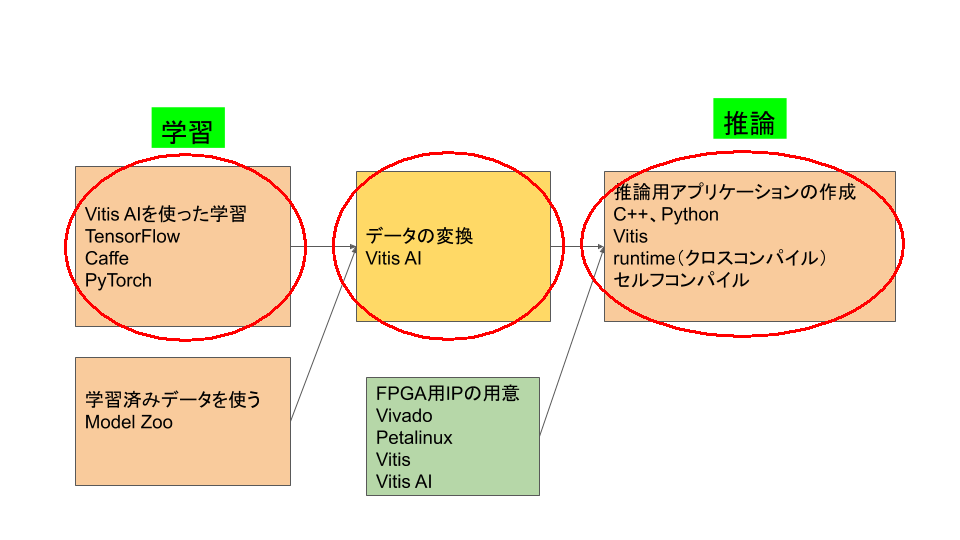
下記図は、Edge AIで行う作業です。今回は、学習から、推論までを一貫して、行います。
今回は、TensorFlowを使って、学習をおこない、Vitis AIを使って、Ultra96にデータを書き込みます。
実行手順
1.Vitis AIの起動
2.演習データの取り込み
3.学習
4.量子化
5.FPGAへのデータ変換
6.ultra96v2への準備、実行
7.USBカメラで、数字認識。
必要な環境
必要なものをご紹介します。順次記事でもご紹介します。
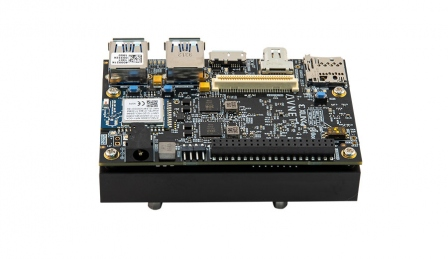
まずは、Ultra96V2は必要なので、購入してしてください。
ハードウェア
- Ultra96V2
- USB-JTAG/UART pod
- USBケーブル TypeA-microTypeB USB2.0
- USBケーブル TypeA-microTypeB USB3.0
- USBカメラ
- 電源12V2A以上
- [電源変換ケーブル](https://www.sengoku.co.jp/mod/sgk_cart/detail.php?code=2AD6-DEK3 "cable change")
使用するパソコンはWindows10とUbuntu18.04LTSでのご紹介になります。以下のツール(無料ツール)を使うことを前提に話を進めていきます。
Windows10の場合
- WSL2 Windows上で、Linuxを動作させるための仕組み
- Ubuntu18.04 LTS Windows上で、Ubuntuを動かす
- [Docker for Windows]( "Docker for Windows") Windows上でのLinuxコンテナ環境
- MobaXterm 多機能Xターミナル
- TeraTerm ターミナルソフト
- Notepad++ テキストエディタ
Ubuntu 18.04 LTSの場合
- Docker Linuxコンテナ環境
開発ツール
XILINX社製のAI開発ツールです。
ultra96v2の動作確認
Ultra96v2向けVitis AI のデモ(SDカードイメージ)2020.1版を参照に、して、Ultra96v2を動かしておいてください。この中のセットアップは終わっていることが条件になります。
-
Vitis AI
XILINX 社のAIツールです。
学習用のツール、変換のためのツールが含まれています。
学習ツールはUltra96向けには、CaffeとTensouflow、Pytouch(GPU版のみ)が用意されています。
AIツールの構築は大変なことも多いのですが、簡単にインストールして、使えるようになっています。
MNISTの画像データ
データの取り込み
MNISTのデータは、AIのハローワールドの位置づけでもあるので、簡単に手に入ります。
ライブラリで、定義されていて関数を読み出すだけで、自動的にダウンロードされます。
今回はPythonで次の一行で、データを読み込んでます。
tf.keras.datasets.mnist.load_data()
データの例
いくつか、データの例を載せておきます。

実際の操作
1.Vitis AIの起動
Vitis AIはXILINX社のAI開発ツールで、無料で公開されています。Dockerとして、提供されており、直接ダウンロードして、アクセスするか、Dockerファイルを自分で、ビルドして、動かす方法があります。なお、予め WSL2とDocker for windows(Windows10の場合)または、Dokcer(Ubuntuの場合)をインストールする必要があります。
Window 10 の場合
直接、ダウンロードして動かすことができます。
1.1 Power Shellをスタートメニューから立ち上げます。
1.2 Windowsで作業用ディレクトトリーを作成します。仮に、c:\AIEDGEにします。
mkdir c:\AIEDGE
注意:\ は ¥のことです。 コマンドの入力の関係上、\と表示されます。
1.3 ディレクトリーを変更します。
cd c:\AIEDGE
1.4 次のコマンドを実行します。CPUでの動作がスタートします。
docker run -e USER=AIEDGE -e UID=1000 -e GID=1000 -v c:\AIEDGE:/home/AIEDGE -w /home/AIEDGE -it --rm --network=host xilinx/vitis-ai:1.2.82 bash
初めてのときは、ダウンロードが始まりますので、時間がかかるかもしれません。2回目以降は保存されているので、比較的すぐに立ち上がります。

次は2章になります。
Ubuntu の場合
1.5 ターミナルから、実行します。
直接ダウンロードして、実行する方法と、予めダウンロードして、ビルドする方法があります。
1.6 直接ダウンロードして実行する場合、次のコマンドで実行できます。(ただし、CPUのみ)
docker run -e USER=AIEDGE -e UID=1000 -e GID=1000 -v $HOME:/home/AIEDGE -w /home/AIEDGE -it --rm --network=host xilinx/vitis-ai:1.2.82 bash
動作したら、2章に移動します。
1.7 ダウンロードして、ビルドする方法もあります。まずは、Vitis AIをGithubからダウンロードします。
git clone https://github.com/Xilinx/Vitis-AI.git
1.8 ダウンロードが終わりましたら、dockerのディレクトリーに移動します。
cd Vitis-AI/docker
1.9 CPU版とGPU版で別れています。GPU版はNVIDIA GPUが必要な上、NVIDIAドライバーの事前インストールが必要になります。
1.10 ビルドを行います。CPU版かGPU版に合わせて、ビルドを行います。
./docker_build_cpu.sh または
./docker_build_gpu.sh
通信回線の状況にもよりますが、数十分かかります。
1.11 実行します。
./docker_run.sh xilinx/vitis-ai-cpu:latest または
./docker_run.sh xilinx/vitis-ai-gpu:latest
この時点で、Vitis AIが立ち上がります。
2.演習データの取り込み
2.1 演習データは、すでに用意されています。それを取り込みます。Githubでダウンロードします。詳しく知りたい方は次のホームページを参照してください。
https://github.com/Xilinx/Vitis-AI-Tutorials/tree/MNIST-Classification-TensorFlow
git clone -b MNIST-Classification-TensorFlow https://github.com/Xilinx/Vitis-AI-Tutorials.git
ただし、容量が大きいので、時間がかかりそうな方は、ZIPファイルでもダウンロードできます。
Vitis-AI-Tutorials-MNIST-Classification-TensorFlow.zip

2.2 ZIPファイルをダウンロードした方は、解凍してください。
unzip Vitis-AI-Tutorials-MNIST-Classification-TensorFlow.zip
注意:Gitの方は、バージョンがアップが時たまあり、バージョンが合わないときがあります。その時は、ZIPファイルの方をダウンロードしてください。
3.学習
ここから先は、スクリプトファイルが用意されていますので、それを順番に行っています。
3.1 作業先に変更します。Gitでダウンロードした方は次の場所です。
cd Vitis-AI-Tutorials/files/
ZIPファイルから解凍した方は、次の場所になります。
cd Vitis-AI-Tutorials-MNIST-Classification-TensorFlow/files/
3.2 環境変数の設定を行います。この先行うことを実施します。
source 0_setenv.sh
この時点で、環境が変わって、tensorflowが使える状態になります。
3.3 学習を行います。スクリプトを実行します。
source 1_train.sh
スクリプトは、Pythonプログラムを読み出すようにできており、データのダウンロードをしたあとに、Tensorflowで、学習を実施します。
ここは、数分かかります。
AIEDGE@docker-desktop:~$ cd Vitis-AI-Tutorials/files/
AIEDGE@docker-desktop:~/Vitis-AI-Tutorials/files$ source 0_setenv.sh
(vitis-ai-tensorflow) AIEDGE@docker-desktop:~/Vitis-AI-Tutorials/files$ source 1_train.sh
-----------------------------------------
TRAINING STARTED..
-----------------------------------------

------------------------------------
Keras version      : 2.2.4-tf
TensorFlow version : 1.15.2
Python version     : 3.6.10 |Anaconda, Inc.| (default, Mar 25 2020, 23:51:54)
[GCC 7.3.0]
------------------------------------
Command line options:
 --input_height    :  28
 --input_width     :  28
 --input_chan      :  1
 --epochs          :  5
 --batchsize       :  100
 --learnrate       :  0.001
 --output_ckpt_path:  ./build/chkpts/float_model.ckpt
 --infer_graph_path:  ./build/chkpts/inference_graph.pb
 --tboard_path     :  ./build/tb_logs
 --gpu             :  0
------------------------------------

Downloading data from https://storage.googleapis.com/tensorflow/tf-keras-datasets/mnist.npz
11493376/11490434 [==============================] - 1s 0us/step
WARNING:tensorflow:From /home/AIEDGE/Vitis-AI-Tutorials/files/customcnn.py:42: conv2d (from tensorflow.python.layers.convolutional) is deprecated and will be removed in a future version.
Instructions for updating:
Use `tf.keras.layers.Conv2D` instead.
WARNING:tensorflow:From /opt/vitis_ai/conda/envs/vitis-ai-tensorflow/lib/python3.6/site-packages/tensorflow_core/python/layers/convolutional.py:424: Layer.apply (from tensorflow.python.keras.engine.base_layer) is deprecated and will be removed in a future version.
Instructions for updating:
Please use `layer.__call__` method instead.
WARNING:tensorflow:From /home/AIEDGE/Vitis-AI-Tutorials/files/customcnn.py:43: batch_normalization (from tensorflow.python.layers.normalization) is deprecated and will be removed in a future version.
Instructions for updating:
Use keras.layers.BatchNormalization instead.  In particular, `tf.control_dependencies(tf.GraphKeys.UPDATE_OPS)` should not be used (consult the `tf.keras.layers.batch_normalization` documentation).
WARNING:tensorflow:From /home/AIEDGE/Vitis-AI-Tutorials/files/customcnn.py:63: flatten (from tensorflow.python.layers.core) is deprecated and will be removed in a future version.
Instructions for updating:
Use keras.layers.flatten instead.
WARNING:tensorflow:From /opt/vitis_ai/conda/envs/vitis-ai-tensorflow/lib/python3.6/site-packages/tensorflow_core/python/ops/losses/losses_impl.py:121: where (from tensorflow.python.ops.array_ops) is deprecated and will be removed in a future version.
Instructions for updating:
Use tf.where in 2.0, which has the same broadcast rule as np.where
Network input shape:  (?, 28, 28, 1)
                      (?, 14, 14, 16)
                      (?, 7, 7, 32)
                      (?, 4, 4, 64)
                      (?, 1, 1, 10)
Network output shape: (?, 10)

----------------------------
 TRAINING STARTED...
----------------------------
 Epoch 1 / 5 - accuracy 96.56 %
 Epoch 2 / 5 - accuracy 97.80 %
 Epoch 3 / 5 - accuracy 98.22 %
 Epoch 4 / 5 - accuracy 98.50 %
 Epoch 5 / 5 - accuracy 98.62 %

----------------------------
 SAVING CHECKPOINT & GRAPH...
----------------------------
 Saved checkpoint to ./build/chkpts/float_model.ckpt
Network input shape:  (?, 28, 28, 1)
                      (?, 14, 14, 16)
                      (?, 7, 7, 32)
                      (?, 4, 4, 64)
                      (?, 1, 1, 10)
Network output shape: (?, 10)
 Saved binary inference graph to ./build/chkpts/inference_graph.pb
 Run `tensorboard --logdir=./build/tb_logs --port 6006 --host localhost` to see the results.
-----------------------------------------
TRAINING COMPLETED
-----------------------------------------
(vitis-ai-tensorflow) AIEDGE@docker-desktop:~/Vitis-AI-Tutorials/files$
ここで、学習が終わります。数分かかります。
3.4 学習が終わったデータを、重みの情報を含めてまとめます。凍結化といいます。
これも、スクリプトファイルを用意しています。もともとは、freeze_graph と言うコマンドを実行しています。
source 2_freeze.sh
(vitis-ai-tensorflow) AIEDGE@docker-desktop:~/Vitis-AI-Tutorials/files$ source 2_freeze.sh
-----------------------------------------
FREEZE STARTED..
-----------------------------------------
WARNING:tensorflow:From /opt/vitis_ai/conda/envs/vitis-ai-tensorflow/lib/python3.6/site-packages/tensorflow_core/python/tools/freeze_graph.py:127: checkpoint_exists (from tensorflow.python.training.checkpoint_management) is deprecated and will be removed in a future version.
Instructions for updating:
Use standard file APIs to check for files with this prefix.
W1110 07:36:35.449990 140391643248448 deprecation.py:323] From /opt/vitis_ai/conda/envs/vitis-ai-tensorflow/lib/python3.6/site-packages/tensorflow_core/python/tools/freeze_graph.py:127: checkpoint_exists (from tensorflow.python.training.checkpoint_management) is deprecated and will be removed in a future version.
Instructions for updating:
Use standard file APIs to check for files with this prefix.
2020-11-10 07:36:35.476759: I tensorflow/core/platform/cpu_feature_guard.cc:142] Your CPU supports instructions that this TensorFlow binary was not compiled to use: SSE4.1 SSE4.2 AVX AVX2 FMA
2020-11-10 07:36:35.482776: I tensorflow/core/platform/profile_utils/cpu_utils.cc:94] CPU Frequency: 2208005000 Hz
2020-11-10 07:36:35.486339: I tensorflow/compiler/xla/service/service.cc:168] XLA service 0x559eeb337da0 initialized for platform Host (this does not guarantee that XLA will be used). Devices:
2020-11-10 07:36:35.486373: I tensorflow/compiler/xla/service/service.cc:176]   StreamExecutor device (0): Host, Default Version
INFO:tensorflow:Restoring parameters from ./build/chkpts/float_model.ckpt
I1110 07:36:35.533249 140391643248448 saver.py:1284] Restoring parameters from ./build/chkpts/float_model.ckpt
WARNING:tensorflow:From /opt/vitis_ai/conda/envs/vitis-ai-tensorflow/lib/python3.6/site-packages/tensorflow_core/python/tools/freeze_graph.py:233: convert_variables_to_constants (from tensorflow.python.framework.graph_util_impl) is deprecated and will be removed in a future version.
Instructions for updating:
Use `tf.compat.v1.graph_util.convert_variables_to_constants`
W1110 07:36:35.587140 140391643248448 deprecation.py:323] From /opt/vitis_ai/conda/envs/vitis-ai-tensorflow/lib/python3.6/site-packages/tensorflow_core/python/tools/freeze_graph.py:233: convert_variables_to_constants (from tensorflow.python.framework.graph_util_impl) is deprecated and will be removed in a future version.
Instructions for updating:
Use `tf.compat.v1.graph_util.convert_variables_to_constants`
WARNING:tensorflow:From /opt/vitis_ai/conda/envs/vitis-ai-tensorflow/lib/python3.6/site-packages/tensorflow_core/python/framework/graph_util_impl.py:277: extract_sub_graph (from tensorflow.python.framework.graph_util_impl) is deprecated and will be removed in a future version.
Instructions for updating:
Use `tf.compat.v1.graph_util.extract_sub_graph`
W1110 07:36:35.587328 140391643248448 deprecation.py:323] From /opt/vitis_ai/conda/envs/vitis-ai-tensorflow/lib/python3.6/site-packages/tensorflow_core/python/framework/graph_util_impl.py:277: extract_sub_graph (from tensorflow.python.framework.graph_util_impl) is deprecated and will be removed in a future version.
Instructions for updating:
Use `tf.compat.v1.graph_util.extract_sub_graph`
INFO:tensorflow:Froze 20 variables.
I1110 07:36:35.599492 140391643248448 graph_util_impl.py:334] Froze 20 variables.
INFO:tensorflow:Converted 20 variables to const ops.
I1110 07:36:35.602429 140391643248448 graph_util_impl.py:394] Converted 20 variables to const ops.
-----------------------------------------
FREEZE COMPLETED
-----------------------------------------
(vitis-ai-tensorflow) AIEDGE@docker-desktop:~/Vitis-AI-Tutorials/files$
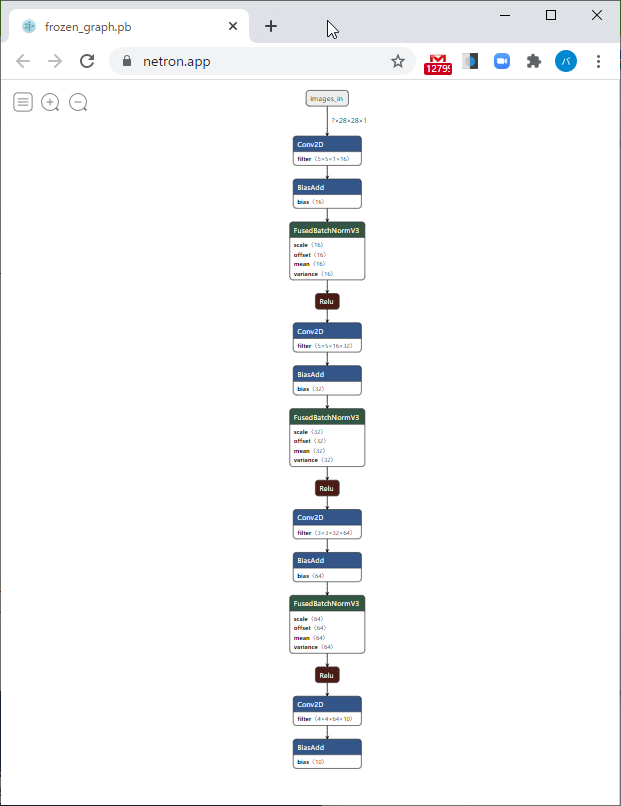
3.5凍結したネットワークの情報を可視化します。
https://netron.app/
にアクセスして、凍結したファイルを選択ます。
凍結したファイルはWindowsから見ると、次のところにあります。
c:\AIEDGE\Vitis-AI-Tutorials\files\build\freeze\frozen_graph.pb
3.6凍結したネットワークが、どのくらい正しいかを検証します。正解率がどのくらいあるかを確認できます。
source 3_eval_frozen_graph.sh
(vitis-ai-tensorflow) AIEDGE@docker-desktop:~/Vitis-AI-Tutorials/files$ source 3_eval_frozen_graph.sh
-----------------------------------------
 EVALUATING THE FROZEN GRAPH..
-----------------------------------------

------------------------------------
Keras version      :  2.2.4-tf
TensorFlow version :  1.15.2
3.6.10 |Anaconda, Inc.| (default, Mar 25 2020, 23:51:54)
[GCC 7.3.0]
------------------------------------
Command line options:
 --graph      :  ./build/freeze/frozen_graph.pb
 --input_node :  images_in
 --output_node:  conv2d_3/BiasAdd
 --gpu        :  0
------------------------------------

Graph accuracy: 96.92 %
-----------------------------------------
GRAPH EVAL COMPLETED
-----------------------------------------
(vitis-ai-tensorflow) AIEDGE@docker-desktop:~/Vitis-AI-Tutorials/files$
ここまでで、凍結した確認が終わります。
4.量子化
AIの計算は膨大なものです。ただし推論の場合は、すべての計算をする必要はありません。結果に影響が出ない範囲で、計算量を減らすことをしてます。その一つが量子化で、計算の桁数を少なくして、演算します。現在のVits AIでは、32ビット浮動小数点を、8ビット整数型にして、使用します。
4.1 量子化を実施します。テストデータを100枚程度用意して、凍結したネットワークで、確認を行います。
source 4_quant.sh
4.2. 量子化したデータでテストを行います。どれだけ、正解度が正しく行えたかを、確認します。
source 5_eval_quant_graph.sh
ここまでは、用意したスクリプトファイルに変更がありません。
Vitis AIでは共通の仕様になります。他のボードでもここまでは同じに操作できます。
(vitis-ai-tensorflow) AIEDGE@docker-desktop:~/Vitis-AI-Tutorials/files$ source 4_quant.sh
-----------------------------------------
QUANTIZE STARTED..
-----------------------------------------
Making list of calibration images..
Command line options:
 --dataset      :  mnist
 --subset       :  test
 --image_dir    :  ./build/quantize/images
 --image_list   :  calib_list.txt
 --label_list   :
 --image_format :  jpg
 --max_images   :  1000
Vai_q_tensorflow v1.2.0 build for Tensorflow 1.15.2
100% (100 of 100) |######################| Elapsed Time: 0:00:11 Time:  0:00:11
INFO: Checking Float Graph...
INFO: Float Graph Check Done.
INFO: Calibrating for 100 iterations...
INFO: Calibration Done.
INFO: Generating Deploy Model...
INFO: Deploy Model Generated.
********************* Quantization Summary *********************
INFO: Output:
  quantize_eval_model: ./build/quantize/quantize_eval_model.pb
  deploy_model: ./build/quantize/deploy_model.pb
-----------------------------------------
QUANTIZED COMPLETED
-----------------------------------------
(vitis-ai-tensorflow) AIEDGE@docker-desktop:~/Vitis-AI-Tutorials/files$ source 5_eval_quant_graph.sh
-----------------------------------------
 EVALUATING THE QUANTIZED GRAPH..
-----------------------------------------

------------------------------------
Keras version      :  2.2.4-tf
TensorFlow version :  1.15.2
3.6.10 |Anaconda, Inc.| (default, Mar 25 2020, 23:51:54)
[GCC 7.3.0]
------------------------------------
Command line options:
 --graph      :  ./build/quantize/quantize_eval_model.pb
 --input_node :  images_in
 --output_node:  conv2d_3/BiasAdd
 --gpu        :  0
------------------------------------

Graph accuracy: 96.74 %
-----------------------------------------
GRAPH EVAL COMPLETED
-----------------------------------------
(vitis-ai-tensorflow) AIEDGE@docker-desktop:~/Vitis-AI-Tutorials/files$
5.FPGAへのデータ変換
ここで、FPGAで実行できる形で、データを変更します。ここで作成した、プログラムをUltra96V2上で、動かすことによって、機械学習の推論ができるようになります。
各FPGAボード、IPコアの構造により、変更が必要になります。もともと、ダウンロードしている演習データはZCU102という、大きめのFPGAを想定して作っています。Ultra96V2とは構造が違うので、ここからは、Ultra96v2用に作成することになります。
手順としては、Ultra96v2のハードウェア情報を手に入れる、設定ファイルを作る、コンパイルする手順になります。
5.1 Ultar96v2用に作ったデータを確保します。hwhファイルと言います。今後、公開予定のVitis AIプラットフォーム作成のときに自動的に作成されます。通常はSD_CARDフォルダーに作成されます。
今回は、予め用意しましたので、hwhファイルをダウンロードします。作業フォルダーに入れます。
~/Vitis-AI-Tutorials/files です。
Windowsの方は、c:\AIEDGE\Vitis-AI-Tutorials\filesになります。
5.2 ダウンロードしたファイルをIP情報だけ取り出します。次のコマンドで実行できます。dcfファイルが作成されます。
dlet -f ./design_1.hwh
5.3 コンパイラーに入れるためのJSONファイルを作成します。ハードコアの情報が入っています。
作業フォルダーに次のファイルを作成してください。ダウンロードもできます。
u96v2.json
{
    "target"   : "DPUCZDX8G",
    "dcf"      : "./dpu-06-18-2020-12-00.dcf",
    "cpu_arch" : "arm64"
}
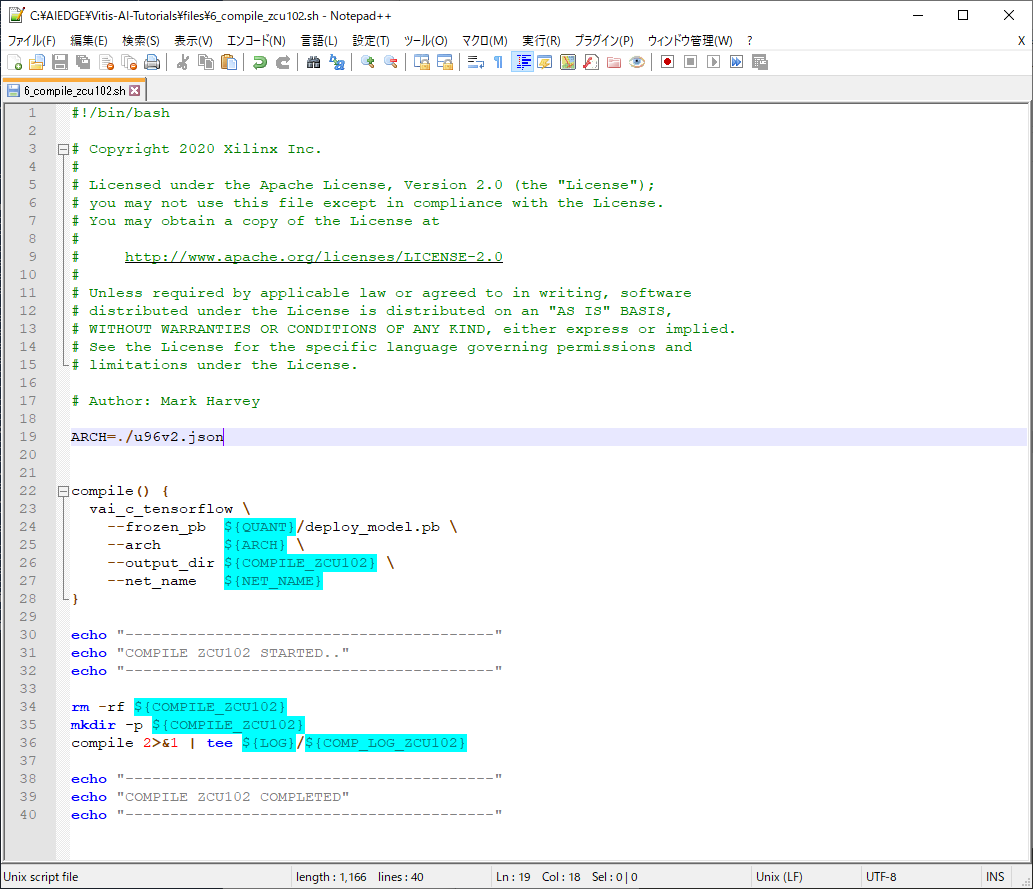
5.4 演習用データは、U50とZCU102というFPGAボードに用意されています。これを、ultra96v2用に変更します。notepad+などテキストエディタを使って、ファイルを開きます。
Windowsの方、c:\AIEDGE\Vitis-AI-Tutorials\files\6_compile_zcu102.sh
Ubuntuの方、~/Vitis-AI-Tutorials/files/6_compile_zcu102.sh
5.5 19行目をUltra96v2に合わせるため変更します。ここで、jsonファイルを指定します。
ARCH=./u96v2.json
5.6 保存します。
5.7コンパイルをします。ここで、Ultra96v2上で実行できるファイルの一つが出来上がります。
source 6_compile_zcu102.sh
5.8 コンパイルしたファイルを使いやすくするため、また、Ultra96v2上で、実行できるようにするために、ファイルをまとめます。またテスト用画像ファイルも用意します。このファイルもスクリプトで実行
できますので、次のファイルを実行します。ファイルは
source 7_make_target_zcu102.sh
5.9 Dockerを終了します。
exit
(vitis-ai-tensorflow) AIEDGE@docker-desktop:~/Vitis-AI-Tutorials/files$ dlet -f ./design_1.hwh
[DLet]Generate DPU DCF file dpu-06-18-2020-12-00.dcf successfully.
(vitis-ai-tensorflow) AIEDGE@docker-desktop:~/Vitis-AI-Tutorials/files$ source 6_compile_zcu102.sh
-----------------------------------------
COMPILE ZCU102 STARTED..
-----------------------------------------

Kernel topology "customcnn_kernel_graph.jpg" for network "customcnn"
kernel list info for network "customcnn"
                               Kernel ID : Name
                                       0 : customcnn

                             Kernel Name : customcnn
--------------------------------------------------------------------------------
                             Kernel Type : DPUKernel
                               Code Size : 3.71KB
                              Param Size : 0.04MB
                           Workload MACs : 2.02MOPS
                         IO Memory Space : 5.61KB
                              Mean Value : 0, 0, 0,
                      Total Tensor Count : 5
                Boundary Input Tensor(s)   (H*W*C)
                          images_in:0(0) : 28*28*1

               Boundary Output Tensor(s)   (H*W*C)
                    conv2d_3_Conv2D:0(0) : 1*1*10

                        Total Node Count : 4
                           Input Node(s)   (H*W*C)
                        conv2d_Conv2D(0) : 28*28*1

                          Output Node(s)   (H*W*C)
                      conv2d_3_Conv2D(0) : 1*1*10


**************************************************
* VITIS_AI Compilation - Xilinx Inc.
**************************************************
-----------------------------------------
COMPILE ZCU102 COMPLETED
-----------------------------------------


(vitis-ai-tensorflow) AIEDGE@docker-desktop:~/Vitis-AI-Tutorials/files$ source 7_make_target_zcu102.sh
-----------------------------------------
MAKE TARGET ZCU102 STARTED..
-----------------------------------------
  Copied application to target folder
  Copied elf file(s) to target folder
Command line options:
 --dataset      :  mnist
 --subset       :  test
 --image_dir    :  ./build/target_zcu102/images
 --image_list   :
 --label_list   :
 --image_format :  jpg
 --max_images   :  10000
  Copied images to target folder
-----------------------------------------
MAKE TARGET ZCU102 COMPLETED
-----------------------------------------
(vitis-ai-tensorflow) AIEDGE@docker-desktop:~/Vitis-AI-Tutorials/files$ exit
exit
6.ultra96v2への準備、実行
Ultra96v2にファイルをコピーして、動作する準備を行います。このサンプルを動かすには、VARTという、新しいライブラリーが必要になります。そのコピーも行います。
6.1 新しいライブラリーをダウンロードします。
[vitis-ai-runtime-1.2.1.tar.gz] (https://www.xilinx.com/bin/public/openDownload?filename=vitis-ai-runtime-1.2.1.tar.gz "VART Library")
なお、バージョンアップされ消されている場合もあるので、こちらにもバックアップをおいておきます。
6.2 vitis-ai-runtime-1.2.1.tar.gzを解凍します。Ubuntu上(WSL2やDockerも含む)では、次のコマンドで、対応解凍できます。
tar xzvf vitis-ai-runtime-1.2.1.tar.gz
なお、Windowsの方は、7-zip等の解凍ツールで、解凍できます。7-zipの場合は、2ステップ解凍になりまして、最初にvitis-ai-runtime-1.2.1.tar.gzを解凍して、次にvitis-ai-runtime-1.2.1.tarを解凍する形になります。
6.3 Ultra96v2を動かします。
Ultra96v2向けVitis AI のデモ(SDカードイメージ)2020.1版を参考に、Ultra96v2に電源を入れます。Mobaxtermまたは、SSHでのultra96への接続まで行ってください。
6.4 ファイルの転送をします。フォルダーコピーになります。Widnwosの場合、フォルダーからドラッグ&ドロップでコピーしてください。コピーするフォルダーは、C:\AIEDGE\Vitis-AI-Tutorials\files\build\target_zcu102 と
C:\AIEDGE\vitis-ai-runtime-1.2.1\aarch64\cetos です。
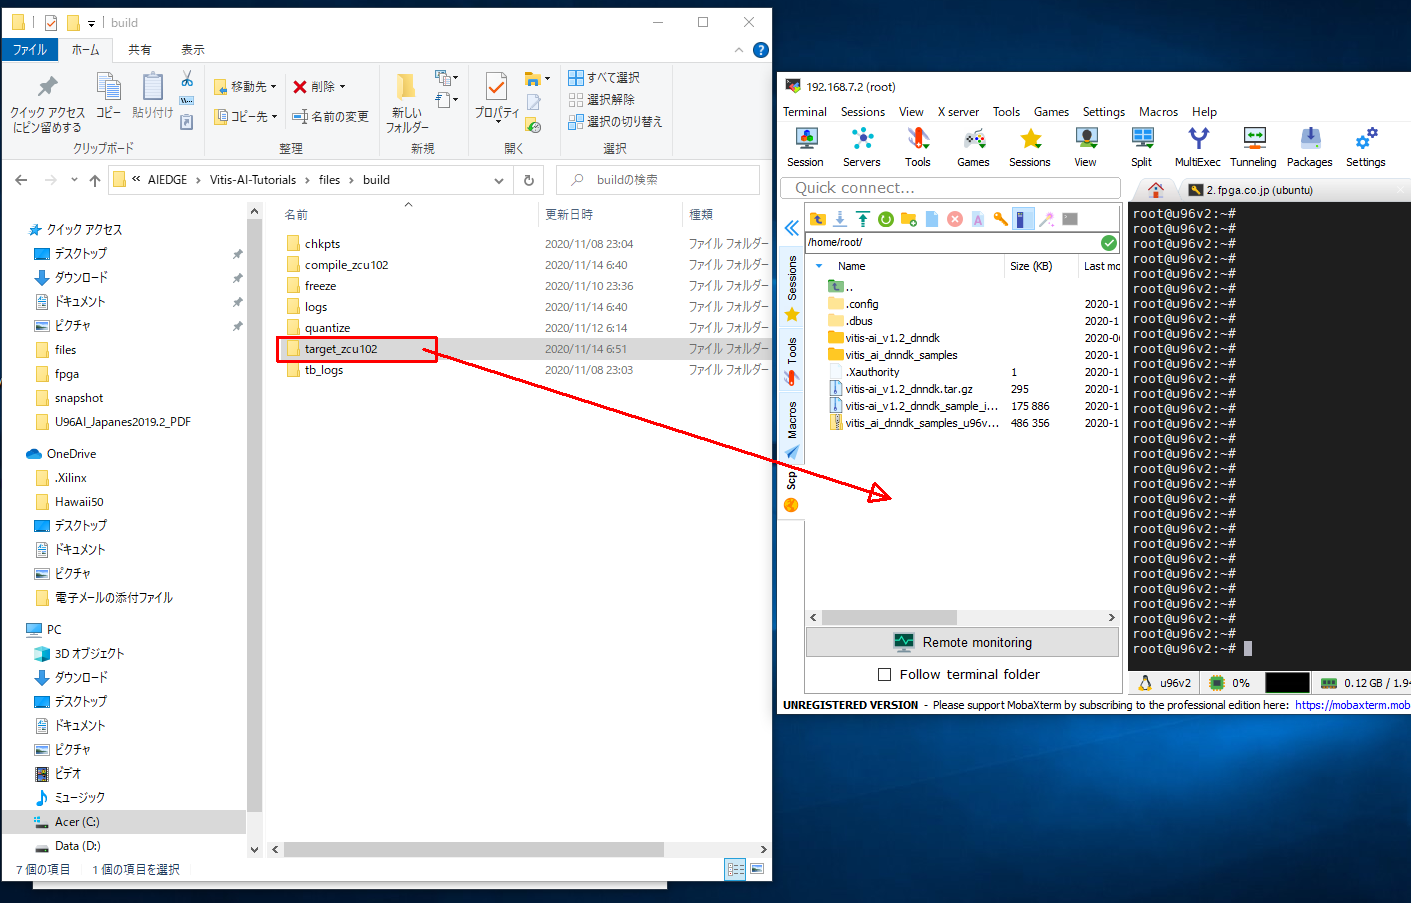
Ubuntuの場合は、scpでフォルダーコピーします。
scp -r ~/AIEDGE/Vitis-AI-Tutorials/files/build/target_zcu102 root@192.168.7.2:~
scp -r ~/AIEDGE/vitis-ai-runtime-1.2.1/aarch64/cetos root@192.168.7.2:~
6.5 Ultra96v2上で、ライブラリーをイントールします。
次のコマンドを順番に、入力します。
cd ~/centos/
rpm -ivh --force libunilog-1.2.0-r10.aarch64.rpm
rpm -ivh --force libxir-1.2.0-r12.aarch64.rpm
rpm -ivh --force libtarget-factory-1.2.0-r10.aarch64.rpm
rpm -ivh --force libvart-1.2.0-r16.aarch64.rpm
root@u96v2:~# cd ~/centos/
root@u96v2:~/centos# rpm -ivh --force libunilog-1.2.0-r10.aarch64.rpm
Verifying...                          ################################# [100%]
Preparing...                          ################################# [100%]
%prein(libunilog-1.2.0-r10.aarch64): scriptlet start
%prein(libunilog-1.2.0-r10.aarch64): execv(/bin/sh) pid 30798
%prein(libunilog-1.2.0-r10.aarch64): waitpid(30798) rc 30798 status 0
Updating / installing...
   1:libunilog-1.2.0-r10              ################################# [100%]
%post(libunilog-1.2.0-r10.aarch64): scriptlet start
%post(libunilog-1.2.0-r10.aarch64): execv(/bin/sh) pid 30805
%post(libunilog-1.2.0-r10.aarch64): waitpid(30805) rc 30805 status 0
root@u96v2:~/centos# rpm -ivh --force libxir-1.2.0-r12.aarch64.rpm
Verifying...                          ################################# [100%]
Preparing...                          ################################# [100%]
%prein(libxir-1.2.0-r12.aarch64): scriptlet start
%prein(libxir-1.2.0-r12.aarch64): execv(/bin/sh) pid 30905
%prein(libxir-1.2.0-r12.aarch64): waitpid(30905) rc 30905 status 0
Updating / installing...
   1:libxir-1.2.0-r12                 ################################# [100%]
%post(libxir-1.2.0-r12.aarch64): scriptlet start
%post(libxir-1.2.0-r12.aarch64): execv(/bin/sh) pid 30948
%post(libxir-1.2.0-r12.aarch64): waitpid(30948) rc 30948 status 0
root@u96v2:~/centos# rpm -ivh --force libtarget-factory-1.2.0-r10.aarch64.rpm
Verifying...                          ################################# [100%]
Preparing...                          ################################# [100%]
%prein(libtarget-factory-1.2.0-r10.aarch64): scriptlet start
%prein(libtarget-factory-1.2.0-r10.aarch64): execv(/bin/sh) pid 31020
%prein(libtarget-factory-1.2.0-r10.aarch64): waitpid(31020) rc 31020 status 0
Updating / installing...
   1:libtarget-factory-1.2.0-r10      ################################# [100%]
%post(libtarget-factory-1.2.0-r10.aarch64): scriptlet start
%post(libtarget-factory-1.2.0-r10.aarch64): execv(/bin/sh) pid 31021
%post(libtarget-factory-1.2.0-r10.aarch64): waitpid(31021) rc 31021 status 0
root@u96v2:~/centos# rpm -ivh --force libvart-1.2.0-r16.aarch64.rpm
Verifying...                          ################################# [100%]
Preparing...                          ################################# [100%]
%prein(libvart-1.2.0-r16.aarch64): scriptlet start
%prein(libvart-1.2.0-r16.aarch64): execv(/bin/sh) pid 31076
%prein(libvart-1.2.0-r16.aarch64): waitpid(31076) rc 31076 status 0
Updating / installing...
   1:libvart-1.2.0-r16                ################################# [100%]
%post(libvart-1.2.0-r16.aarch64): scriptlet start
%post(libvart-1.2.0-r16.aarch64): execv(/bin/sh) pid 31095
%post(libvart-1.2.0-r16.aarch64): waitpid(31095) rc 31095 status 0
root@u96v2:~/centos#
6.6 ディレクトリーを移動して、pythonにて実行します。計算速度の結果が出ます。
cd ~/target_zcu102/
python3 app_mt.py -m model_dir/dpu_customcnn.elf
root@u96v2:~/centos# cd ~/target_zcu102/
root@u96v2:~/target_zcu102# python3 app_mt.py -m model_dir/dpu_customcnn.elf
Command line options:
 --image_dir :  images
 --threads   :  1
 --model     :  model_dir/dpu_customcnn.elf
Pre-processing 10000 images...
Starting 1 threads...
FPS=2656.22, total frames = 10000 , time=3.7648 seconds
Correct: 9767 Wrong: 233 Accuracy: 0.9767
root@u96v2:~/target_zcu102#
6.7 マルチスレッドでする場合、-tのオプションをつけて、数字を追加します。
python3 app_mt.py -m model_dir/dpu_customcnn.elf -t 2
速度が早くなりました。
7.USBカメラで、数字認識。
今度は、C++を使った例で、USBカメラからの画像を取り込み、それを数字判定します。
USBカメラはUltra96V2のUSB端子に差し込んで使ってください。
7.1 ソースファイルをダウンロードします。
target_mnist_live_io.zip
7.2 このファイルをUltra96V2に、ファイル転送します。MobaXtermか、scpコマンドを使ってください。SCPコマンドの例をします。
scp target_mnist_live_io.zip root@192.168.7.2:~
7.3 Ultra96V2で、ファイルを解凍します。
unzip target_mnist_live_io.zip
7.4 モデルファイルのコピーを行います。学習データは同じものを使えますので、そのまま使えます。
cp ./target_zcu102/model_dir/dpu_customcnn.elf target/mnist_live_io/model/
7.5 ディレクトリーを移動します。
cd target/mnist_live_io/
7.6 コンパイルします。少し時間が長くかかります。
make
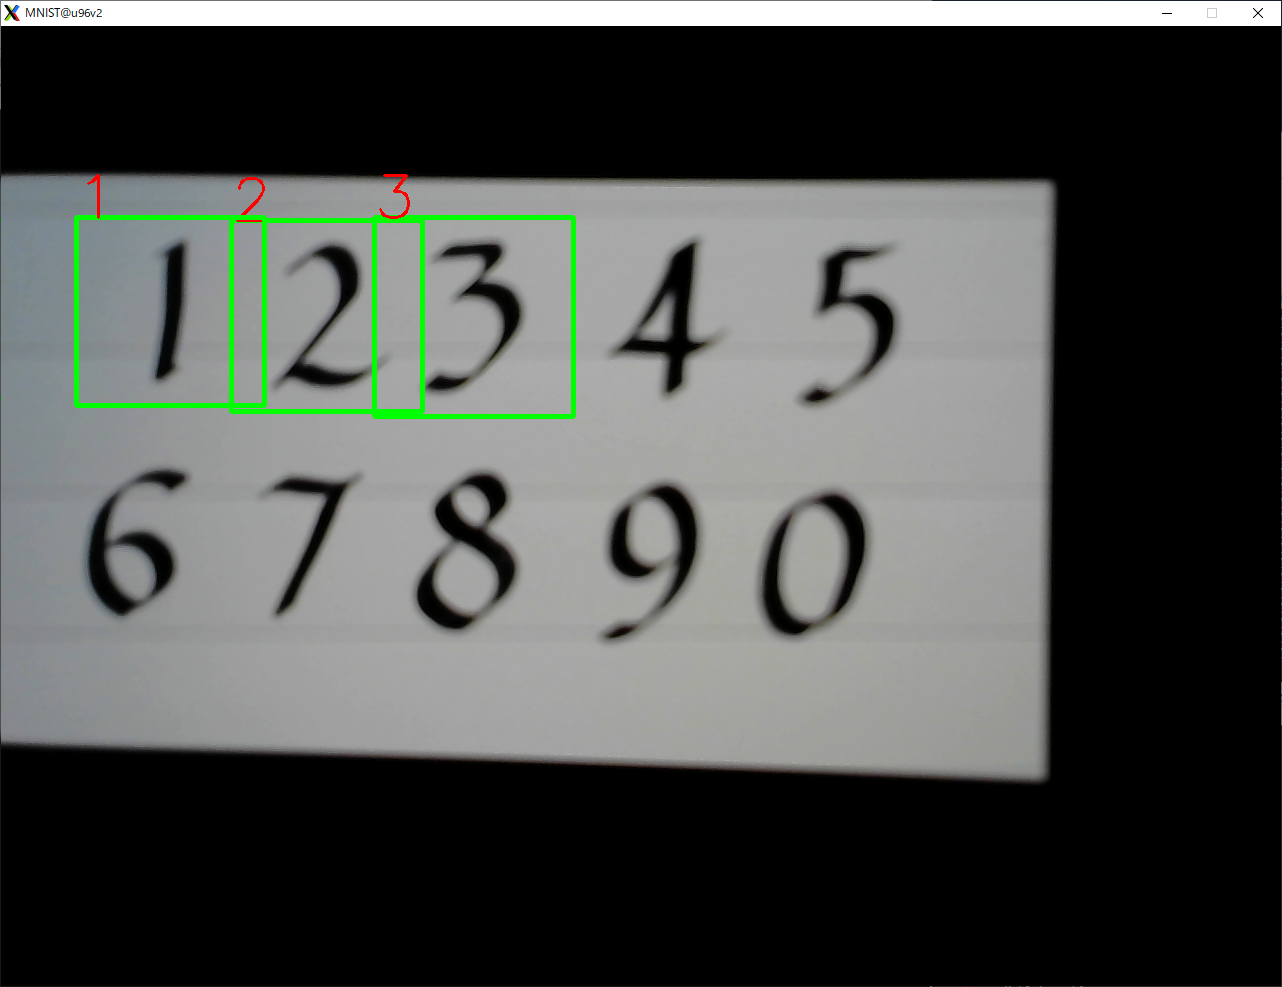
7.7 実行します。少し遅れて、パソコン上から画面が出てきて、数字が認識されます。(モデルが低精度なので、認識率は悪いですが)
./mnist_live_io
以下、実行までのログと実際の画像を表示しておきます。
root@u96v2:~# unzip target_mnist_live_io.zip
Archive:  target_mnist_live_io.zip
   creating: target/
   creating: target/common/
  inflating: target/common/dputils.cpp
  inflating: target/common/dputils.h
  inflating: target/common/dputils.py
   creating: target/mnist_live_io/
  inflating: target/mnist_live_io/Makefile
  inflating: target/mnist_live_io/mnist_live_io
  inflating: target/mnist_live_io/mnist_live_io.cc
   creating: target/mnist_live_io/model/
root@u96v2:~# cp ./target_zcu102/model_dir/dpu_customcnn.elf target/mnist_live_io/model/
root@u96v2:~# cd target/mnist_live_io/
root@u96v2:~/target/mnist_live_io# make
mkdir -p /home/root/target/mnist_live_io/build
make: Warning: File 'mnist_live_io.cc' has modification time 1113385 s in the future
g++ -c -O2 -Wall -Wpointer-arith -std=c++0x -ffast-math -I../common/ -mcpu=cortex-a53 mnist_live_io.cc -o /home/root/target/mnist_live_io/build/mnist_live_io.o
g++ -c -O2 -Wall -Wpointer-arith -std=c++0x -ffast-math -I../common/ -mcpu=cortex-a53 /home/root/target/common/dputils.cpp -o /home/root/target/mnist_live_io/build/dputils.o
g++ -O2 -Wall -Wpointer-arith -std=c++0x -ffast-math -I../common/ -mcpu=cortex-a53 /home/root/target/mnist_live_io/build/mnist_live_io.o /home/root/target/mnist_live_io/build/dputils.o /home/root/target/mnist_live_io/model/dpu_customcnn.elf -o mnist_live_io -ln2cube -lhineon -lopencv_videoio  -lopencv_imgcodecs -lopencv_highgui -lopencv_imgproc -lopencv_core -lpthread
make: warning:  Clock skew detected.  Your build may be incomplete.
root@u96v2:~/target/mnist_live_io# ./mnist_live_io
7.8 電源を切るときは次のコマンドを忘れないでください。
shutdown -h now