0. はじめに
この記事はHowtelevision Advent Calendar 202224日目の記事です。
はじめまして、株式会社HowTelevisionの長期インターンをしております小川です。
現在はMondというQ&Aサービスで機械学習プロジェクトを担当していて、刺激的な毎日を過ごしております💪
2022年の終わりが見えてきた時期なので、これまでの業務を振り返って
最も困難であった「TFXでHugging Faceを使う難しさ」について書いていこうと思います!
初めての技術記事の投稿のため、不慣れな所や不備などが生じるかもしれませんが
是非ともコメントにてフィードバックをいただけると幸いです!
この記事に含まれる内容
- TFX単体の技術的な難しさについて
- TFXの実装コード例(中級者向け)
- Runtime Parameter
- Custom components
- TFXでHugging Faceのモデルを使う際の注意点
目次
1. MondにおけるML Ops
私が携わるMondではユーザが投稿した質問を自動でカテゴリに分類する機能を、Hugging FaceのTransformersで提供されているモデルをファインチューニングして実装しています。
質問投稿を自動分類するため、新しく現れる言葉(ex: 「ポケットモンスター スカーレット・バイオレット」)に対応する必要があり、継続的なモデルの学習とデプロイが必須になっています。
現在Mondでは機械学習のメンバーが少ないため、ルーティンワークを減らしてやるべきタスクに集中する必要があります。そのためTFXによる機械学習パイプラインを実装して、ML Opsを実現することになりました。
2. TFXについて

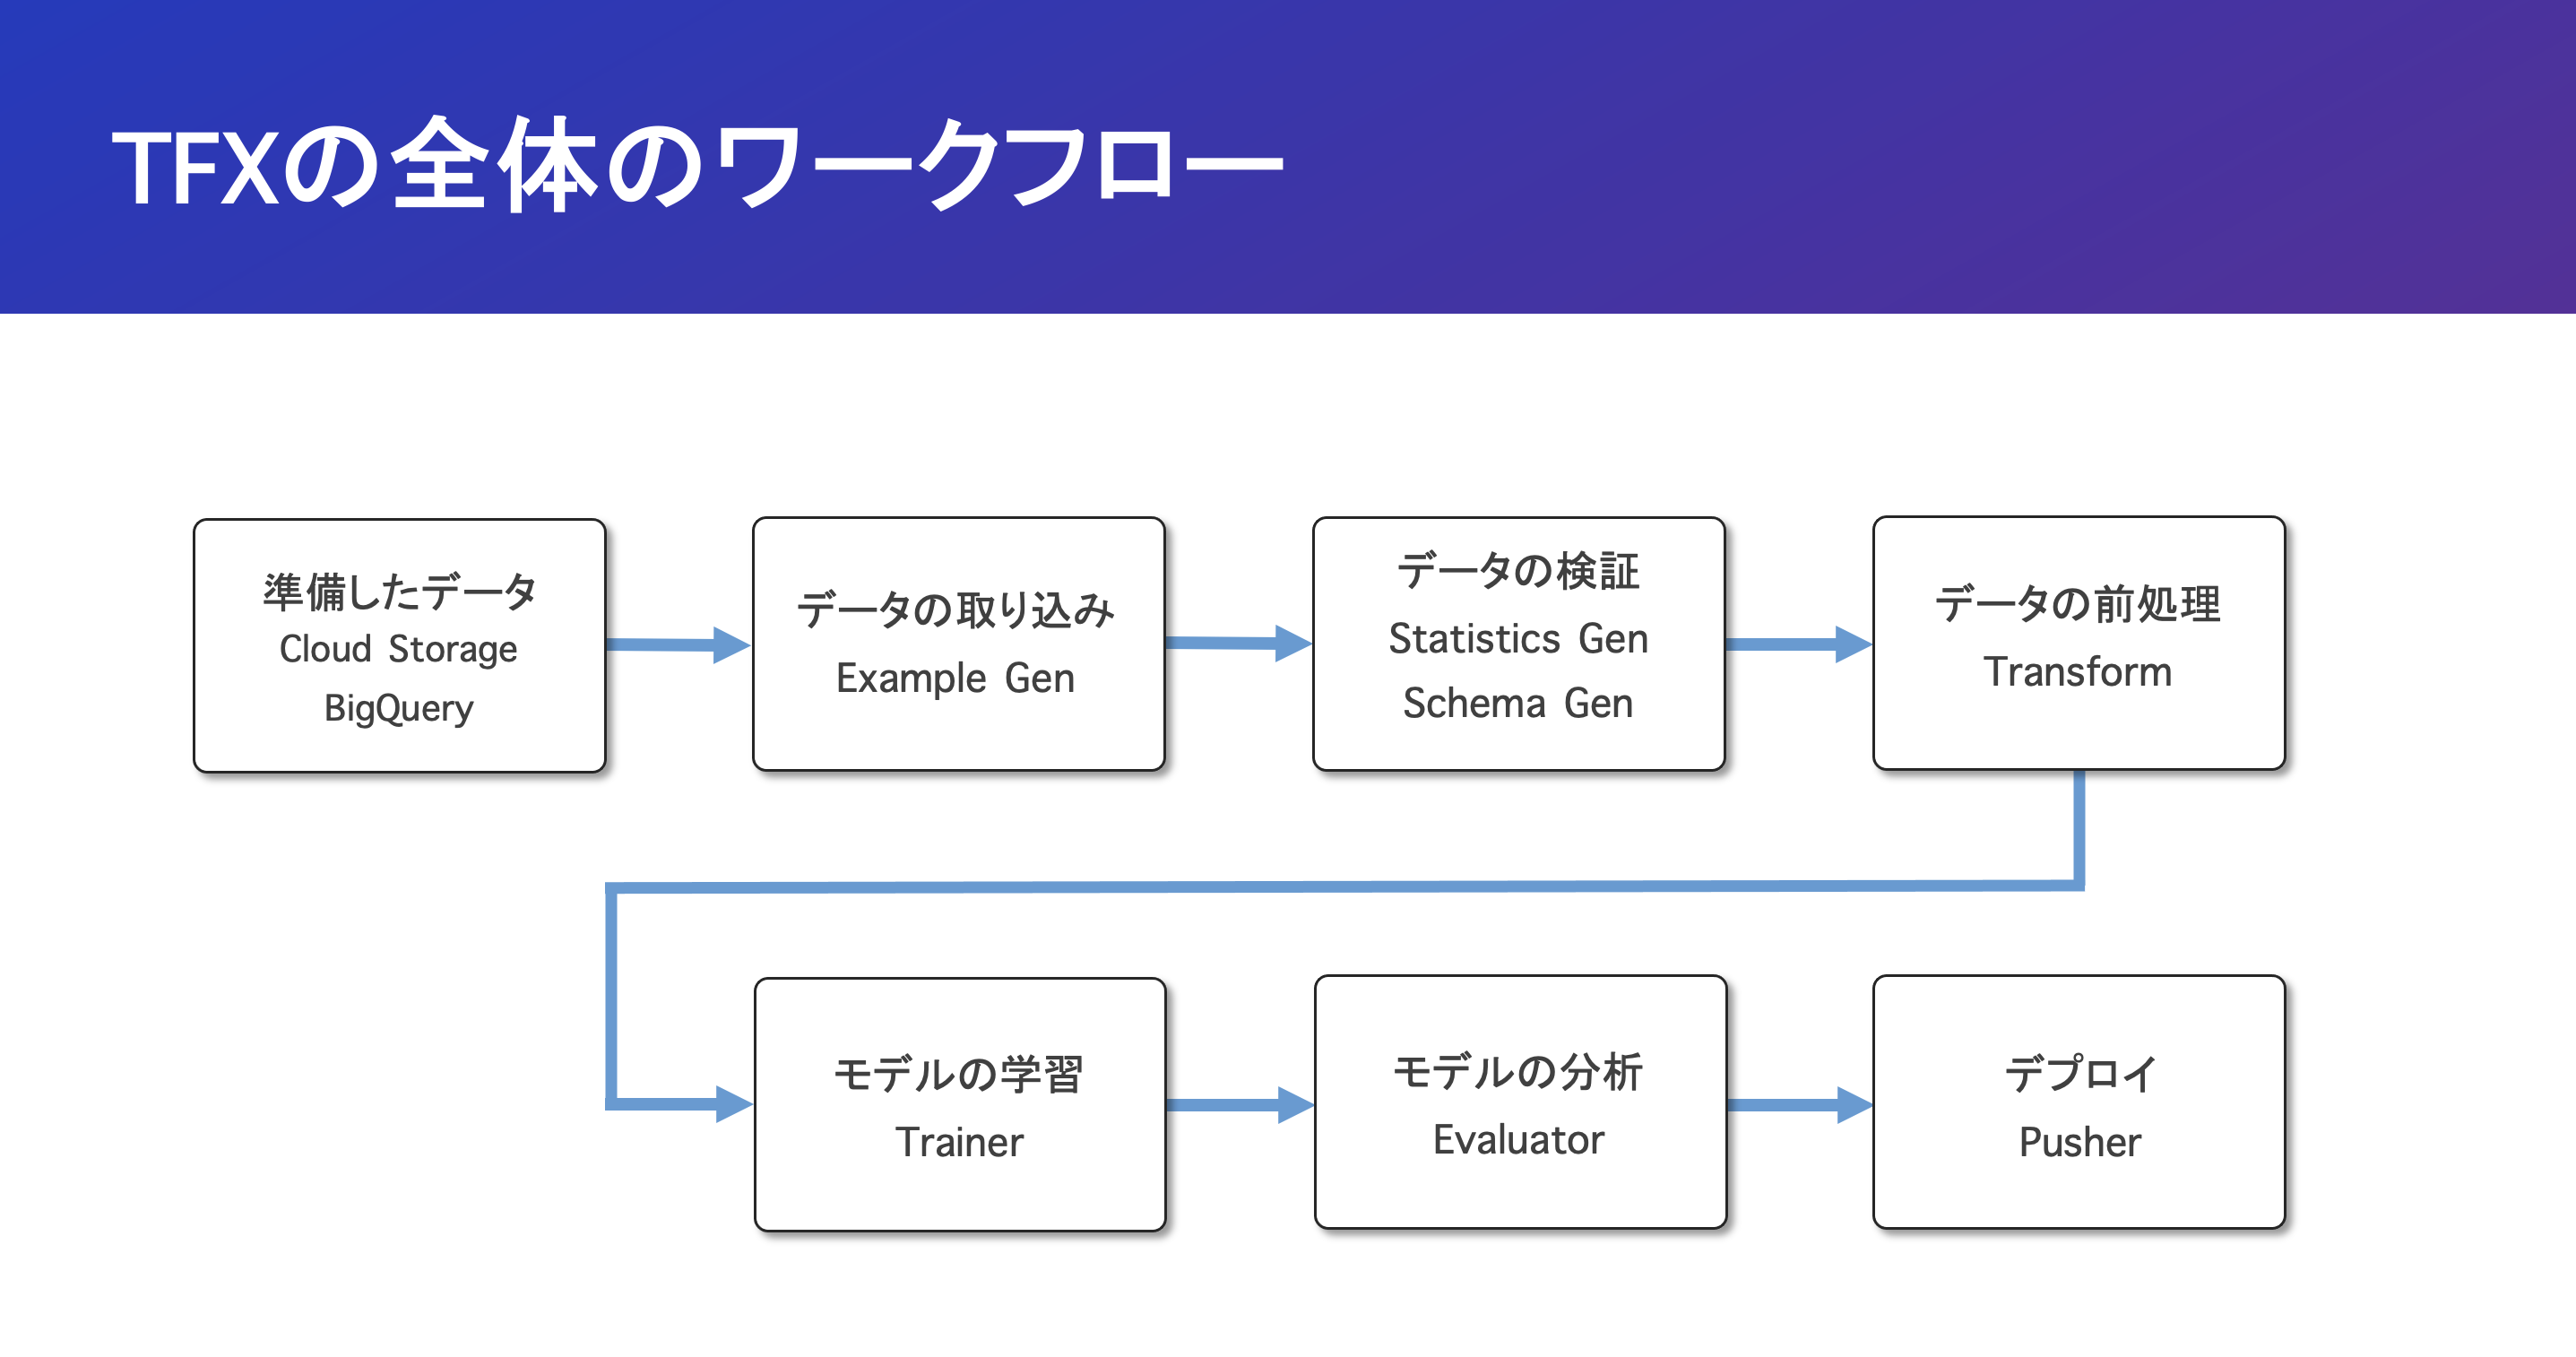
TFXとは「データの取り込みからデプロイ」までのワークフローをEnd-to-EndでサポートするML Pipelineを実現するために開発されたフレームワークです。
TFXで実装されたML Pipelineは、KubeflowやApache Airflowといったパイプラインオーケストレーション上で実行されます。
現在では独自にK8sのクラスタを作成せずにGCPのVertex AI Pipelineを利用することで、TFXのパイプラインをサーバレスで実行できるため、保守運用の面で取り入れやすい状況だと思います。
3. ML Opsにおける難しさ
3.1 TFX独自の難しさについて
これからTFX独自の課題として3つ紹介します。
これらは全て私がTFXを導入する際に感じたものになります。
3.1.1. 日本語の記事が少ない
これについては読んで字の如くであり、特にカスタムコンポーネント・HyperParameter・Runtime Parameterについてはほとんど見つかりませんでした。
参考文献のセクションにてTFXに関する日本語の資料を集めているので、日本語の資料をお探しの方は確認してみてください!
3.1.2. TFXのstandard componentsの1つのTransformが曲者
これはTransformコンポーネントでの前処理は全てTensorFlowのオペレーションで処理する必要があることを指します。
Transformコンポーネントは、学習時と推論時に同じ前処理ができるように、処理をあらかじめTensorFlowのグラフに変換し、TensorFlowのモデルに組み込めるようにしています。そしてこのTensorFlowのグラフの作成をするためには全ての処理をTensorFlowのオペレーションで行う必要があります。これにより実装には慣れと処理の制限が生じているため、扱いが難しいものとなっています。
3.1.3. TFXの詳細に関するドキュメントの不足
TFXの大まかな使い方に関しては、Tensorflow Extendedの公式のチュートリアルが充実してきていますが、より詳細なRuntime Parameterやカスタムコンポーネントに関しては、まだまだ不十分に感じます。
例えばRuntime Parameterについて紹介します。
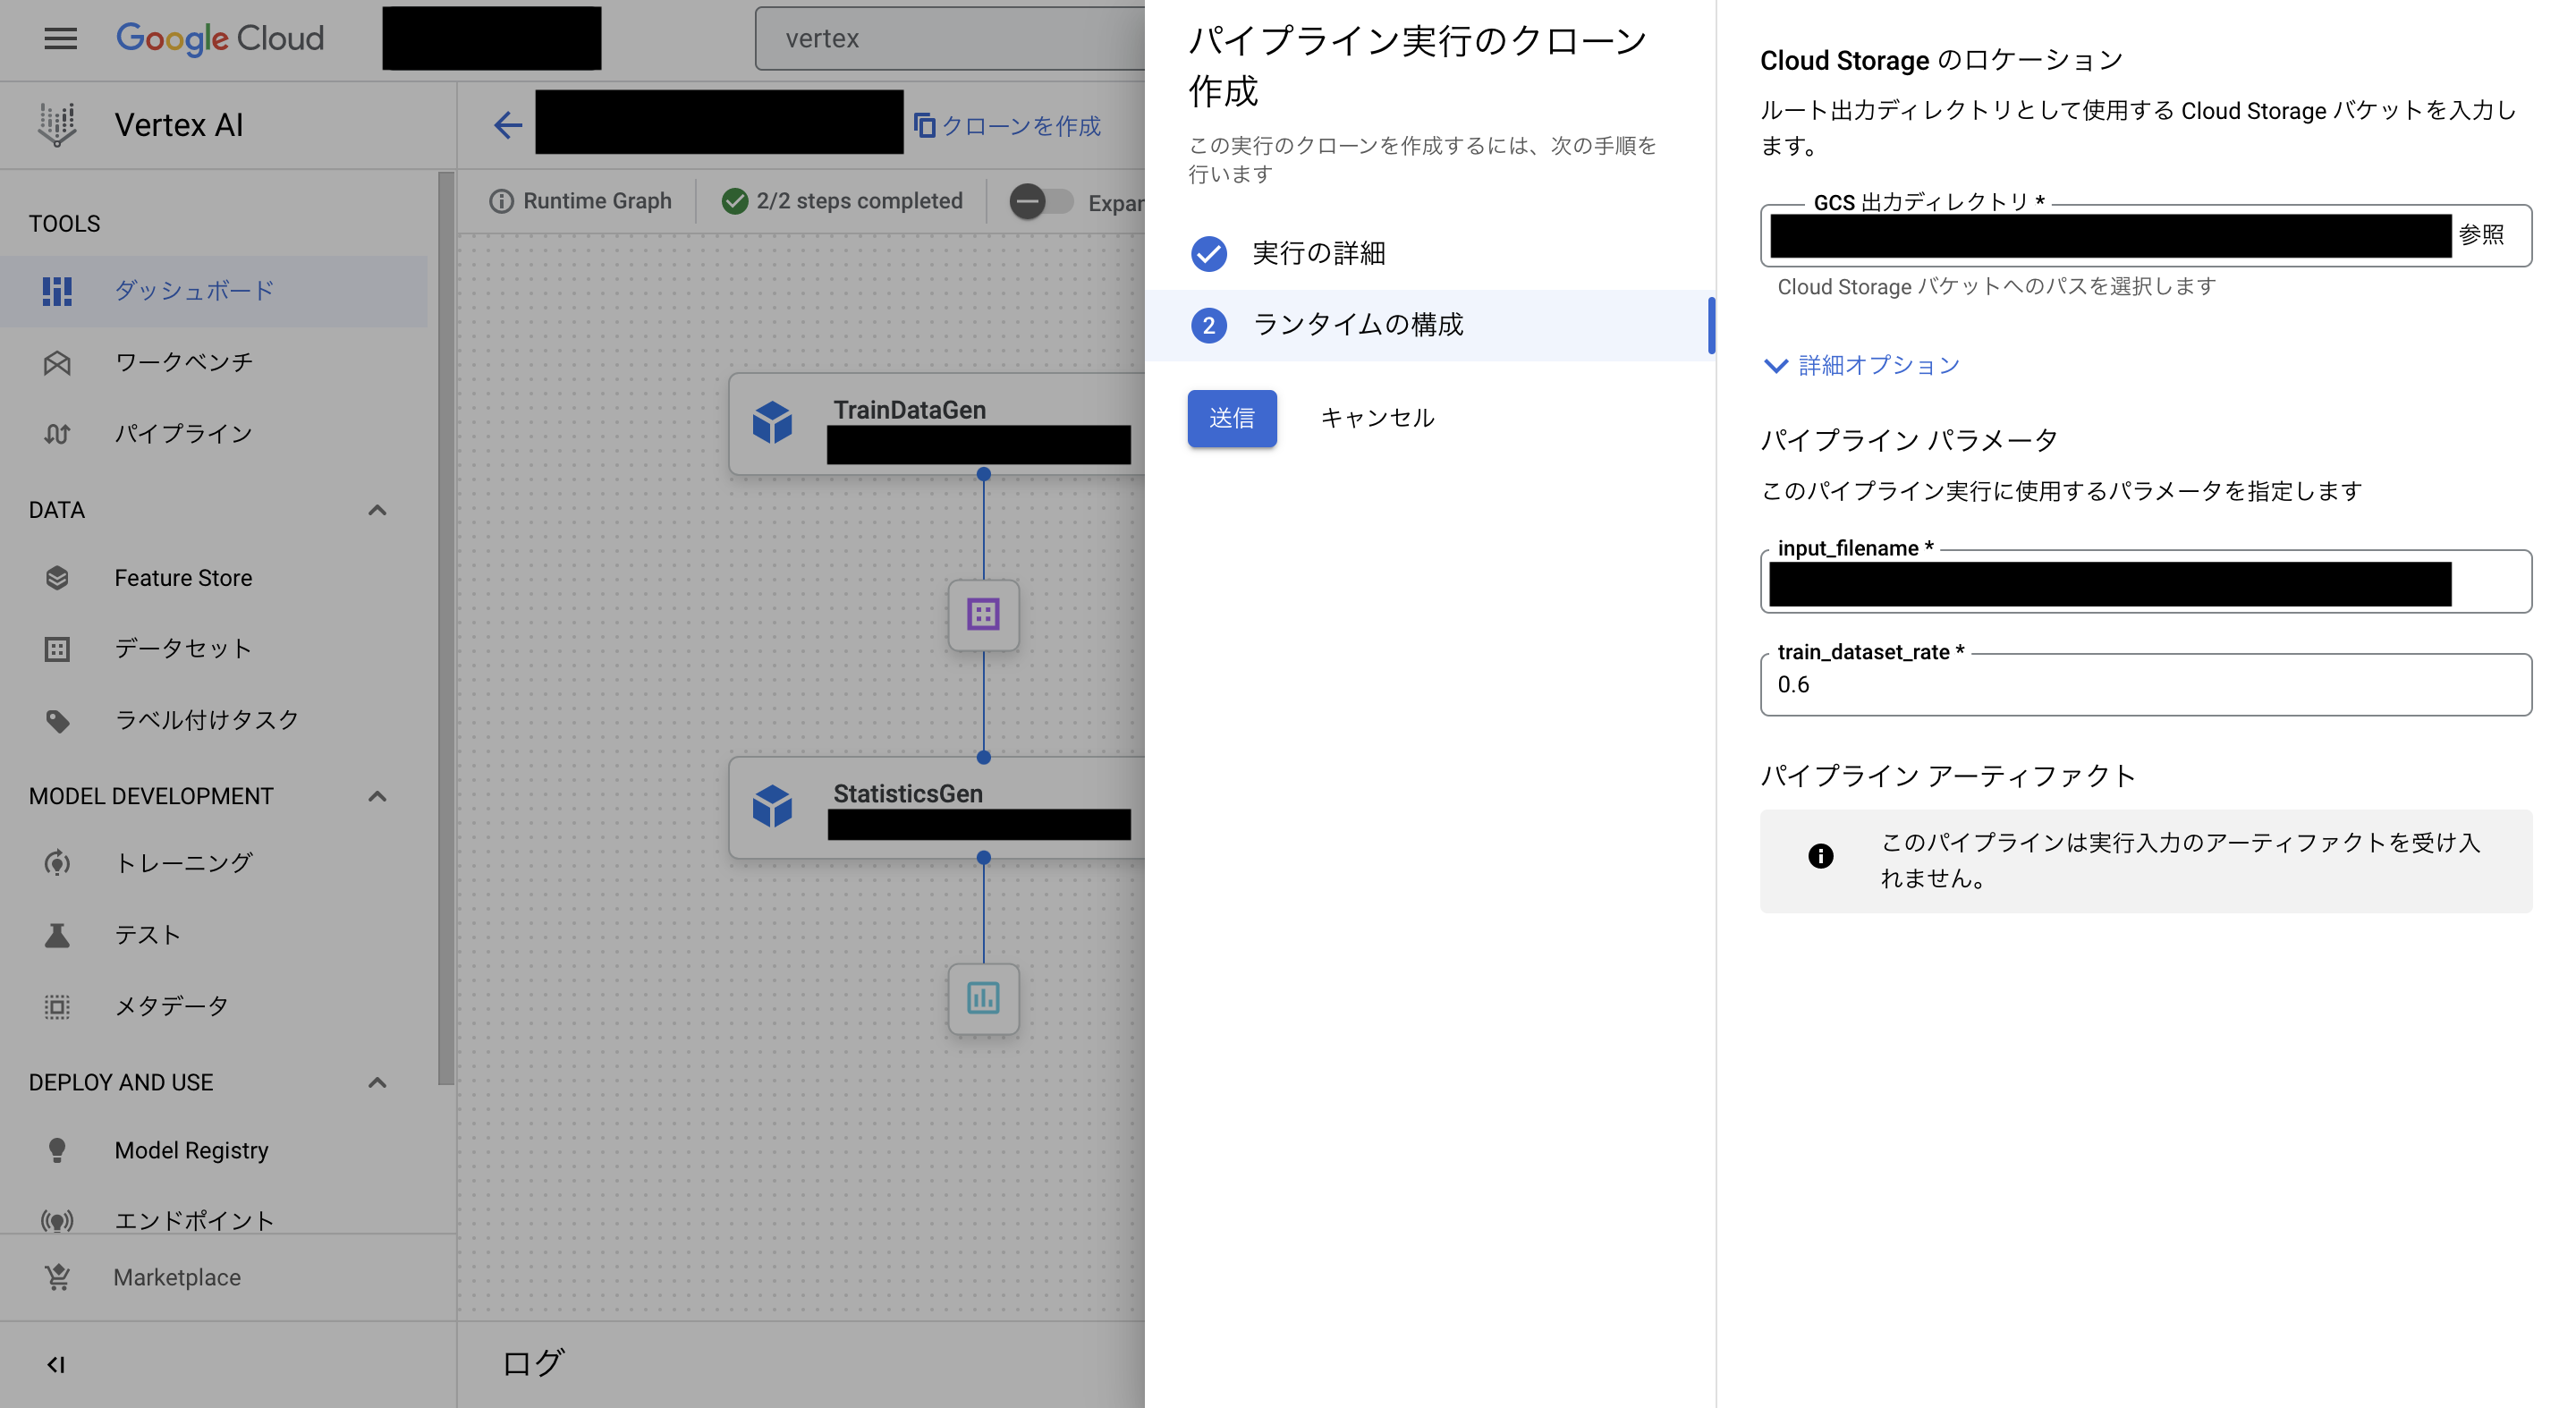
Runtime Parameterとは下の画像のように、パイプラインを実行するときに指定できるParameterのことです。

上記はTFXのパイプラインを「KubeflowV2DagRunner」で実行できるようにコンパイルしたものであるものの、公式ページのRuntime Parameterに関しては以下の文言が書かれてありました。
Currently only supported on KubeflowDagRunner.
Runtime Parameterの使い方を探していた際は、この情報に惑わされ「KubeflowV2DagRunner」では使えないという間違った解釈をしてしまい、多くの時間を無為にしてしまいました...
(Runtime Parameterの使い方に関してはこちらのgithubページで見つけました)←大事
3.2 Hugging Faceを利用するとき独自の難しさについて
最大の課題: 「テキストのトークン化という前処理が必要」
Hugging Face TransformersのText Modelを利用する場合は、下記のようなコードでトークン化する必要があります。しかしHugging FaceのTokenizerクラスは、Tensorflowのオペレーションで実装されていない+TFXコンポーネントもこれをサポートしていないため、大きな課題となります。
from transformers import AutoTokenizer
tokenizer = AutoTokenizer.from_pretrained(MODEL_NAME)
# トークン化
tokenized = tokenizer(input_text)

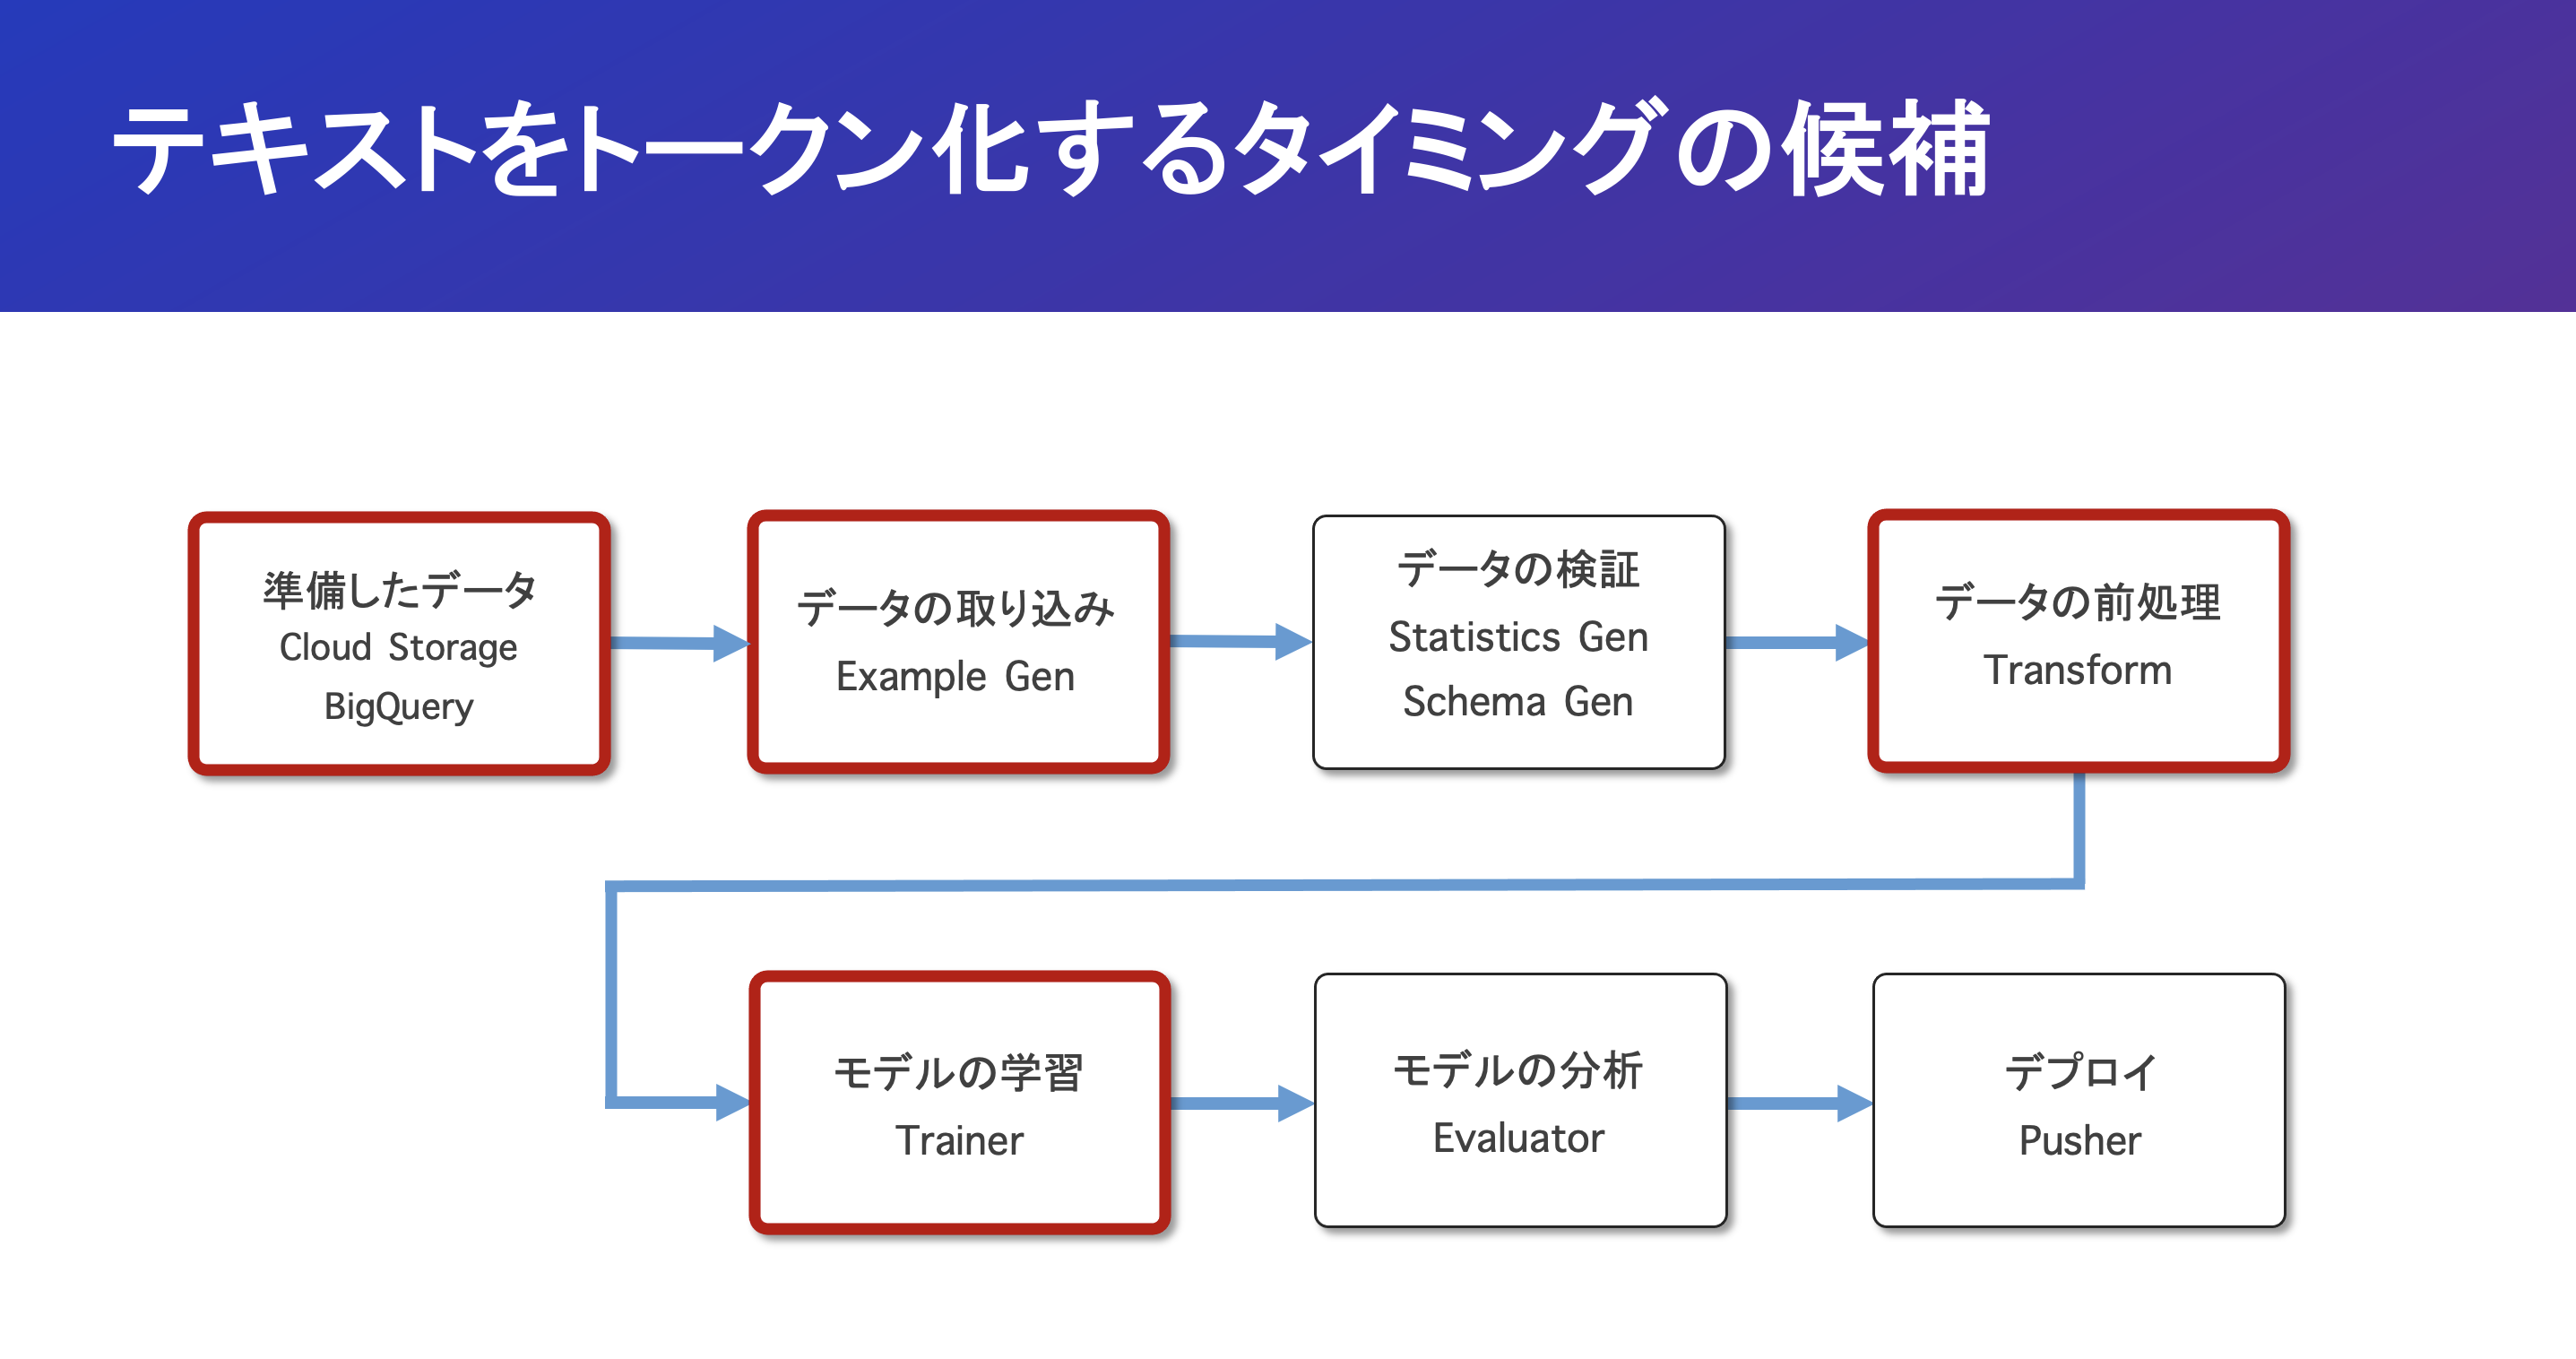
TFXの中でテキストをトークン化するタイミングの候補は4つありますが
Mondではこの内の「データの取り込み」にてトークン化の処理をすることに決めました。
トークン化を実施するタイミングの各候補について以下の特徴があります。
3.2.1 「データ準備」の時の場合
Cloud StorageやBigQuery上に取り込むデータとして保存するときに、トークン化情報を入れた場合2つの問題が生じます。
- csvやBigQuery等のテーブルデータにトークン化データを用意することが大変
- 別途Dataflowなどによってトークン化処理を行う必要がある
特にテーブルデータを利用する場合は、データが複雑になりやすい+データの容量が大きくなるという懸念があります。TF Recordなどによって一応回避は可能ですが、保存するデータが増えるという点は同じなので、今回は見送りました。
3.2.2 「データの取り込み」の時の場合
「データ取り込み」の時にトークン化処理することには2つのメリットがあります。
- Apache Beamによる分散処理を実現できる
- パイプラインの一連の流れで処理できる
これにより大規模なデータセットを取り扱う場合でも効率的にトークン化できます。
一方でこのタイミングの場合ならではのデメリットもあります。
- カスタムExecutorなたComponentを実装する必要がある
ただでさえ日本語の記事が少ない中でカスタムExecutorに関する資料もほとんどない状況のため、技術的なキャッチアップが必要であり、ML Opsが属人化しないようにする取り組みも必要になります。
この部分については、この記事の一例で紹介するつもりなので参考にしてみてください。
3.2.3 「データの前処理」の時の場合
TFXのTransformコンポーネントはTensorflowオペレーションのみを受け付けるため、 Hugging FaceのTokenizerはこれに準拠しておらず、使用不可の状態です。
現在Tensorflow Textのライブラリの中に「BertTokenizer」が作成されていて、Tensorflowオペレーションに対応したTokenizerが出現することが予想されます。もし使用しているモデルにあったTokenizerが利用可能になった場合は、「データの前処理」にてトークン化することが最善となります。
3.2.4 「モデルの学習」の時の場合
「モデルの学習」の時もトークン化処理する候補となりますが、このコンポーネントはハイスペックなマシンが設定されるため、コスト面では余分な処理をしない方が好ましいです。そのため、「モデルの学習」の時よりも「データの取り込み」の方を選びました。
4. TFXの具体例
これまでの内容のように、TFXは日本語の記事が足りないという問題があるので、この章で2つ具体例を紹介していこうと思います。特に2つ目は「データ取り込み」の時に分散処理のApache Beamを利用してトークン化するという実装を、シンプルにしたものとなります。
- TFXの日本語資料不足 → Runtime Parameterの使い方
- データ取り込み時のトークン化 → カスタムコンポーネントの作り方
※内容はTFX中級者のレベルとなります
4.1. Runtime Parameterを利用したCsvExampleGenのパス指定
 Runtime Parameterはパイプラインの実行の時に指定できるParameterのことです。これを利用することでパイプラインを再コンパイルせずに別のパラメータでパイプラインが実行できるようになります。
今回はCsvExampleGenのベースディレクトリをRuntime Parameterで指定できるように実装します。
Runtime Parameter実装の補足コード
Colabでインストール必要なライブラリ(ランタイムの再起動が必要)
!pip install --upgrade pip
!pip install --upgrade -q "tfx[kfp]<2"
!pip install -q tfx
!pip install -q transformers==4.25.1
メインの実装コードは以下のようになっており、
Componentの引数にRuntimeParameterのデータ型を渡す形となります。
from tfx import v1 as tfx
from tfx.orchestration import pipeline, data_types
from tfx.orchestration.kubeflow.v2 import kubeflow_v2_dag_runner

# Arbitrary name of the pipeline
PIPELINE_NAME = <PIPELINE_NAME> # ex: "runtime-parameter-pipeline"

# The root directory for the pipeline outputs
PIPELINE_ROOT = <PIPELINE_ROOT> # ex: "gs://gcs-location/pipeline-root"

# Specific directory which contains CSV files.
INPUT_BASE = <INPUT_BASE_PATH> # ex: "gs://gcs-locaton/data"

################################################################
# Runtime Parameterの使用方法
# 入力する引数にRuntime Parameterを指定する
################################################################
example_gen = tfx.components.CsvExampleGen(
    input_base = data_types.RuntimeParameter(
                      name="input_base",
                      default=INPUT_BASE,
                      ptype=str)
)

statistics_gen = tfx.components.StatisticsGen(
    examples = example_gen.outputs['examples']
)

pipeline_components = [
    example_gen,
    statistics_gen
]

compiled_pipeline = pipeline.Pipeline(
    pipeline_name=PIPELINE_NAME,
    pipeline_root=PIPELINE_ROOT,
    components=pipeline_components
)

runner = kubeflow_v2_dag_runner.KubeflowV2DagRunner(
    config=kubeflow_v2_dag_runner.KubeflowV2DagRunnerConfig(),
    output_filename=f"{PIPELINE_NAME}.json"
)

runner.run(compiled_pipeline, write_out=True)
コンパイルされたパイプラインはディレクトリ上に出力されるので、
GCPのVertex AI Pipelineへアップロードして実行することで試す事ができます。
トークン化処理を取り入れたカスタムFileBasedExampleGenの実装
データの取り込みの時にトークン化処理を実装するために、カスタムのExecutorを実装して、既存のBase componentであるFileBasedExampleGenのExecutorを上書きします。完全にカスタムのcomponentを実装することは可能ですが、既存のcomponentであるFileBasedExampleGenを再利用することでを利用することでApache Beamの恩恵を受けることができるので、今回は後者の実装例を紹介します。
カスタムコンポーネントをパイプラインで実行するためには、カスタムコンポーネントのコードが入ったコンテナイメージを利用する必要があります。(私はこれを知らずに頭を悩ませ続けました...)
そのため開発の流れは以下のようになります。
- カスタムコンポーネントの実装
- カスタムコンポーネントのコードを含んだコンテナイメージのアップロード
- パイプラインのコンパイルと実行
これに沿ってサンプルコードを書きます。
入力するcsvファイルの中身の例
| content | label | |
|---|---|---|
| 1 | スペインとドイツに日本代表が勝った! | 1 |
| 2 | Bit Coinの価値が大暴落してしまった | 2 |
| 3 | Twitter大丈夫か...? | 2 |
| 4 | 納豆食べた | 3 |
| ... | ... | ... |
labelについて
1→ポジティブ
2→ネガティブ
3→ニュートラル
カスタムFileBasedExamplGeneの補足のコード
Colabでインストール必要なライブラリ(ランタイムの再起動が必要)
!pip install --upgrade pip
!pip install --upgrade -q "tfx[kfp]<2"
!pip install -q tfx
!pip install -q transformers==4.25.1
CSV fileを読み込んでTF Recordに変換するための処理関数
import tensorflow as tf
from transformers import AutoTokenizer

# Specify the model
MODEL_NAME = <MODEL_NAME> #ex: "bert-base-uncased"

tokenizer = AutoTokenizer.from_pretrained(MODEL_NAME)

def _bytes_feature(value):
  return tf.train.Feature(bytes_list=tf.train.BytesList(value=[value]))

def _int64_feature(value):
  if not isinstance(value, list):
    value = [value]
  return tf.train.Feature(int64_list=tf.train.Int64List(value=value))

def _tensor_to_list(value):
  return list(value.numpy())

def _tokenize_content(content):
  content = content.decode()
  encoded = tokenizer(
    content,
    padding='max_length',
    truncation=True,
    max_length=MAX_SEQ_LENGTH,
    return_tensors="tf"
  )
  return (encoded["input_ids"], encoded["attention_mask"])

def _convert_to_example(input_ids, attention_mask, label, content):
    example = tf.train.Example(
      features=tf.train.Features(
          feature={
              'input_ids': _int64_feature(_tensor_to_list(input_ids)),
              "attention_mask": _int64_feature(_tensor_to_list(attention_mask)),
              'label': _int64_feature(label),
              'content': _bytes_feature(content)
    }))
    return example


def get_tokenized_example(content: str, label: int):
  if type(label) == str: label=int(label)
  content = content.encode()
  input_ids, attention_mask = _tokenize_content(content)
  input_ids, attention_mask = tf.squeeze(input_ids), tf.squeeze(attention_mask)
  example = _convert_to_example(input_ids, attention_mask, label, content)
  return example
Colab上でカスタムコンポーネントのディレクトリを作成する
_custom_example_gen_component_file = 'custom_example_gen.py'
%%writefile {_custom_example_gen_component_file}

# 以下2つのコードを含める
# serialize.py(補足コードに記載)
# custom_components/tokenize_example_gen.pyのコード(補足コード外で記載)
!mkdir -p ./custom_components
!touch ./custom_components/__init__.py
!cp -r {_custom_example_gen_component_file} custom_components
1. Executor上書きによるカスタムFileBasedExampleGenの実装
import os
import io
import csv
from typing import Dict, Text, Any
import apache_beam as beam
from tfx.types import standard_component_specs
from tfx.components.example_gen.base_example_gen_executor import BaseExampleGenExecutor

@beam.ptransform_fn
def content_to_example(
      pipeline: beam.Pipeline,
      exec_properties: Dict[Text, Any],
      split_pattern: Text,
      ) -> beam.pvalue.PCollection:

    class GenerateExample(beam.DoFn):
      def __init__(self):
        pass

      def process(self, element):
        yield get_tokenized_example(element["content"], element["label"])

    def get_csv_reader(readable_file):
      csv_file = beam.io.filesystems.FileSystems.open(readable_file)
      csv_reader = csv.reader(io.TextIOWrapper(csv_file))
      next(csv_reader)
      return csv_reader

    input_base_uri = exec_properties[standard_component_specs.INPUT_BASE_KEY]
    csv_pattern = os.path.join(input_base_uri, split_pattern)
    csv_files = tf.io.gfile.glob(csv_pattern)

    example = (pipeline
            | "Read" >> beam.Create(csv_files)
            | "ReadCSV" >> beam.FlatMap(get_csv_reader)
            | 'Split by delimeters' >> beam.Map(lambda x: {"content":x[1], "label":x[2]})
            | "Generate example" >> beam.ParDo(GenerateExample())
    )
    return example

class TokenizeExampleGenExecutor(BaseExampleGenExecutor):
    def GetInputSourceToExamplePTransform(self) -> beam.PTransform:
        return content_to_example
2. コンテナイメージのアップロード
(i) カスタムコンポーネント(./custom_components/tokenize_example_gen.py)を取り入れる
FROM gcr.io/tfx-oss-public/tfx:1.10.0
RUN mkdir -p custom_components
COPY custom_components/* ./custom_components/
RUN pip install --upgrade google-cloud-aiplatform google-cloud-storage
RUN pip install transformers==4.25.1
(ii) GCPのContainer RegistryまたはArtifact Registryにアップロード
# ex: TFX_IMAGE_URI = asia-northeast1-docker.pkg.dev/project_id/repository/image:v1.0.0"
!gcloud builds submit --tag $TFX_IMAGE_URI . --timeout=60m
3. pipelineを作成するためのスクリプト
# IMPORTANT!: コンテナ内で実行される時と同じファイルパスでimportする必要がある
from custom_components.custom_example_gen import TokenizeExampleGenExecutor

from tfx.orchestration import pipeline, data_types
from tfx.components.example_gen.component import FileBasedExampleGen

# The root directory for the pipeline outputs
PIPELINE_ROOT = <PIPELINE_ROOT> # ex: "gs://gcs-location/pipeline-root"

# Arbitrary name of the pipeline
PIPELINE_ROOT = <PIPELINE_ROOT> # ex: "runtime-parameter-pipeline"

# Specific directory which contains CSV files.
INPUT_BASE = <INPUT_BASE_PATH> # ex: "gs://gcs-locaton/data"


example_gen = FileBasedExampleGen(
  input_base=data_types.RuntimeParameter(
                      name="input_base",
                      default=INPUT_BASE,
                      ptype=str),
  custom_executor_spec=executor_spec.ExecutorClassSpec(TokenizeExampleGenExecutor)
)

statistics_gen = tfx.components.StatisticsGen(
  examples=example_gen.outputs['examples']
)

pipeline_components = [
    example_gen,
    statistics_gen
]

compiled_pipeline= pipeline.Pipeline(
    pipeline_name=PIPELINE_NAME,
    pipeline_root=PIPELINE_ROOT,
    components=pipeline_components
)

# Change the default image to the custom image which contains the custom component
runner = kubeflow_v2_dag_runner.KubeflowV2DagRunner(
    config=kubeflow_v2_dag_runner.KubeflowV2DagRunnerConfig(
        default_image=TFX_IMAGE_URI
    ),
    output_filename=f"{PIPELINE_NAME}.json"
)

runner.run(compiled_pipeline, write_out=True)
作成したパイプラインはGCPのVertex AI Pipeline上で実行できます。
パイプラインの実装コードはgcloudの設定やcloud buildの設定等を省略していますので、ご了承ください。
また注意点として、この方法でランタイムパラメータに 「訓練/評価のデータの割合」を指定することはできないので、学習コンポーネントにてHyper Parameterコンポーネントを使用する等の回避か完全なカスタムコンポーネントの作成が必要になります。
5. おわりに
この記事は今年のML Opsの業務を振り返りながら書いたのですが
改めてハウテレビジョンの長期インターンを通じて、私自身すごく成長した1年になったと感じました!
この記事ではML Opsについて紹介しましたが、それ以外にも新しいサービスを生み出すための機械学習のプロジェクトが進行しており、まだまだやることは山積みです!
もし機械学習や深層学習に興味があれば、是非参加して頂きたい限りです🔥
特に私の所属するMondは今年の8月にリリースされたばかりのサービスで、きっと挑戦してみたい事が多くあると思います!
なので一度Mondに訪れて、興味を持って頂けれたら幸いです(宣伝)
最後にHowTelevision Advent Calendarの企画に招待くださり
技術記事を書くという機会を提供くださった社員の方々に厚く御礼申し上げます!
参考文献
Vertex AI Pipelineがサーバレス方式:
https://cloud.google.com/vertex-ai/docs/pipelines/introduction
Runtime Parameterは「KubeflowDagRunner」のみ対応と書かれている公式ドキュメント
https://www.tensorflow.org/tfx/api_docs/python/tfx/v1/dsl/experimental/RuntimeParameter
Runtime Parameterの使い方を見つけたGCP公式のgithubページ
https://github.com/GoogleCloudPlatform/mlops-with-vertex-ai/blob/main/src/tfx_pipelines/runner.py
TFXの日本資料・書籍