概要
以前、Pythonスクリプトで__直接__TwitterAPIを叩いてみる記事を投稿しました。
PythonでTwitter API を利用していろいろ遊んでみる
しかし、これだと
- Consumer Key
- Consumer Secret
に加え、
- Access Token
- Access Token Secret
が必要なので__特定のユーザー__でしかAPI操作を出来ませんでした。
なので、今回はPythonのWebアプリフレームワークの「Django」を使って、__ブラウザ上__でTwitter認証をして__各アカウント単位の認証処理__を行うところまでを作ってみました。
Djangoとは
__ジャンゴ__と読みます。
思想としては、__model-view-templateデザインパターン__に沿って開発を行います。
__model-view-controller__と似ていますが少し違うようです。
(@udoooom さんご指摘ありがとうございます!)
また、非常に__開発をしやすい__フレームワークとなっており、インストール〜__Twitter認証成功__までを__数時間程度__で動くものを作ることが出来ました。
手順
開発環境
- Python == 3.5.1
- Django == 2.0.1
- social-auth-app-django == 2.1.0
また、TwitterAPIのConsumer情報は
PythonでTwitter API を利用していろいろ遊んでみる
で取得したものを__そのまま流用__しますので、まだ作成されていない方はまずはコチラの記事を参考に__Twitterアプリを作成__するところまで進めてください。
モジュールのインストール
とりあえず__大元__のDjangoフレームワークをインストールします。
pip install django
プロジェクトの作成
まずは__プロジェクト__を作成します。
django-admin startproject project
__プロジェクト作成直後__は以下のような__ディレクトリ構成__になっています。
.
└── project
    ├── manage.py
    └── project
        ├── __init__.py
        ├── settings.py
        ├── urls.py
        └── wsgi.py
DBのmigrate
Djangoには__DB__も含まれています。
デフォルトでは__sqlite3__が使われるようです。
まずは__migrate__を行いましょう。
cd myApp
python manage.py migrate
__正常__に完了します。

管理ユーザーの作成
次に__管理ユーザー__を作成します。
python manage.py createsuperuser
__ユーザー名/メールアドレス/パスワード/パスワード(確認)__の入力を求められるので良しなに。

サーバー起動
一旦、この状態で__サーバー__を起動してみましょう。
python manage.py runserver

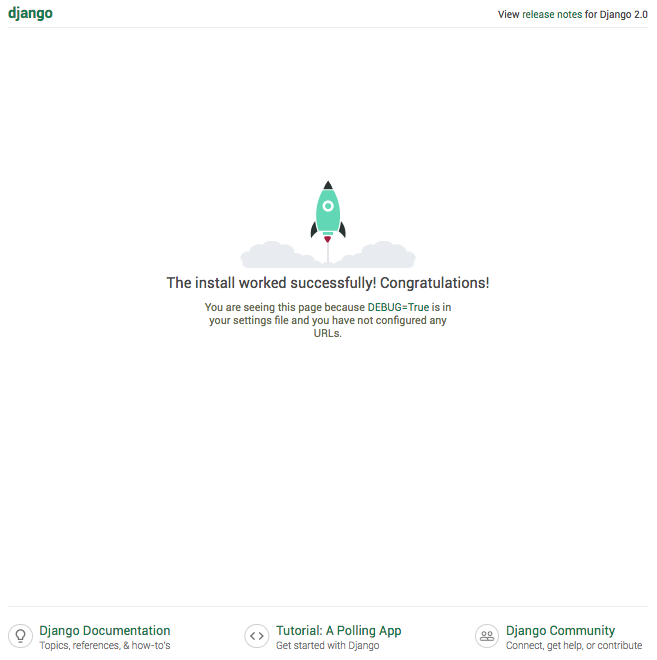
ブラウザで、http://localhost:8000 にアクセスすると以下のような__アプリ画面__が表示されると思います。
管理画面へのログイン
DJangoは__標準で管理画面__を用意してくれています。
http://localhost:8000/admin にアクセスします。
先ほど作成した__ユーザー名/パスワード__を入力してください。

ログイン成功!!!
アプリケーションの作成
次は__アプリケーション__を作成します。
Djangoでは、プロジェクトの中に__複数のアプリケーション__を作成することが出来るらしいです。
python manage.py startapp twitterManager
すると、__こんなディレクトリ構成__になります。
.
└── project
    ├── db.sqlite3
    ├── manage.py
    ├── project  # 共通
    │   ├── __init__.py
    │   ├── settings.py
    │   ├── urls.py
    │   └── wsgi.py
    └── twitterManager  # アプリ①
        ├── __init__.py
        ├── admin.py
        ├── apps.py
        ├── migrations
        │   └── __init__.py
        ├── models.py
        ├── tests.py
        └── views.py
そして、作成したアプリを__プロジェクト管理対象__に含めるために、以下ファイルを編集します。
INSTALLED_APPS = [
    'django.contrib.admin',
    'django.contrib.auth',
    'django.contrib.contenttypes',
    'django.contrib.sessions',
    'django.contrib.messages',
    'django.contrib.staticfiles',
+   'twitterManager.apps.TwittermanagerConfig',
]
そして、以下のコマンドでmigration対象に入れておきます。
python manage.py makemigrations twitterManager
python manage.py migrate twitterManager
※何も変更してないので差分は発生しませんが、念のためです。
Twitter認証に使うモジュールのインストール
今回はsocial-auth-app-djangoを使います。
pip install social-auth-app-django
認証情報の作成
以下のファイルを作成し、__TwitterアプリケーションのConsumer情報__を記載してください。
SOCIAL_AUTH_TWITTER_KEY = 'XXXXXXXXXXXXXXX'
SOCIAL_AUTH_TWITTER_SECRET = 'YYYYYYYYYYYYYY'
※gitリポジトリの場合、認証情報はgit管理外にしたいので、.gitignoreに追加しておきましょう。
**twitter.py
settings.pyの修正
こんな感じに変えます。
"""
Django settings for project project.

Generated by 'django-admin startproject' using Django 2.0.1.

For more information on this file, see
https://docs.djangoproject.com/en/2.0/topics/settings/

For the full list of settings and their values, see
https://docs.djangoproject.com/en/2.0/ref/settings/
"""

import os
+ from project.configs import twitter

# Build paths inside the project like this: os.path.join(BASE_DIR, ...)
BASE_DIR = os.path.dirname(os.path.dirname(os.path.abspath(__file__)))


# Quick-start development settings - unsuitable for production
# See https://docs.djangoproject.com/en/2.0/howto/deployment/checklist/

# SECURITY WARNING: keep the secret key used in production secret!
SECRET_KEY = 'XXXXXXXXXXXXXXXXXXXXXXXXXXXXXXXXX'

# SECURITY WARNING: don't run with debug turned on in production!
DEBUG = True

ALLOWED_HOSTS = []


# Application definition

INSTALLED_APPS = [
    'django.contrib.admin',
    'django.contrib.auth',
    'django.contrib.contenttypes',
    'django.contrib.sessions',
    'django.contrib.messages',
    'django.contrib.staticfiles',
    'twitterManager.apps.TwittermanagerConfig',
+   'social_django',
]

MIDDLEWARE = [
    'django.middleware.security.SecurityMiddleware',
    'django.contrib.sessions.middleware.SessionMiddleware',
    'django.middleware.common.CommonMiddleware',
    'django.middleware.csrf.CsrfViewMiddleware',
    'django.contrib.auth.middleware.AuthenticationMiddleware',
    'django.contrib.messages.middleware.MessageMiddleware',
    'django.middleware.clickjacking.XFrameOptionsMiddleware',
]

ROOT_URLCONF = 'project.urls'

TEMPLATES = [
    {
        'BACKEND': 'django.template.backends.django.DjangoTemplates',
        'DIRS': [],
        'APP_DIRS': True,
        'OPTIONS': {
            'context_processors': [
                'django.template.context_processors.debug',
                'django.template.context_processors.request',
                'django.contrib.auth.context_processors.auth',
                'django.contrib.messages.context_processors.messages',
+               'social_django.context_processors.backends',
+               'social_django.context_processors.login_redirect',
            ],
        },
    },
]

WSGI_APPLICATION = 'project.wsgi.application'


# Database
# https://docs.djangoproject.com/en/2.0/ref/settings/#databases

DATABASES = {
    'default': {
        'ENGINE': 'django.db.backends.sqlite3',
        'NAME': os.path.join(BASE_DIR, 'db.sqlite3'),
    }
}


# Password validation
# https://docs.djangoproject.com/en/2.0/ref/settings/#auth-password-validators

AUTH_PASSWORD_VALIDATORS = [
    {
        'NAME': 'django.contrib.auth.password_validation.UserAttributeSimilarityValidator',
    },
    {
        'NAME': 'django.contrib.auth.password_validation.MinimumLengthValidator',
    },
    {
        'NAME': 'django.contrib.auth.password_validation.CommonPasswordValidator',
    },
    {
        'NAME': 'django.contrib.auth.password_validation.NumericPasswordValidator',
    },
]


# Internationalization
# https://docs.djangoproject.com/en/2.0/topics/i18n/

LANGUAGE_CODE = 'en-us'

TIME_ZONE = 'UTC'

USE_I18N = True

USE_L10N = True

USE_TZ = True


# Static files (CSS, JavaScript, Images)
# https://docs.djangoproject.com/en/2.0/howto/static-files/

STATIC_URL = '/static/'

+ AUTHENTICATION_BACKENDS = [
+ 	    'social_core.backends.twitter.TwitterOAuth',
+ 	    'django.contrib.auth.backends.ModelBackend',
+ 	]

+ SOCIAL_AUTH_TWITTER_KEY = twitter.SOCIAL_AUTH_TWITTER_KEY
+ SOCIAL_AUTH_TWITTER_SECRET = twitter.SOCIAL_AUTH_TWITTER_SECRET
ログイン/ログアウト画面の追加
次に__ログイン画面__と__ログアウト画面__を表示するための準備をします。
以下のファイルを作成します。
from django.contrib import admin
from django.urls import path
from django.conf.urls import include
import django.contrib.auth.views

urlpatterns = [
    path('', include('social_django.urls', namespace = 'social')),
    path('login/',
	        django.contrib.auth.views.login,
	        {
	            'template_name': 'login/index.html',
	        },
	        name='login'),
    path('logout/',
        django.contrib.auth.views.logout,
        {
            'template_name': 'logout/index.html',
        },
        name='logout'),

]
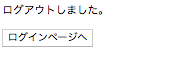
__ログイン画面/ログアウト画面__それぞれのHTMLを作成します。
取り急ぎの__表示確認レベル__なので適当で。
<html>
<head>
 <title>ログイン</title>
</head>
<body>
  <div>
    <button type="button" onclick="location.href='{% url 'social:begin' 'twitter' %}'">ログイン</button>
  </div>
</body>
</html>
<html>
<head>
 <title>ログアウト</title>
</head>
<body>
  <div>
    <p>
      ログアウトしました。
    </p>
    <p>
      <a href="/twitterManager/login"><button type="button" >ログインページへ</button></a>
    </p>
  </div>
</body>
</html>
最後に__既存__のproject/urls.pyを編集します。
from django.contrib import admin
from django.urls import path
+ from django.conf.urls import include

urlpatterns = [
    path('admin/', admin.site.urls),
+   path('twitterManager/', include('twitterManager.urls')),
]
migrateの実行
__social-auth-app-django__を新たに追加しているので、__migrate__をする必要があります。
migrateしないまま__サーバー起動__をすると、
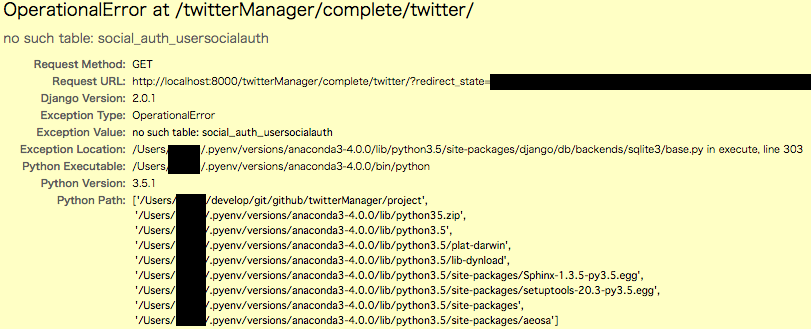
が発生してしまいます。
migrateが必要なタイミングはサーバ起動時のログに出るので気にしておきましょう。

python manage.py migrate

確認
この状態で__サーバー起動__します。
python manage.py runserver
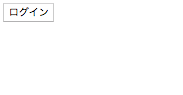
__とてもシンプル__なページが表示されると思います。笑
しかしここで問題が・・・
__意気揚々__とログインボタンを押したところ、

401エラーが発生しました。
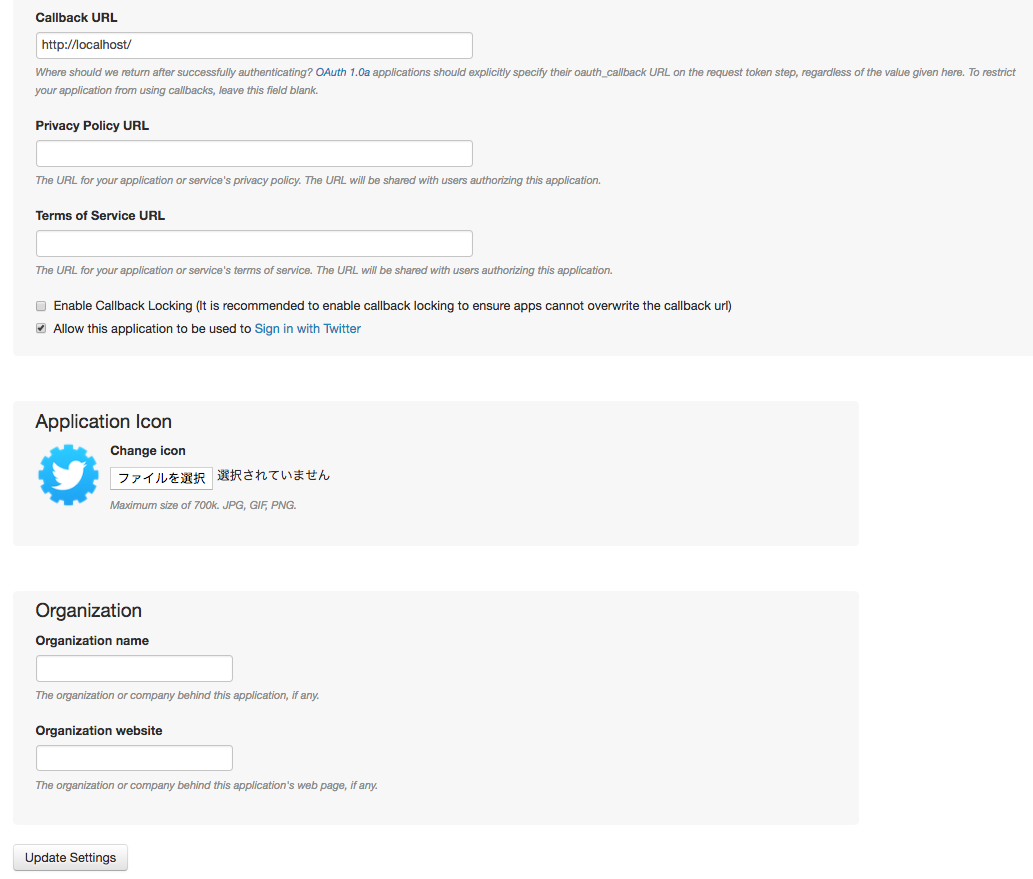
原因はCallbackURLの未入力
Twitterアプリケーション作成時__に__Callback URL__を未入力__にすると、Webシステム__として使う場合は401エラー__が起きてしまうようです。
__特に利用する項目ではない__ので、とりあえず__ダミーURL__でも入れておきましょう。
これで__連携確認画面__が表示されました!!!
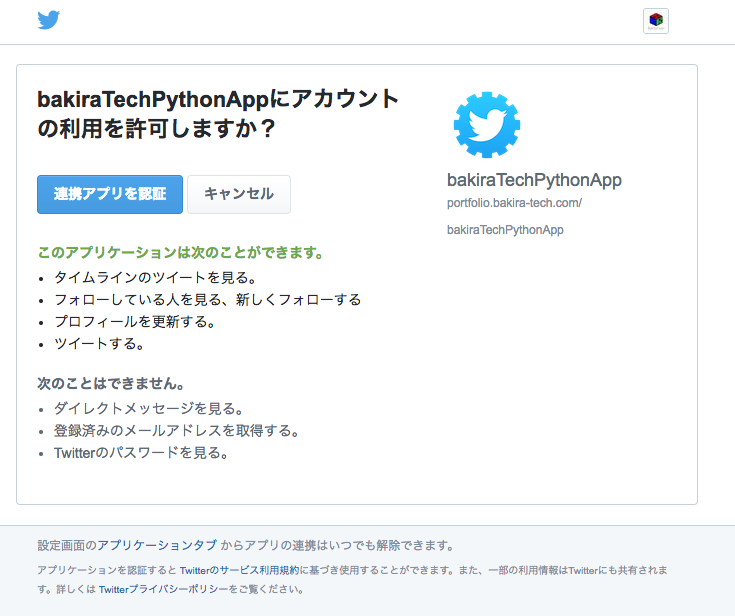
次こそ・・・!
__連携アプリを認証ボタン__をクリックすると、
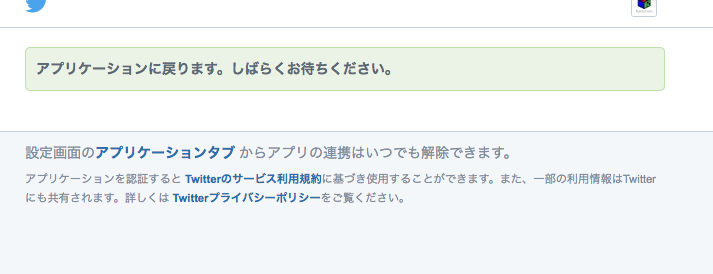
おぉ・・・!!(wktk)

原因はソーシャル認証成功後のリダイレクト指定
__認証成功時__に遷移させる__リダイレクトURL__を指定する必要があります。
デフォルトでは /accounts/profile/ に飛ばされてしまうようですね。
取り急ぎ、__会員トップ画面__を用意して__リダイレクト__させてみましょう。
+ from . import views

urlpatterns = [
    path('', include('social_django.urls', namespace = 'social')),
+   path('top/', views.top_page, name="top_page"),
    path('login/',
	        django.contrib.auth.views.login,
	        {
	            'template_name': 'login/index.html',
	        },
	        name='login'),
    path('logout/',
        django.contrib.auth.views.logout,
        {
            'template_name': 'logout/index.html',
        },
        name='logout'),

]
from django.shortcuts import render

# Create your views here.

from django.shortcuts import render
from django.http.response import HttpResponse
from django.contrib.auth.decorators import login_required
from social_django.models import UserSocialAuth

@login_required
def top_page(request):
    user = UserSocialAuth.objects.get(user_id=request.user.id)
    pageDic = {
        'hoge': 'fuga',
        'user': user
    }
    return render(request, 'top/index.html', pageDic)
<html>
<head>
 <title>会員トップ</title>
</head>
<body>
  <div>
    <h1>会員トップ</h1>
    <h2>{{ user }}</h2>
    <div>
      <p>UserId:{{ user.access_token.user_id }}</p>
      <p>OAuthTokenSecret:{{ user.access_token.oauth_token_secret }}</p>
      <p>OAuthToken:{{ user.access_token.oauth_token }}</p>
      <p>ScreenName:{{ user.access_token.screen_name }}</p>
    </div>
    <h3>hoge:{{ hoge }}</h3>
    <p>
      <a href="/twitterManager/logout"><button type="button" >ログアウト</button></a>
    </p>
  </div>
</body>
</html>
+ SOCIAL_AUTH_LOGIN_REDIRECT_URL = '/twitterManager/top'
これでどうだ・・・!

取れた!!!
他のアカウントでも確認
いや待てよ?
Twitterアプリケーションの所有者と認証アカウントが__Bakira_Tech__で同じだから正常に動いているだけであって、__他のアカウント__ではうまくいかないのでは?という__不安__が頭を過ぎりました。。。

__余 計 な お 世 話 で し た ! ! ! __
これで__Twitter認証__が完成したので、あとはOAuthTokenを使って__ロジック__なり__デザイン__を組み込んでいけばそれなりのものが作れそうですね♪
最終的な構成
以下のようになりました!
(ベストプラクティスではないので悪しからず・・・orz)
.
└── project
    ├── db.sqlite3
    ├── manage.py
    ├── project
    │   ├── __init__.py
    │   ├── configs
    │   │   └── twitter.py
    │   ├── settings.py
    │   ├── urls.py
    │   └── wsgi.py
    └── twitterManager
        ├── __init__.py
        ├── admin.py
        ├── apps.py
        ├── migrations
        │   └── __init__.py
        ├── models.py
        ├── templates
        │   ├── login
        │   │   └── index.html
        │   ├── logout
        │   │   └── index.html
        │   └── top
        │       └── index.html
        ├── tests.py
        ├── urls.py
        └── views.py
終わりに
__知識0__からの作業だったので、調べながら試行錯誤しましたが、それでも__会員トップ画面が表示される__まで__5時間くらい__の学習コストで動くものが作れました。
Djangoフレームワーク、楽しいです♪
参考にさせて頂いた記事
非常に助かりました!!!