textlint
textlintは自然言語をLintできるツールですが、Travis CIなどで動してPull Request/コミットごとにチェックするのも簡単です。
Travis CIでのLint
サンプルリポジトリは以下に置いてあります。
Lintにひっかかる文章があるので、CIがFailしています 
textlintの導入方法は色々あるので、以下などを参考にしてください。
- Getting Started with textlint
- textlintで日本語の文章をチェックする | Web Scratch
- miy4/docker-textlint: Docker container with textlint.
- Ubuntu 15.04でtextlint - メモ
インストール
textlintはJavaScriptで動作/拡張するのでNode.jsが必要です。
textlintとルールをインストール
まずtextlintといくつかルールをインストールします。
textlintのルールは Collection of textlint rule · textlint/textlint Wiki にまとめられています。
npm init
# 適当にEnterしてれば package.json が作成される
npm install -D textlint textlint-rule-common-misspellings textlint-rule-preset-japanese
# textlintとルールをインストール
$(npm bin)/textlint --init
# .textlintrc ファイルが作成される
.textlintrc の設定
$(npm bin)/textlint --init または 普通に .textlintrc を作成し、次のように使うルールを設定します。
{
  "rules": {
    "common-misspellings": true,
    "preset-japanese": true
  }
}
これで2つのルールが有効化されます。
package.jsonにコマンドを設定
package.jsonのscriptsに"textlint": "textlint -f pretty-error docs/"を追加します。
このように設定すると $ npm run textlint で docs/ ディレクトリをtextlintでチェックすることができます。
{
  "private": true,
  "scripts": {
    "textlint": "textlint -f pretty-error docs/"
  },
  "devDependencies": {
    "textlint": "^6.8.0",
    "textlint-rule-common-misspellings": "^1.0.1",
    "textlint-rule-preset-japanese": "^1.3.0"
  }
}
実行例
docs/ に適当なMarkdownファイルなどを入れて実行してみます。
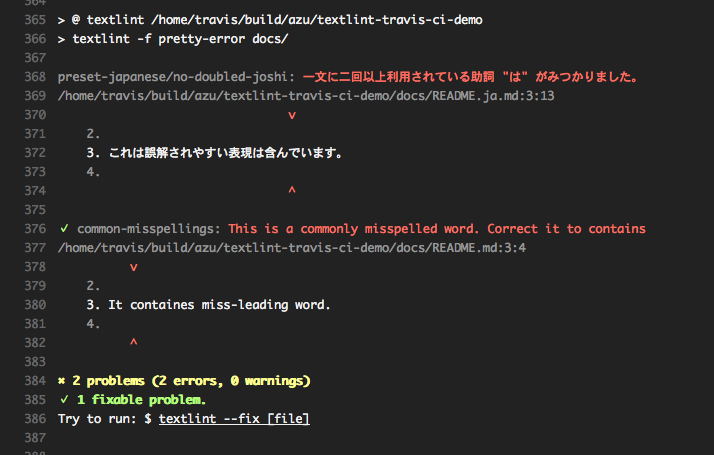
$ npm run textlint

> @ textlint /Users/azu/.ghq/github.com/azu/textlint-travis-ci-demo
> textlint -f pretty-error docs/

preset-japanese/no-doubled-joshi: 一文に二回以上利用されている助詞 "は" がみつかりました。
/Users/azu/.ghq/github.com/azu/textlint-travis-ci-demo/docs/README.ja.md:3:13
                                v
    2.
    3. これは誤解されやすい表現は含んでいます。
    4.
                                ^

✓ common-misspellings: This is a commonly misspelled word. Correct it to contains
/Users/azu/.ghq/github.com/azu/textlint-travis-ci-demo/docs/README.md:3:4
          v
    2.
    3. It containes miss-leading word.
    4.
          ^

✖ 2 problems (2 errors, 0 warnings)
✓ 1 fixable problem.
Try to run: $ textlint --fix [file]
Travis CIの設定
作成したリポジトリをGitHubにpushしておき、次はTravis CIから実行できるように設定します。
travis コマンドを使えると楽なので、次のようにインストールします。
gem install travis
Travis CIの有効化
travis init node.js を実行すると、Travis CIが有効化され、.travis.ymlが作成されます。
$ travis init node.js
.travis.yml の設定
travis initで生成されるNode.jsのバージョン指定は古いので、node_js: "stable"と最新を使うようにします。
そして、次のようにscriptでtextlintを実行するように設定します。
sudo: false
language: node_js
node_js: "stable"
script:
  - npm run textlint
これでpushするたびにTravis CIで文章のチェックが走るようになります。
手元でリアルタイムにチェックしたい場合はエディタ連携を使うと、AtomやSublimeText、Vimなどで動作します。
さらに発展させて、Pull RequestのレビューコメントしてLint結果を出したり、カバレッジ?を取ったりもできます。
- jser/jser.github.ioの記事をpull request時にLintする仕組み | Web Scratch
- textlintで文章カバレッジレポートを継続的に見ていく | Web Scratch
追記(2016-06-18): Travis CIからレビューコメントで書き込むようにする設定を書きました。