スマホ/PCからラズパイにbluetooth 接続し、ラズパイ側でpython を使った制御を行う時の一通りの手順をまとめてみました。
(外のサイトを参照していて嵌ったところもあったので、改めて。。。)
動作環境
- Raspberry PI 4 & Rasubian
- Windows 10
環境のインストール
参考:
https://qiita.com/shippokun/items/0953160607833077163f
# pyBluez の依存パッケージをインストール
$ sudo apt-get install -y python-dev libbluetooth3-dev

# pyBluez のインストール
$ sudo pip3 install pybluez

# sudo apt-get install bluetooth blueman -y # bluez-tool

$ sudo apt install libusb-dev
$ sudo apt install libdbus-1-dev
$ sudo apt install libglib2.0-dev
$ sudo apt install libudev-dev -y
$ sudo apt install libical-dev -y
$ sudo apt install libreadline-dev -y
$ sudo apt install libdbus-glib-1-dev -y
$ sudo apt install libbluetooth-dev
ラズパイのBluetooth macアドレスを確認する(必要に応じて)
$ hciconfig
hci0:   Type: Primary  Bus: UART
        BD Address: DC:A6:32:37:3D:60  ACL MTU: 1021:8  SCO MTU: 64:1
        UP RUNNING PSCAN
        RX bytes:3163 acl:22 sco:0 events:92 errors:0
        TX bytes:3627 acl:21 sco:0 commands:64 errors:0
未使用のチャンネルを調べる(必要に応じて)
$ sudo sdptool browse local | grep Channel
    Channel: 17
    Channel: 16
    Channel: 15
    Channel: 14
    Channel: 10
    Channel: 9
    Channel: 24
    Channel: 12
    Channel: 3
sudo sdptool browse local だけ実行すると何にどのチャンネルが使われているのがわかると思います。
$ sudo sdptool browse local
...
Service Name: Headset Voice gateway
Service RecHandle: 0x10005
Service Class ID List:
  "Headset Audio Gateway" (0x1112)
  "Generic Audio" (0x1203)
Protocol Descriptor List:
  "L2CAP" (0x0100)
  "RFCOMM" (0x0003)
    Channel: 12
Profile Descriptor List:
  "Headset" (0x1108)
    Version: 0x0102

...
未使用のチャンネルを指定してシリアルポートサービスを追加。
(当然のことながら、使用済みのチャンネルを指定するとこの後のステップで失敗します。これに気づかずに最初嵌りました…)
sudo sdptool add --channel=22 SP
チャンネルを指定せずにシリアルポートサービスを追加する場合は、上記の代わりに以下を実行する。
sudo sdptool add SP
シリアルポートサービスを追加できたかどうか確認する。
sudo sdptool browse local
上記を実行すると以下のような
Service Name: Serial Port
という出力が得られるはず。ここに
Channel: 1
のようにチャンネル番号が表示されているので確認しておくこと。
Service Name: Serial Port
Service Description: COM Port
Service Provider: BlueZ
Service RecHandle: 0x10001
Service Class ID List:
  "Serial Port" (0x1101)
Protocol Descriptor List:
  "L2CAP" (0x0100)
  "RFCOMM" (0x0003)
    Channel: 1
Language Base Attr List:
  code_ISO639: 0x656e
  encoding:    0x6a
  base_offset: 0x100
Profile Descriptor List:
  "Serial Port" (0x1101)
    Version: 0x0100
設定ファイルを編集して、起動直後にBluetoothでシリアル通信ができるようにする。
sudo nano /etc/systemd/system/dbus-org.bluez.service
ExecStart ... の行に --compat を追記する(互換モードで動作するようにする)。
また、
ExecStartPost=/usr/bin/sdptool add SP
# チャンネルを指定する場合は上記の代わりに以下を記述する。
# 使用済のチャンネルを指定しないように注意。
# ExecStartPost=/usr/bin/sdptool add --channel=22 SP
を追記してシリアル通信プロトコル(SPP)が起動時に追加されるようにしておく。
チャンネル番号の指定は任意で。
[Unit]
Description=Bluetooth service
Documentation=man:bluetoothd(8)
ConditionPathIsDirectory=/sys/class/bluetooth

[Service]
Type=dbus
BusName=org.bluez
ExecStart=/usr/lib/bluetooth/bluetoothd --compat
ExecStartPost=/usr/bin/sdptool add SP
# チャンネルを指定する場合は上記の代わりに以下を記述する。
# 使用済のチャンネルを指定しないように注意。
# ExecStartPost=/usr/bin/sdptool add --channel=22 SP

NotifyAccess=main
# WatchdogSec=10
# Restart=on-failure
CapabilityBoundingSet=CAP_NET_ADMIN CAP_NET_BIND_SERVICE
LimitNPROC=1
ProtectHome=true
ProtectSystem=full
ラズパイを再起動する。
$ sudo reboot -h
ペアリングする
ラズパイのBluetoothをONし、server側でBluetooth が検索されるのを許可する。
sudo bluetoothctl
[bluetooth] power on
[bluetooth] discoverable on
[bluetooth] agent on
[bluetooth] default-agent
この状態で接続しようとすると以下のようなパスキー確認やサービス認証の確認を求められるので、yes/no を入力する。
参考:
https://qiita.com/oko1977/items/9f53f3b11a1b033219ea
[CHG] Device 80:19:34:31:CD:1E Connected: yes
Request confirmation
[agent] Confirm passkey 291086 (yes/no): yes
Authorize service
[agent] Authorize service 0000110e-0000-1000-8000-00805f9b34fb (yes/no): yes
Authorize service
[agent] Authorize service 0000110d-0000-1000-8000-00805f9b34fb (yes/no): yes
[CHG] Device 80:19:34:31:CD:1E UUIDs: 00001000-0000-1000-8000-00805f9b34fb
...
[CHG] Device 80:19:34:31:CD:1E UUIDs: c7f94713-891e-496a-a0e7-983a0946126e
[CHG] Device 80:19:34:31:CD:1E Connected: no
[CHG] Device 80:19:34:31:CD:1E Connected: yes
[CHG] Device 80:19:34:31:CD:1E Connected: no
[bluetooth]#
ここで、
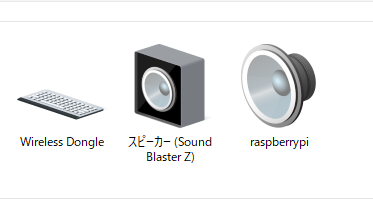
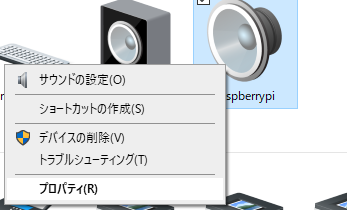
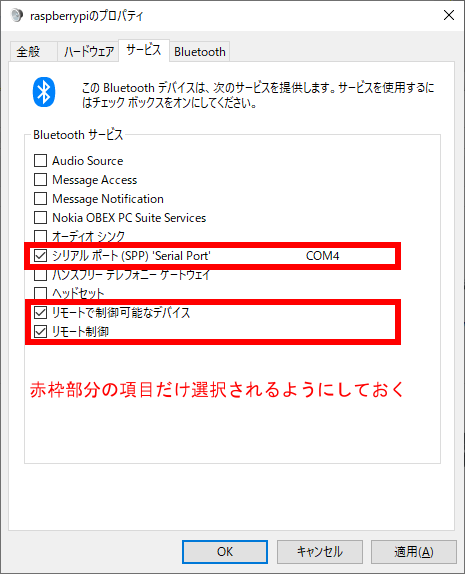
上記画像のように、サウンドデバイスとして認識される場合、デバイスとプリンターからraspberrypi を選んで、
- シリアルポート(SPP)'SerialPort'
- リモートで制御可能なデバイス
- リモート制御
以外の項目のチェックを外しておく。
(外しておかないと、サウンドデバイスとして扱われる。筆者の環境では、元々使っていたサウンドデバイスが不活性化して音が鳴らなくなった。。。)
ちなみに、「シリアルポート(SPP) 'SerialPort'」が出てこない場合は、序盤の手順で
sdptool add SP
を実行してシリアル通信サービスを有効いるかどうかを再度確認すること。
受信してみる
以下を実行する。
sudo rfcomm listen /dev/rfcomm0
チャンネル番号を指定する場合は以下のように実行する(チャンネル番号22の場合)。
sudo rfcomm listen /dev/rfcomm0 22
別コンソールを立ち上げて、Raspberry Pi側でメッセージを確認するために、/dev/rfcomm0をcatする。
$ sudo cat /dev/rfcomm0
また、さらに別コンソールを立ち上げて
Raspberry Pi上で/dev/rfcomm0デバイスにメッセージをechoしてみる。
$ sudo echo abcd > /dev/rfcomm0
python & bluez で受信してみる
  1 # -*- coding: utf-8 -*-
  2 # Author: Shinsuke Ogata
  3
  4 import sys
  5 import traceback
  6 import time
  7 import bluetooth
  8 import threading
  9
 10 class SocketThread(threading.Thread):
 11     '''
 12     @param client_socket accept の結果返ってきたクライアントソケット.
 13     @param notify_receive シリアル通信で受信したデータを処理する関数・メソッド.
 14     @param notify_error エラー時の処理を実行する関数・メソッド
 15     '''
 16     def __init__(self, server_socket, client_socket, notify_receive, notify_error, debug):
 17         super(SocketThread, self).__init__()
 18         self._server_socket = server_socket
 19         self._client_socket = client_socket
 20         self._receive = notify_receive
 21         self._error = notify_error
 22         self._debug = debug
 23
 24     def run(self):
 25         while True:
 26             try:
 27                 data = self._client_socket.recv(1024)
 28                 if self._receive != None:
 29                     self._receive(data)
 30             except KeyboardInterrupt:
 31                 self._client_socket.close()
 32                 self._server_socket.close()
 33                 break
 34             except bluetooth.btcommon.BluetoothError:
 35                 self._client_socket.close()
 36                 self._server_socket.close()
 37                 if self._debug:
 38                     print('>>>> bluetooth.btcommon.BluetoothError >>>>')
 39                     traceback.print_exc()
 40                     print('<<<< bluetooth.btcommon.BluetoothError <<<<')
 41                 break
 42             except:
 43                 self._client_socket.close()
 44                 self._server_socket.close()
 45                 if self._debug:
 46                     print('>>>> Unknown Error >>>>')
 47                     traceback.print_exc()
 48                     print('<<<< Unknown Error <<<<')
 49                 break
 50
 51 class BluetoothServer(threading.Thread):
 52
 53     '''
 54     @param notify_receive シリアル通信で受信したデータを処理する関数・メソッド.
 55     @param notify_error エラー時の処理を実行する関数・メソッド
 56     @param debug デバッグメッセージを出すときTrue をセット
 57     '''
 58     def __init__(self, notify_receive, notify_error=None, debug=False):
 59         super(BluetoothServer, self).__init__()
 60         self._port =1
 61         self._receive = notify_receive
 62         self._error = notify_error
 63         self._server_socket = None
 64         self._debug = debug
 65
 66     def run(self):
 67         try:
 68             self._server_socket=bluetooth.BluetoothSocket( bluetooth.RFCOMM )
 69
 70             if self._debug:
 71                 print("BluetoothServer: binding...")
 72
 73             self._server_socket.bind( ("",self._port ))
 74
 75             if self._debug:
 76                 print("BluetoothServer: listening...")
 77
 78             self._server_socket.listen(1)
 79
 80             client_socket,address = self._server_socket.accept()
 81
 82             if self._debug:
 83                 print("BluetoothServer: accept!!")
 84             task = SocketThread(self._server_socket, client_socket, self._receive, self._error, self._debug)
 85             task.start()
 86         except KeyboardInterrupt:
 87             if self._debug:
 88                 print("BluetoothServer: KeyboardInterrupt")
 89         except:
 90             if self._debug:
 91                 print('>>>> Unknown Error >>>>')
 92                 traceback.print_exc()
 93                 print('<<<< Unknown Error <<<<')
 94
 95
 96 def receive(data):
 97     print("receive [%s]" % data)
 98
 99 def error(data):
100     print("error")
101
102 if __name__ == '__main__':
103     task = BluetoothServer(receive, error, True)
104     task.start()


