あるものを作りたいと思っていて、それにはラズパイとBluetoothで通信させることが必要そう。ラズパイとPCをBlueToothで通信させるところまでやってみたのでメモしておく。
1.ラズパイとペアリング
1)ラズパイのBluetoothをON
SSHで以下のコマンドを叩いてペアリングできる状態にする。
sudo bluetoothctl
[bluetooth] power on
[bluetooth] discoverable on
[bluetooth] agent on
[bluetooth] default-agent
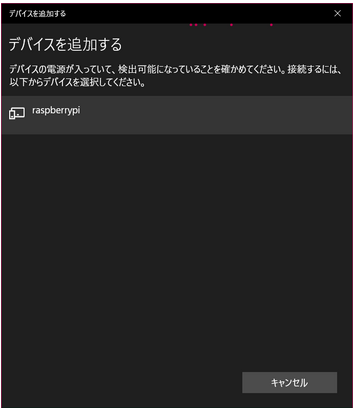
2)PCとペアリング
ここではWindows10。アクションセンター→接続を選んで、表示されるラズパイを選択してペアリングする。
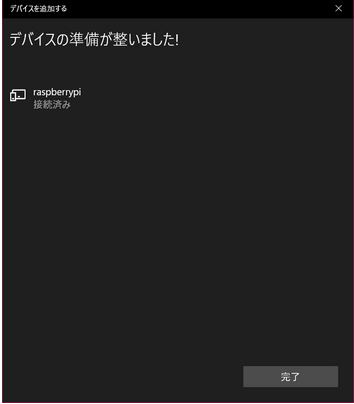
ペアリング完了状態
2.SDPサーバの準備
通信テストはシリアル通信で行う。このためにシリアルポートを追加した状態でSDPサーバを起動する。
サーバの利用可否確認
Raspberry PiでSDPサーバが使えるか確認する。
pi@rapi:~ $ sdptool browse local
Failed to connect to SDP server on FF:FF:FF:00:00:00: No such file or directory
上記のエラーが表示される場合は、
/etc/systemd/system/dbus-org.bluez.serviceの設定変更を行う。
変更前
ExecStart=/usr/lib/bluetooth/bluetoothd
変更後
ExecStart=/usr/lib/bluetooth/bluetoothd --compat
変更後、bluetoothdを再起動する。
pi@rapi:~ $ sudo systemctl daemon-reload
pi@rapi:~ $ sudo systemctl restart bluetooth
いったん、bluetoothサービスを止める。
pi@rapi:~ $ sudo systemctl stop bluetooth
bluetoothをデーモンで上げる。
pi@rapi:~ $ sudo bluetoothd -C &
SDPサービスが利用可能なら以下のような応答が返ってくる。
pi@rapi:~ $ sdptool browse local
Browsing FF:FF:FF:00:00:00 ...
Service RecHandle: 0x10000
Service Class ID List:
 "PnP Information" (0x1200)
Profile Descriptor List:
 "PnP Information" (0x1200)
  Version: 0x0103

Browsing FF:FF:FF:00:00:00 ...
Service Search failed: Invalid argument
Service Name: Generic Access Profile
Service Provider: BlueZ
Service RecHandle: 0x10001
Service Class ID List:
 "Generic Access" (0x1800)
Protocol Descriptor List:
 "L2CAP" (0x0100)
  PSM: 31
 "ATT" (0x0007)
  uint16: 0x0001
  uint16: 0x0008

Service Name: Generic Attribute Profile
Service Provider: BlueZ
Service RecHandle: 0x10002
Service Class ID List:
 "Generic Attribute" (0x1801)
Protocol Descriptor List:
 "L2CAP" (0x0100)
  PSM: 31
 "ATT" (0x0007)
  uint16: 0x0010
  uint16: 0x0010

Service Name: AVRCP CT
Service RecHandle: 0x10003
Service Class ID List:
 "AV Remote" (0x110e)
 "AV Remote Controller" (0x110f)
Protocol Descriptor List:
 "L2CAP" (0x0100)
  PSM: 23
 "AVCTP" (0x0017)
  uint16: 0x0103
Profile Descriptor List:
 "AV Remote" (0x110e)
  Version: 0x0105

Service Name: AVRCP TG
Service RecHandle: 0x10004
Service Class ID List:
 "AV Remote Target" (0x110c)
Protocol Descriptor List:
 "L2CAP" (0x0100)
  PSM: 23
 "AVCTP" (0x0017)
  uint16: 0x0103
Profile Descriptor List:
 "AV Remote" (0x110e)
  Version: 0x0104
たぶんService Name: Serial Portというサービスがないので追加する。
pi@rapi:~ $ sudo sdptool add --channel=22 SP
Serial Port service registered
再度確認すると、Service Name: Serial Portが追加されていると思う。
pi@rapi:~ $ sdptool browse local
(省略)
Service Name: Serial Port
Service Description: COM Port
Service Provider: BlueZ
Service RecHandle: 0x10005
Service Class ID List:
 "Serial Port" (0x1101)
Protocol Descriptor List:
 "L2CAP" (0x0100)
 "RFCOMM" (0x0003)
  Channel: 22
Language Base Attr List:
 code_ISO639: 0x656e
 encoding:  0x6a
 base_offset: 0x100
Profile Descriptor List:
 "Serial Port" (0x1101)
  Version: 0x0100
バックグラウンドで実行していたbluetoothデーモンを停止して、bluetoothサービスを起動する。
同じコマンドを打ってSerialPortを追加する。
3.通信させてみる
1)RFCOMMセットアップ
以下のコマンドでrfcommをリッスン状態にする。
pi@rapi:~ $ sudo rfcomm listen /dev/rfcomm0 22
Waiting for connection on channel 22
これでシリアル通信のリッスン待ちの状態になる。シリアル通信が確立すると、/dev/rfcomm0デバイスでデータ送受信ができるようになる。
2)シリアル通信接続
ペアリングしたWindows 7のPCとシリアル通信してみる。
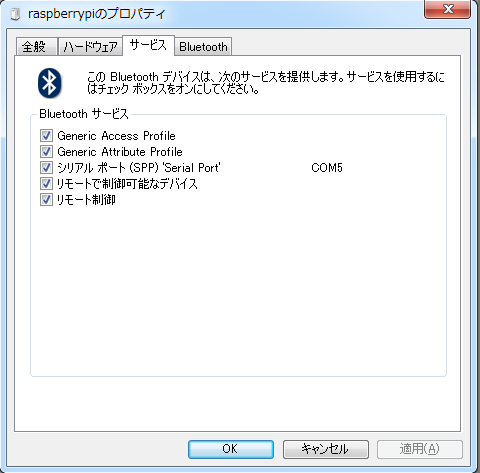
Windows側の準備として、ペアリングした状態で以下を開く。
コントロール パネル > ハードウェアとサウンド >デバイスとプリンター
デバイスからペアリングしたRaspberry Piデバイスのプロパティを開く。
「サービス」タブの「シリアルポート (SPP) 'Serial Port'」のチェックを入れると、仮想ポートが割り当てられる。
割り当てられるポート(ここでいうCOM5)はその時々で変動する。
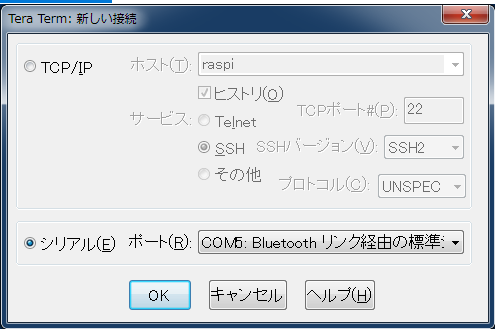
Tera Termを開き、「シリアル」接続する。ポートは上記の「COM5」が選択できるので、それを指定する。
の時点でRasbperry Piのリッスン状態だったrfcommにConnectionと表示され、正常に接続できたことが確認できる。
pi@rapi:~ $ sudo rfcomm listen /dev/rfcomm0 22
Waiting for connection on channel 22
Connection from28:C2:DD:XX:XX:XX to /dev/rfcomm0
Press CTRL-C for hangup
3)Windows PCからRaspberry Piへデータ送信
Tera Termで適当に文字列を入力してみる。
シリアル通信は一文字ずつの送信なので特にEnterとかせずともメッセージは送信される。
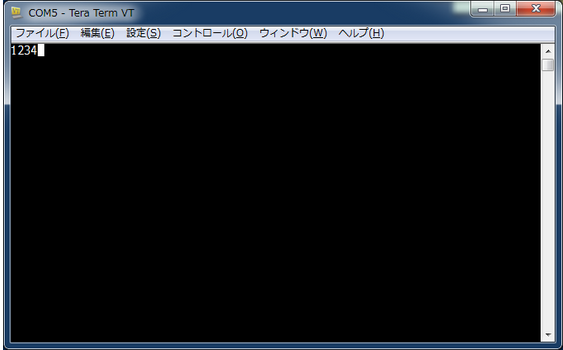
Raspberry Pi側でメッセージを確認するために、/dev/rfcomm0をcatする。
pi@rapi:~ $ sudo cat /dev/rfcomm0
1234
Tera Termで入力した文字が出力される。
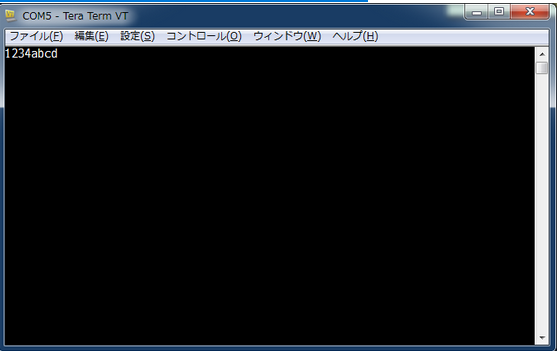
4)Raspberry PiからWindows PCへデータ送信
今度はRaspberry Pi上で/dev/rfcomm0デバイスにメッセージをechoしてみる。
pi@rapi:~ $ sudo echo abcd > /dev/rfcomm0
するとTera Termの画面にechoされた文字列が表示される。
以上です!次はスマホとBluetoothで通信させたいです。