概要
Open Weather APIを利用して、Spotsテーブルの座標を元に、今日明日の天気予報を表示する機能を実装しました。備忘録として記します。
環境
- Ruby 2.7.2
- Rails 6.0.3.4
Railsアプリに天気予報表示を追加する流れ
① OpenWeather に登録し、APIキーを取得する(無料)
② アプリに表示させたい気象項目を決める(天気アイコン・気温・風向き等)
③ 目的に合うAPIを選択する(現在の気象情報や30日分の天気予報等、10種類のAPIがある)
④ どのような JSONデータ が取得できるか、Chrome拡張の Advanced REST Client を使って確認
⑤ API呼び出しコードをJSファイルに記述
⑥ 生成されたhtmlのスタイルを調整して完成!
私の場合、下記条件で作成したので、特に同じような方には参考になるかもしれません。
- 天気アイコン・日付・風向き・風速を表示する
- 座標を元に観測地点を特定する
- APIキーを
config/credentials.yml.encファイルで管理する

コード解説
0. 最終的なコード
詳細を順に解説していきます。
<div class="weather">
  <div id="weather"></div>
</div>
<%= javascript_pack_tag 'weather_api' %>

<!-- 天気予報を表示するビューを作成 -->
def show
  @spot = Spot.find(params[:id])
  gon.spot = @spot
  gon.api = Rails.application.credentials.open_weather_api_key
end

# Railsで定義した変数を、JavaScriptで使えるよう代入
$(function () {
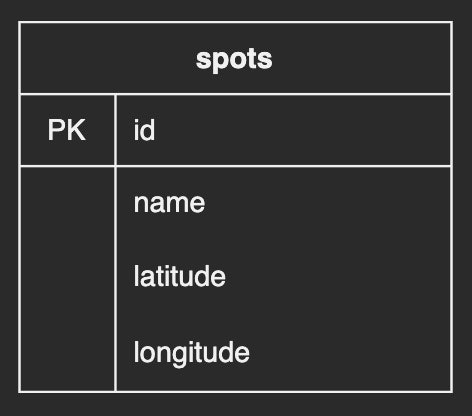
const lat = gon.spot.latitude
const lon = gon.spot.longitude
const key = gon.api
// 天気予報を取得
const weather_url = 'https://api.openweathermap.org/data/2.5/onecall?lat=' + lat + '&lon=' + lon + '&exclude=current,minutely,alerts&units=metric&appid=' + key;
$.ajax({
url: weather_url,
dataType: 'json',
type: 'GET',
})
.done(function (weather) {
let insertHTML = '';
for (let i = 0; i <= 1; i = i + 1) {
insertHTML += buildHTML(weather, i);
}
$('#weather').html(insertHTML);
})
.fail(function (weather) {
alert('天気予報の取得に失敗しました');
});
});
// 日本語で表示
function buildHTML(weather, i) {
//日付、時間を取得(Dateがミリ秒なので1000倍が必要)
const date = new Date(weather.daily[i].dt * 1000);
//UTCとの時差を無くす(日本は-9時間のため9を足す)
date.setHours(date.getHours() + 9);
//月を取得。getMonth()は0~11を返すため1を足すことによって1月~12月を返すように設定
const month = date.getMonth() + 1;
//曜日の日本語化のため、配列を用意する
const Week = new Array('(日)', '(月)', '(火)', '(水)', '(木)', '(金)', '(土)');
//月+日+曜日をdayに代入。getDay()は0~6を返すためWeek配列内のインデックスに対応した文字列を取得
const day = month + '/' + date.getDate() + Week[date.getDay()];
//天気のアイコンを取得
const icon = weather.daily[i].weather[0].icon;
//風速を取得
const wind_speed = Math.floor(weather.hourly[i].wind_speed * 10) / 10;
//風向(角度)を取得し方角表記へ変換
const get_deg_string = function(wind_deg) {
let r = '北';
if (wind_deg>=11.25) r = '北北東';
if (wind_deg>=33.75) r = '北東';
if (wind_deg>=56.25) r = '東北東';
if (wind_deg>=78.75) r = '東';
if (wind_deg>=101.25) r = '東南東';
if (wind_deg>=123.75) r = '南東';
if (wind_deg>=146.25) r = '南南東';
if (wind_deg>=168.75) r = '南';
if (wind_deg>=191.25) r = '南南西';
if (wind_deg>=213.75) r = '南西';
if (wind_deg>=236.25) r = '西南西';
if (wind_deg>=258.75) r = '西';
if (wind_deg>=281.25) r = '西北西';
if (wind_deg>=303.75) r = '北西';
if (wind_deg>=326.25) r = '北北西';
return r + '風';
};
const wind_deg = get_deg_string(weather.hourly[i].wind_deg);
const html =
'<div class="weather__content--report">' +
'<img src="https://openweathermap.org/img/w/' + icon + '.png">' +
'<p class="weather__content--report-date">' + day + "</p>" +
'<p class="weather__content--report-wind_deg">' + wind_deg + "</p>" +
'<p class="weather__content--report-wind_speed">' + wind_speed + "m</p>" +
'</div>';
return html
}
1. Rails変数を、JavaScriptで変数宣言
const lat = gon.spot.latitude
const lon = gon.spot.longitude
const key = gon.api
 // 天気予報を取得
const weather_url = 'https://api.openweathermap.org/data/2.5/onecall?lat=' + lat + '&lon=' + lon + '&exclude=current,minutely,alerts&units=metric&appid=' + key;
-
上3行
-
Railsの
controller内で定義した変数を、JavaScriptでそれぞれ変数宣言 -
Railsで定義した変数を、JavaScriptで使うために、「 gon 」 というgemを使用
-
4行目
-
Open Weather の One Call API の
urlを変数宣言し、後述のコードでAPIを呼び出し -
url 内のexclude 等のオプションは OpenWeather で詳細が見られます。
gonの使い方
gem 'gon'
bundle install #gem「gon」をインストール
<head>
  ... 省略 ...
  <%= include_gon %>     #gem「gon」を使えるよう設定
</head>
def show
  @spot = Spot.find(params[:id])
  gon.spot = @spot
  gon.api = Rails.application.credentials.open_weather_api_key
end
これで、controller内で定義した変数 @spotが、JavaScriptでは gon.spot として使えるようになりました。
- Rails「
@spot.latitude」 = JavaScript「gon.spot.latitude」
2. JSONデータ取得、データ加工等
$.ajax({
  url: weather_url,

     ...
     ...

//天気のアイコンを取得
  const icon = weather.daily[i].weather[0].icon;
この部分は、下記記事の解説が分かりやすかったです。
【週間天気予報表示】OpenWeatherMap APIを用いてユーザーが登録した住所から週間天気予報を表示する!(無料)
3. 風速を取得
まず、Open Weather API からどのような情報(JSONデータ)が取得できているか確認するために、Chrome拡張の Advanced REST Client を使いました。

path・オプション・APIキー等を入力し「SEND」ボタンを押すと、下記のようなJSONデータが表示されます。
.

このJSONデータから、必要な値をJSファイルに記述して取り出します。
//風速を取得
const wind_speed = Math.floor(weather.hourly[i].wind_speed * 10) / 10;
-
i番目のhourly配列のwind_speedの値を取得 - その値の小数第二位を切り捨てる
-
wind_sppedという変数に入れる
4. 風向(角度)取得後、方角表記へ変換
//風向(角度)を取得、方角表記へ変換
const get_deg_string = function(wind_deg) {
  let r = '北';
  if (wind_deg>=11.25) r = '北北東';
  if (wind_deg>=33.75) r = '北東';
  if (wind_deg>=56.25) r = '東北東';
  if (wind_deg>=78.75) r = '東';
  if (wind_deg>=101.25) r = '東南東';
  if (wind_deg>=123.75) r = '南東';
  if (wind_deg>=146.25) r = '南南東';
  if (wind_deg>=168.75) r = '南';
  if (wind_deg>=191.25) r = '南南西';
  if (wind_deg>=213.75) r = '南西';
  if (wind_deg>=236.25) r = '西南西';
  if (wind_deg>=258.75) r = '西';
  if (wind_deg>=281.25) r = '西北西';
  if (wind_deg>=303.75) r = '北西';
  if (wind_deg>=326.25) r = '北北西';
  return r + '風';
};
const wind_deg = get_deg_string(weather.hourly[i].wind_deg);
-
i番目のhourly配列のwind_degの値を取得 - その値を、if文を使って方角に変換する
-
wind_degという変数に入れる
5. html生成
生成された html に、適宜cssでスタイルをあてて完成!🎉
さいごに
API や gem を組み合わせる事で、より実用的なサービスにできたと思います。
間違っているところがあればご指摘いただけるとありがたいです。