概要
この記事では、AndroidのTextInputLayoutのように、エラー表示付きの入力フォームを作る方法について説明します。ついでに、入力値のバリデーションも行います。
サンプル
Text-Input-Layout@githubに動作するプロジェクトがあります。
仕組み
TextInputView
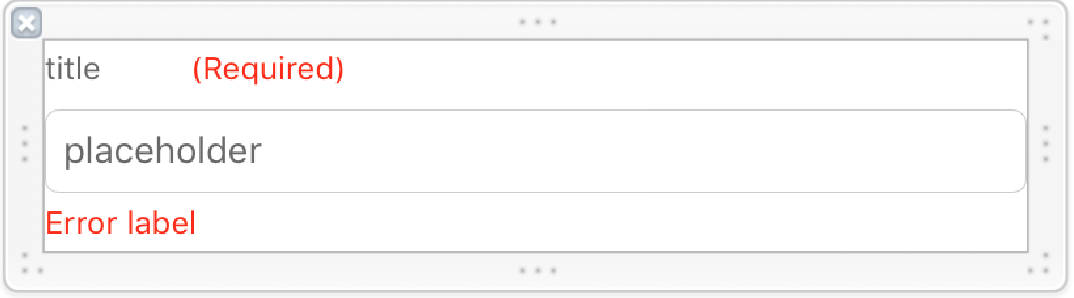
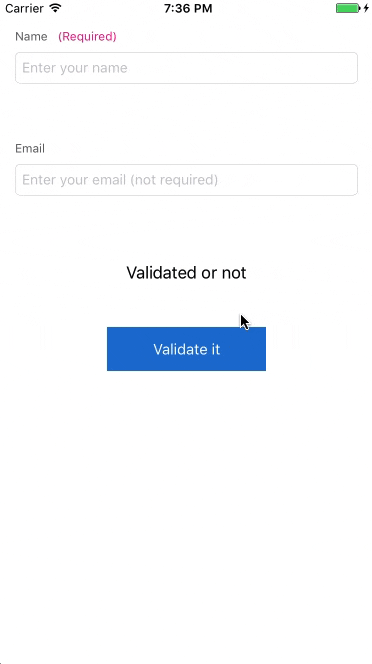
タイトルラベル、必須マークラベル、テキストフィールド、エラーラベルを持つカスタムビューとTextInputViewを用意します。
クラス全体をIBDesignable、title, isRequired, placeholder, errorMessageを@IBInspectableとし、Interface Builderから値を入力できるようにします。
また、computed propertyとして、isValidatedを宣言します。isValidatedを呼ぶと、バリデーションを行い、必要に応じてエラーを表示します。
これにより、呼び出し元は、TextInputValidationTypeを最初に設定すれば、バリデーションロジックやエラーの表示・非表示を気にする必要はありません。
enum TextInputValidationType: Int {
    case none
    case email
}

@IBDesignable
class TextInputView: UIView {
    @IBOutlet fileprivate weak var titleLabel: UILabel!
    @IBOutlet fileprivate weak var titleViewWidthConstraint: NSLayoutConstraint!
    @IBOutlet fileprivate weak var requiredLabel: UILabel!
    @IBOutlet weak var textField: UITextField!
    @IBOutlet fileprivate weak var errorLabel: UILabel!

    @IBInspectable var title: String = "" {
        didSet {
            titleLabel?.text = title
            titleLabel?.sizeToFit()
            titleViewWidthConstraint?.constant = titleLabel.frame.width
        }
    }
    @IBInspectable var isRequired: Bool = true {
        didSet {
            requiredLabel?.isHidden = !isRequired
        }
    }
    @IBInspectable var placeholder: String = "" {
        didSet {
            textField?.placeholder = placeholder
        }
    }
    @IBInspectable var errorMessage: String = "" {
        didSet {
            errorLabel?.text = errorMessage
        }
    }

    var validationType: TextInputValidationType = .none
    var text: String {
        return textField?.text ?? ""
    }
    var isValidated: Bool {
        errorLabel.isHidden = true
        switch validationType {
        case .email:
            errorLabel.isHidden = isEmail(text: text)
        default:
            break
        }

        if text.isEmpty {
            errorLabel.isHidden = !isRequired
        }

        return errorLabel.isHidden
    }
}
TextInputViewの使い方
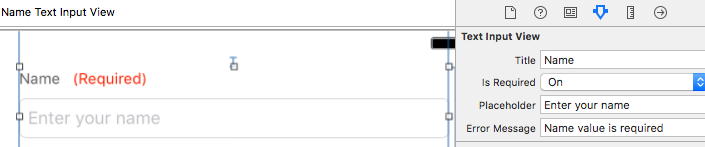
Interface Builder上でUIViewを追加し、ClassをTextInputViewに設定します。
そうすると、IBInspectableを設定したプロパティをInterface Builder上から操作できることがわかります。isRequiredをOn(true)にすると、(Required)が表示されていることがわかります。
逆にisRequiredをOff(false)にすると、(Required)が非表示になったことがわかります。
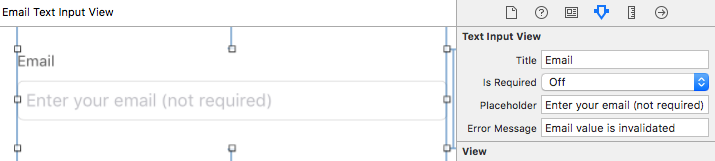
呼び出し元では、validationTypeやtextFieldのキーボードタイプを指定します。
また、isValidatedを呼び出すことで、バリデーション条件をクリアしているかを知ることができます。
このように、TextInputView側にバリデーションやエラー表示の処理を任せることで、呼び出し元は、スッキリとしたコードとなります。
(ちなみに、IBInspectableに、enum型を指定することができれば、より簡易に書けそうですが、現状はできません。)
class ViewController: UIViewController {
    @IBOutlet fileprivate weak var emailTextInputView: TextInputView!
    @IBOutlet fileprivate var textInputViews: [TextInputView]!
    @IBOutlet fileprivate weak var resultLabel: UILabel!

    override func viewDidLoad() {
        super.viewDidLoad()

        emailTextInputView.validationType = .email
        emailTextInputView.textField.keyboardType = .emailAddress
        emailTextInputView.textField.returnKeyType = .done
    }

    @IBAction private func onValidationButtonClick(_ sender: UIButton) {
        let areValidated = !textInputViews.map({ $0.isValidated }).contains(false)
        resultLabel.text = areValidated ? "Validated :)" : "Invalidated :("
    }
}
サンプル
Text-Input-Layout@githubに動作するプロジェクトがあります。