概要
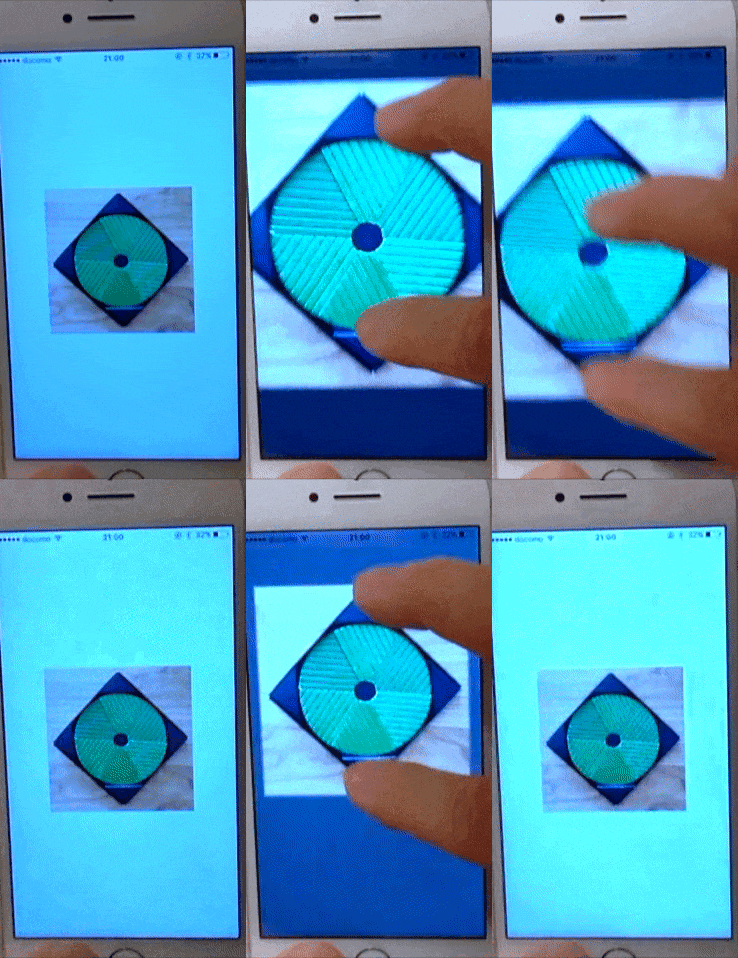
Instagramアプリのようなパン/ピンチ操作を受け取り、拡大/移動ができるイメージビューを作成する方法です。
サンプルでは、パン操作とピンチ操作を使用していますが、同じ方法で回転(Rotation gesture)することもできます。
Interface Builder構築手順
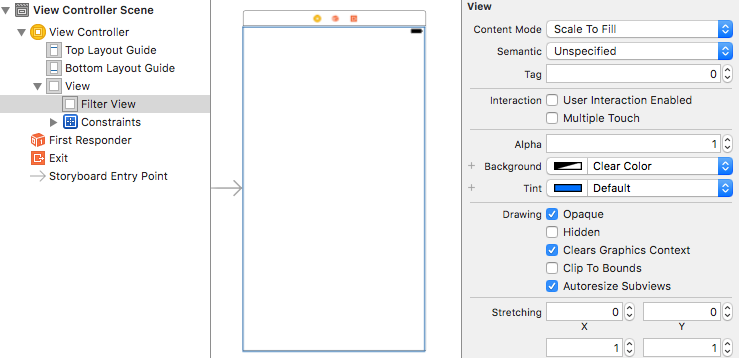
1.フィルタービューの追加
イメージビューの下の階層に透明なビューを用意します。
イメージビューが操作を受け取り拡大率に応じて、フィルタービューの背景色を濃くすることで画像を見やすくします。
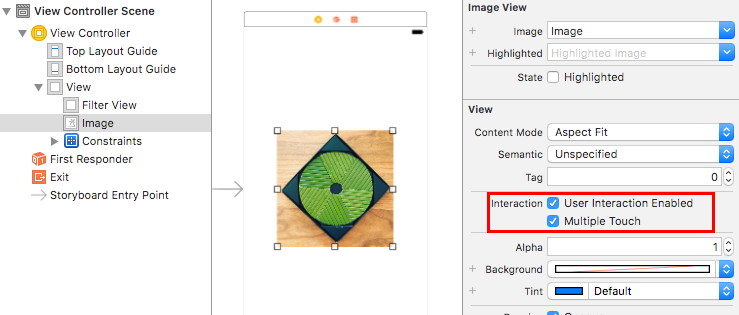
2.イメージビューの追加
フィルタービューの上の階層にイメージビューを配置します。
User Interaction EnabledとMultiple Touchにチェックをします。
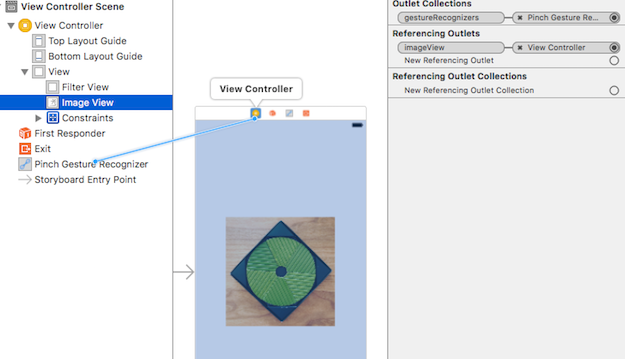
3.パン/ピンチジェスチャーの追加
Pan Gesture RecognizerおよびPinch Gesture Recognizerをイメージビューの上にドラッグ&ドロップします。
また、delegateおよびIBActionをViewControllerにセットします。
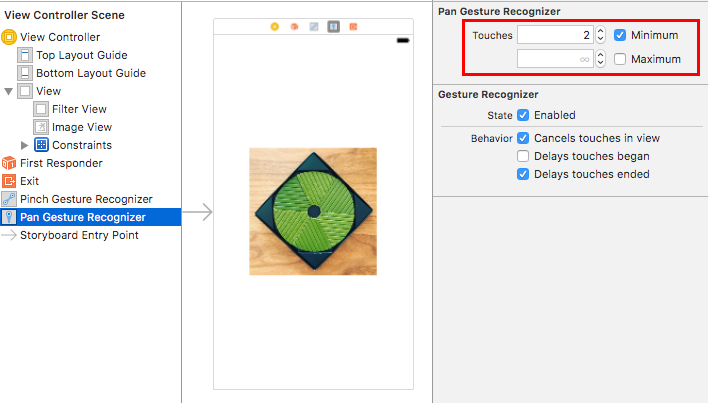
4.パンジェスチャーのプロパティ
1本指では、パン操作を受け付けたくない場合には、Touchesを2に変更します。
プログラム説明
TransformProperty構造体
イメージビューの変形状態を保持します。
fileprivate struct TransformProperty {
    private let kMaxBackgroundAlpha: CGFloat = 0.77
    private let kMinBackgroundAlpha: CGFloat = 0.4

    var point: CGPoint
    var scale: CGFloat
    var backgroundAlpha: CGFloat {
        didSet {
            // Round the value
            backgroundAlpha = min(kMaxBackgroundAlpha, max(kMinBackgroundAlpha, backgroundAlpha))
        }
    }

    init() {
        point = CGPoint(x: 0, y: 0)
        scale = 1.0
        backgroundAlpha = kMinBackgroundAlpha
    }
}
ViewControllerとIBAction
onPinchGestureとonPanGestureで操作を受け取り、イメージビューを変形します。
class ViewController: UIViewController {
    @IBOutlet fileprivate weak var filterView: UIView!
    @IBOutlet fileprivate weak var imageView: UIImageView!

    lazy fileprivate var transformProperty = TransformProperty()

    override func viewDidLoad() {
        super.viewDidLoad()

        // Bring the expanded view to the forefront if needed
//        self.view.bringSubview(toFront: imageView)
    }

    @IBAction private func onPinchGesture(_ sender: UIPinchGestureRecognizer) {
        switch sender.state {
        case .changed:
            let scale = sender.scale
            if scale <= 1 {
                break
            }
            transformProperty.scale = (sender.scale - 1.0) * 0.5 + 1.0
            transform()
            // Darken the background color when scaled
            transformProperty.backgroundAlpha = (sender.scale - 1.0) * 0.8
            changeBaseViewBackgroundColor()
        case .ended, .cancelled:
            revertTransform()
        default:
            break
        }
    }

    @IBAction private func onPanGesture(_ sender: UIPanGestureRecognizer) {
        guard let view = sender.view else {
            return
        }
        switch sender.state {
        case .changed:
            transformProperty.point = sender.translation(in: view)
            transform()
            changeBaseViewBackgroundColor()
        case .ended, .cancelled:
            revertTransform()
        default:
            break
        }
    }
}
イメージビューの変形
transformPropertyの値に基づき、イメージビューを変形します。
指が離れて、操作が終わった時には、アニメーションを使って、元の位置にイメージビューを戻します。
fileprivate extension ViewController {
    func transform() {
        imageView.transform = CGAffineTransform(translationX: transformProperty.point.x, y: transformProperty.point.y)
            .scaledBy(x: transformProperty.scale, y: transformProperty.scale)
    }

    func revertTransform() {
        transformProperty = TransformProperty()
        UIView.animate(withDuration: 0.6, delay: 0.0, usingSpringWithDamping: 0.8, initialSpringVelocity: 1.0, options: .curveEaseOut, animations: { () -> Void in
            self.imageView.transform = CGAffineTransform.identity
            self.transform()
            self.filterView.backgroundColor = UIColor.clear
        }, completion: nil)
    }

    func changeBaseViewBackgroundColor() {
        filterView.backgroundColor = UIColor(red: 0.0, green: 0.0, blue: 0.0, alpha: transformProperty.backgroundAlpha)
    }
}
UIGestureRecognizerDelegateの実装
trueを返すことにより、一つのジェスチャー中に他のジェスチャーも受け取ることができます。
extension ViewController: UIGestureRecognizerDelegate {
    func gestureRecognizer(_ gestureRecognizer: UIGestureRecognizer, shouldRecognizeSimultaneouslyWith otherGestureRecognizer: UIGestureRecognizer) -> Bool {
        return true
    }
}
注意点
機能を実現するためには、イメージビューを最前面に表示し、その下にフィルタービューを表示する必要があります。
Interface Builderでのビューの重なりによっては、前面にビューを持ってくる必要があります。
また、イメージビューが入れ子構造になっている場合は、親要素ごと最前面に表示する必要があります。
self.view.bringSubview(toFront: imageView)

or

self.view.bringSubview(toFront: scrollView)
scrollView.bringSubview(toFront: stackView)
stackView.bringSubview(toFront: imageView)
サンプル
Scale-ImageView@githubに動作するプロジェクトがあります。
動作確認
このTipsは、「スマホの写真素材が売買できるサイトSnapmart」を開発する中で生まれました。
実際の動作をSnapmartアプリ(iOS)から確認できますので、是非ダウンロードしてみてください!
