はじめに
先日投稿した「LINEの音声メッセージをAmazon Transcribeで文字起こし」にて、Herokuを使わないほうがよいのではと思ったので、今回はAWSのみでLINEBOTを作ってみます~
また、Amazon Pollyというサービスが面白そうだったので、この機会に組み合わせてみます!
Amazon Pollyって?
簡単に言うと、文章を音声に変換してくれるサービスです。様々な言語に対応しており、かなり自然で人間っぽい音声を生成してくれます。さらに、音声合成マークアップ言語(SSML)を利用すればかなり細かく音声をカスタマイズできます。話す速度や声量はもちろんのこと、『ニュースキャスターの話し方』など面白そうなカスタマイズまでありました。詳しくは開発者ガイドのSSMLの使用で確認できます。
LINEBOTをAWSのみでつくる
それでは本題に参りましょ~
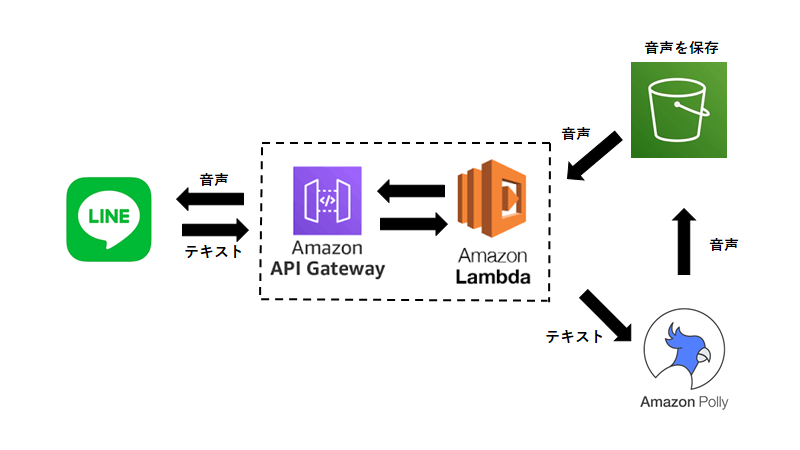
今回メインで利用するサービスは Amazon LambdaとAmazon API Gatewayです(図の通り)。
Step1. おうむ返しBOTが動くことを確認
おうむ返しBOTの作成に関して、上記サイトを参考にさせていただきました。
Step2. S3 Bucketの作成と設定
・バケットポリシー
このバケットは音声を保管するために作ります。バケット名はなんでもOKです。
次に、アクセス許可をクリックし、以下をバケットポリシーに追加します。
{
    "Version": "2012-10-17",
    "Statement": [
        {
            "Sid": "ReadObject",
            "Effect": "Allow",
            "Principal": "*",
            "Action": [
                "s3:GetObject"
            ],
            "Resource": [
                "arn:aws:s3:::<バケット名>/*"
            ]
        }
    ]
}
これによりバケットへのアクセスを可能にします。(※アクセスがオープンになるのでそこは気を付けて)下記URLは参考になります。
・CORS設定
また、CORSも設定します。バケットポリシーと同様に、アクセス許可をクリックし、下にスクロールします。下記をCross-Origin Resource Sharingに追加。
[
    {
        "AllowedHeaders": [
            "*"
        ],
        "AllowedMethods": [
            "GET",
            "HEAD",
            "POST",
            "PUT"
        ],
        "AllowedOrigins": [
            "*"
        ],
        "ExposeHeaders": []
    }
]
Step3. Lambdaの設定確認
・トリガー
API GatewayがトリガーになっていればOK!

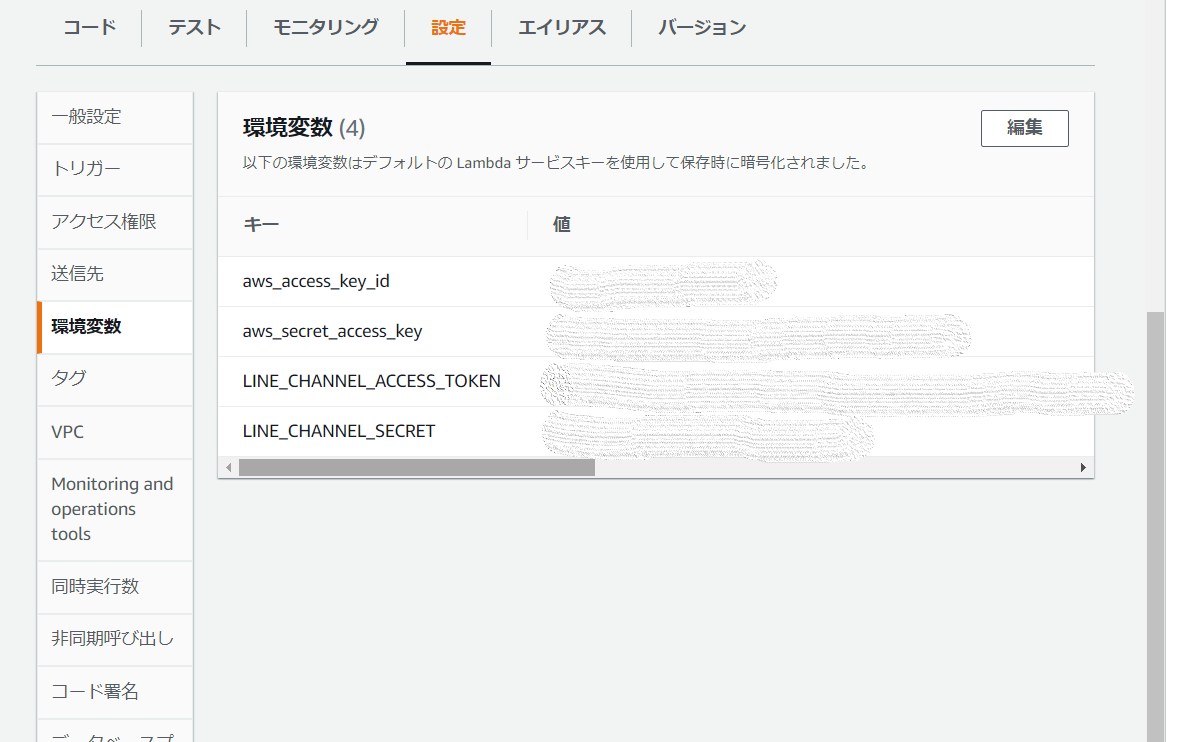
・環境変数の設定と確認
下のように4つ設定する必要があります。
上2つはAMIから取得可能。
下2つはLINEDeveloperから取得可能。
・実行ロールの確認
僕はロールの設定をミスしてしまい、エラーが出てしまいました。もしエラーが出たなら確認してみるといいかもしれません。
{
    "Version": "2012-10-17",
    "Statement": [
        {
            "Effect": "Allow",
            "Action": [
                "polly:SynthesizeSpeech",
                "s3:ListBucket",
                "s3:PutObject"
            ],
            "Resource": [
                "*"
            ]
        }
    ]
}
↑僕の場合、こんな感じのポリシーを実行ロールにアタッチしました。
Step4. lambda_function.pyの書き換え
いよいよラストです。メインのコードをPollyが使えるよう書き換えます!
最初にコードを全文記述しておきます。
import os
import sys
from linebot import (
    LineBotApi, WebhookHandler
)
from linebot.models import (
    MessageEvent, TextMessage, TextSendMessage, AudioSendMessage, AudioMessage
)
from linebot.exceptions import (
    LineBotApiError, InvalidSignatureError
)
import logging

logger = logging.getLogger()
logger.setLevel(logging.ERROR)

channel_secret = os.environ['LINE_CHANNEL_SECRET']
channel_access_token = os.environ['LINE_CHANNEL_ACCESS_TOKEN']

if channel_secret is None:
    logger.error('Specify LINE_CHANNEL_SECRET as environment variable.')
    sys.exit(1)
if channel_access_token is None:
    logger.error('Specify LINE_CHANNEL_ACCESS_TOKEN as environment variable.')
    sys.exit(1)

line_bot_api = LineBotApi(channel_access_token)
handler = WebhookHandler(channel_secret)

import boto3
from boto3 import Session
from boto3 import resource
from contextlib import closing

def lambda_handler(event, context):
    if "x-line-signature" in event["headers"]:
        signature = event["headers"]["x-line-signature"]
    elif "X-Line-Signature" in event["headers"]:
        signature = event["headers"]["X-Line-Signature"]
    body = event["body"]

    ok_json = {"isBase64Encoded": False,
              "statusCode": 200,
              "headers": {},
              "body": ""}
    error_json = {"isBase64Encoded": False,
                  "statusCode": 500,
                  "headers": {},
                  "body": "Error"}

    @handler.add(MessageEvent, message=TextMessage)
    def message(event):
        text=event.message.text
        message_id=event.message.id

        #使用するバケットの指定
        s3 = resource('s3')
        bucket = s3.Bucket("<バケット名>")

        polly_client = boto3.Session(
                    aws_access_key_id=os.environ['aws_access_key_id'],
                    aws_secret_access_key=os.environ['aws_secret_access_key'],
                    region_name='ap-northeast-1').client('polly')

        response = polly_client.synthesize_speech(VoiceId='Mizuki',
                        OutputFormat='mp3',
                        Text = text)

        with closing(response["AudioStream"]) as stream:
            bucket.put_object(Key=f"{message_id}.mp3", Body=stream.read())

        #バケット内の音声
        original_content_url=f"https://<バケット名>.s3-ap-northeast-1.amazonaws.com/{message_id}.mp3"

        #返信
        line_bot_api.reply_message(
        event.reply_token,
        AudioSendMessage(
            original_content_url=original_content_url,
            duration=5000
        ))

    try:
        handler.handle(body, signature)
    except LineBotApiError as e:
        logger.error("Got exception from LINE Messaging API: %s\n" % e.message)
        for m in e.error.details:
            logger.error("  %s: %s" % (m.property, m.message))
        return error_json
    except InvalidSignatureError:
        return error_json

    return ok_json
今回はPollyに関する部分のみ解説します~
1.ユーザーが送信した文字を取得
    @handler.add(MessageEvent, message=TextMessage)
    def message(event):
        text=event.message.text
        message_id=event.message.id
2.バケットを指定
        s3 = resource('s3')
        bucket = s3.Bucket("<バケット名>")
3.Pollyの使用を宣言
        polly_client = boto3.Session(
                    aws_access_key_id=os.environ['aws_access_key_id'],
                    aws_secret_access_key=os.environ['aws_secret_access_key'],
                    region_name='ap-northeast-1').client('polly')
4.どのようにPollyを使用するか
        response = polly_client.synthesize_speech(VoiceId='Mizuki',
                        OutputFormat='mp3',
                        Text = text)
VoiceIdは誰の声で出力するか決めます(日本語はMizukiかTakumiを選択できます)
5.音声ファイルで出力し、バケットに格納
        with closing(response["AudioStream"]) as stream:
            bucket.put_object(Key=f"{message_id}.mp3", Body=stream.read())
(上記URLが参考になります)
6.音声をユーザーに返信
        #バケット内の音声
        original_content_url=f"https://<バケット名>.s3-ap-northeast-1.amazonaws.com/{message_id}.mp3"

        #返信
        line_bot_api.reply_message(
        event.reply_token,
        AudioSendMessage(
            original_content_url=original_content_url,
            duration=5000
        ))
Step5. 動作確認
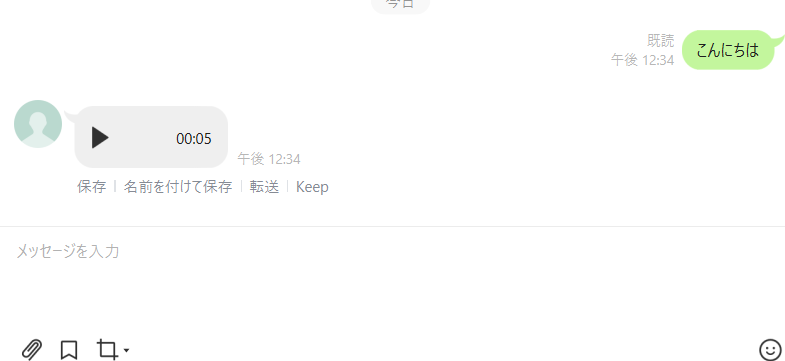
こんな感じで音声が返されればOK!
もし、うまくいかなかったらAmazon CloudWatchでログとエラー内容を確認してみてください
まとめ
前回の反省を活かし、すべてAWSでLINEBOTを作ってみました。思ったより簡単にできたので、ぜひ作ってみてください。Pollyのほかにも面白いサービスがあるのでそちらも試してみると面白いでしょう!様々な応用が利きそうですね~
音声は友達に送りつけてやりましょう!!!
ここまで見てくださりありがとうございました!まだまだ初心者なので何か改善点などございましたらコメントよろしくお願いします。(またLGTMしてくれたら喜びます。。。。)