前回の記事
データをサーバー側に配置する-Express MongoDB を使って簡単なアプリを作る
前回の記事で、データをサーバー側に配置しましたが、今回はデータベースにデータを入れて運用したいと思います。
最終の記事はQruchにupしましたので、よろしければ寄ってください。
herokuに登録する-Express MongoDB を使って簡単なアプリを作る
使用ライブラリのバージョン
| パッケージ | バージョン |
|---|---|
| MongoDB | v4.0.4 |
インストールが済んでいれば、sudo mongod でMongoサーバーがdefult状態で起動しますので、MongoShellで中に入れることを確認します。
mongo
> show dbs
admin      0.000GB
config     0.000GB
local      0.000GB
>exit
MongoDB側は、OKですので node.jsからアクセスできるように、ドライバーをインストールしていきます。
yarn add mongodb でドライバーをインストールします。
package.json を確認します。
{
  "name": "myapp",
  "version": "0.0.0",
  "private": true,
  "scripts": {
    "start": "node ./bin/www"
  },
  "dependencies": {
    "cookie-parser": "~1.4.3",
    "debug": "~2.6.9",
    "express": "~4.16.0",
    "http-errors": "~1.6.2",
    "mongodb": "^3.1.10",
    "morgan": "~1.9.0",
    "node-sass-middleware": "0.11.0",
    "pug": "2.0.0-beta11"
  }
}
ドライバーが入ったので、index.jsに設定を追加していきます。
var express = require('express');
var router = express.Router();
const MongoClient = require('mongodb').MongoClient
const url = 'mongodb://localhost:27017/myproject'
const dbName = 'myproject'

const main = async () => {
  const client = new MongoClient(url, { useNewUrlParser: true })
  await client.connect()
  console.info("Connected  Server ...")
  const db = client.db(dbName)
  /* GET home page. */
  router.get('/', function(req, res, next) {
    res.render('index', { title: 'Express' });
  });
  router.get('/api/insertMany', async(req, res, next) => {
    const collection = db.collection('omikuji')
    await collection.insertMany([
      {"item": "大吉"},
      {"item": "中吉"},
      {"item": "末吉"},
      {"item": "凶"},
    ])
      .then(r => console.log(r.result))
      .catch(err => console.error(err))
    res.send('insertMany done')
  })
  router.get('/api/random', async(req, res, next) => {
    const collection = db.collection('omikuji')
    const result = await collection.aggregate([
      { $sample: { size: 1 }}
    ]).toArray()
    // console.log(result[0])
    res.json(result[0])
  })
  // router.get('/api/random', (req, res, next) => {
  //   const items = [ '大吉', '中吉', '末吉', '凶']
  //   const random = Math.floor(Math.random()*items.length)
  //   const item = {
  //     item: items[random]
  //   }
  //   res.json(item)
  // })
}
main()

module.exports = router;
だいぶ賑やかになりましたが、DBには基本コレクションメソッドを使ってアクセスしますので、それの準備の記述だと思ってもらったらいいかと思います。
コレクションメソッドの基本はcollection.find, collection.delte, collection.update などの形にして使いたいのです。
コレクションというのは、エクセルソフトのシートによく例えられますがコードを書いている人であれば、javascriptでDOMを操作するところを例にしたほうがわかりやすいかもしれません。
const btn = document.querySelector('#btn') この記述でクリックしたり、結果表示を書き込んだり出来るようになりますが、コレクションメソッドもcollectionを元に切ったり張ったりする感じです。
あと、DBとExpressサーバーは、別物なのでデータの取得には、コスト(時間)がかかると考えます。そのためawaitを挟んで処理結果がやってくるのを待つ必要があります。 いわゆる非同期処理というものです。 await を使いたい場合は、async もセットで使う必要があります。
実装すると、だいたい上記のようなコードに収まります。
DBには、まだデータがはいっていませんので、/api/insertMany を使っていれてみます。 ブラウザーのURL欄を使えばいいですね。
http://localhost:3000/api/insertManyを実行するとinsertMany done と表示が出るはずですので、DBにデータが入ったはずです。
mongo Shellを使って実際確認してみるといいかもしれません。
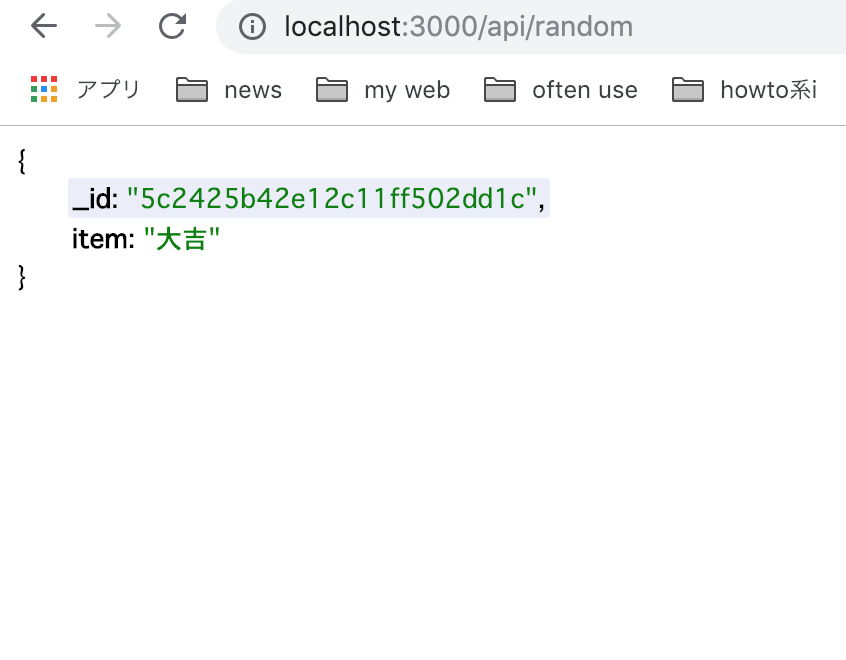
/api/random を実行すると、値がランダムに一個取得されます。
こちらもブラウザーのURLで確認してみます。
index.js 抜粋
const result = await collection.aggregate([
  { $sample: { size: 1 }}
]).toArray()
コレクションメソッドの中身を簡単に説明しますとaggregateは、主に集計時に使うメソッドなのですが、そのときのオプションに、ランダムな値を取得する$sampleが用意されていますので、これを使ってランダムな値(MongoDB的には、ドキュメント)を取得しています。
まさに今回ほしい命令で、JSで乱数を作る必要もなくなります。
返り値は、配列ですので結果の0番目を取得しています。
http://localhost:3000/にアクセスして、運勢が占えるか確認してみてください。
削除と追加
これでほぼ実装は完了したのですが、せっかくなので全削除と1件追加も実装してみたいと思います。
index.js
var express = require('express');
var router = express.Router();
const MongoClient = require('mongodb').MongoClient
const url = 'mongodb://localhost:27017/myproject'
const dbName = 'myproject'

const main = async () => {
  const client = new MongoClient(url, { useNewUrlParser: true })
  await client.connect()
  console.info("Connected  Server ...")
  const db = client.db(dbName)
  /* GET home page. */
  router.get('/', function(req, res, next) {
    res.render('index', { title: 'Express' });
  });

  // api
  router.post('/api/new', async(req, res) => {
    const collection = db.collection('omikuji')
    console.log(req.body)
    await collection.insertOne(req.body)
      .then(r => console.log(r.result))
      .catch(err => console.error(err))

    res.redirect('/')
  })
  router.get('/api/deleteMany', async(req, res) => {
    const collection = db.collection('omikuji')
    await collection.deleteMany({})
      .then(r => console.log(r.result))
      .catch(err => console.error(err))
    res.send('DeleteMany done')
  })
  router.get('/api/insertMany', async(req, res, next) => {
    const collection = db.collection('omikuji')
    await collection.insertMany([
      {"item": "大吉"},
      {"item": "中吉"},
      {"item": "末吉"},
      {"item": "凶"},
    ])
      .then(r => console.log(r.result))
      .catch(err => console.error(err))
    res.send('insertMany done')
  })
  router.get('/api/random', async(req, res, next) => {
    const collection = db.collection('omikuji')
    const result = await collection.aggregate([
      { $sample: { size: 1 }}
    ]).toArray()
    // console.log(result[0])
    res.json(result[0])
  })
}
main()

module.exports = router;
/api/delteMany はブラウザーのURL欄を使えば、DBからデータをすべて削除してくれるはずです。
/api/new は、1件追加用なのですが、post命令を使っているので、残念ながらブラウザーのURL欄が使えませんので、curl, HTTPieなどのターミナルから使える、httpクライアントを使います。
今回は、HTTPieをつかいますので、入ってない場合は便利なので入れてみてください。
http localhost:3000/api/random
HTTP/1.1 200 OK
Connection: keep-alive
Content-Length: 53
Content-Type: application/json; charset=utf-8
Date: Thu, 27 Dec 2018 02:16:05 GMT
ETag: W/"35-qdu8Y7FAKzal0TPpKO3d/AM4Y0c"
X-Powered-By: Express

{
    "_id": "5c2228cd2b7dc207d918d875",
    "item": "のの吉"
}
http localhost:3000/api/deleteMany データを消しておきます
http POST localhost:3000/api/new item=momo データを1件入れます
http localhost:3000/api/random 1件しか入っていないはずなので、momoのデータが取得できるはずです。
サーバー側の実装は終わりましたので、フロントエンド側に1件のデータを投げる部分を記述していきたいと思います。
index.pugにポスト用フォームを追加します。
extends layout

block content
  #btn 今日の運勢
  section.new
    form(method="POST" action="/api/new")
      input(type="text" name="item" placeholder="ネコ吉" ).item
      input(type="submit" value="Create").submit
  script(src="javascripts/main.js")
スタイルもつけておきます
style.scss
# btn {
  margin: 60px auto 0;
  width: 300px;
  height: 100px;
  border-radius: 5px;
  background-color: #ec3f3f;
  color: #fff;
  text-align: center;
  line-height: 100px;
  font-size: 33px;
  font-weight: bold;
  cursor: pointer;
  opacity: .8;
  user-select: none;
  &:hover {
    opacity: 1;
  }
}
.new {
  margin: 20px auto 0;
  width: 300px;
  height: 50px;
  line-height: 50px;
  background-color: rgba(40, 46, 40, 0.507);
  color: #fff;
  text-align: center;
  border-radius: 5px;
  .submit{
    width: 80px;
    color: red;
    cursor: pointer;
    font-size: 24px;
    margin: 0 10px;
  }
}
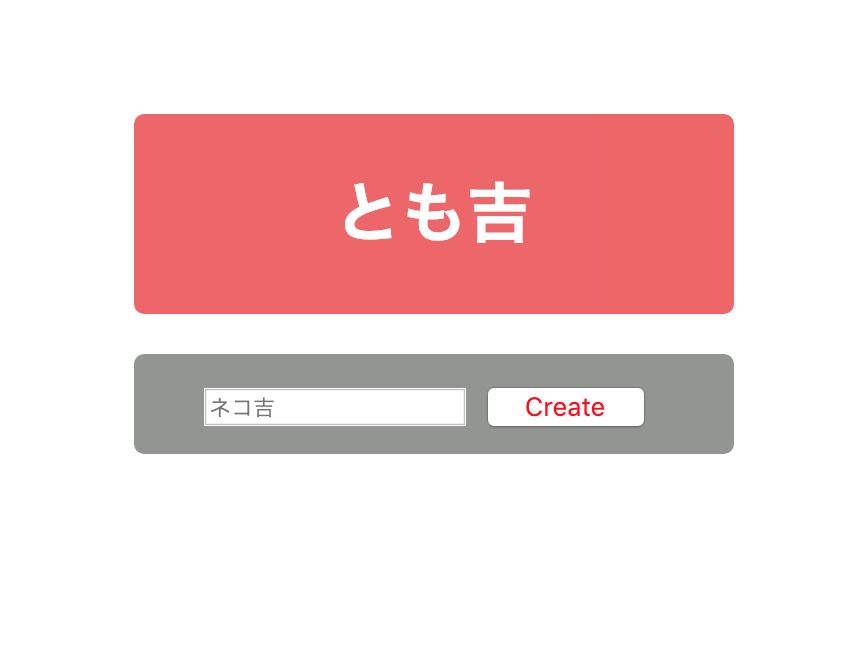
いい感じに、収まったのではないでしょうか。(笑)
http://localhost:3000/にアクセスして、追加と占が出来るか試してみてください。
今回はここまでにしたいと思います。
次回で終了にするつもりですが、内容的にはcsrf対策を最低限施して、heroku にサービスとしてupしたいと思います。
QiitaとQranch にクロス投稿をしていましたが、最後の記事は、Qranchのみにしますので、良ければよっていってください。 よろしくおねがいします。m(__)m
herokuに登録する-Express MongoDB を使って簡単なアプリを作る
ここまでのコード
コミット: step3.1
コードは、githubにもupしていますので、うまく動かない方は覗いてみてください。https://github.com/atoris1192/omikujiExpress2
git reset --hard e87b2fc88c47
git pull origin master
git reset --hard 7f13d73fd0014