環境
MacOS:11.5.2
Nuxt.js:2.14.12
CompositAPI:^1.4.3
Node.js:16.13.2
docker:20.10.7
docker-compose: 1.29.2
ディレクトリ構成(完成後)
project
├── README.md
├── application
│   ├── assets
│   ├── components
│   ├── layouts
│   ├── middleware
│   ├── node_modules
│   ├── nuxt.config.ts
│   ├── package-lock.json
│   ├── package.json
│   ├── pages
│   ├── plugins
│   ├── static
│   ├── store
│   └── tsconfig.json
├── docker
│   └── Dockerfile
└── docker-compose.yml
nuxtプロジェクトを生成
ルートディレクトリを作成し移動
mkdir project
cd project
nuxtアプリケーションを生成
npx create-nuxt-app application

## 設定情報
? Project name: project_name
? Programming language: TypeScript
? Package manager: Npm
? UI framework: Vuetify.js
? Nuxt.js modules: Axios - Promise based HTTP client
? Linting tools: ESLint
? Testing framework: None
? Rendering mode: Single Page App
? Deployment target: Server (Node.js hosting)
? Development tools: jsconfig.json (Recommended for VS Code if you're not using
typescript)
? Continuous integration: None
? Version control system: Git
参考:https://nuxtjs.org/ja/docs/get-started/installation
設定についての補足
- Programming language:TypeScriptを選択
- Package manager:npm、yarnお好みで選択
- UI framework:勉強のためVuetify.jsを選択
- Testing framework:使用するフレームワーク未定のめ選択せず
- Rendering mode:SSRは必要ではないためSPAを選択
- Development tools:typescriptを使用するため、jsconfig.jsonは不要
動作確認
Dockerで構築するため不要だが、一応確認。
cd application
npm run dev

(中略)

   ╭───────────────────────────────────────╮
   │                                       │
   │   Nuxt @ v2.15.8                      │
   │                                       │
   │   ▸ Environment: development          │
   │   ▸ Rendering:   client-side          │
   │   ▸ Target:      server               │
   │                                       │
   │   Listening: http://localhost:3000/   │
   │                                       │
   ╰───────────────────────────────────────╯

ℹ Preparing project for development                                                                                              12:11:06
ℹ Initial build may take a while                                                                                                 12:11:06
ℹ Discovered Components: .nuxt/components/readme.md                                                                              12:11:06
✔ Builder initialized                                                                                                            12:11:06
✔ Nuxt files generated                                                                                                           12:11:06

✔ Client
  Compiled successfully in 6.68s

ℹ Waiting for file changes                                                                                                       12:11:15
ℹ Memory usage: 375 MB (RSS: 497 MB)                                                                                             12:11:15
ℹ Listening on: http://localhost:3000/                                                                                           12:11:15
No issues found.
localhost:3000にアクセスし、nuxtプロジェクトが立ち上がっていることを確認。
Typescript対応
nuxt.config.jsをnuxt.config.tsへ変更
公式ドキュメント参考
https://typescript.nuxtjs.org/ja/
拡張子を.tsに変更。
記述方法が.jsのままでエラーが出るため下記を変更。
import colors from 'vuetify/es5/util/colors'

export default {
  // (中略)

}
import colors from 'vuetify/es5/util/colors'
// 追記
import { NuxtConfig } from '@nuxt/types'

// 変更
const config: NuxtConfig = {
  // (中略)

}

// 追記
export default config
tsconfig.jsonの編集
Vuetifyの型定義ファイルの読み込みエラーが発生するので、tsconfig.josnの型定義にvuetifyを追加する。
"types": [
  "@nuxt/types",
  "@nuxtjs/axios",
  "@types/node",
  "vuetify"  // 追記
]
Composition APIをnuxt.jsに導入
参考:https://typescript.nuxtjs.org/ja/
applicaitonフォルダ直下で下記のコマンドを実行
Composition APIをインストール
npm install @vue/composition-api
プラグインのインストール
nuxt.jsプロジェクト内で@vue/composition-apiプラグインを使用する必要があるため、プロジェクト内でプラグインの使用を宣言する。
application/pluginsの直下に「composition-api.js」を作成。
import Vue from 'vue'
import VueCompositionApi from '@vue/composition-api'

Vue.use(VueCompositionApi)
nuxt.config.tsで@vue/composition-apiプラグインを登録する。
const config: NuxtConfig = {
  // (中略)
  plugins: ['@/plugins/composition-api']
}
動作確認
CompositionAPIを使ったVueコンポーネントを試しに作成する。
application/views直下に「composition.vue」を作成。
<template>
  <div>
    Name: {{ fullName }}
    <br>
    Message: {{ message }}
  </div>
</template>

// typescriptを使用するため lang="ts"とする。
<script lang="ts">
// composition APIを使用するためのインポート
import { defineComponent, computed, ref } from '@vue/composition-api'

interface User {
  firstName: string
  lastName: string
}

export default defineComponent({
  setup () {
    const user: User = {
      firstName: 'yamada',
      lastName: 'taro'
    }
    const fullName = computed(() => `${user.firstName} ${user.lastName}`)
    const message = ref('Composition test')

    return {
      fullName,
      message
    }
  }
})
</script>
参考:https://typescript.nuxtjs.org/ja/cookbook/components/
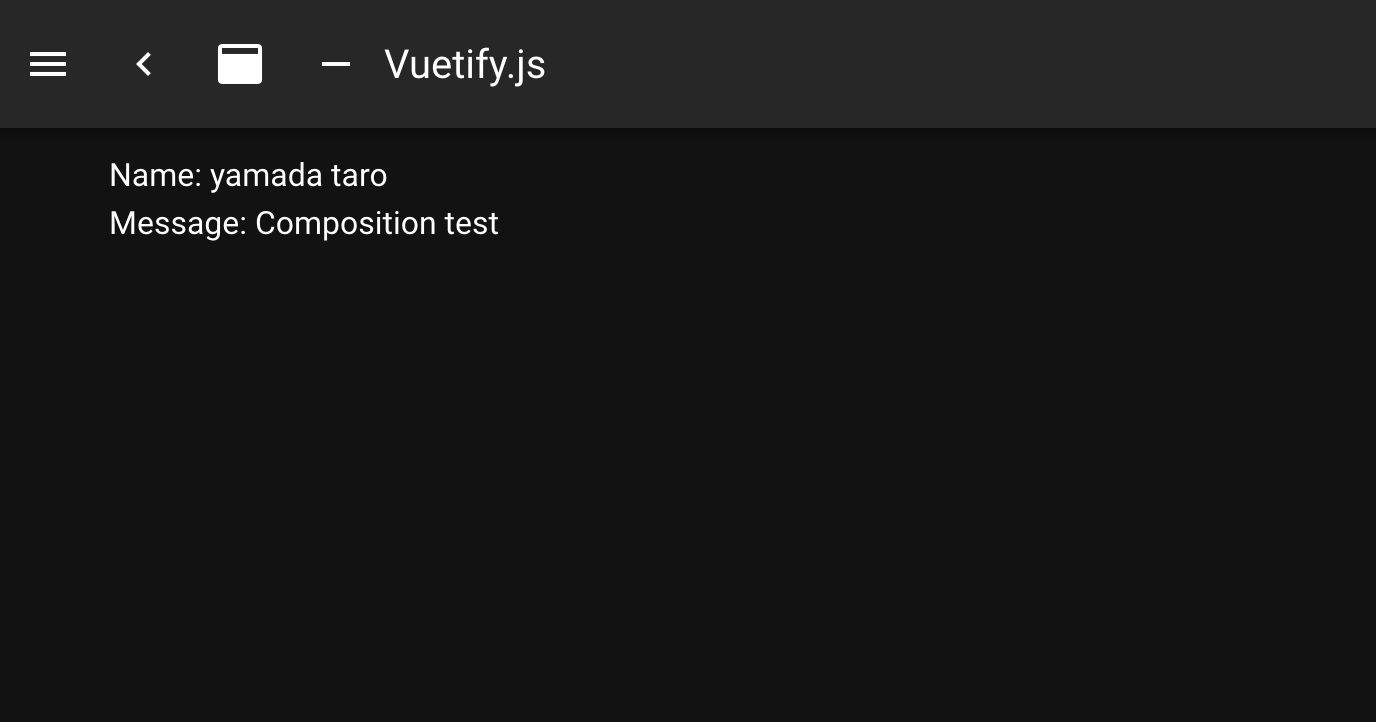
npm run devで開発サーバを立ち上げた後、「http://localhost:3000/composition 」にアクセスし、NameとMessageが表示されていることを確認。
Dockerで開発環境を構築する
Dockerfileの作成
application/docker直下に、Dockerfileを作成
# 公式で最新の最新の LTS バージョンがインストールを推奨とあったので、最新のLTSのイメージを使用
# https://nodejs.org/en/
FROM node:16.13.2-alpine

# ADDやCOPY、CMDを実行するフォルダを指定
# 指定しないと、package.jsonのインストール時にエラーになる
WORKDIR /var/www

RUN apk update

# Macのlocalhostからdockerコンテナにアクセスするために必要
ENV HOST 0.0.0.0

# 待ち受けポートを明示
EXPOSE 3000
docker-compose.ymlの作成
applicationフォルダ直下に「docker-compose.yml」を作成
version: "3"

services:
  web-front:
    build: ./docker
    container_name: web-front
    networks:
      - web-network
    volumes:
      - ./application:/var/www/
      - node-modules:/var/www/node_modules
    ports:
      - "3000:3000"
    restart: always
    tty: true
    command: sh -c "npm install && npm run dev"

networks:
  web-network:

volumes:
  node-modules:
それぞれの設定についてメモ
# buildに使用するDockerfileの相対パス
build: ./docker

# 必須ではないが、生成されるコンテナ名を毎回同じにしたいため指定
container_name: web-front

# ゆくゆくはバックエンド側のコンテナと通信を行いたいため指定
networks: web-network

# nuxtプロジェクトをDockerfileで指定したWORKDIRにマウント
# node_modulesを保存しておくためのvolumeを指定
volumes:
 - ./application:/var/www/
 - node-modules:/var/www/node_modules

# web-networkのポートとコンテナの待ち受けポートをマッピング
# nuxtはデフォルトで3000ポートを使用
ports:
 - "3000:3000"

# コンテナの軌道に失敗した場合、リスタートするよう設定
restart: always

# コンテナの出力を標準出力に出力するために設定
tty: true

# コンテナ起動後に実行するコマンド
command: sh -c "npm install && npm run dev"
※dockerは勉強不足のため、間違っていたらアドバイスいただけると嬉しいです。
動作確認
docker-compose.ymlのあるディレクトリで下記コマンドを実行
docker-compose up
コンテナ上で開発サーバが立ち上がったのを確認したら「localhost:3000/」へアクセスし、nuxtプロジェクトのトップ画面が表示されるのを確認。
githubにプッシュする
applicationフォルダに.gitがあるため、削除
※ルートディレクトリ直下に.gitを生成するため、削除をしておかないとgit addでエラーとなる
cd application
rm -rf .git
Githubでプッシュするリポジトリを作成。
作成すると、Githubのリポジトリへのpush方法が案内されるので、ルートディレクトリ直下で案内にしたがってコマンドを実行。
echo "# project" >> README.md
git init
git add README.md
git commit -m "first commit"
git branch -M main
git remote add origin git@github.com:{githubID}/{プロジェク名}.git
git push -u origin main
以上。