はじめに
機能が豊富なPostgreSQLは、FDW(外部データラッパ)やテーブルパーティショニング機能の充実で益々便利になってきました。これまでデータベースは単体で使う事が普通だったと思いますが、これからはスケールアウト用途で複数のデータベースを同時に使う機会も増えてくるかもしれません。
データベースを安定運用するには統計情報の確認が欠かせませんが、複数のデータベースを扱うようになると個々の値をチェックするだけでなく、データベース間の統計値を比較してバランスをとる必要が出てきますので、統計情報のバランスがパッと見分かると嬉しいですよね。
そこで、PostgreSQLの統計データをグラフ化してみようと思います。
データの可視化には(色々な意味で最近ハマっている)Nuxt.jsを使ってみました。
なお、PostgreSQLのモニタリング手法やツールの導入を真面目に検討されている方は、公式サイトのwiki をご覧ください。
このテーマで書き始めた所、少々長くなってしまいましたので、目的別に章を4つに分けました。
1.環境構築編(この章です)
2.バックエンド編
3.フロントエンド編
4.単体テスト編
興味のある章をお選びください。
環境構築 事始め
普段はLinuxを使っているのですが、今回はWindows上で環境構築にチャレンジしてみました。
まずは、npm をインストールします。
・Node.js の公式サイト https://nodejs.org/ja/
続いて、後から色々便利なのでyarnもインストールします。
・yarn の公式サイト https://yarnpkg.com/ja/
エディタとしてVisual Studio Code (VSCode)をインストールします。
・VSCode の公式サイト https://code.visualstudio.com/
データベース(PostgreSQL)環境構築
(リモート環境のPostgreSQLを使う場合は「Nuxt環境構築」の章までスキップしてください)
Windows用のPostgreSQLのインストーラは、EnterpriseDB社のサイトからダウンロード出来ます。
https://www.postgresql.org/download/windows/
インストーラを起動してメッセージに従ってインストールしてください。
(今回は2019年12月時点で最新のバージョン12をインストールしました。)
pg_stat_statementsモジュール設定
"postgresql.conf"ファイルに'shared_preload_libraries'で'pg_stat_statements'を読み込むように設定を追加します。postgresql.confファイルは、デフォルトだと"C:\Program Files\PostgreSQL[version]\data"の下にあると思います。
(設定後、postgreSQLの再起動が必要です)
# - Shared Library Preloading -
shared_preload_libraries = 'pg_stat_statements'
pg_stat_statements.max = 10000
pg_stat_statements.track = all
DB作成
PostgreSQLのインストール時に同梱されているpgAdmin4を使ってデータベースを作ってみます。
"Servers" >"PostgreSQL 12" > "Databases"を右クリックして"Create" > "Database..."を選択します。
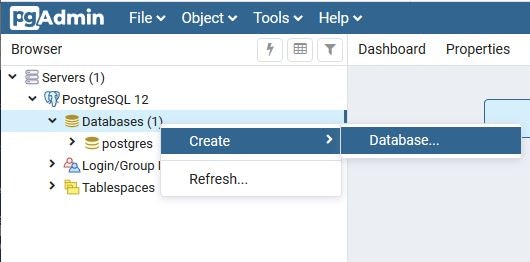
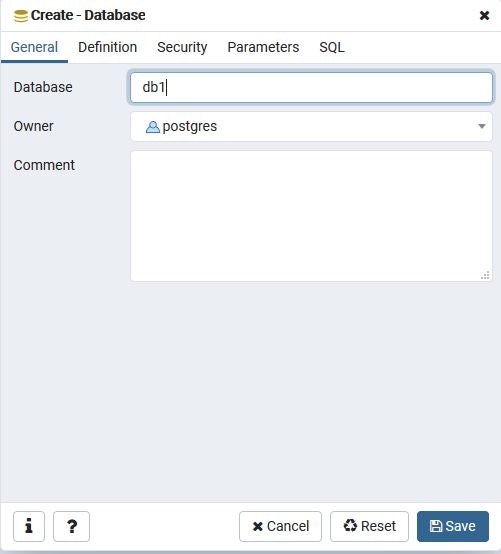
DB名を編集してデータベースを作成します。
Extension登録
作成したデータベースの"Extensions"を右クリックして"Create" > "Extension..."を選択します。
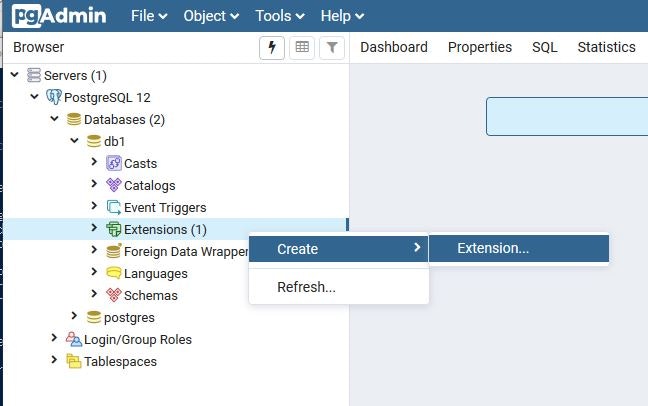
"Name"のプルダウンから"pg_stat_statements"を選択し、Extensionを登録します。

SQLでExtensionを登録する場合は、以下のSQLを実行します。
CREATE EXTENSION pg_stat_statements;
Nuxt環境構築
作業フォルダに移動して、PowerShellで npx create-nuxt-app プロジェクト名 というコマンドを叩きます。
(ここでは例としてpgmonというプロジェクト名を使っています)
> npx create-nuxt-app pgmon
環境構築時に色々聞いてきますが、以下を選択しました。
| 質問事項 | 選択 |
|---|---|
| Choose the package manager | Yarn |
| Choose UI framework | Vuetify.js |
| Choose custom server framework | Express |
| Choose Nuxt.js modules | Axios |
| Choose linting tools | ESLint |
| Choose test framework | Jest |
| Choose rendering mode | Universal (SSR) |
| Choose development tools | jsconfig.json |
プロジェクト名で指定したフォルダが出来ていますので、プロジェクトフォルダに降ります(ここ大事)。
続いて、今回の開発に必要なモジュールをインストールします。
> yarn add vue-context
> yarn add @nuxtjs/axios
> yarn add compression
> yarn add path
> yarn add cors
> yarn add pg pg-hstore
> yarn add -D nyc
> yarn add vue-i18n
> yarn add apexcharts vue-apexcharts
> yarn add eslint-config-prettier eslint-loader eslint-plugin-vue
> yarn add mocha supertest
以下のコマンドで環境をビルドして成功すればOKです。
> yarn run build
バックエンドサーバ(Express)環境設定
起動スクリプトがどうなっているかをpackage.jsonで確認します。
 "scripts": {
    "dev": "cross-env NODE_ENV=development nodemon server/index.js --watch server",
    "build": "nuxt build",
    "start": "cross-env NODE_ENV=production node server/index.js",
    "generate": "nuxt generate",
    "lint": "eslint --ext .js,.vue --ignore-path .gitignore .",
    "test": "jest"
  },
この例では"server/index.js"から起動されている事が分かります。
デフォルトの"server/index.js"にはフロントエンド側しか書かれていないので、バックエンド側(Express)の起動を追加します。
まず、"nuxt.config.js"にフロントエンドとバックエンドの待ち受けポート等の設定を追加します。
module.exports = {
  mode: 'universal',
  frontend: {
    host: '0.0.0.0',
    port: '8080'
  },
  backend: {
    host: '0.0.0.0',
    port: '3000'
  },
  env: {
    apiUrl: 'http://localhost:3000'
  },
(以下略)
次に、"server/index.js"にバックエンド側(Express)の起動を追加します。
const express = require('express')
const consola = require('consola')
const { Nuxt, Builder } = require('nuxt')
const compression = require('compression')
const cors = require('cors')
// Import and Set Nuxt.js options
const config = require('../nuxt.config.js')
config.dev = process.env.NODE_ENV !== 'production'
// Init Nuxt.js
const nuxt = new Nuxt(config)
// Backend startup script
async function backend() {
  const app = express()
  app.use(compression({
    threshold: 0,
    level: 9,
    memLevel: 9
  }))
  app.use(express.json())
  app.use(express.urlencoded({ extended: false }))
  app.use(cors())
  const { host, port } = nuxt.options.backend
  var http = require('http')
  app.set('port', port)
  var server = http.createServer(app)
  server.listen(port, host)
  consola.ready({
    message: `Backend listening on ${host}:${port}`,
    badge: true
  })
}

backend()  // start backend script
多言語対応(i18n)の設定
"lang"フォルダの下に日本語定義ファイル(ja.json)と英語定義ファイル(en.json)を用意し、"nuxt.config.js"に"nuxt-i18n"の設定を追加します。
  modules: [
    '@nuxtjs/axios',
    [
      'nuxt-i18n',
      {
        locales: [
          {
            code: 'en',
            iso: 'en',
            file: 'en.json'
          },
          {
            code: 'ja',
            iso: 'ja',
            file: 'ja.json'
          }
        ],
        defaultLocale: 'ja',
        lazy: true,
        langDir: 'lang/'
      }
    ]
  ],
日本語設定ファイル(ja.json)はこんな感じです。
{
  "label": {
    "otherError": "エラー",
    "pageNotFound": "ページはありません",
    "pgbmon": "Pg バランスモニター"
  },
  "button": {},
  "tooltip": {
    "menu": "メニュー"
  },
  "message": {
    "otherError": "エラーが発生しました",
    "pageNotFound": "指定のページはありません"
  }
}
"layout/error.vue"を多言語化すると、こんな感じです。
<template>
  <v-app dark>
    <h1 v-if="error.statusCode === 404">
      {{ $t('label.pageNotFound') }}
    </h1>
    <h1 v-else>
      {{ $t('label.otherError') }}
    </h1>
    <NuxtLink to="/">
      {{ $t('label.homePage') }}
    </NuxtLink>
  </v-app>
</template>
<script>
export default {
(省略)
  data () {
    const $t = this.$t.bind(this)
    return {
      pageNotFound: $t('message.pageNotFound'),
      otherError: $t('message.otherError')
    }
  }
}
</script>
コード検証ツール(ESLint)の設定
Nuxt環境構築時にESLintはインストールされていますが、Expressのコードやテストコード用に".eslintrc.js"に設定値を追加します。
  "env": {
    "browser": true,
    "es6": true,
    "node": true,
    "jest": true
  },
  "extends": [
    "@nuxtjs",
    "plugin:nuxt/recommended"
  ],
  "globals": {
    "Atomics": "readonly",
    "SharedArrayBuffer": "readonly"
  },
  "parserOptions": {
    "parser": "babel-eslint",
    "ecmaVersion": 2018,
    "sourceType": "module"
  },
  "plugins": [
    "vue"
  ],
  "rules": {
    "no-unused-vars": ["error", { "args": "none" }],
    "func-call-spacing": ["error", "never"],
    "no-multi-spaces": 0,
    "no-var": 0,
    "nuxt/no-cjs-in-config": "off",
    "vue/singleline-html-element-content-newline": 0,
    "vue/max-attributes-per-line": 0,
    "object-shorthand": 0,
    "quote-props": ["error", "as-needed"]
  }
package.jsonに以下の記述が無ければ追加してください。
"scripts": {
    (省略)
    "lint": "eslint --ext .js,.vue --ignore-path .gitignore .",
    "lintfix": "eslint --fix --ext .js,.vue --ignore-path .gitignore ."
  },
テストツール(mocha,supertest)の設定
Nuxt環境構築時にJestがインストールされていますが、バックエンドのExpressのテストはsupertest+mochaが便利なので、"package.json"のスクリプトに設定を追加します。
"scripts": {
    (省略)
    "test": "jest ./test/store/statistics.spec.js",
    "nyc": "nyc mocha --timeout 20000 ./test/routers/*.spec.js",
  },
(省略)
 "jest": {
    "transform": {
      "^.+\\.(js)$": "babel-jest",
      ".*\\.(vue)$": "vue-jest"
    },
    "moduleNameMapper": {
      "^@/(.*)$": "<rootDir>/$1",
      "^~/(.*)$": "<rootDir>/$1"
    },
    "moduleFileExtensions": [
      "js",
      "vue"
    ],
    "collectCoverageFrom": [
      "<rootDIr>/**/*.{js,vue}"
    ]
  },
  "babel": {
    "presets": [
      [
        "@babel/preset-env",
        {
          "targets": {
            "node": "current"
          }
        }
      ]
    ]
  },
  "nyc": {
    "check-coverage": true,
    "sourceMap": true,
    "instrument": true,
    "exclude": [
      ".nuxt",
      "app.js",
      "*.js",
      "*.sh",
      "*.json",
      "bin",
      "config",
      "coverage",
      "log",
      "middleware",
      "migrations",
      "node_modules",
      "plugins",
      "public",
      "seeders",
      "store",
      "server/*.js",
      "test",
      "pgmon/.nuxt"
    ],
    "reporter": [
      "html",
      "text"
    ],
    "require": [],
    "extension": [
      ".js"
    ],
    "cache": true,
    "all": true,
    "report-dir": "./coverage"
  }
さらに"nuxt.config.js"に設定を追加します。
  build: {
    extend (config, ctx) {
       if (ctx.isDev && ctx.isClient) {
        config.module.rules.push({
          enforce: "pre",
          test: /\.(js|vue)$/,
          loader: "eslint-loader",
          exclude: /(node_modules)/
        })
      }
    }
  }
server環境構築
"server"の下に"models"フォルダと"routers"フォルダを作成し、"config.js"ファイルを作成します。
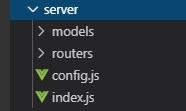
config.jsにはバックエンドが接続するデータベースの情報を記述します。
exports.dbConf = [
    {
        host: 'localhost',
        database: 'db1',
        port: 5432,
        user: 'postgres',
        password: 'xxxxxxxx',
        max: 20,
        idleTimeoutMillis: 30000,
        connectionTimeoutMillis: 2000
    },
    {
        host: 'localhost',
        database: 'db2',
        port: 5432,
        user: 'postgres',
        password: 'xxxxxxxx',
        max: 20,
        idleTimeoutMillis: 30000,
        connectionTimeoutMillis: 2000
    },
    {
        host: 'localhost',
        database: 'db3',
        port: 5432,
        user: 'postgres',
        password: 'xxxxxxxx',
        max: 20,
        idleTimeoutMillis: 30000,
        connectionTimeoutMillis: 2000
    }
]
"server/models/index.js"にconfig.jsで設定したDBに接続するプログラムを書きます。
const dbConf =  require('../config.js').dbConf
const { Pool } = require('pg')
const dbNum = dbConf.length
var pool = []
for (let i = 0; i < dbNum; i ++) {
    pool[i] = new Pool(dbConf[i])
}
module.exports = { pool, dbConf }
まとめ
Windows環境にPostgreSQLサーバとNuxt環境を構築しました。
次はPostgreSQLの統計情報をAPIとして取得できるようにバックエンドを作ります。
>>PostgreSQLの統計情報を可視化(バックエンド編)