前提
- AWSとTerraformについて、ぐぐって 概要 が だいたい わかる程度の人が対象です
- brewを使うのでmac前提です...。読み替えて頂ければ、windowsでも実現可能かと思われます
- Terraformを今日初めて触ったので勢いでやってる部分があります。誤りやアドバイスあればぜひコメントください!
免責事項としてまして、この記事に書いてあることを実施したことで「大量の課金請求が来た!」など、あらゆる問題については責任を負いかねますので、全て自己責任で実施をお願いいたします!
ここでやること
- AWSのアカウントを作成して、AWS上で開発用ユーザを作成
- 開発用ユーザを用いて、TerraformでEC2インスタンスを作成
さぁ、やってみよう!
1. AWSのアカウントを作成して、AWS上で開発用ユーザを作成
AWSアカウント作成
すでにAWSアカウントを持っている人は、飛ばしてもらって構いません。
AWS アカウント作成の流れ の「コンソールにサインイン」からアカウントを登録します。

- クレジットカードの登録が必要になります
- プランの選択はFreeで問題ありません
- 英語で住所登録をするので、住所の英語変換サービスが便利です → JuDress
開発用ユーザの作成
前項で作ったAWSアカウントはroot権限を持っており、普段使いするものではありません
そこで開発用ユーザーを作成し、そちらで開発をします
今回は開発用ユーザーグループを作成し、そのグループを開発用ユーザーに
IAMでユーザーグループの作成
マネジメントコンソールで、「IAM」と検索し、IAMを選択します

左ナビから、「グループ」を選択し、「新しいグループの作成」を選択します

グループ名は「developer」を入力して「次のステップ」へ

ポリシーは「PowerUserAccess」を入力、選択して「次のステップ」へ

最後は確認なので、そのまま「次のステップ」へ
IAMでユーザーの作成
左ナビから、「ユーザー」を選択し、「ユーザーを追加」を選択します

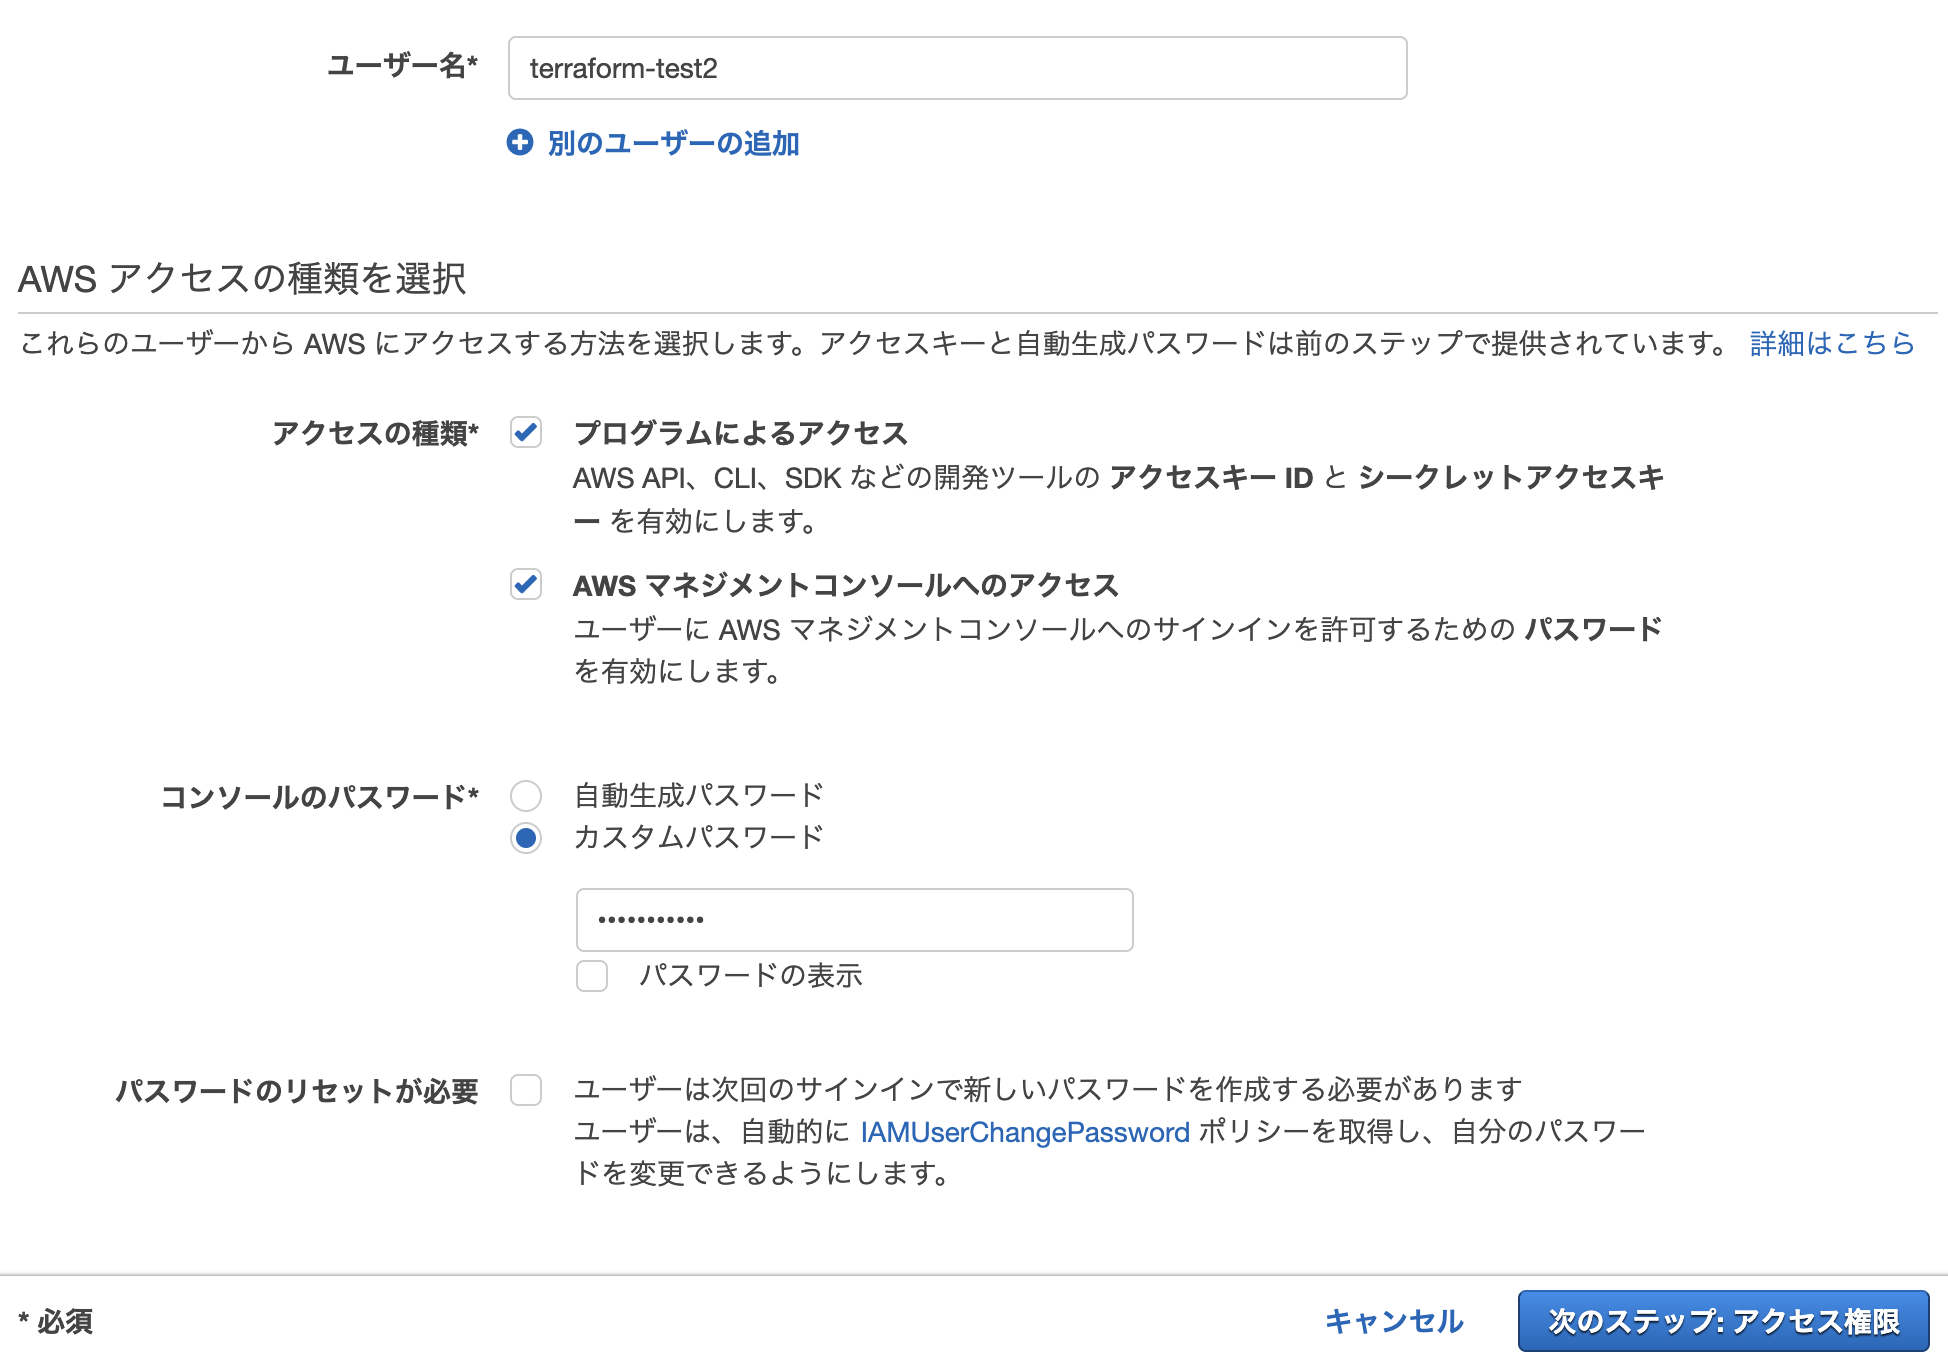
ユーザー名を「terraform-test」と入力し、アクセスについては以下のように設定します
カスタムパスワードは忘れないように!
そして「次のステップ」へ

作成したユーザーグループの「developer」を選択して「次のステップへ」

タグの追加は今回しませんので、何もせず「次のステップ」へ
そして最後は確認なので、そのまま「ユーザーを作成」
以下の3つ(赤で囲ったところ)はあとで使うのでメモっておいてください
cvsダウンロードしておくと楽です
- コンソールアクセスのurl
- アクセスキーID
- シークレットアクセスキー
これらを用いて外部からAWSの操作を行います
githubにpushなどは大変危険です 絶対に他人が知れない状態を保ってください
最後にコンソールへのurlへアクセスしてみましょう!
ログインができたらフェーズ1は完了です!
2. 開発用ユーザを用いて、TerraformでEC2インスタンスを作成
AWS CLIを使えるようにする
AWSを使う上で、今回はAWS CLIというコマンドラインでAWSとやりとりするツールを使います
そのためpython pipなど、インストールに必要なものを整備していきます
すでにインストールが完了しているものは飛ばしてもらって構いません
pythonインストール
pyenvを使います
$ brew install pyenv
$ pyenv install --list  | egrep '^[ ]+[23]\.[0-9\.]+$' | grep ' 3' | tail -n 1
$ pyenv install 3.7.4 # 最新をインストール
$ pyenv global 3.7.4
$ pyenv global 3.7.4
$ pyenv versions
  system
* 3.7.4 (set by /usr/local/var/pyenv/version)
$ python --version
Python 3.7.4
pipインストール
pythonでpipをインストールします
$ python -m pip install pip --upgrade
$ pip -V
pip 19.2.1 from /usr/local/var/pyenv/versions/3.7.4/lib/python3.7/site-packages/pip (python 3.7)
AWS CLIインストール
pipでAWS CLIをインストール
$ sudo pip install awscli
$ aws --version
aws-cli/1.16.205 Python/3.7.4 Darwin/18.7.0 botocore/1.12.195
...
AWS CLIに開発用ユーザーの登録
先ほどの「アクセスキーID」「シークレットアクセスキー」をそれぞれ設定します
$ aws configure --profile terraform-test
AWS Access Key ID [None]: XXXXXXXXXXXXXXXXX        # アクセスキー
AWS Secret Access Key [None]: YYYYYYYYYYYYYYYYYYYY # シークレットアクセスキー
Default region name [None]: ap-northeast-1         # デフォルトのリージョン:アジアパシフィック (東京)
Default output format [None]: json                 # とりあえずjson
設定を確認
$ aws configure list --profile terraform-test
      Name                    Value             Type    Location
      ----                    -----             ----    --------
   profile           terraform-test           manual    --profile
access_key     ****************XXXX shared-credentials-file
secret_key     ****************YYYY shared-credentials-file
    region           ap-northeast-1      config-file    ~/.aws/config
AWS CLIを使う準備が完了しました!
Terraformでインスタンスを立てる
Terraformインストール
$ brew update
$ brew install terraform
$ terraform -v
Terraform v0.12.5
...
リポジトリの作成
$ mkdir terraform-test
$ cd terraform-test
$ terraform init
.tfファイルの作成
Ubuntuのインスタンスを2つ立ててみるという内容です
terreform-testディレクトリ直下に以下の2ファイルを作成します
GitHub - first-terraform
provider "aws" {
  profile = "terraform-test" # aws cliで設定したprofile
  version = "~> 2.0"
  region  = "ap-northeast-1" # リージョン:アジアパシフィック (東京)
}
resource "aws_instance" "sandbox" {
  count         = 2              # インスタンス数
  ami           = "ami-785c491f" # Ubuntu 16.04 LTS official ami
  instance_type = "t2.micro"     # インスタンスタイプ

  tags = {
    Name = "${format("sandbox-%02d", count.index + 1)}"
  }
}
ドライラン
.tfで記載した内容であるかを確認します
$ terraform plan
...
Terraform will perform the following actions:

  # aws_instance.sandbox[0] will be created
  + resource "aws_instance" "sandbox" {
      + ami                          = "ami-785c491f"
  ...

  # aws_instance.sandbox[1] will be created
  + resource "aws_instance" "sandbox" {
      + ami                          = "ami-785c491f"
  ...

Plan: 2 to add, 0 to change, 0 to destroy.
...
実行
ドライランで確認した内容で、インスタンスの生成を行います
$ terraform apply
...
Do you want to perform these actions?
  Terraform will perform the actions described above.
  Only 'yes' will be accepted to approve.

  Enter a value: yes # yesを入力

aws_instance.sandbox[0]: Creating...
aws_instance.sandbox[1]: Creating...
aws_instance.sandbox[1]: Still creating... [10s elapsed]
aws_instance.sandbox[0]: Still creating... [10s elapsed]
aws_instance.sandbox[0]: Still creating... [20s elapsed]
aws_instance.sandbox[1]: Still creating... [20s elapsed]
aws_instance.sandbox[0]: Creation complete after 23s [id=i-xxxxxxxxxxxxxxxxx]
aws_instance.sandbox[1]: Still creating... [30s elapsed]
aws_instance.sandbox[1]: Creation complete after 33s [id=i-xxxxxxxxxxxxxxxxx]

Apply complete! Resources: 2 added, 0 changed, 0 destroyed.
生成されたインスタンスの確認
コマンドライン
$ terraform show
# aws_instance.sandbox[0]:
resource "aws_instance" "sandbox" {
    ami                          = "ami-785c491f"
    ...

# aws_instance.sandbox[1]:
resource "aws_instance" "sandbox" {
    ami                          = "ami-785c491f"
    ...
AWS マネジメントコンソール
terraform-testユーザのAWSマネジメントコンソールで「EC2」を検索し、選択します

右上のプルダウンから「東京リージョン」を選択すると、EC2インスタンスが2つ立ち上がっています!
僕は「東京リージョン」を選択するのを失念して、関係ない設定をいじくりまわしてかなり無駄な時間を過ごしました

このようにTerraformでEC2インスタンスを立ち上げることができました!
あとは公式ドキュメントなどに従い .tfをいじって見ましょう!
インスタンスの削除
クラウドサービスでインスタンスの放置は、ある日突然多大な料金の請求がくる原因になり大変危険です
常日頃から、勉強用、使わないインスタンスは停止なり削除を心がけましょう
$ terraform destroy
Terraform will perform the following actions:

  # aws_instance.sandbox[0] will be destroyed
  - resource "aws_instance" "sandbox" {
      - ami                          = "ami-785c491f" -> null
      ...

  # aws_instance.sandbox[1] will be destroyed
  - resource "aws_instance" "sandbox" {
      - ami                          = "ami-785c491f" -> null
      ...

Do you really want to destroy all resources?
  Terraform will destroy all your managed infrastructure, as shown above.
  There is no undo. Only 'yes' will be accepted to confirm.

  Enter a value: yes # yesを入力

aws_instance.sandbox[0]: Destroying... [id=i-0f64c8ea558dcfb68]
aws_instance.sandbox[1]: Destroying... [id=i-063fb9265f57a867d]
aws_instance.sandbox[0]: Still destroying... [id=i-0f64c8ea558dcfb68, 10s elapsed]
aws_instance.sandbox[1]: Still destroying... [id=i-063fb9265f57a867d, 10s elapsed]
aws_instance.sandbox[0]: Still destroying... [id=i-0f64c8ea558dcfb68, 20s elapsed]
aws_instance.sandbox[1]: Still destroying... [id=i-063fb9265f57a867d, 20s elapsed]
aws_instance.sandbox[0]: Destruction complete after 30s
aws_instance.sandbox[1]: Still destroying... [id=i-063fb9265f57a867d, 31s elapsed]
aws_instance.sandbox[1]: Destruction complete after 31s

Destroy complete! Resources: 2 destroyed.
削除されたインスタンスの確認
コマンドライン
$ terraform show
# 何も表示されない
AWS マネジメントコンソール
最後に
ここまで読んでいただきありがとうございます!
僕自身、Terraform触ったことない、AWSの課金体型よくわからん怖い、IAMもようわからん、という状況でしたが、なんとか動かすところまで持っていくことができました
この記事がTerraformを知ろうとしている人の助けになれば幸いです!


