はじめに
rails と react で何か作ろうと思います。のパート2。React準備編です。
やったことをメモ&共有します。
パート1:Rails準備編はこちらです。
create-react-app でプロジェクトを作成する
$ npx create-react-app プロジェクト名
- create-react-app は npm で installできるパッケージ
- npx は npm で install して コマンド実行して unistall するというコマンド
npm で install して使ってるとバージョンアップとかメンテが必要なので、
npx で必要な時に install して使ったらすぐuninstall しておくというのも
良いかもねと思いました。
TypeScript でやりたい場合は「--template typescript」をつけたらいいみたいです。
ドキュメントはこちらです。
$ npx create-react-app quiz_react --template typescript
.
.
.
Created git commit.

Success! Created quiz_react at /Users/aoyamanaoki/workspace/private/quiz_react
Inside that directory, you can run several commands:

  npm start
    Starts the development server.

  npm run build
    Bundles the app into static files for production.

  npm test
    Starts the test runner.

  npm run eject
    Removes this tool and copies build dependencies, configuration files
    and scripts into the app directory. If you do this, you can’t go back!

We suggest that you begin by typing:

  cd quiz_react
  npm start

Happy hacking!
とりあえず、今の状態で動かしてみます。
$ cd quiz_react
$ yarn start
http://localhost:3000

いつもの画面が表示されました !
{
  "name": "quiz_react",
  "version": "0.1.0",
  "private": true,
  "dependencies": {
    "@testing-library/jest-dom": "^5.16.1",
    "@testing-library/react": "^12.1.2",
    "@testing-library/user-event": "^13.5.0",
    "@types/jest": "^27.4.0",
    "@types/node": "^16.11.21",
    "@types/react": "^17.0.38",
    "@types/react-dom": "^17.0.11",
    "react": "^17.0.2",
    "react-dom": "^17.0.2",
    "react-scripts": "5.0.0",
    "typescript": "^4.5.5",
    "web-vitals": "^2.1.4"
  },
.
.
.
reactのバージョンは17みたいですね。
RailsのAPIを呼び出す
httpクライアントを入れる
いろいろあるみたいですが、 axios というものを使いました。
$ yarn add axios
.
.
.
✨  Done in 90.44s.
(心の声:なんか、すごく時間がかかりました。。。パソコンが調子悪いのか、、、m1 mac にした方が良いのかななど思いました)
APIをコールする
  useEffect(() => {
      const getChats = async () => {
      const response = await axios.get('http://localhost:3000/api/v1/chats');
      console.log(response.data)
    };
    getChats();
  }, []);
useEffect()をコンポーネントの中に書きます。
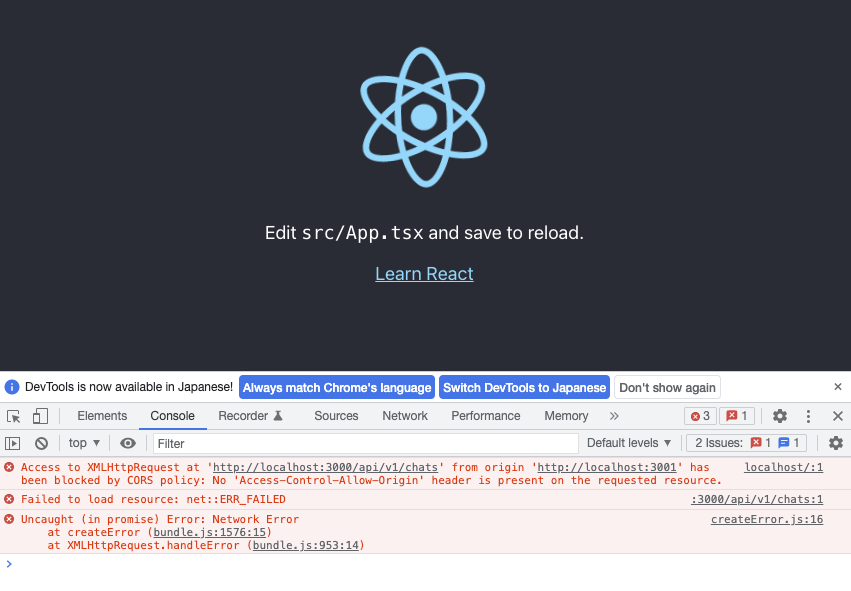
コンソールログを見てみると、エラーが出てました。
railsを起動してなかった。。。
$ rails s
railsを起動してからもう一度確認する
http://localhost:3000

railsの画面になっている。。。ポートが同じだからか。。。
react側のポートを変更する
react側のpackage.jsonを直します。
  "scripts": {
    "start": "PORT=3001 react-scripts start",
    "build": "react-scripts build",
    "test": "react-scripts test",
    "eject": "react-scripts eject"
  },
もう一度、reactを動かしてみます。
reactの画面は表示されましたが、まだエラーがでていますね。
Access to XMLHttpRequest at 'http://localhost:3000/api/v1/chats' from origin 'http://localhost:3001' has been blocked by CORS policy: No 'Access-Control-Allow-Origin' header is present on the requested resource.
CORSのエラーが出ました。
CORSの問題を解決する
http://localhost:3000
と
http://localhost:3001
が
別のドメインだから通信させまへんでぇって奴ですね。
Railsにrack-corsを追加
gem 'rack-cors'
$ bundle install
# Be sure to restart your server when you modify this file.

# Avoid CORS issues when API is called from the frontend app.
# Handle Cross-Origin Resource Sharing (CORS) in order to accept cross-origin AJAX requests.

# Read more: https://github.com/cyu/rack-cors

Rails.application.config.middleware.insert_before 0, Rack::Cors do
  allow do
    origins "http://localhost:3001"

    resource "*",
      headers: :any,
      methods: [:get, :post, :put, :patch, :delete, :options, :head]
  end
end
$ rails s
再び、react側を確認すると、、、
おぉ、APIでチャットリストを取得できました!
react側で簡単な画面を作る
Railsから受け取ったデータをリストで表示します
import React, { useEffect, useState } from 'react';
import './App.css';
import axios from 'axios';

interface Chat {
  id: number;
  content: string;
}

function App() {
  const [chats, setChats] = useState([]);
  useEffect(() => {
    const getChats = async () => {
      const response = await axios.get('http://localhost:3000/api/v1/chats');
      console.log("useEffect() ",response.data)
      setChats(response.data);
    };
    getChats();
  }, []);

  return (
    <div className="App">

      <ul>
        { chats.map((chat:Chat) => {
          return <li key={chat.id}>{chat.content}</li>;
        })}
      </ul>

    </div>
  );
}

export default App;
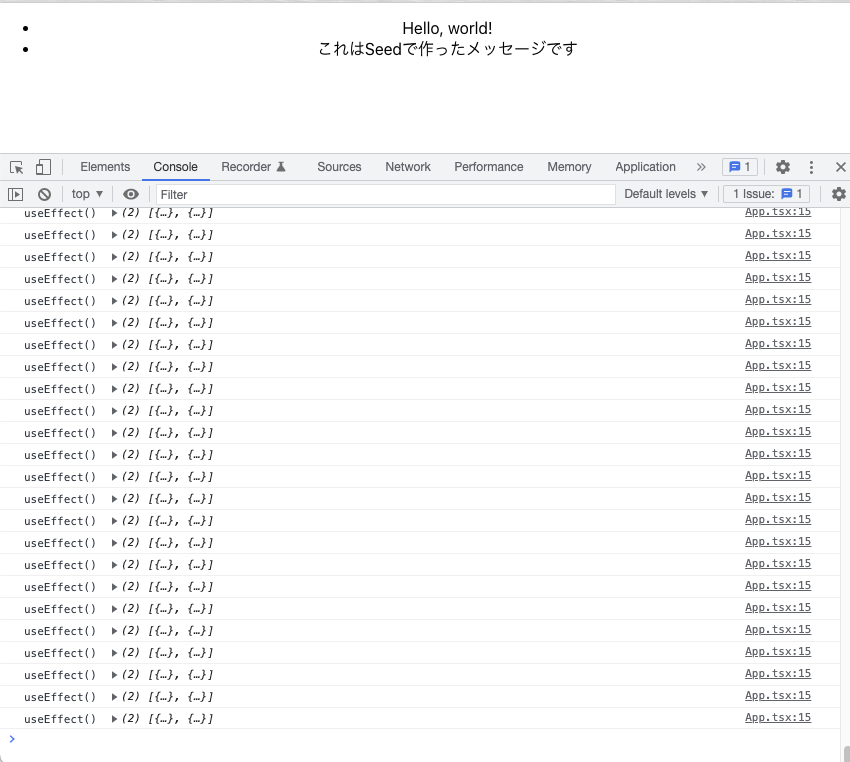
無事、表示されました。
実験:useEffect()の第二引数の[]を消してみる
結果:無限ループする
useEffect()はコンポーネントがレンダリングされた際に呼び出す関数の設定で、
useState()で取得した setChats()をコールするとstateが更新されて、
コンポーネントが再レンダリングされます。
再レンダリング -> useEffect()の関数がよばれる -> state更新 -> 再レンダリング
となるみたいです。
そこで、第二引数(配列)を使います。
第二引数で指定したデータが変更された時だけ関数がコールされます。
ほんで、空配列[]を指定しておくと、空配列[]はstate更新しても値が変わらないとなります。
フォームを追加する
入力したメッセージを持っておくstate
const [message, setMesssage] = useState("");
入力したメッセージのstateにセットする関数
  // メッセージ入力時の処理
  var handleChange = (event: React.ChangeEvent<HTMLInputElement>) => {
    setMesssage(event.target.value);
  };
Submitボタン押下時の処理
  // Submitボタン押下時の処理
  var handleSubmit = (event: React.FormEvent<HTMLFormElement>) => {
    // チャットリストへ追加
    setChats([...chats, { id: chats.length + 1, content: message}]);

    // 入力メッセージをクリア
    setMesssage("");

    // Submitボタン押下時のデフォルト処理を無効化する
    event.preventDefault();
  }
フォーム
      <form onSubmit={handleSubmit}>
        <label>Message:
          <input type="text" value={message} onChange={handleChange} />
          <input type="submit" value="Submit" />
        </label>
      </form>
入力した内容をonChangeで拾ってメッセージstateに保管しておき、
Submitボタン押下をonSubmitで拾って、
メッセージstateの内容をチャットリストのstateへ追加しています。
※ただし、この状態ではrails側にデータを送っていないのでブラウザで再読み込みボタンを押すと追加したメッセージが消えます。
rails側へ登録データを送る
先ほどのSubmitボタン押下時の処理を書き換えます。
  // Submitボタン押下時の処理
  var handleSubmit = (event: React.FormEvent<HTMLFormElement>) => {

    // 登録するデータ
    const data = { content: message }

    // railsへ送る
    axios.post('http://localhost:3000/api/v1/chats', data)
          .then(res => {
            console.log(res);

            // チャットリストへ追加
            setChats([...chats, { id: res.data.id, content: res.data.content}]);

            // 入力メッセージをクリア
            setMesssage("");
          } )
          .catch( error => {
            console.error(error, data);
          })

    // Submitボタン押下時のデフォルト処理を無効化する
    event.preventDefault();
  }
railsへデータを送り、rails側からの返信を待って、チャットリストに登録する流れとしました。
おわりに
やっとアプリケーションの土台ができてきました。
次回は、クラウド上にrailsアプリとreactアプリを置いて動かしてみたいと思います。
おわり。


