こんな人におすすめ
- プログラミング初心者でポートフォリオの作り方が分からない
- Rails Tutorialをやってみたが理解することが難しい
前回:#5 Userモデル編
次回:#7 ログイン機能の下準備編
今回の流れ
- 今回のゴールを把握する
- ユーザー登録画面のビューを作る
- フォームのエラーを日本語化する
- flashを作る
- Usersコントローラーを作る
- ユーザー登録画面のテストを作る
- 本番環境を整える
※ この記事は、ポートフォリオを作る理由をweb系自社開発企業に転職するためとします。
※ 2020年4月1日、記事を大幅に更新しました。
今回のゴールを把握する
ゴールは、ユーザー登録画面を完成させることです。
対応するURLとUsersコントローラーのアクション、役割は以下の通りです。
| URL | アクション | 役割 |
|---|---|---|
| /signup | new | フォーム画面を表示する |
| /users | create | フォーム情報を送信する |
| /users/:id | show | ユーザーページを表示する |
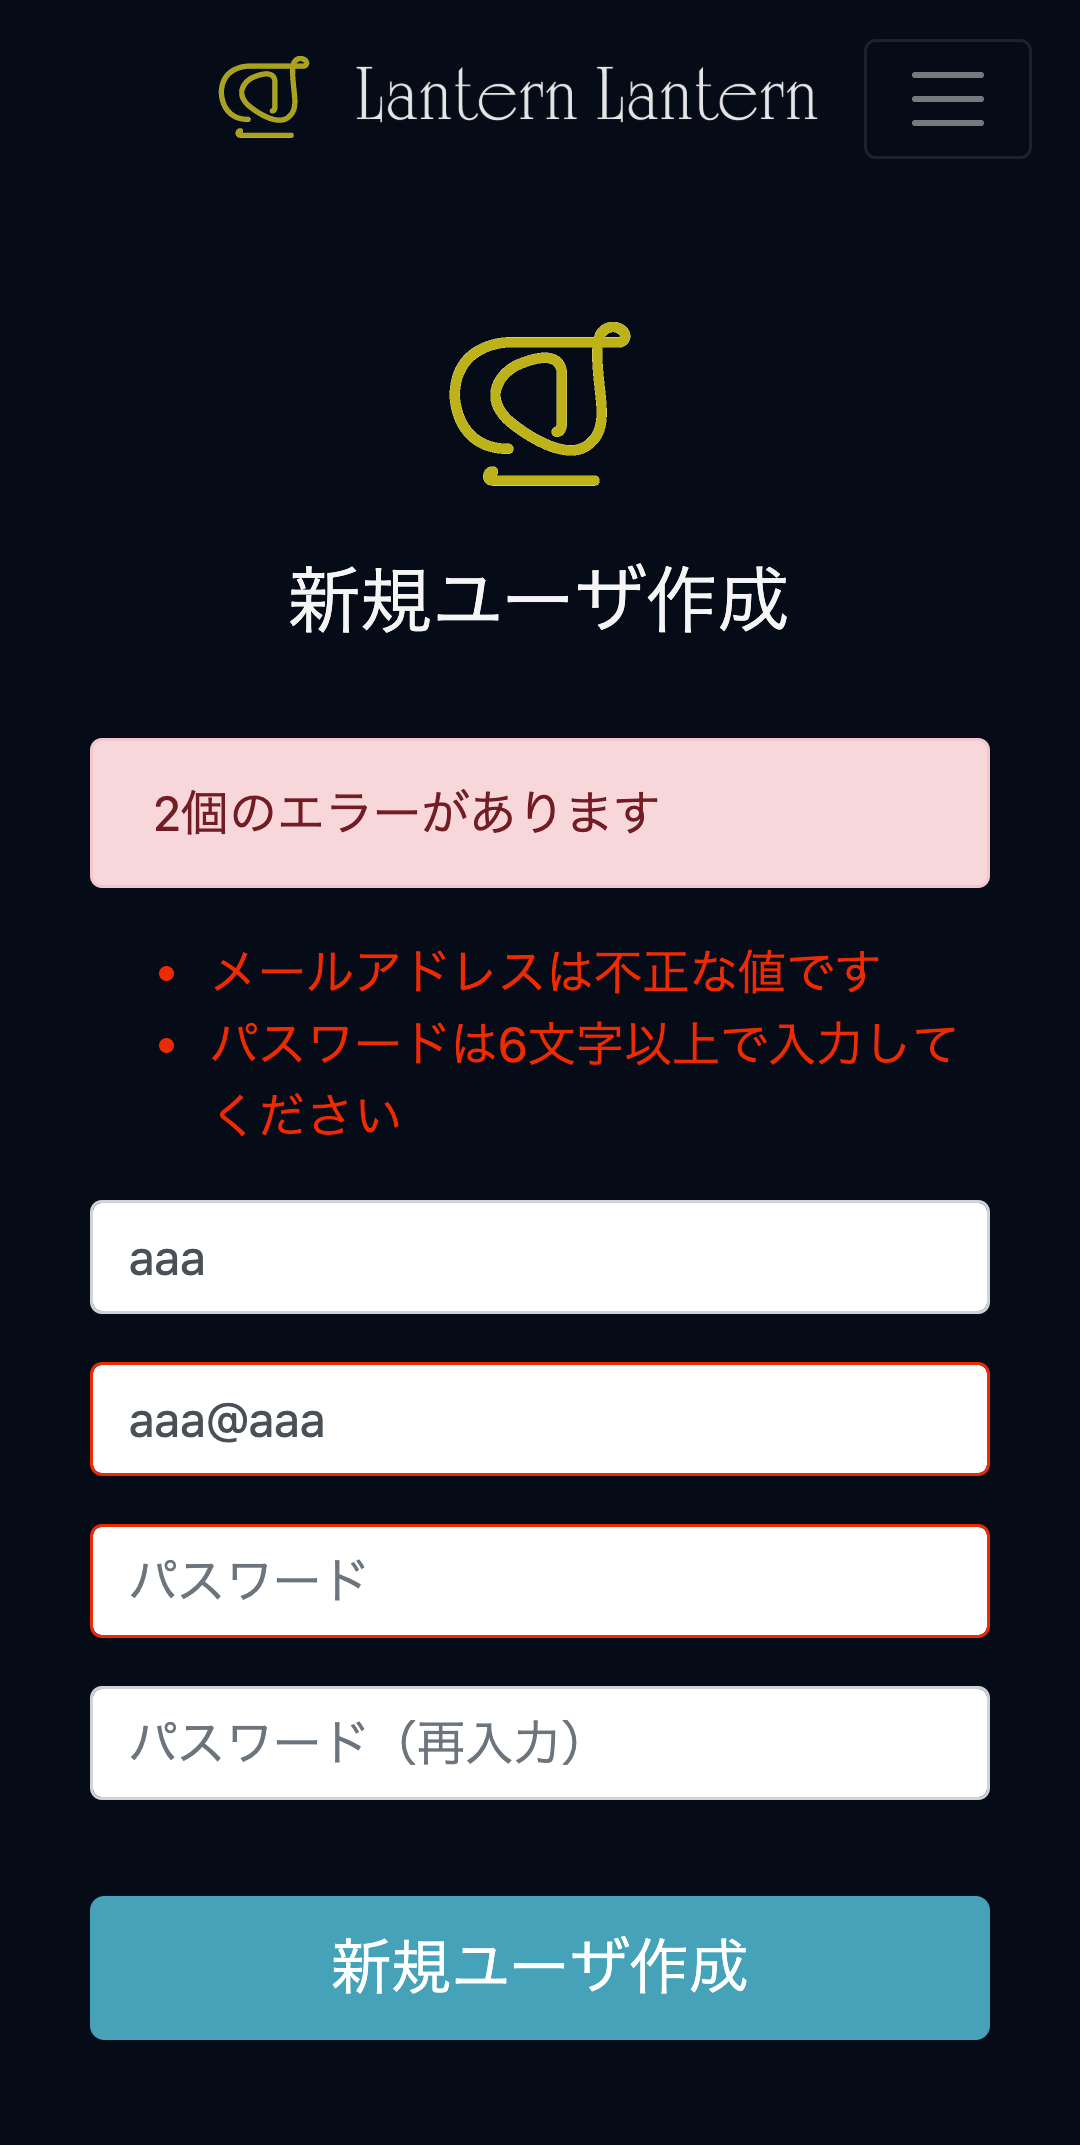
まずは、ユーザー登録画面のビューを作ります。
その際、フォームに不備がある場合のエラーも作ります。
続いて、フォームのエラーを日本語化します。
続いて、初めてのユーザーに登録完了を伝えるflashを作ります。
続いて、Usersコントローラーを作ります。
続いて、ユーザー登録失敗/成功時のテストを作ります。
最後に、デプロイを行うために本番環境を整えます。
以上です。
ユーザー登録画面のビューを作る
ユーザー登録画面のビューを作ります。
フォームに不備がある場合のエラーも作ります。
Rails Tutorial 7.2 ユーザー登録フォームとの変更点は以下の2つです。
- labelではなくplaceholderを使う
- form_forではなくform_withを使う
フォームを作成するform_forは非推奨になりました。
代わりにform_withを使います。
<% provide(:title, '新規ユーザ作成') %>
<div class="container signup-container">
  <div class="row">
    <div class="col">
      <div class="signup-logo-img">
        <%= link_to image_tag('lantern_lantern_logo.png', width: 100), root_path, class: "logo-img" %>
      </div>
      <h1 class="signup-title">新規ユーザ作成</h1>
      <%= form_with(model: @user, url: signup_path, local: true) do |form| %>
        <%= render 'shared/error_messages' %>

        <div class="form-group">
          <%= form.text_field :name, class: 'form-control', placeholder: "名前" %>
        </div>

        <div class="form-group">
          <%= form.email_field :email, class: 'form-control', placeholder: "メールアドレス" %>
        </div>

        <div class="form-group">
          <%= form.password_field :password, class: 'form-control', placeholder: "パスワード" %>
        </div>

        <div class="form-group">
          <%= form.password_field :password_confirmation, class: 'form-control', placeholder: "パスワード(再入力)" %>
        </div>

        <div class="form-group">
          <%= form.submit "新規ユーザ作成", class: "btn btn-info btn-lg form-submit" %>
        </div>
      <% end %>
    </div>
  </div>
</div>
<% if @user.errors.any? %>
  <div id="error_explanation">
    <div class="alert alert-danger alert-form-extend" role="alert">
      <%= @user.errors.count %>個のエラーがあります
    </div>
    <ul>
      <% @user.errors.full_messages.each do |msg| %>
        <li><%= msg %></li>
      <% end %>
    </ul>
  </div>
<% end %>
// 中略
// signup

.signup-container {
  width: 100%;
  max-width: 330px;
  margin: auto;
  padding-top: 1rem !important;
}

.signup-logo-img {
  text-align: center;
}

.signup-title {
  text-align: center;
  font-weight: normal;
  font-size: 1.5rem;
  margin-bottom: 2rem;
}

.form-control {
  margin-bottom: 0;
}

.form-submit {
  width: 100%;
  margin-top: 1rem;
}

# error_explanation {
  color: red;
  ul {
    color: red;
    padding-bottom: 0;
  }
}

.field_with_errors .form-control {
  border-color: red;
}

.alert-form-extend {
  margin: 1.5rem 0 1rem;
}
フォームのエラーを日本語化する
フォームのエラーを日本語化します。
日本語化には、rails-i18nを使います。
+ gem 'rails-i18n'
$ bundle install
続いて、設定を加えます。
特別に、理解する必要はありません。
# 中略
module LanternApp
  class Application < Rails::Application
# 中略
# 以下2行を追加
    config.i18n.default_locale = :ja
    config.i18n.load_path += Dir[Rails.root.join('config', 'locales', '**', '*.{rb,yml}').to_s]
  end
end
$ mkdir config/locales/models
$ touch config/locales/models/ja.yml
ja:
  activerecord:
    models:
      user: ユーザ
    attributes:
      user:
        name: 名前
        email: メールアドレス
        password: パスワード
        password_confirmation: パスワード(再入力)
モデル名と属性名に、それぞれ対応する日本語を与えます。
これにより、日本語化が可能になります。
最後に、サーバーを再起動します。
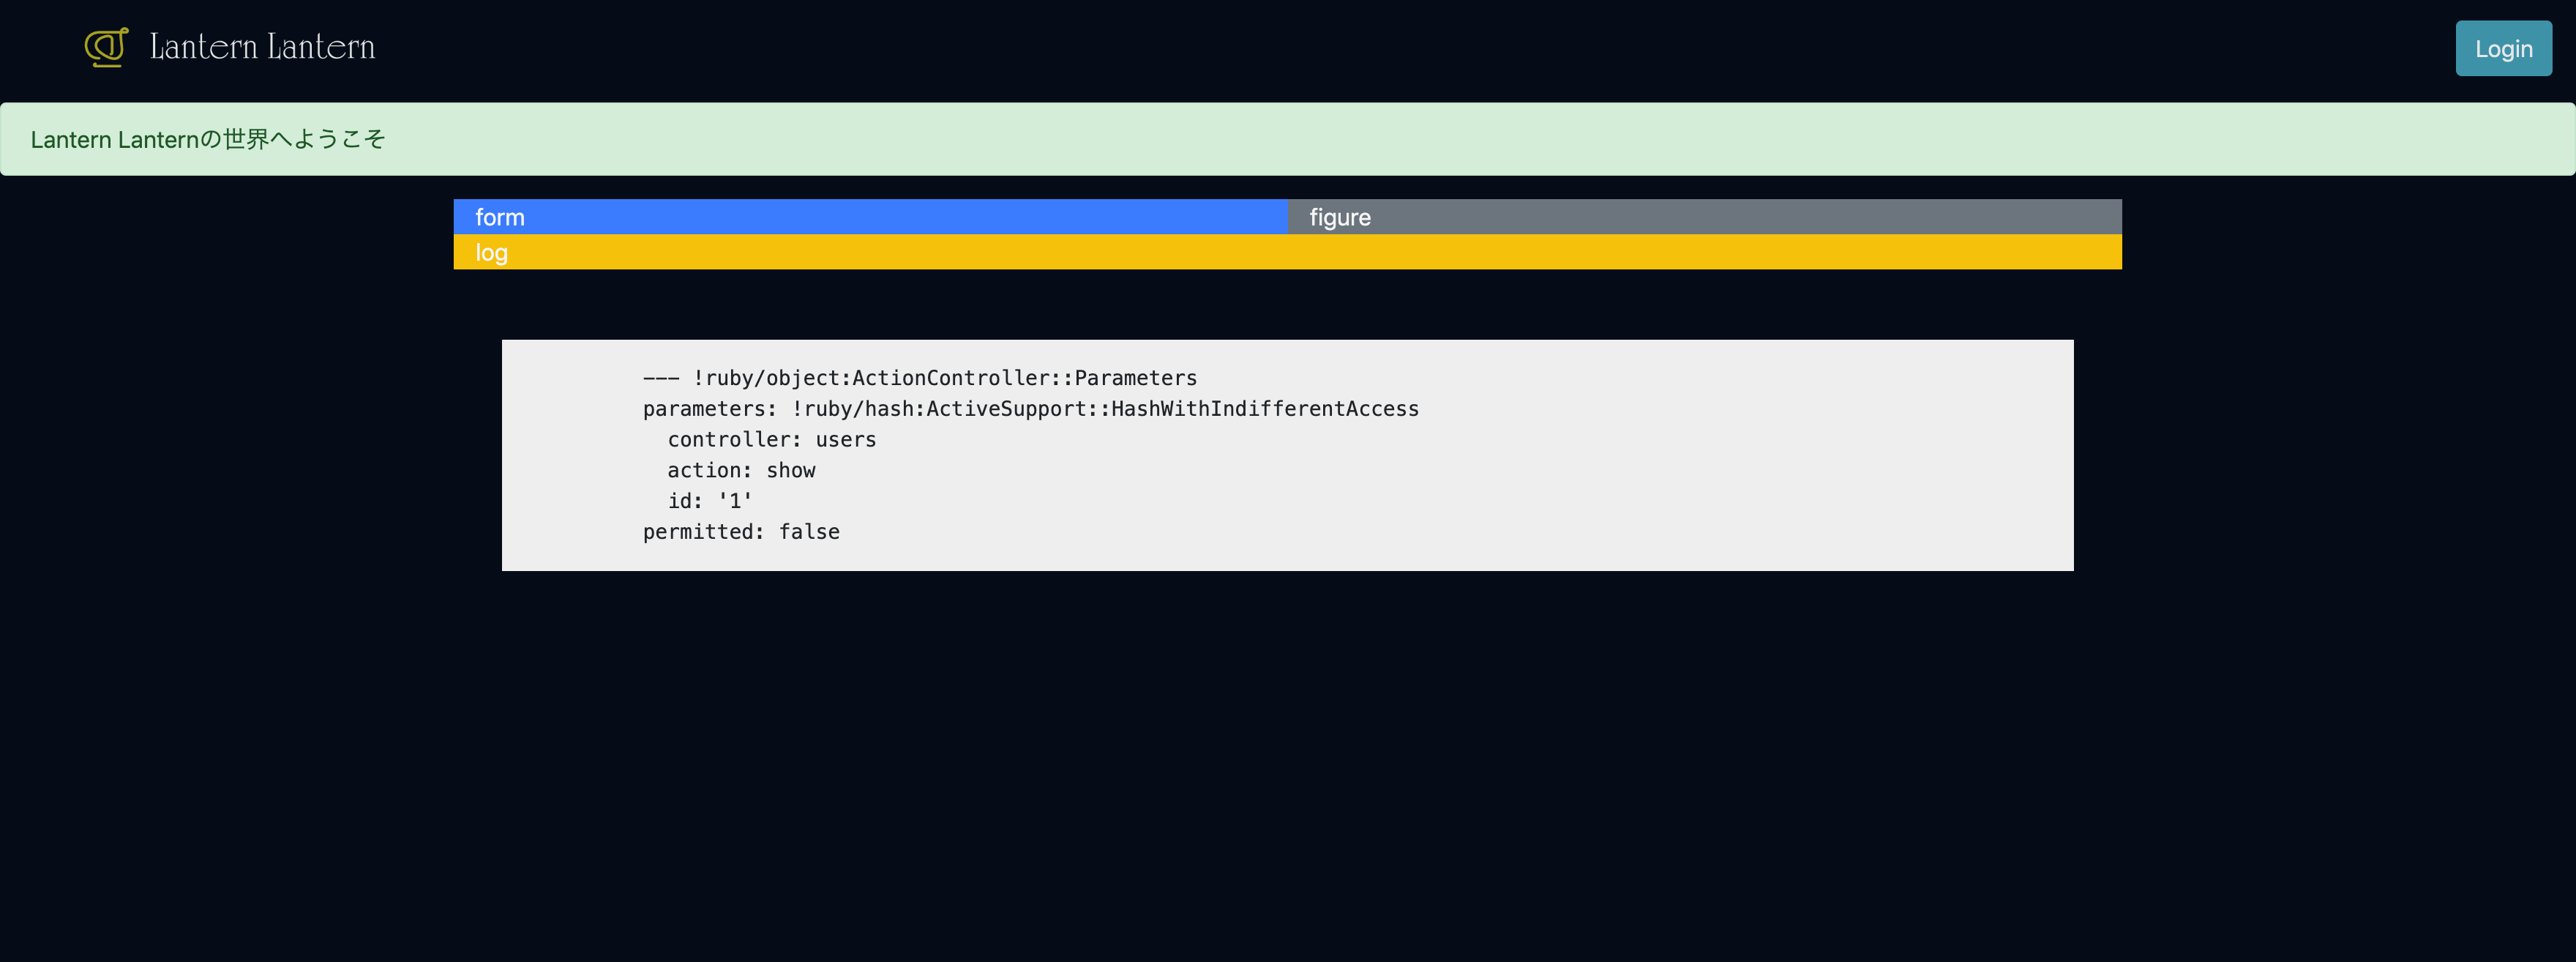
メッセージが日本語になりました。
(唐突なスマホ画面をお許しください。)
参考になりました↓
[初学者]Railsのi18nによる日本語化対応
Railsのバリデーションエラーのメッセージの日本語化
flashを作る
初めてのユーザーに登録完了を伝えるflashを作ります。
Rails Tutorialではflashの実装にcontent_tagを使っています。
しかしRails 5.1からはtag(:br)よりtag.brを推奨するので、こちらを使います。
<!-- 中略 -->
<body>
  <%= render 'layouts/header' %>
  <% flash.each do |message_type, message| %>
    <%= tag.div message, class: "alert alert-#{message_type}" %>
  <% end %>
  <%= yield %>
  <%= render 'layouts/footer' %>
  <%= debug(params) if Rails.env.development? %>
</body>
Usersコントローラーを作る
Usersコントローラーを作ります。
newとcreateアクションを編集します。
class UsersController < ApplicationController
  def new
    @user = User.new
  end

  def create
    @user = User.new(user_params)
    if @user.save
      flash[:success] = "Lantern Lanternの世界へようこそ"
      redirect_to @user
    else
      render 'new'
    end
  end

  def show
    @user = User.find(params[:id])
  end

  private

    def user_params
      params.require(:user).permit(:name, :email, :password, :password_confirmation)
    end
end
各アクションで各インスタンス変数@userを用意します。
各@userの役割は、以下の通りです。
- new → Userモデルを作る受け皿を作る
- create → フォームの情報からUserモデルを作る
- show → フォームから送信されたパラメーターからユーザーを特定する
セキュリティ上、フォームに余計な情報が送信される可能性があります。
そこで、user_paramsメソッドを作ります。
このメソッドは、フォームから受け取る情報をUserモデルの属性に限定します。
それにより、セキュリティ面を向上させます。
ユーザー登録が成功するとこのような画面になります。
本番環境を整える
デプロイを行うために本番環境を整えます。
ここはTutorial 7.5 プロのデプロイ通りに進めます。
具体的にはアプリケーションサーバーにPumaを使うよう、設定しています。
サーバーに関しては#18で学習するので、現状理解しなくて大丈夫です。
まず、SSLを有効にします。
# 中略
# Force all access to the app over SSL, use Strict-Transport-Security, and use secure cookies.
config.force_ssl = true
# 中略
次に、Pumaを設定します。
workers Integer(ENV['WEB_CONCURRENCY'] || 2)
threads_count = Integer(ENV['RAILS_MAX_THREADS'] || 5)
threads threads_count, threads_count

preload_app!

rackup      DefaultRackup
port        ENV['PORT']     || 3000
environment ENV['RACK_ENV'] || 'development'

on_worker_boot do
  # Worker specific setup for Rails 4.1+
  # See: https://devcenter.heroku.com/articles/
  # deploying-rails-applications-with-the-puma-web-server#on-worker-boot
  ActiveRecord::Base.establish_connection
end
最後に、Herokuで使うアプリケーションサーバーをPumaに設定します。
その設定に、Procfileを使います。
$ touch ./procfile
web: bundle exec puma -C config/puma.rb
それを終えたら、commitとpushを行います。
$ git add -A
$ git commit -m "Use SSL and the Puma webserver in production"
$ git push
$ git push heroku
$ heroku run rails db:migrate
無事に本番環境が動いていたら成功です。
参考になりました↓
Herokuに必要なProcfileの書き方についてまとめておく
ユーザー登録画面のテストを作る
ユーザー登録失敗/成功時のテストを作ります。
Rails Tutorial 7.3.4 失敗時のテストを参考に、Request / System specで書きます。
$ rails g rspec:request users_signup
$ touch spec/systems/users_signup_spec.rb
require 'rails_helper'

RSpec.describe "UsersSignups", type: :request do
  describe "GET /signup" do
    it "is invalid signup information" do
      get signup_path
      expect {
        post signup_path, params: {
          user: {
            name: "",
            email: "user@invalid",
            password: "foo",
            password_confirmation: "bar"
          }
        }
      }.not_to change(User, :count)
    end

    it "is valid signup information" do
      get signup_path
      expect {
        post signup_path, params: {
          user: {
            name: "Example User",
            email: "user@example.com",
            password: "password",
            password_confirmation: "password"
          }
        }
      }.to change(User, :count).by(1)
    end
  end
end
require 'rails_helper'

RSpec.describe "UsersSignups", type: :system do

  it "is invalid because it has no name" do
    visit signup_path
    fill_in '名前', with: ''
    fill_in 'メールアドレス', with: 'user@invalid'
    fill_in 'パスワード', with: 'foo'
    fill_in 'パスワード(再入力)', with: 'bar'
    click_on '新規ユーザ作成'
    expect(current_path).to eq signup_path
    expect(page).to have_selector '#error_explanation'
    # expect(page).to have_selector 'li', text: '名前を入力してください'
  end

  it "is valid because it fulfils condition of input" do
    visit signup_path
    fill_in '名前', with: 'Example User'
    fill_in 'メールアドレス', with: 'user@example.com'
    fill_in 'パスワード', with: 'password'
    fill_in 'パスワード(再入力)', with: 'password'
    click_on '新規ユーザ作成'
    # follow_redirect!
    expect(current_path).to eq user_path(1)
    expect(page).not_to have_selector '#error_explanation'
  end
end
Request specでは、もっぱらuserが追加されたかを確認します。
System specでは、画面が正しく遷移するか確認します。
assert_templateは現在使用できないので、リダイレクト先のdivを検証します。
マッチャにchangeを使用する際、expectの中身はblockである必要があります。
よって、expect()ではなく、expect{}で書きます。
コメントアウトを載せている理由は、以下の通りです。
-
1つ目:テキストに対するテストは壊れやすい
テキストはよく変更することがあるので、テストは壊れやすいです。この場合、flashが空でないかをテストするだけに留めます。 -
2つ目:follow_redirect!をするとエラーが発生する
直接リダイレクトする操作はブラウザ上で期待できないために、エラーが発生します(詳しくは#8で解説します)。
参考になりました↓
rspecでのsubjectの使い方について
使えるRSpec入門・その2「使用頻度の高いマッチャを使いこなす」
今回は以上です。
前回:#5 Userモデル編
次回:#7 ログイン機能の下準備編