はじめに
皆様お疲れ様です。気分転換にこんな記事を作成します。
今回の 「番外編」 では 「接触判定」 についての記事を作成して参ります。
![]() お題がⅠならⅡもあるんですか?
お題がⅠならⅡもあるんですか?
![]() できたらやります
できたらやります
接触判定の仕組み
接触判定のイメージをみていきましょう(下記の図をご覧ください)

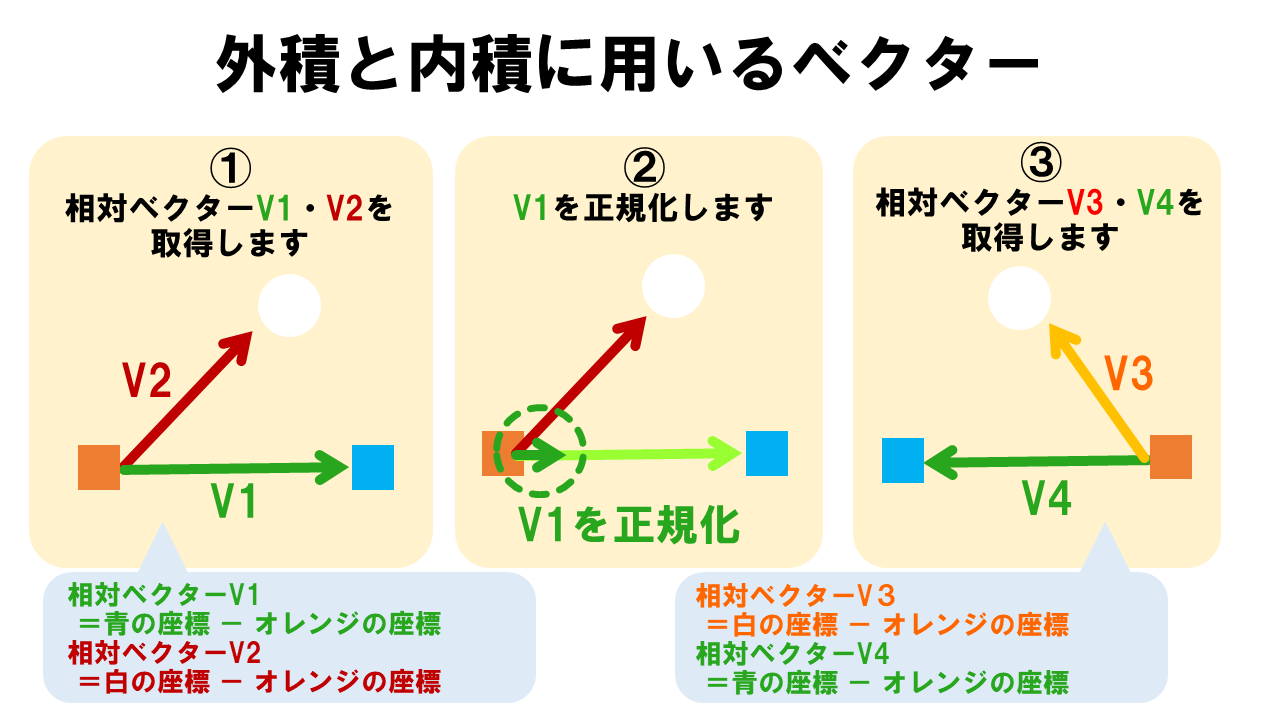
外積の計算
上記の図を活かしてV1(x,y)とV2(x,y)の外積は以下の式で計算が可能です
今回は「2D」バージョンの式です
// (x * y - y * x)
// x成分が「横軸」、y成分が「縦軸」の前提です
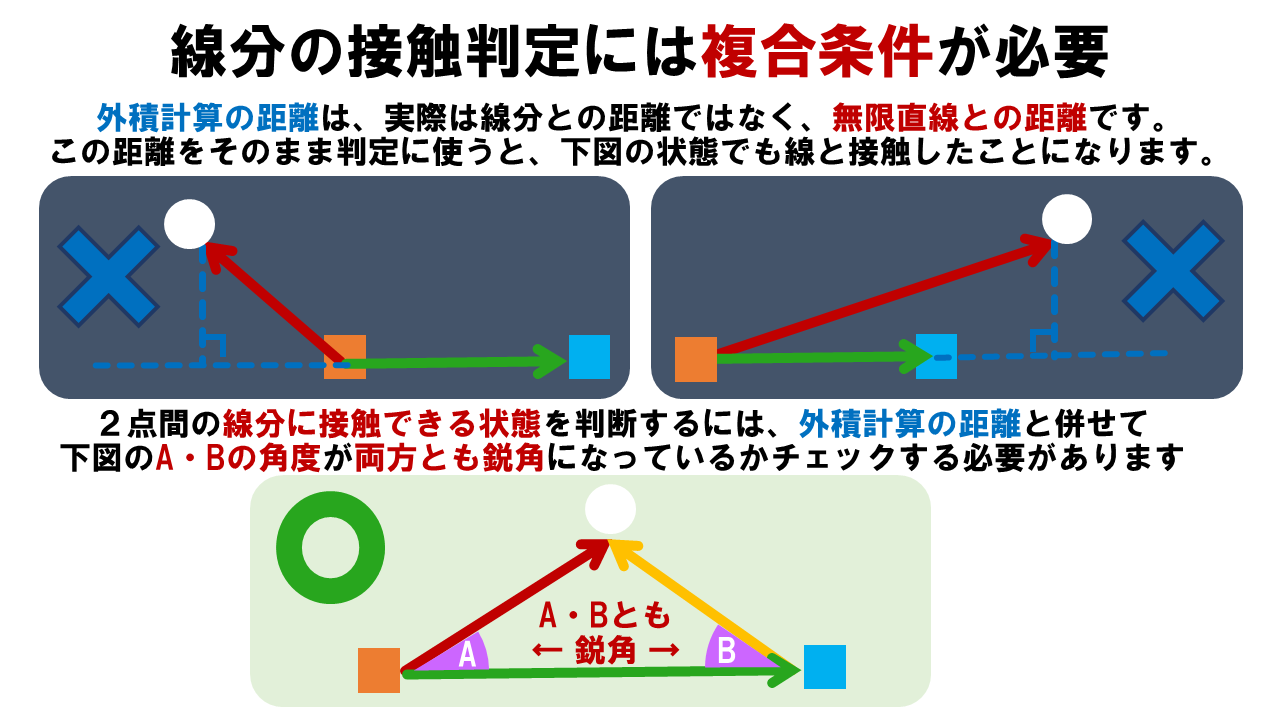
複合条件
外積の計算で得た判定はそのまま利用すると下図のように線分の間でなくとも判定がとれてしまいます。このままではいけませんので複合条件でチェックする必要があります。

内積の計算

計算式は2Dを前提としています
判定の仕組みはざっと以上になります。
では次にこの図を基にコードを作成してみたいと思います。
作成したコード
今回もDxLib C++ を使用しております。下記がコードです。
// ヘッダーファイル.
#include "DxLib.h"
#include "iostream"

// 定数値.
#define SCREEN_X 1920		// スクリーンサイズ(X).
#define SCREEN_Y 1080		// スクリーンサイズ(Y).

#define OBJECT_Y1 750		// ゴールサイズ(X1).
#define OBJECT_Y2 857		// ゴールサイズ(Y1).
#define GOAL_X1 1500		// ゴールサイズ(X1).
#define GOAL_Y1  800		// ゴールサイズ(Y1).
#define GOAL_X2 1350		// ゴールサイズ(X2).
#define GOAL_Y2  750		// ゴールサイズ(Y2).

// float変数.
float VectorX;		// ベクター変数X.
float VectorY;		// ベクター変数Y

float rad;			// ラジアン.
float rRadian;		// 回転の半径.
float theta;		// θ(シータ:sinθ/角度を表す記号としてよく使われるもの).
float degree;		// 度合い.

// int変数.
int direct;			// ボールの進行方向.
int cx;				// 回転軸座標(X).
int cy;				// 回転軸座標(Y).
int color;			// ボールの枠の色.
int angle;			// 角度.


int TxCr = GetColor(255, 255, 255);			// テキスト用(白色).
int TxCr2 = GetColor(0, 255, 255);			// デバッグテキスト用(青緑色).
int TxCr3 = GetColor(255, 0, 0);			// デバッグテキスト用(赤色).
int TxCr4 = GetColor(255, 212, 0);			// デバッグテキスト用(赤色).
int Handle;									// 画像データを格納する.

// bool変数.
bool GoalHitFlg = FALSE;					// ゴールヒットフラグ(初期値はFALSE).
bool ballHitFlg = FALSE;					// ボールヒットフラグ(初期値はFALSE).

// クラス設定.
// ボールクラス.
class BallData {
private:
	float x;
	float y;
	float vx;
	float vy;
	float radius;
	float speed;

public:
	BallData(float X, float Y, float R, float S) { x = X, y = Y, radius = R, speed = S; }

	float GetX() { return x; }
	float GetY() { return y; }
	float GetVX() { return vx; }
	float GetVY() { return vy; }
	float GetRadius() { return radius; }
	float GetSpeed() { return speed; }

	void SetX(float X) { x = X; }
	void SetY(float Y) { y = Y; }
	void SetVX(float VX) { vx = VX; }
	void SetVY(float VY) { vy = VY; }
	void SetRadius(float R) { radius = R; }
};

// 方向データクラス.
class BoxData {
private:
	float x;
	float y;
	float radius;
	float speedX;
	float speedY;

public:
	BoxData(float X, float Y, float vx, float vy) { x = X, y = Y, radius = 10, speedX = vx, speedY = vy; }

	float GetX() { return x; }
	float GetY() { return y; }
	float GetRadius() { return radius; }
	float GetSpeedX() { return speedX; }
	float GetSpeedY() { return speedY; }
	void SetSpeedX(float vx) { speedX = vx; }
	void SetSpeedY(float vy) { speedY = vy; }

	void SetX(float X) { x = X; }
	void SetY(float Y) { y = Y; }
};

// ベクタークラス.
class Vector {
private:
	float x;
	float y;

public:
	float GetVectorX() { return x; }
	float GetVectorY() { return y; }

	void SetVectorX(float X) { x = X; }
	void SetVectorY(float Y) { y = Y; }
};
#include "LineInner.h"
#include <math.h>
#include <time.h>

// クラス変数宣言.
BallData ball(100, 100, 40, 20);

BoxData Box1(250, 150, 1, 5);
BoxData Box2(50, 350, 10, 1);

Vector vector1, vector2, vector3;

bool HitCheck(float a, float b);
bool outerProductCheck(float a, float b, float c, float d);
void KeyCheck();
void BoxInner();
void Boxmove();

// 初期化
void init();

int WINAPI WinMain(HINSTANCE, HINSTANCE, LPSTR, int)
{
	ChangeWindowMode(TRUE);						// ウィンドウモードに設定.
	DxLib_Init();								// DXライブラリ初期化処理.
	SetDrawScreen(DX_SCREEN_BACK);				// 描画先を裏画面に設定.
	SetGraphMode(SCREEN_X, SCREEN_Y, 32);		// 実行画面のスクリーンサイズ(画面サイズX, 画面サイズY ,カラービット数 (`16 or 32` 基本的には32bitを使う) ).
	SetMouseDispFlag(0);

	Handle = LoadGraph("sports_racing_checkered_flag.png");		// 画像データの格納.

	while (1)
	{
		if (ProcessMessage() != 0) {			// メッセージ処理.
			break;
		}

		if (CheckHitKey(KEY_INPUT_ESCAPE) != 0)	// ESCAPEキーが押されているか調べる.
			break;								// 押されたらメインループを抜ける.

		ClearDrawScreen();						// 画面を消す(画像が重複されるため).

		// テキスト情報表示.
		DrawString(30, 40, "白ボール移動 : WASD", TxCr);
		DrawString(30, 70, "ESCキー      : 終了", TxCr);
		DrawString(600, 20, "「白線に触れずにフラッグをゲットせよ!」", TxCr4);

		if (!GoalHitFlg)
		{
			DrawExtendGraph(GOAL_X2, OBJECT_Y1, GOAL_X1, OBJECT_Y2, Handle, TRUE);				// 画像データを表示する(ゴールフラッグ).
		}
		// 自機ボール関数呼び出し.
		BoxInner();

		// キー入力関数呼び出し.
		KeyCheck();

		// カラーボックス移動処理関数呼び出し.
		Boxmove();

		if (!ballHitFlg)
		{
			// 自機ボールの描画.
			DrawCircle(ball.GetX(), ball.GetY(), ball.GetRadius(), GetColor(255, 255, 255), 1, TRUE);
		}

		// BOXとBOXを繋ぐ線.
		DrawLine(Box1.GetX(), Box1.GetY() + Box1.GetRadius() / 2, Box2.GetX(), Box2.GetY() + Box2.GetRadius() / 2, GetColor(255, 255, 255), 6);

		// 敵BOX(V1).
		DrawBox(Box1.GetX(), Box1.GetY(), Box1.GetX() + Box1.GetRadius(), Box1.GetY() + Box1.GetRadius(), GetColor(255, 165, 38), TRUE);

		// 敵BOX(V2).
		DrawBox(Box2.GetX(), Box2.GetY(), Box2.GetX() + Box2.GetRadius(), Box2.GetY() + Box2.GetRadius(), GetColor(0, 246, 255), TRUE);
		ScreenFlip();			// 裏画面のデータを表画面に反映させる関数.

		// 白弾とフラッグの当たり判定(超簡素).
		// 白弾とフラッグ画像のx座標の判定式.
		if ((ball.GetX() < GOAL_X1) && (GOAL_X2 < ball.GetX()))
		{
			// y座標の判定式.
			if ((ball.GetY() < GOAL_Y1) && (GOAL_Y2 < ball.GetY()))
			{
				// DrawString(100, 200, "当たりました", TxCr);		// デバッグ用.
				GoalHitFlg = TRUE;									// 当たったら画像を削除.

				DrawString(600, 400, "クリアしました!!", TxCr3);
			}
		}
	}

	DxLib_End();   // DXライブラリ終了処理.
	return 0;
}

// 自機移動の処理(W/A/S/Dキーで上下左右移動させる).
void KeyCheck() {

	// 自機速度の初速度.
	float vx = 1.0;
	float vy = 1.0;

	// (↑)Wキーで上移動.
	if (CheckHitKey(KEY_INPUT_W) != 0)
	{
		ball.SetY(ball.GetY() + vy * -10.0);
	}
	// (↓)Sキーで下移動.
	if (CheckHitKey(KEY_INPUT_S) != 0)
	{
		ball.SetY(ball.GetY() + vy * 10.0);
	}
	// (←)Aキーで左移動.
	if (CheckHitKey(KEY_INPUT_A) != 0)
	{
		ball.SetX(ball.GetX() + vx * -10.0);
	}
	// (→)Dキー入力で右移動.
	if (CheckHitKey(KEY_INPUT_D) != 0)
	{
		ball.SetX(ball.GetX() + vx * 10.0);
	}

	// カラーボックス1移動処理.
	if (CheckHitKey(KEY_INPUT_W) != 0) {
		Box1.SetY(Box1.GetY() - Box1.GetSpeedY());

	}
	if (CheckHitKey(KEY_INPUT_S) != 0) {
		Box1.SetY(Box1.GetY() + Box1.GetSpeedY());
	}
	if (CheckHitKey(KEY_INPUT_A) != 0) {
		Box1.SetX(Box1.GetX() - Box1.GetSpeedX());

	}
	if (CheckHitKey(KEY_INPUT_D) != 0) {
		Box1.SetX(Box1.GetX() + Box1.GetSpeedX());
	}


	// カラーボックス2移動処理.
	if (CheckHitKey(KEY_INPUT_UP) != 0) {
		Box2.SetY(Box2.GetY() - Box2.GetSpeedY());

	}
	if (CheckHitKey(KEY_INPUT_DOWN) != 0) {
		Box2.SetY(Box2.GetY() + Box2.GetSpeedY());
	}
	if (CheckHitKey(KEY_INPUT_LEFT) != 0) {
		Box2.SetX(Box2.GetX() - Box2.GetSpeedX());

	}
	if (CheckHitKey(KEY_INPUT_RIGHT) != 0) {
		Box2.SetX(Box2.GetX() + Box2.GetSpeedX());
	}
}

// カラーボックスの移動及び反転処理.
void Boxmove()
{
	// カラーボックス1.
	float x1 = Box1.GetX();
	float y1 = Box1.GetY();

	float vx1 = 3;
	float vy1 = 3;

	float speedX1 = Box1.GetSpeedX();
	float speedY1 = Box1.GetSpeedY();

	// カラーボックス2.
	float x2 = Box2.GetX();
	float y2 = Box2.GetY();

	float vx2 = 2;
	float vy2 = 2;

	float speedX2 = Box2.GetSpeedX();
	float speedY2 = Box2.GetSpeedY();


	// カラーボックス1:壁反射の実装(X).
	if( x1 < 0 || x1 > 1520)
	{
		// DrawString(30, 230, "arrow1のBOXのx座標が触れました!", TxCr3);//デバッグテキスト用.
		speedX1 *= -1.0;
		Box1.SetSpeedX(speedX1);
	}

	// カラーボックス1:壁反射の実装(Y).
	if (y1 < 0 || y1 > 850)
	{
		// DrawString(30, 260, "arrow1のBOXのy座標が触れました!", TxCr3);//デバッグテキスト用.
		speedY1 *= -1.0;
		Box1.SetSpeedY(speedY1);
	}

	// カラーボックス2:壁反射の実装(X).
	if (x2 < 0 || x2 > 1520)
	{
		// DrawString(30, 290, "arrow2のBOXのx座標が触れました!", TxCr3);//デバッグテキスト用.
		speedX2 *= -1.0;
		Box2.SetSpeedX(speedX2);
	}

	// カラーボックス2:壁反射の実装(Y).
	if (y2 < 0 || y2 > 850)
	{
		// DrawString(30, 310, "arrow2のBOXのy座標が触れました!", TxCr3);//デバッグテキスト用.
		speedY2 *= -1.0;
		Box2.SetSpeedY(speedY2);
	}

	//// カラーボックス1移動処理.
	Box1.SetX(x1 + (vx1 * speedX1));
	Box1.SetY(y1 + (vy1 * speedY1));

	//// カラーボックス2移動処理.
	Box2.SetX(x2 + (vx2 * speedX2));
	Box2.SetY(y2 + (vx2 * speedY2));
}

bool HitCheck(float a, float b) {
	float hit = a * b;
	return hit < 0;
}

bool outerProductCheck(float a, float b, float c, float d) {
	float outer = a * d - b * c;
	return outer > 0;
}

void BoxInner() {
	// カラーボックス水色とボールのベクトル
	vector1.SetVectorX(ball.GetX() - Box1.GetX());
	vector1.SetVectorY(ball.GetY() - Box1.GetY());

	// カラーボックス橙とカラーボックス水色のベクトル
	vector2.SetVectorX(Box2.GetX() - Box1.GetX());
	vector2.SetVectorY(Box2.GetY() - Box1.GetY());

	// カラーボックス橙からボールのベクトル
	vector3.SetVectorX(ball.GetX() - Box2.GetX());
	vector3.SetVectorY(ball.GetY() - Box2.GetY());

	// カラーボックス橙とカラーボックス水色の距離
	float distance = sqrtf((vector2.GetVectorX() * vector2.GetVectorX()) + (vector2.GetVectorY() * vector2.GetVectorY()));

	// カラーボックス水色とカラーボックス橙を結ぶ線とボールの最短距離
	float shortDis = fabsf(vector1.GetVectorX() * vector2.GetVectorY() - vector1.GetVectorY() * vector2.GetVectorX()) / distance;

	// ベクトルの内積角の計算.
	float inner_product1 = vector1.GetVectorX() * vector2.GetVectorX() + vector1.GetVectorY() * vector2.GetVectorY();
	float inner_product2 = vector2.GetVectorX() * vector3.GetVectorX() + vector2.GetVectorY() * vector3.GetVectorY();


	// カラーボックス同士を繋ぐ線と自機ボールとの判定.
	if (HitCheck(inner_product1, inner_product2) && shortDis <= ball.GetRadius()) {


		float vx2, vy2;
		if (outerProductCheck(vector1.GetVectorX(), vector1.GetVectorY(), vector2.GetVectorX(), vector2.GetVectorY())) {

			// ベクトル反転
			vx2 = vector2.GetVectorY();
			vy2 = -(vector2.GetVectorX());

		}
		else {

			// ベクトル反転
			vx2 = -vector2.GetVectorY();
			vy2 = vector2.GetVectorX();
		}

		float len = sqrtf((vx2 * vx2) + (vy2 * vy2));
		if (len > 0)len = 1 / len;

		vx2 *= len;
		vy2 *= len;

		DrawString(730, 300, "OUT!!", TxCr3);	// デバッグテキスト用.
		ballHitFlg = TRUE;						// ボールがヒットしたらボールを削除.
	}
}
動作確認
上記で作成したコードを実行してみます。
今回「線分」は自動で移動し、「白ボール」は操作します。線分に触れずにゴールを目指すゲーム感覚で動作確認をします。(ゴールの旗を取った時と、線分に触れてミスったパターンを提示します)

あくまで一例のやり方です。参考程度としてください
ちなみに
外積や内積の計算で2Dの例を紹介しました。では3Dではどうでしょうか。
「3D」バージョンの式は下記になります。
// 外積の計算.
// ( y*z-z*y , z*x-x*z ,x*y-y*x )
// ※x成分が横軸、y成分が縦軸、z成分が奥行きの前提

// 内積の計算
// ( x*x + y*y + z*z)
奥行きの「z]もこのようにシンプルに計算出来ると思います。
おわりに
ベクトルの仕組みは私も完璧ではないところが多々あります。気分転換がてらで楽しんで頂けたら幸いです。
今回は 「接触判定」 の動きについて紹介いたしました。
この[番外編]では今後もちょっと変わった記事を作成して参ります。
最後まで読んで頂きありがとうございました!
「サイト」
ゲームを動かす数学・物理 R(参考書)
「qiita」
衝突判定 2D編