Azure Communication Services (以下 ACS) は、リアルタイム コミュニケーション基盤となるサービスで、テキスト | 音声 | ビデオ によるコミュニケーションのハブとなり、接続やコントロールを行うアプリやサービスを SDK などを用いて容易に開発できます。
今回は、2021 年 3 月 から ACS に追加された Microsoft Teams 会議参加ができる機能を使って、Teams 会議に音声通話で参加できるまでの手順を追って確認し、Node.js の Web アプリを作成します。
Teams にビデオ通話(音声+カメラ動画)で参加する手順はこちらをご覧ください
Azure Communication Services ことはじめ (4) : Microsoft Teams 会議にビデオ通話参加ができるまで

開発環境
- 開発環境
- Windows 10 (20H2 - Build 19042)
- Visual Studio Code (ver 1.54.3)
- Node.js (12.18.4)
- 利用ライブラリー、フレームワークなど
- Azure Communication Services
- azure/communication-common@1.0.0
- azure/communication-calling@1.0.0
- azure/communication-identity@1.0.0
- Webpack
- webpack@4.42.0
- webpack-cli@3.3.11
- webpack-dev-server@3.10.3
- Azure Communication Services
0. 事前準備
Azure Communication Services サービス
Azure Communication Services ことはじめ (1) : チャットができるまで の 0.事前準備 と同様に、Azure Portal で ACS のサービスを作成し、接続文字列とエンドポイントを取得しておきます。
Microsoft Teams tenant interoperability (相互運用) 有効化
Microsoft Teams テナントと ACS の接続を有効にする必要があります。2021 年 3 月現在 プレビュー機能のため、こちらのフォームから申請が必要です。
Request to enable/disable the federation between ACS resources and your Teams tenant
申請者は Microsoft 365 の Global Administrator または Teams Service Administrator の権限が必要になります。(→ Microsoft 365 の 管理者ロール)
1. 音声通話ができるまで
今回は Node.js、Web アプリを念頭に、VoIP 通話 | Teams 会議へ音声参加ができるまでの手順を確認します。
1-0. ライブラリの追加
以下のライブラリを冒頭に追加します。
| ライブラリ | |
|---|---|
| azure/communication-common | ユーザーの作成、アクセストークン取得 |
| azure/communication-identity | (同上) |
| azure/communication-calling | 音声通話のコントロール |
import { AzureCommunicationTokenCredential } from '@azure/communication-common';
import { CommunicationIdentityClient } from "@azure/communication-identity";
import { CallClient, Features } from "@azure/communication-calling";
1-1. ユーザーを作成し、アクセストークンを取得する
接続文字列を用いて CommunicationIdentityClient を新規作成し、ユーザーの作成とアクセストークンの取得を行います。接続文字列には Azure Communication Services にアクセスするキーが含まれています。アクセストークンの種類は Calling を指定します。(他に Chat, SMS があります)
YOUR_CONNECTION_STRING は 事前準備で取得した 接続文字列に置き換えてください。
const identityClient = new CommunicationIdentityClient("YOUR_CONNECTION_STRING");

let userId;
let userToken;
identityClient.createUser().then(userResponse => {
    userId = userResponse.communicationUserId;
    identityClient.issueToken(userResponse, ["voip"]).then(tokenResponse => {
        userToken = tokenResponse.token;
}
1-2. 通話クライアントを作成
取得したトークンを用いて、通話をコントロールする CallClient を作成します。
その後作成する CallAgent で VoIP通話 | Teams 会議参加の処理を行います。
let callClient;
const tokenCredential = new AzureCommunicationUserCredential(userToken);
callClient.createCallAgent(tokenCredential).then(agent => { callAgent = agent; }
1-3. VoIP 通話を開始する | Teams 会議に参加する
VoIP 通話、Teams 会議の参加、いずれも CallAgent から処理することができます。
1-3-1. VoIP 通話を開始する
CallAgent から、通話したい相手を CommunicationUserId で指定して Call します。
let call
call = callAgent.call([{ communicationUserId: "8:echo123" }], {});
1-3-2. Teams 会議に参加する
CallAgent から、参加したい Teams 会議にアクセスします。Teams 会議 URL を引数として与えるだけで OK です。
let call
call = callAgent.join({ meetingLink: "TEAMS_MEETING_URL" }, {});
Teams 会議 URL は以下のような URL をエンコードしたものになります。
https://teams.microsoft.com/l/meetup-join/19:meeting_xxx...xxx@thread.v2/0?context={"tid":"xxx...xxx","oid":"xxx...xxx"}
Teams 会議への参加ステータス (リクエスト、許可、参加など) を取得したり、録音録画の有無を確認したりすることが可能です。
var message = "";
call.on('stateChanged', () => {
        message = call.state;
});

call.api(Features.Recording).on('isRecordingActiveChanged', () => {
        if (call.api(Features.Recording).isRecordingActive) {
            message = "This call is being recorded";
        };
    });
1-4. 通話を終了する
Call を終了して音声通話 | Teams 会議参加を終了します。
call.hangUp({ forEveryone: false });
2. Web アプリの開発
以上の手順を踏まえて、Visual Studio Code で Node.js Web アプリを作成します。
2-1. 新規 Node.js アプリの作成
Node.js アプリを作成するフォルダーを作成し、Visual Studio Code で開き、npm init コマンドで package.json を作成します。
npm init -y
2-2. Azure Communication Services のライブラリのインストール
npm install コマンドで Azure Communication Services の必要なライブラリ (パッケージ) をインストールします。
npm install @azure/communication-common --save
npm install @azure/communication-identity --save
npm install @azure/communication-calling --save
2-3. Webpack のインストール
今回は Webpack を利用して、JavaScript のモジュールバンドル & ローカルでの実行確認 を行います。
npm install コマンドで、webpack、webpack-cli、webpack-dev-server をインストールします。
npm install webpack@4.42.0 webpack-cli@3.3.11 webpack-dev-server@3.10.3 --save-dev
今回は Azure Communication Services ドキュメント 推奨バージョンを指定してインストールしています。
2-4. コーディング
画面 (index.html)
ユーザーからの操作および音声入出力、各種情報を表示するため、index.html という名前でファイルを作成し、以下のような UI を作成します。
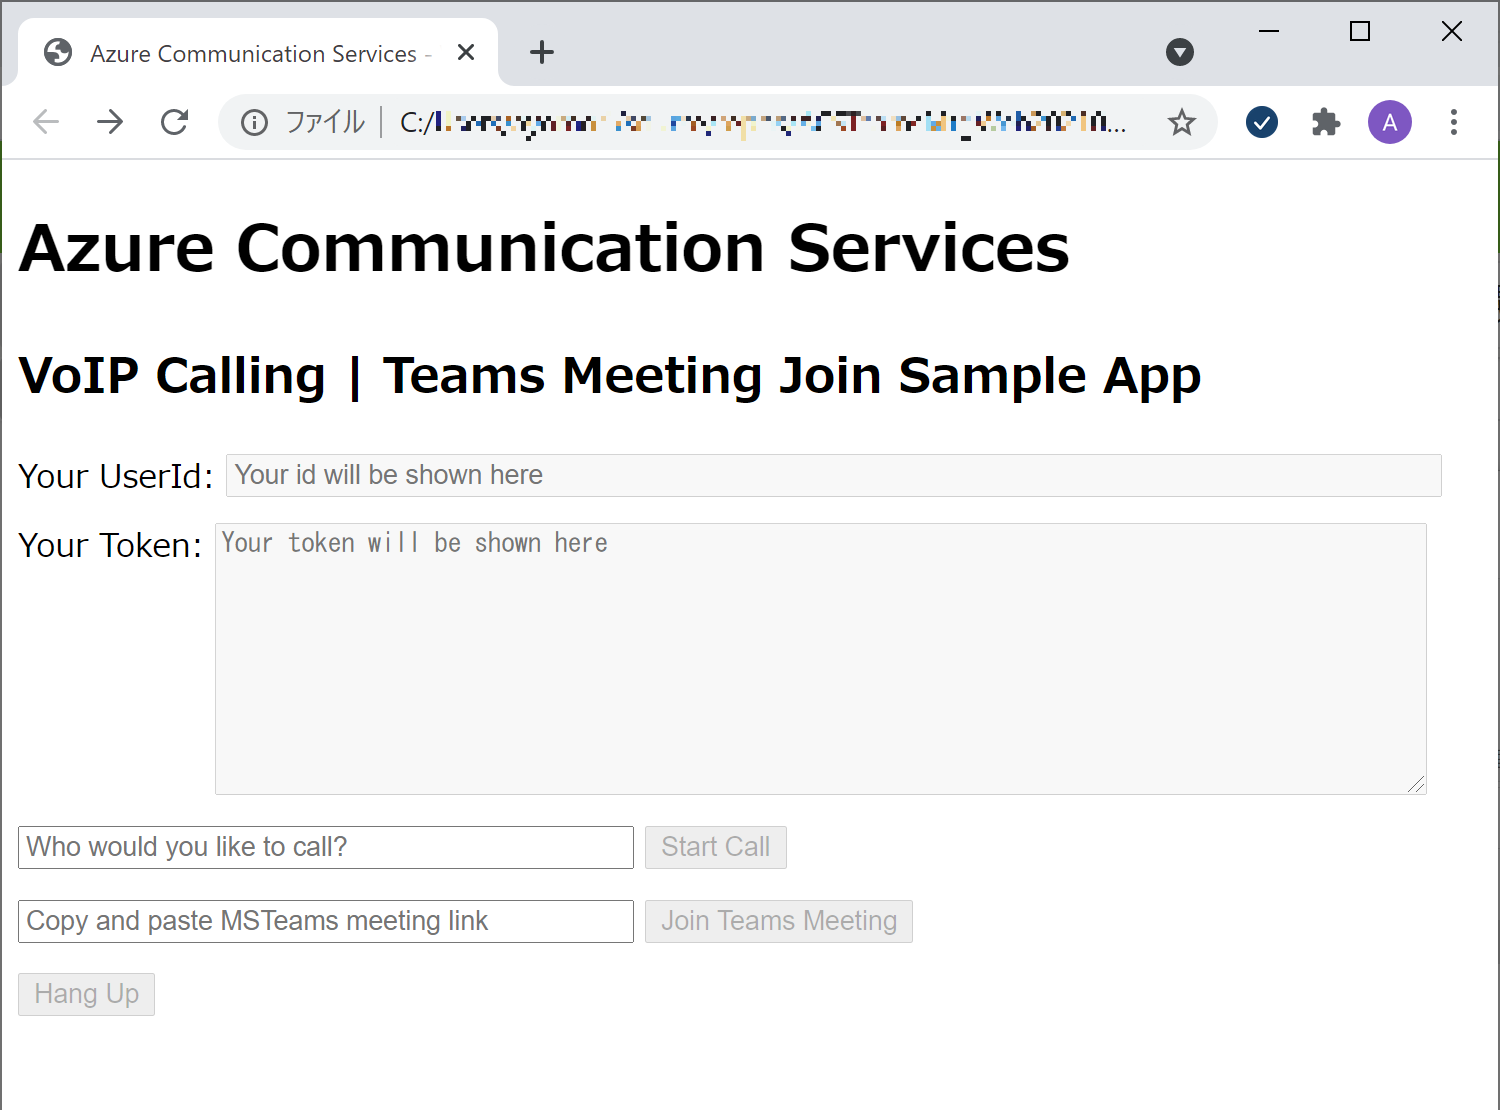
コードは以下になります。
<!DOCTYPE html>
<html>
  <head>
    <title>Azure Communication Services - VoIP Calling | Teams Interop</title>
  </head>
  <body>
    <h1>Azure Communication Services</h1>
    <h2>VoIP Calling | Teams Meeting Join Sample App</h2>
    <div>
      <label>Your UserId: </label>
      <input
      id="caller-id-output" type="text" placeholder="Your id will be shown here"
      style="margin-bottom:1em; width: 600px; vertical-align: text-top;"
      disabled="true"
      />
    </div>
    <div>
      <label>Your Token: </label>
      <textarea
      id="caller-token-output" type="text" placeholder="Your token will be shown here"
      style="margin-bottom:1em; width: 600px; height: 130px; vertical-align: text-top;"
      disabled="true"
      ></textarea>
    </div>
    <div>
      <input
      id="callee-id-input" type="text" placeholder="Who would you like to call?"
      style="margin-bottom:1em; width: 300px;"
      />
      <button id="call-button" type="button" disabled="true" style="margin-bottom:1em">
        Start Call
      </button>
    </div>
    <div>
      <input
      id="meeting-url-input" type="text" placeholder="Copy and paste MSTeams meeting link"
      style="margin-bottom:1em; width: 300px;"
      />
      <button id="join-meeting-button" type="button" disabled="true" style="margin-bottom:1em">
        Join Teams Meeting
      </button>
    </div>
    <div>
      <button id="hang-up-button" type="button" disabled="true" style="margin-bottom:1em">
        Hang Up
      </button>
    </div>
    <div>
      <label
      id="message-output"
      style="margin-bottom:1em; width: 1000px; height: 50px;"
      ></label>
    </div>
    <script src="./index.js"></script>
  </body>
</html>
加筆を行って整えたコードは以下になります。
ACSTeamsCallWeb202103/index.html
通話機能 (client.js)
client.js という名前でファイルを作成し、VoIP 通話 | Teams 会話 をコントロールする機能を記述します。
後ほど client.js を index.js にビルドして index.html で読み込みます。
利用ライブラリー
今回は、これらのライブラリーを利用します。
import { AzureCommunicationTokenCredential } from '@azure/communication-common';
import { CommunicationIdentityClient } from "@azure/communication-identity";
import { CallClient, Features } from "@azure/communication-calling";
接続文字列
client.js に connectionString を記載しておきます。
YOUR_CONNECTION_STRING は 事前準備で取得した 接続文字列に置き換えてください。
セキュリティの観点から別の設定ファイルなどに記載して読み出すのが一般的ですが、今回は動作を確認するのみのアプリなので本体に記載しています。
let connectionString = "YOUR_CONNECTION_STRING";
UI 画面の入出力
呼び出しを行う相手先の UserId または Teams 会議リンク(URL) の入力を取得できるようにします。
また、VoIP通話 の開始 | Teams 会話 の参加、終了のボダンのクリックを取得できるようにします。
出力は、UserId、UserToken、動作に対するメッセージを表示するようにしておきます。
// 入力
const calleeInput = document.getElementById("callee-id-input"); // 通話先 UserId
const callButton = document.getElementById("call-button");      // 通話開始ボタン
const meetingUrlInput = document.getElementById("meeting-url-input");       // Teams会議URL
const joinMeetingButton = document.getElementById("join-meeting-button");   // Teams会議会話参加ボタン
const hangUpButton = document.getElementById("hang-up-button"); //通話終了ボタン
// 出力
const callerIdOutput = document.getElementById("caller-id-output");       // ACS UserId
const callerTokenOutput = document.getElementById("caller-token-output"); // ACS UserToken
const messageOutput = document.getElementById("message-output");          // 状態メッセージ
CommunicationUser の新規作成、Token の取得、CallAgent の生成
接続文字列から User を新規作成して Token を取得します。Token を利用して、通話のコントロールを行う CallAgent を生成します。CAllAgent が無事生成出来たら callButton (VoIP通話開始ボタン) | joinMeetingButton (Teams会議参加ボタン) をクリック可能(disabled = false)にします。
const identityClient = new CommunicationIdentityClient(connectionString);
const callClient = new CallClient();
let callAgent;
let call;

identityClient.createUser().then(identityResponse => {
    callerIdOutput.value = identityResponse.communicationUserId;    // ACS User Id 画面出力
    identityClient.getToken(identityResponse, ["voip"]).then(tokenResponse => {
        const userToken = tokenResponse.token;
        callerTokenOutput.value = userToken;                        // ACS User Token 画面出力
        messageOutput.innerText += "Got user token.";               // 状態メッセージ画面出力

        const tokenCredential = new AzureCommunicationTokenCredential(userToken);
        callClient.createCallAgent(tokenCredential, {displayName: 'ACS user'}).then(agent => {
          callAgent = agent;
          callButton.disabled = false;                              // VoIP通話開始ボタンをクリック可能に
          joinMeetingButton.disabled = false;                       // Teams会議参加ボタンをクリック可能に
          messageOutput.innerText += "\nReady to call | join MSTeam's Meeting.";        // 状態メッセージ画面出力
        });
    });
});
VoIP 通話の開始
callButton (通話開始ボタン) がクリックされたら、callAgent から相手の Communication Id (callee-id-input TextBox から取得) の呼び出しを行います。
callButton.addEventListener("click", () => {
    // 通話開始
    call = callAgent.startCall(
        [{ id: calleeInput.value }],
        {}
    );

    // 各ボタンのステータス変更、状態メッセージ表示
    hangUpButton.disabled = false;      // 通話停止ボタンをクリック可能に
    callButton.disabled = true;         // VoIP通話開始ボタンをクリック不可に
    joinMeetingButton.disabled = true;  // Teams会議参加ボタンをクリック不可に
    messageOutput.innerText += "\nCall: started.";    // 状態メッセージ画面出力
});
Teams 会議への参加
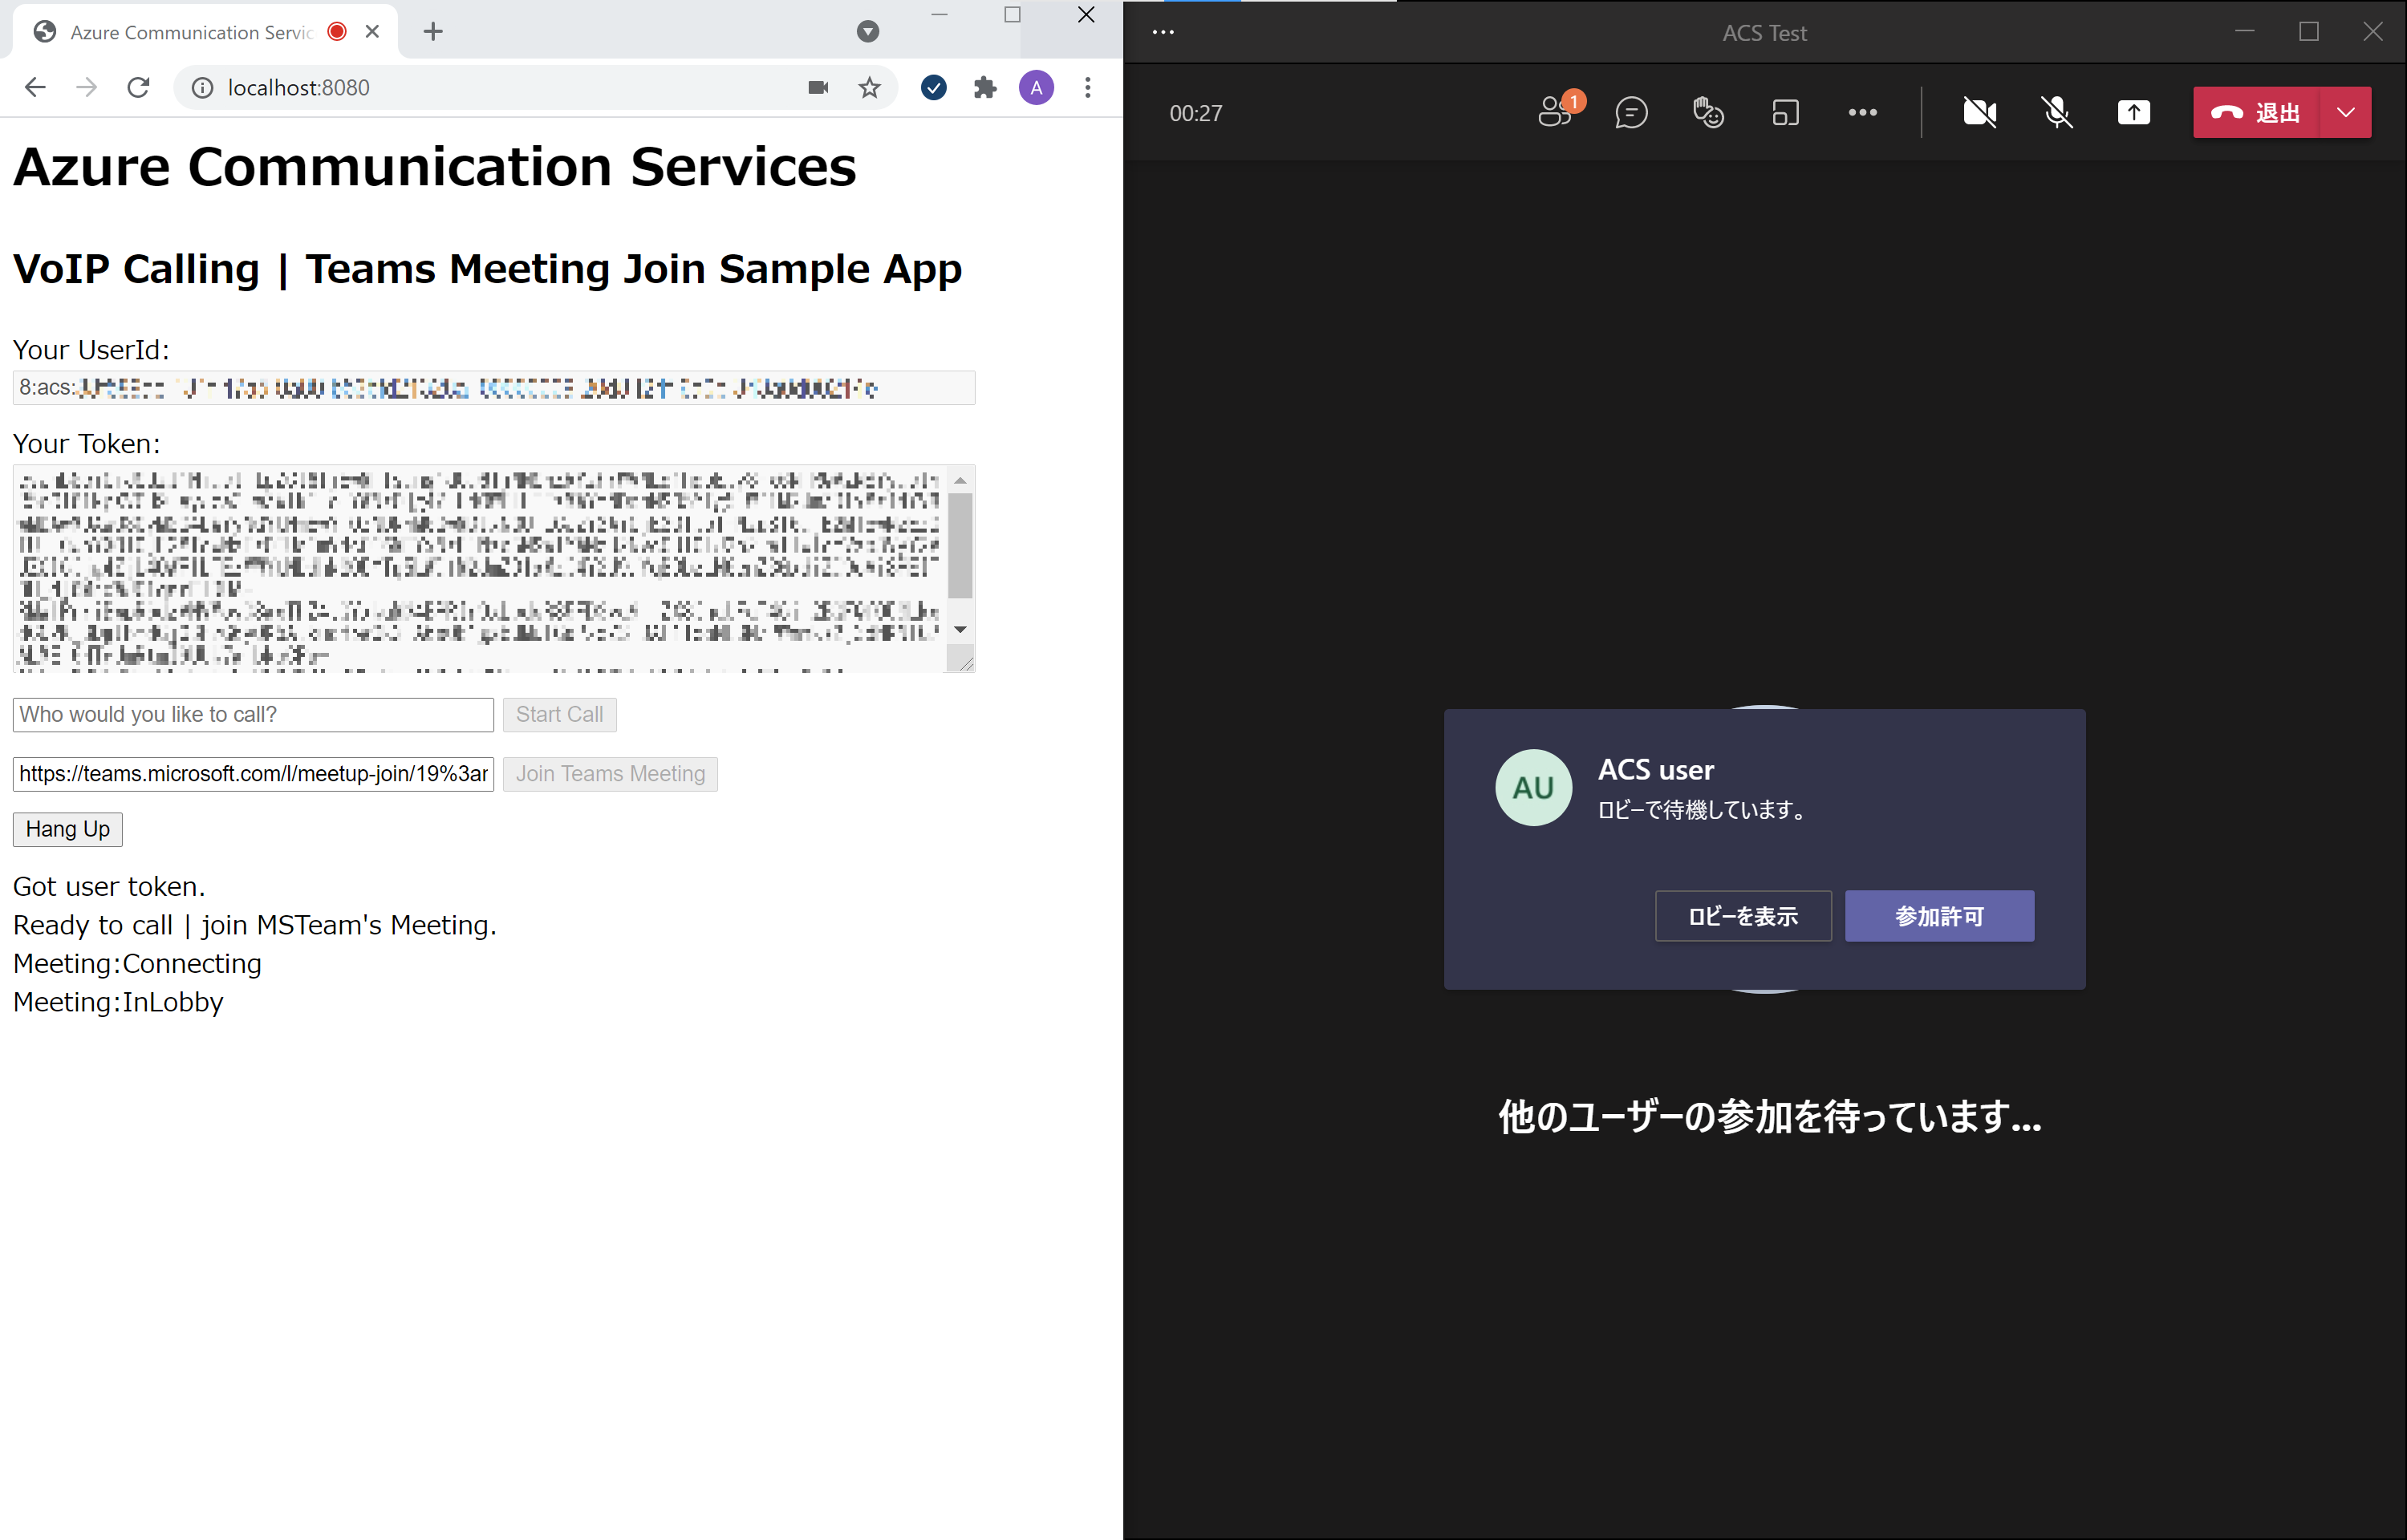
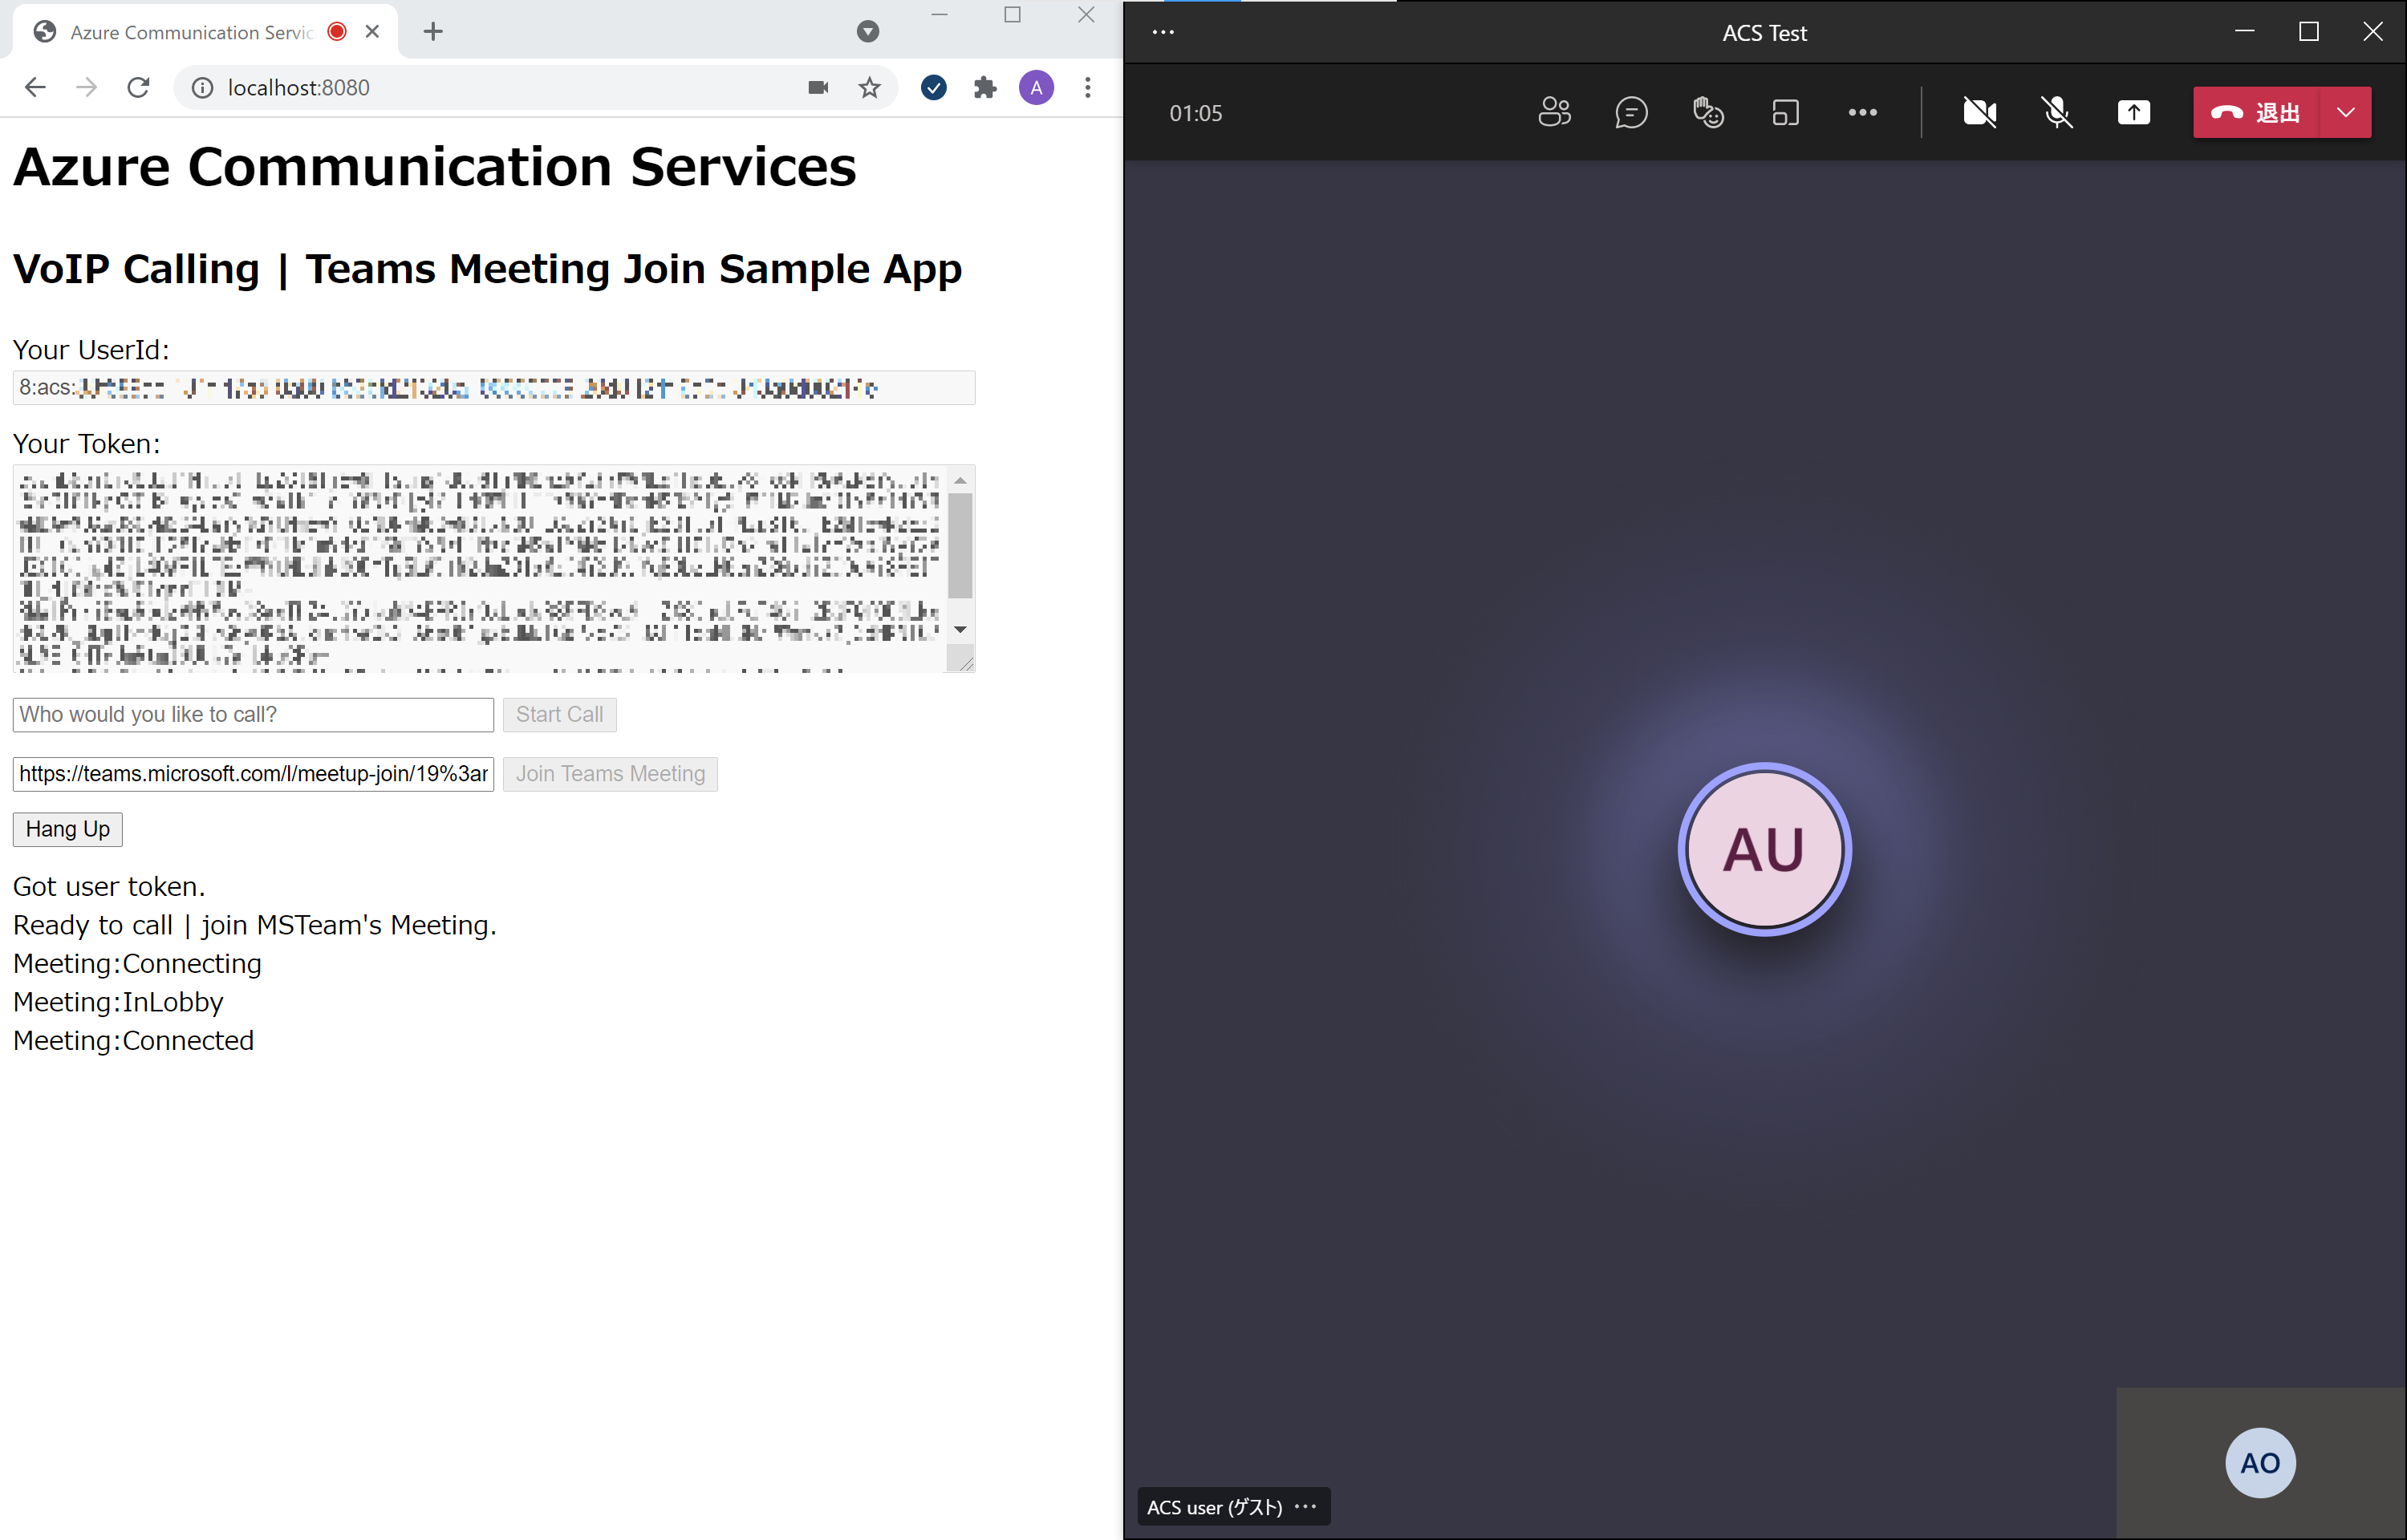
joinMeetingButton (Teams会議参加ボタン) がクリックされたら、callAgent から Teams 会議 (meeting-url-input TextBox から取得) への参加をリクエストします。
call のステータスを確認して、会議参加リクエストの承認、会議参加、録音録画有無を表示します。
joinMeetingButton.addEventListener("click", () => {
    // 会議参加リクエスト
    call = callAgent.join(
        { meetingLink: meetingUrlInput.value },
        {}
    );

    // 会議参加ステータスのチェック
    call.on('stateChanged', () => {
        messageOutput.innerText += "\nMeeting:" + call.state;
    })

    // 会議の録音録画のステータス表示
    call.api(Features.Recording).on('isRecordingActiveChanged', () => {
        if (call.api(Features.Recording).isRecordingActive) {
            messageOutput.innerText += "\nThis call is being recorded";
        };
    });

    // 各ボタンのステータス変更、状態メッセージ表示
    hangUpButton.disabled = false;      // 通話停止ボタンをクリック可能に
    callButton.disabled = true;         // VoIP通話開始ボタンをクリック不可に
    joinMeetingButton.disabled = true;  // Teams会議参加ボタンをクリック不可に
});
通話の終了
hangupButton (通話終了ボタン) がクリックされたら、callAgent の通話を切断します。
hangUpButton.addEventListener("click", () => {
    // 通話 | 会議参加 の終了
    call.hangUp({ forEveryone: true });

    // 各ボタンのステータス変更、状態メッセージ表示
    hangUpButton.disabled = true;       // 通話停止ボタンをクリック不可に
    callButton.disabled = false;        // VoIP通話開始ボタンをクリック可能に
    joinMeetingButton.disabled = false; // Teams会議参加ボタンをクリック可能に
    messageOutput.innerText += "\nNow hanged up.";
});
最終的なコードはこちらになります。
ACSTeamsCallWeb202103/client.js
3. 音声通話 | Teams 会議通話参加 を試してみる
今回は Webpack を利用しているので、client.js を index.js にビルドして起動します。
npx webpack-dev-server --entry ./client.js --output index.js --debug --devtool inline-source-map
起動したら、ブラウザーから http://localhost:8080 にアクセスします。
User Id と Token が取得できると [Start Call] のボタンがアクティブになります。
音声会話のチェック
音声通話テスト用のユーザーである 8:echo123 を入力して [Start Call] をクリックします。
"Hello, welcome to Azure Communication Services audio testing system..." と音声が聞こえれば OK です。音声を録音して再生することで、こちらの音声が取得できていることも確認できます。
[Hang Up] をクリックすると会話は終了します。

Teams 会議通話参加のチェック
Teams 会議を作成し、参加 URL を取得します。
Teams 会議参加 URL を入力て Join Team's Meeting をクリックします。
[Hang Up] をクリックすると会議から退出します。