Azure Communication Services (以下 ACS) は、リアルタイム コミュニケーション基盤となるサービスで、テキスト | 音声 | ビデオ によるコミュニケーションのハブとなり、接続やコントロールを行うアプリやサービスを SDK などを用いて容易に開発できます。
今回は、2021 年 3 月 から ACS に追加された Microsoft Teams 会議参加ができる機能を使って、Teams 会議にビデオ通話(音声+カメラ動画)で参加できるまでの手順を追って確認し、Node.js の Web アプリを作成します。
ひとまず Teams 会議に音声で参加できるまでの手順はこちらに掲載しています:
Azure Communication Services ことはじめ (3) : Microsoft Teams 会議に音声参加ができるまで
開発環境
- 開発環境
- Windows 10 (20H2 - Build 19042)
- Visual Studio Code (ver 1.55.2)
- Node.js (12.18.4)
- 利用ライブラリー、フレームワークなど
- Azure Communication Services
- azure/communication-common@1.0.0-beta.5
- azure/communication-calling@1.0.0-beta.10
- azure/communication-identity@1.0.0
- Webpack
- webpack@4.42.0
- webpack-cli@3.3.11
- webpack-dev-server@3.10.3
- Azure Communication Services
0. 事前準備
Azure Communication Services サービス
Azure Communication Services ことはじめ (1) : チャットができるまで の 0.事前準備 と同様に、Azure Portal で ACS のサービスを作成し、接続文字列とエンドポイントを取得しておきます。
Microsoft Teams tenant interoperability (相互運用) 有効化
Azure Communication Services ことはじめ (3) : Microsoft Teams 会議に音声参加ができるまで の 0.事前準備 と同様に申請を行い、有効化しておきます。
1. ビデオ通話ができるまで (ライブラリーの使い方)
Azure Communication Services ことはじめ (3) : Microsoft Teams 会議に音声参加ができるまで との差分は、動画ストリームのコントロールです。
1-0. ライブラリの追加
以下のライブラリを冒頭に追加します。動画ストリームを扱うモジュール(VideoStreamRenderer, VideoStream)が追加になります。
| ライブラリ | |
|---|---|
| azure/communication-common | ユーザーの作成、アクセストークン取得 |
| azure/communication-identity | (同上) |
| azure/communication-calling | 音声およびビデオ通話のコントロール |
import { AzureCommunicationTokenCredential } from '@azure/communication-common';
import { CommunicationIdentityClient } from "@azure/communication-identity";
import { CallClient, VideoStreamRenderer, LocalVideoStream } from "@azure/communication-calling";
1-1. ユーザーを作成し、アクセストークンを取得する
[Azure Communication Services ことはじめ (3) 1-1] (https://qiita.com/annie/items/42f9a75f12e564d6ffb0#1-1-%E3%83%A6%E3%83%BC%E3%82%B6%E3%83%BC%E3%82%92%E4%BD%9C%E6%88%90%E3%81%97%E3%82%A2%E3%82%AF%E3%82%BB%E3%82%B9%E3%83%88%E3%83%BC%E3%82%AF%E3%83%B3%E3%82%92%E5%8F%96%E5%BE%97%E3%81%99%E3%82%8B) と全く同様です。
1-2. 通話クライアントを作成
Azure Communication Services ことはじめ (3) 1-2 と全く同様です。
1-3. Teams 会議に参加する
CallAgent から、参加したい Teams 会議にアクセスします。Teams 会議 URL がそのまま引数になります。
PCカメラの画像を送る場合は、CallClient から DevideManager を呼び出し、デバイス(PC)のカメラ情報(VideoDevices)を取得します。カメラを指定して (※環境に合わせて videoDevices[x] の x 値を変更してください)、LocalVideoStream として取得し、Teams 会議情報に追加します。
let call
let deviceManager;
let localVideoStream;

deviceManager = callClient.getDeviceManager()
const videoDevices = deviceManager.getCameras();
const videoDeviceInfo = videoDevices[0];
localVideoStream = new LocalVideoStream(videoDeviceInfo);

call = callAgent.join(
        { meetingLink: "TEAMS_MEETING_URL" },
        { videoOptions: { localVideoStreams: [localVideoStream] }
});
Teams 会議 URL は以下のような URL をエンコードしたものになります。
https://teams.microsoft.com/l/meetup-join/19:meeting_xxx...xxx@thread.v2/0?context={"tid":"xxx...xxx","oid":"xxx...xxx"}
1-4. Teams 会議の動画をコントロールする
1-4-1. PC カメラからの動画を使用
LocalVideoStream から VideoStreamRenderer で View を作成し、HTMLElement として append すれば OKです。
let rendererLocal;

rendererLocal = new VideoStreamRenderer(localVideoStream);
const view = await rendererLocal.createView();
document.getElementById("myVideo").appendChild(view.target);
1-4-2. Teams 会議 (の参加者) の動画を使用
Teaams 会議の動画である RemoteVideoStream を取得したら、VideoStreamRenderer で View を生成して HTMLElement として append するという流れは同様です。
let rendererRemote;

rendererRemote = new VideoStreamRenderer(remoteVideoStream);
const view = await rendererRemote.createView();
document.getElementById("remoteVideo").appendChild(view.target);
RemoteVideoStream は 会議情報をストアする Call から取得します。Teams会議参加者(Allay)情報から動画ストリームを取り出します。参加者の動画が切断されたら(remoteVideoStream.on('isAvailableChanged'...)、RemoteVideoStream を破棄します。
//CallAgent callAgent;
let call;
call = callAgent.join({ meetingLink: meetingUrlInput.value });
subscribeToRemoteParticipantInCall(call)

function subscribeToRemoteParticipantInCall(call) {
    call.on('remoteParticipantsUpdated', e => {
        e.added.forEach( p => {
            subscribeToParticipantVideoStreams(p);
        })
    });
    call.remoteParticipants.forEach(p => {
        subscribeToPaticipantVideoStreams(p);
    })
}

function subscribeToParticipantVideoStreams(remoteParticipant){
    remoteParticipant.on('videoStreamsUpdated', e=> {
        e.added.forEach(v => {
            handleVideoStream(v);
        })
    });
    remoteParticipant.videoStreams.forEach(v => {
        handleVideoStream(v);
    });
}

function handleVideoStream(remoteVideoStream) {
    remoteVideoStream.on('isAvailableChanged', async () => {
        if (remoteVideoStream.isAvailable) {
            remoteVideoView(remoteVideoStream);
        } else {
            rendererRemote.dispose();
        }
    });
    if (remoteVideoStream.isAvailable) {
        remoteVideoView(remoteVideoStream);
    }
}
2. Web アプリの開発 (手順)
以上の手順を踏まえて、Visual Studio Code で Node.js Web アプリを作成します。
2-1. 新規 Node.js アプリの作成
Node.js アプリを作成するフォルダーを作成し、Visual Studio Code で開き、npm init コマンドで package.json を作成します。
npm init -y
2-2. Azure Communication Services のライブラリのインストール
npm install コマンドで Azure Communication Services の必要なライブラリ (パッケージ) をインストールします。
npm install @azure/communication-common@1.0.0-beta.5 --save
npm install @azure/communication-identity@1.0.0 --save
npm install @azure/communication-calling@1.0.0-beta.10 --save
2-3. Webpack のインストール
今回は Webpack を利用して、JavaScript のモジュールバンドル & ローカルでの実行確認 を行います。
npm install コマンドで、webpack、webpack-cli、webpack-dev-server をインストールします。
npm install webpack@4.42.0 webpack-cli@3.3.11 webpack-dev-server@3.10.3 --save-dev
今回は Azure Communication Services ドキュメント 推奨バージョンを指定してインストールしています。
2-4. コーディング
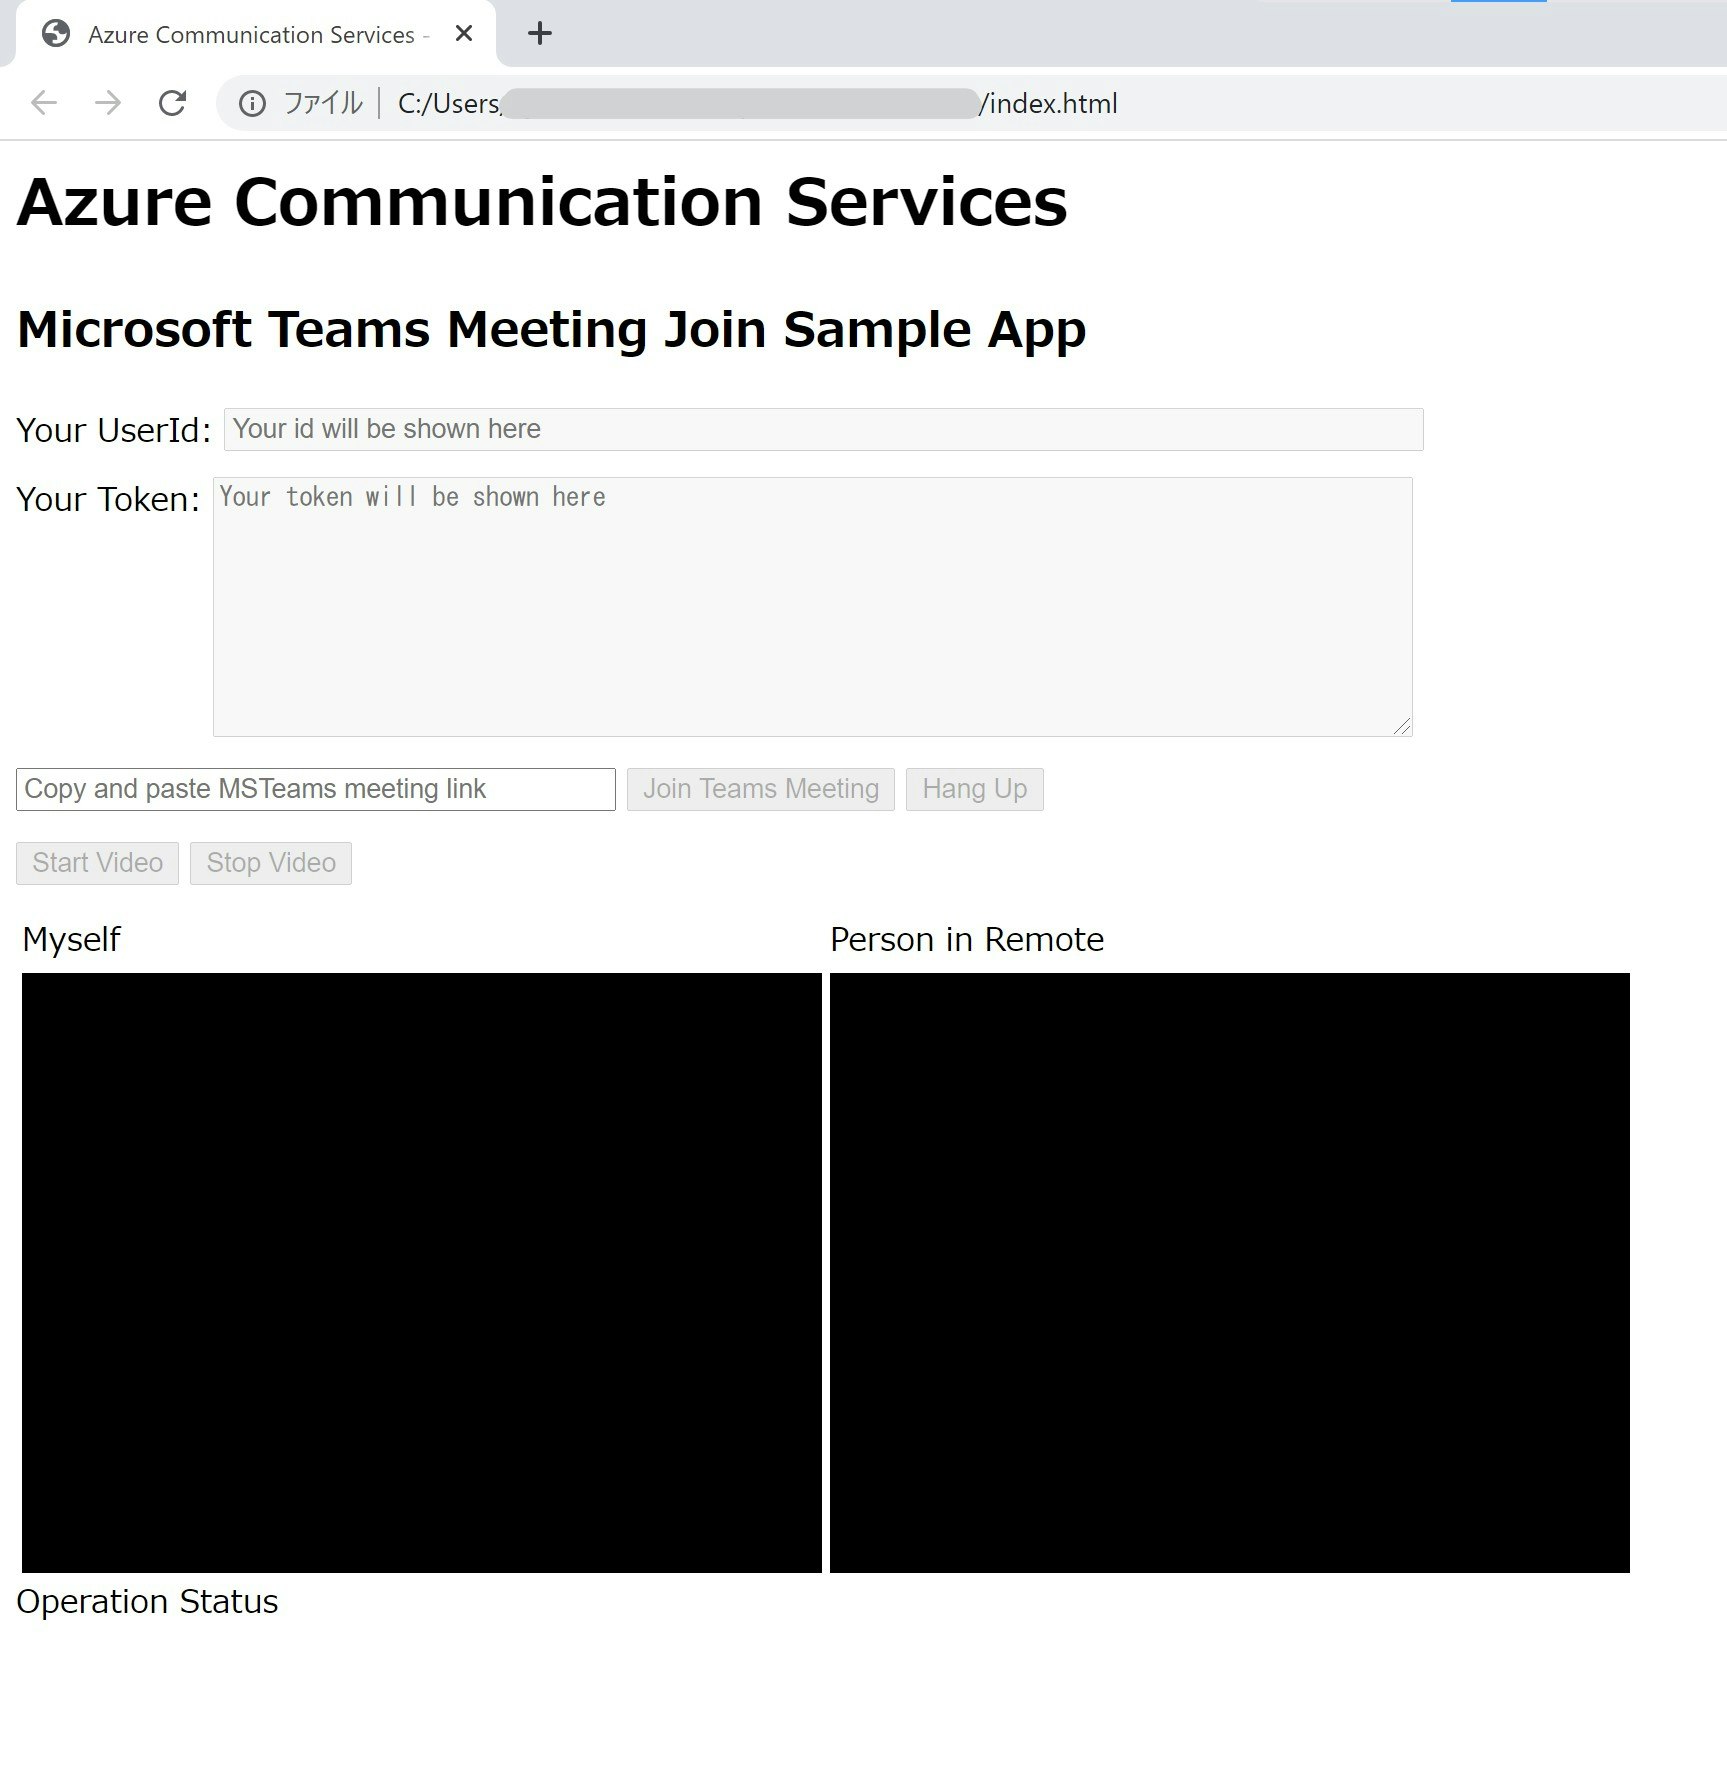
画面 (index.html)
ユーザーからの操作および音声入出力、各種情報を表示するため、index.html という名前でファイルを作成し、以下のような UI を作成します。
コードは以下になります。
ACSTeamsVideoWeb202104/index.html
カメラ動画 & 音声 を使った通話機能 (client.js)
client.js という名前でファイルを作成し、Teams 会話 (カメラ動画、音声) をコントロールする機能を記述します。
後ほど client.js を index.js にビルドして index.html で読み込みます。
利用ライブラリー
今回は、これらのライブラリーを利用します。
import { AzureCommunicationTokenCredential } from '@azure/communication-common';
import { CommunicationIdentityClient } from "@azure/communication-identity";
import { CallClient, Features } from "@azure/communication-calling";
接続文字列
client.js に connectionString を記載しておきます。
YOUR_CONNECTION_STRING は 事前準備で取得した 接続文字列に置き換えてください。
セキュリティの観点から別の設定ファイルなどに記載して読み出すのが一般的ですが、今回は動作を確認するのみのアプリなので本体に記載しています。
let connectionString = "YOUR_CONNECTION_STRING";
UI 画面の入出力
Web 画面から Teams 会議リンク(URL) の入力を取得できるようにします。
また、Teams 会議の参加、終了のボタンのクリック、および カメラ動画のオン、オフボタンのクリックを取得できるようにします。
出力は、UserId、UserToken、動作に対するメッセージ(messageOutput)を表示するようにしておきます。
動画(自分の PC カメラ動画および Teams 会議動画) は後ほど設定します
// 入力
const meetingUrlInput = document.getElementById("meeting-url-input");       // Teams 会議 URL
const joinMeetingButton = document.getElementById("join-meeting-button");   // Teams 会議参加ボタン
const hangUpButton = document.getElementById("hang-up-button");             // Teams 会議退出ボタン
const startVideoButton = document.getElementById("start-video-button");     // カメラ動画開始ボタン
const stopVideoButton = document.getElementById("stop-video-button");       // カメラ動画停止ボタン

// 出力
const callerIdOutput = document.getElementById("caller-id-output");       // ACS UserId
const callerTokenOutput = document.getElementById("caller-token-output"); // ACS UserToken
const messageOutput = document.getElementById("message-output");          // 状態メッセージ
CommunicationUser の新規作成、Token の取得、CallAgent の生成
接続文字列から User を新規作成して Token を取得します。Token を利用して、Teams 会議のコントロールを行う CallAgent を生成します。CAllAgent が無事生成出来たら、joinMeetingButton (Teams会議参加ボタン) をクリック可能(disabled = false)にします。
// ACS User の作成とトークンの取得
const identityClient = new CommunicationIdentityClient(connectionString);
const callClient = new CallClient();

let callAgent;
let call;

identityClient.createUser().then(identityResponse => {
    callerIdOutput.value = identityResponse.communicationUserId;    // ACS User Id 画面出力
    identityClient.getToken(identityResponse, ["voip"]).then(tokenResponse => {
        const userToken = tokenResponse.token;
        callerTokenOutput.value = userToken;                        // ACS User Token 画面出力
        messageOutput.innerText += "Got user token.";               // 状態メッセージ画面出力

        const tokenCredential = new AzureCommunicationTokenCredential(userToken);
        callClient.createCallAgent(tokenCredential, {displayName: 'ACS user'}).then(async agent => {
          callAgent = agent;
          deviceManager = await callClient.getDeviceManager()
          joinMeetingButton.disabled = false;                       // Teams 会議参加ボタンをクリック可能に
          messageOutput.innerText += "\nReady to join MSTeam's Meeting.";        // 状態メッセージ画面出力
        });
    });
});
動画の設定
自分の PC カメラ動画 および Teams 会議動画 の操作を設定します。
let deviceManager       // PCカメラを操作
let localVideoStream;   // PCカメラの動画ストリーム
let rendererLocal;      // PCカメラの動画レンダラー
let rendererRemote;     // Teams 会議の動画レンダラー

// 自分の PC カメラ動画を配置
async function localVideoView(){
    rendererLocal = new VideoStreamRenderer(localVideoStream);
    const view = await rendererLocal.createView({ scalingMode: 'Crop'});
    document.getElementById("myVideo").appendChild(view.target);
}

// Teams 会議の参加者の動画を配置
async function remoteVideoView(remoteVideoStream) {
    rendererRemote = new VideoStreamRenderer(remoteVideoStream);
    const view = await rendererRemote.createView({ scalingMode: 'Crop'});
    document.getElementById("remoteVideo").appendChild(view.target);
}

// Teams 会議の動画有無、参加者の増減による変更をハンドリング
// Teams 会議への参加者が確認出来たら動画ストリームを取得
function subscribeToRemoteParticipantInCall(callInstance) {
    callInstance.on('remoteParticipantsUpdated', e => {
        e.added.forEach( p => {
            subscribeToParticipantVideoStreams(p);
        })
    });
    callInstance.remoteParticipants.forEach(p => {
        subscribeToPaticipantVideoStreams(p);
    })
}

function subscribeToParticipantVideoStreams(remoteParticipant){
    remoteParticipant.on('videoStreamsUpdated', e=> {
        e.added.forEach(v => {
            handleVideoStream(v);
        })
    });
    remoteParticipant.videoStreams.forEach(v => {
        handleVideoStream(v);
    });
}

// 取得したストリームを配置
function handleVideoStream(remoteVideoStream) {
    remoteVideoStream.on('isAvailableChanged', async () => {
        if (remoteVideoStream.isAvailable) {
            remoteVideoView(remoteVideoStream);
        } else {
            rendererRemote.dispose();
        }
    });
    if (remoteVideoStream.isAvailable) {
        remoteVideoView(remoteVideoStream);
    }
}
Teams 会議への参加
joinMeetingButton (Teams 会議参加ボタン) がクリックされたら、callAgent から Teams 会議 (meeting-url-input TextBox から取得) への参加をリクエストします。また、PC カメラを取得し、カメラ動画 と Teams 会議動画 を出力します。
call のステータスを確認して、会議参加リクエストの承認、会議参加の状態を表示します。
joinMeetingButton.addEventListener("click", async () => {
    // PC カメラの取得
    const videoDevices = await deviceManager.getCameras();
    const videoDeviceInfo = videoDevices[0];

    // PC カメラ動画の出力
    localVideoStream = new LocalVideoStream(videoDeviceInfo);
    localVideoView();
    // カメラ動画の開始、停止ボタンのステータス変更
    startVideoButton.disabled = true;   // カメラ動画開始ボタンをクリック不可に
    stopVideoButton.disabled = false;   // カメラ動画停止ボタンをクリック可能に

    // Teams 会議参加リクエスト
    call = callAgent.join(
        { meetingLink: meetingUrlInput.value },
        { videoOptions: { localVideoStreams: [localVideoStream] } }
    );

    // Teams 会議動画の出力
    subscribeToRemoteParticipantInCall(call);

    // 会議参加ステータスのチェック
    call.on('stateChanged', () => {
        messageOutput.innerText += "\nMeeting:" + call.state;
    })

    // 各ボタンのステータス変更、状態メッセージ表示
    hangUpButton.disabled = false;      // Teams 会議退出ボタンをクリック可能に
    joinMeetingButton.disabled = true;  // Teams 会議参加ボタンをクリック不可に
});
Teams 会議からの退出
hangupButton (Teams 会議退出ボタン) がクリックされたら、callAgent の Teams 会議を切断します。
hangUpButton.addEventListener("click", () => {
    // Teams 会議から退出
    call.hangUp();

    // 動画レンダラーの終了
    rendererLocal.dispose();

    // 各ボタンのステータス変更、状態メッセージ表示
    hangUpButton.disabled = true;       // Teams 会議退出ボタンをクリック不可に
    joinMeetingButton.disabled = false; // Teams 会議参加ボタンをクリック可能に
    stopVideoButton.disabled = true;    // カメラ動画停止ボタンをクリック不可に
    messageOutput.innerText += "\nNow hanged up.";  // 状態メッセージ画面出力
});
PCカメラ動画の開始、停止
startVideoButton(PCカメラ動画開始)、stopVideoButton(PCカメラ動画停止) がクリックされたら、カメラ動画を開始または停止します。
startVideoButton.addEventListener("click", async () => {
    await call.startVideo(localVideoStream);
    localVideoView();
    startVideoButton.disabled = true;   // カメラ動画開始ボタンをクリック不可に
    stopVideoButton.disabled = false;   // カメラ動画停止ボタンをクリック可能に
});

stopVideoButton.addEventListener("click", async () => {
    await call.stopVideo(localVideoStream);
    rendererLocal.dispose();
    startVideoButton.disabled = false;  // カメラ動画開始ボタンをクリック可能に
    stopVideoButton.disabled = true;    // カメラ動画停止ボタンをクリック不可に
 });
最終的なコードはこちらになります。
ACSTeamsVideoWeb202104/client.js
3. Teams 会議へのビデオ通話参加 を試してみる
今回は Webpack を利用しているので、client.js を index.js にビルドして起動します。
npx webpack-dev-server --entry ./client.js --output index.js --debug --devtool inline-source-map
起動したら、ブラウザーから http://localhost:8080 にアクセスします。
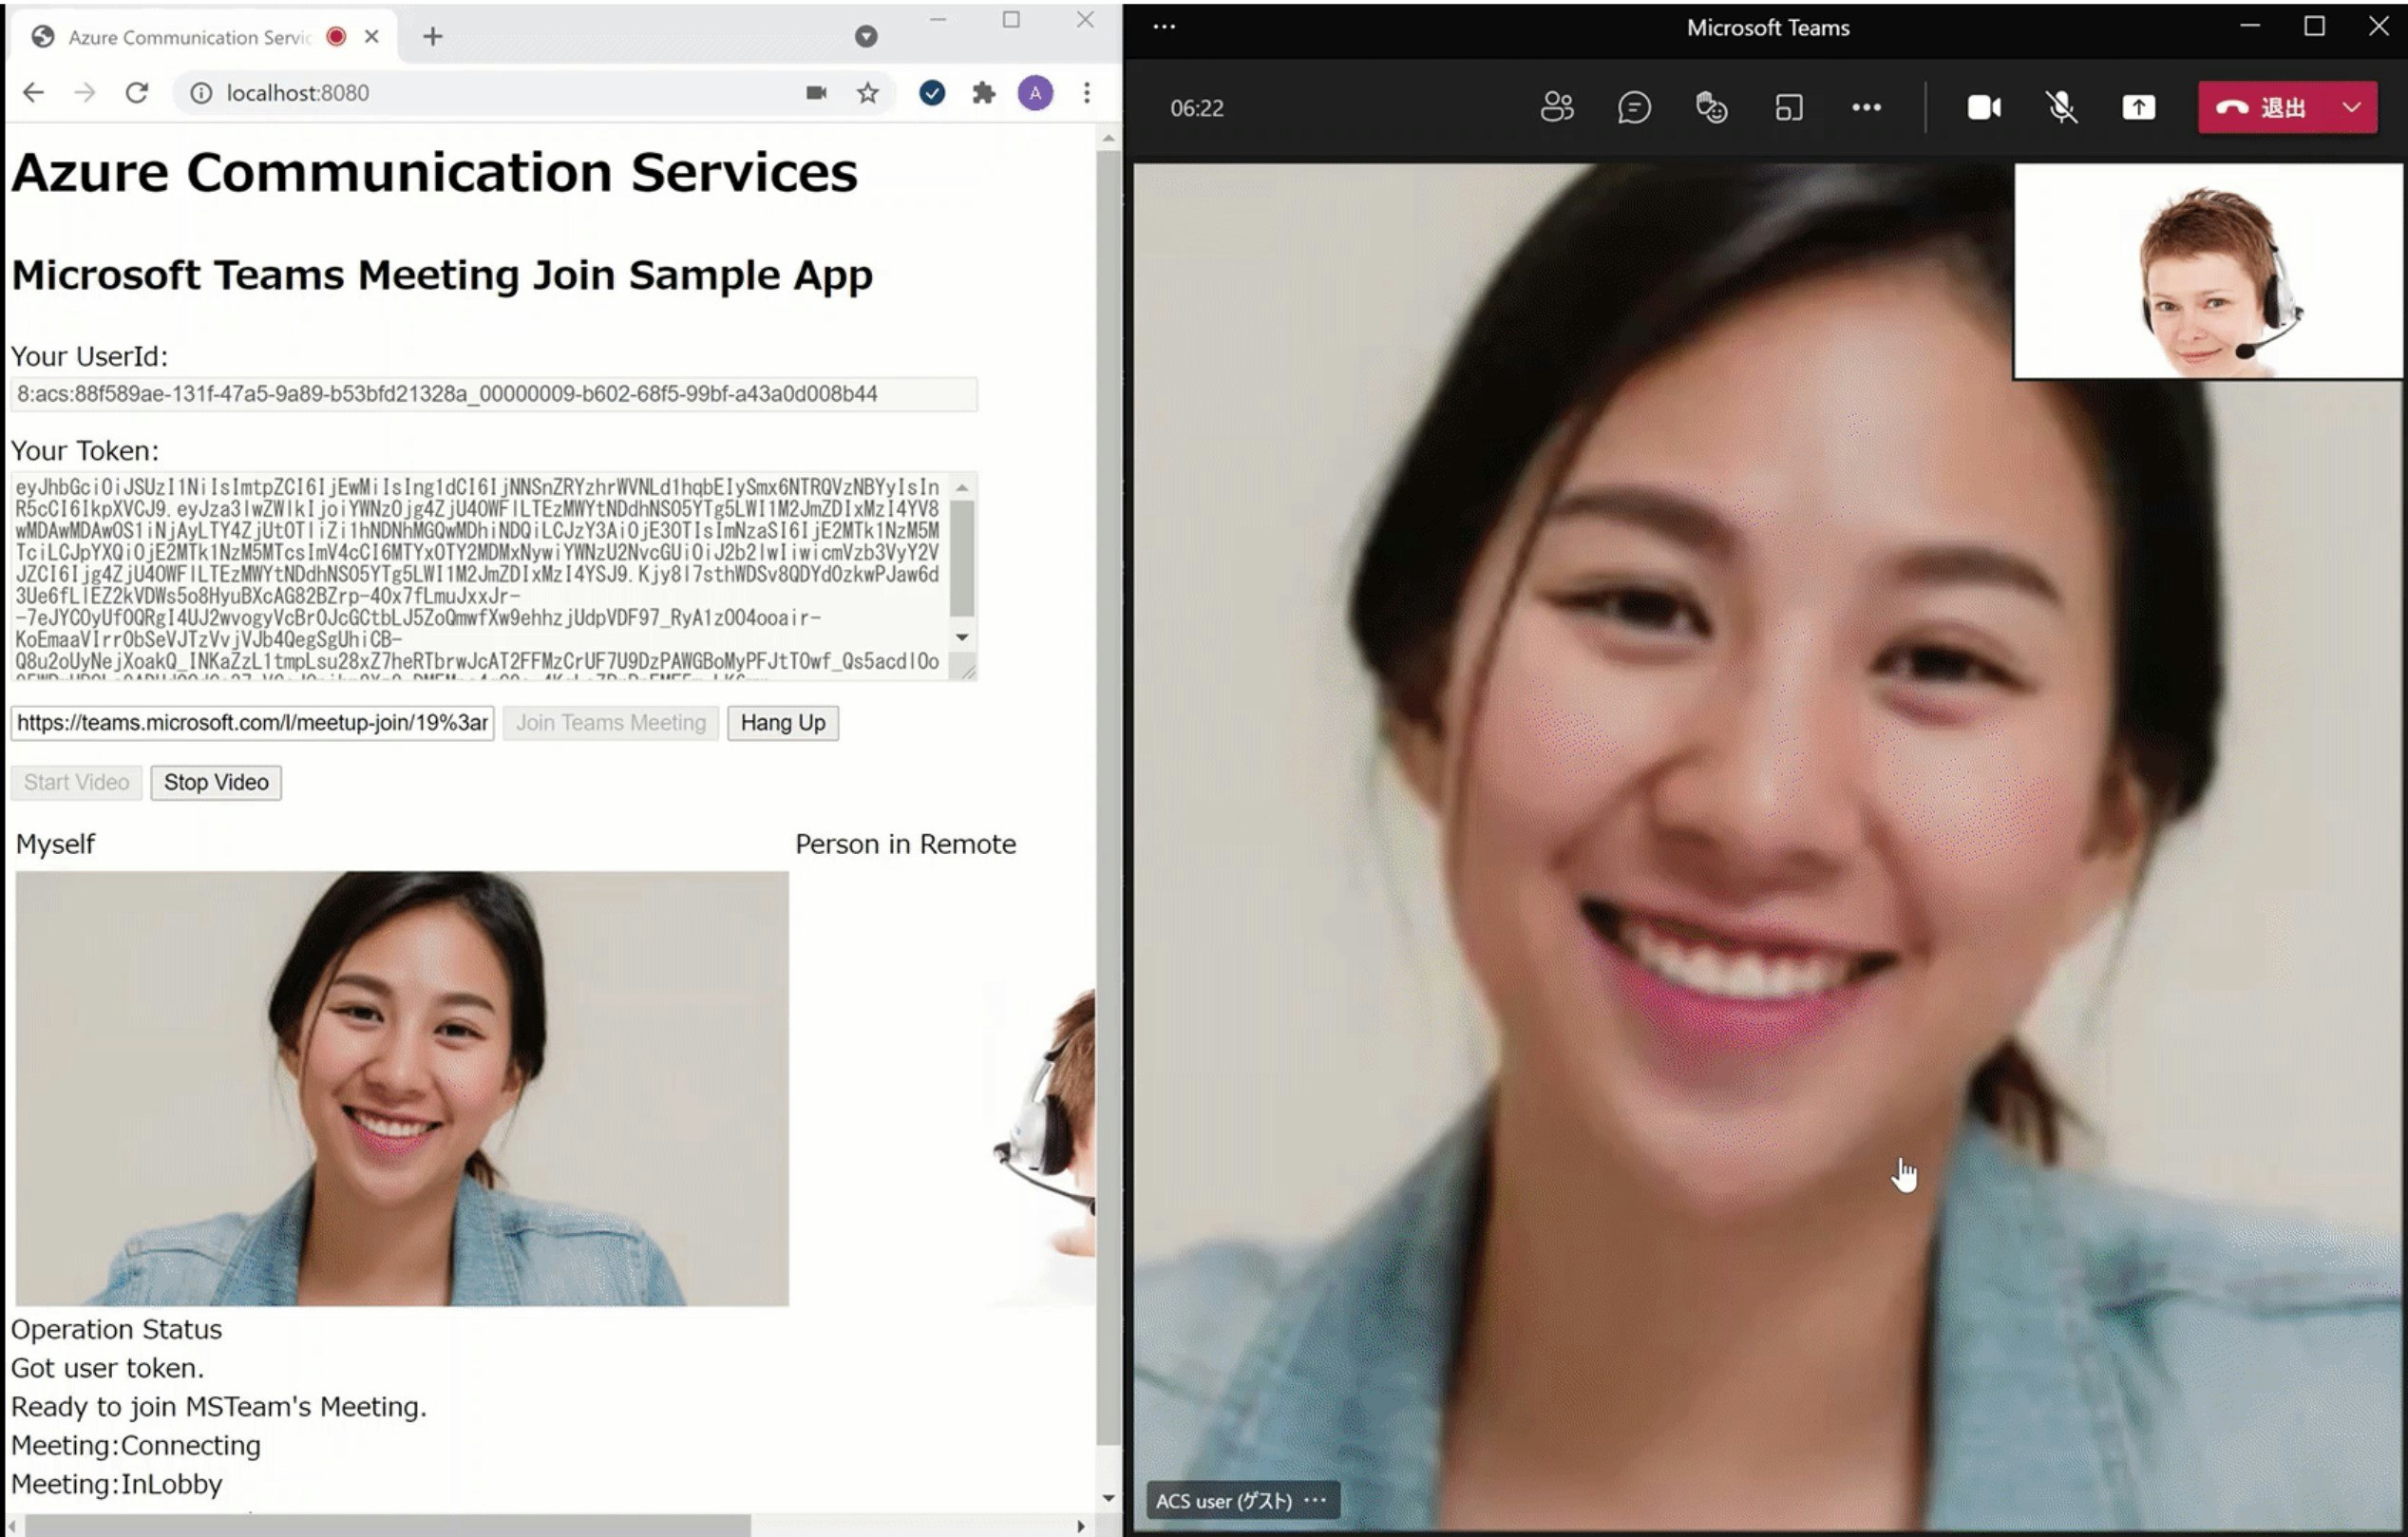
User Id と Token が取得できると [Join Teams Meeting] のボタンがアクティブになります。
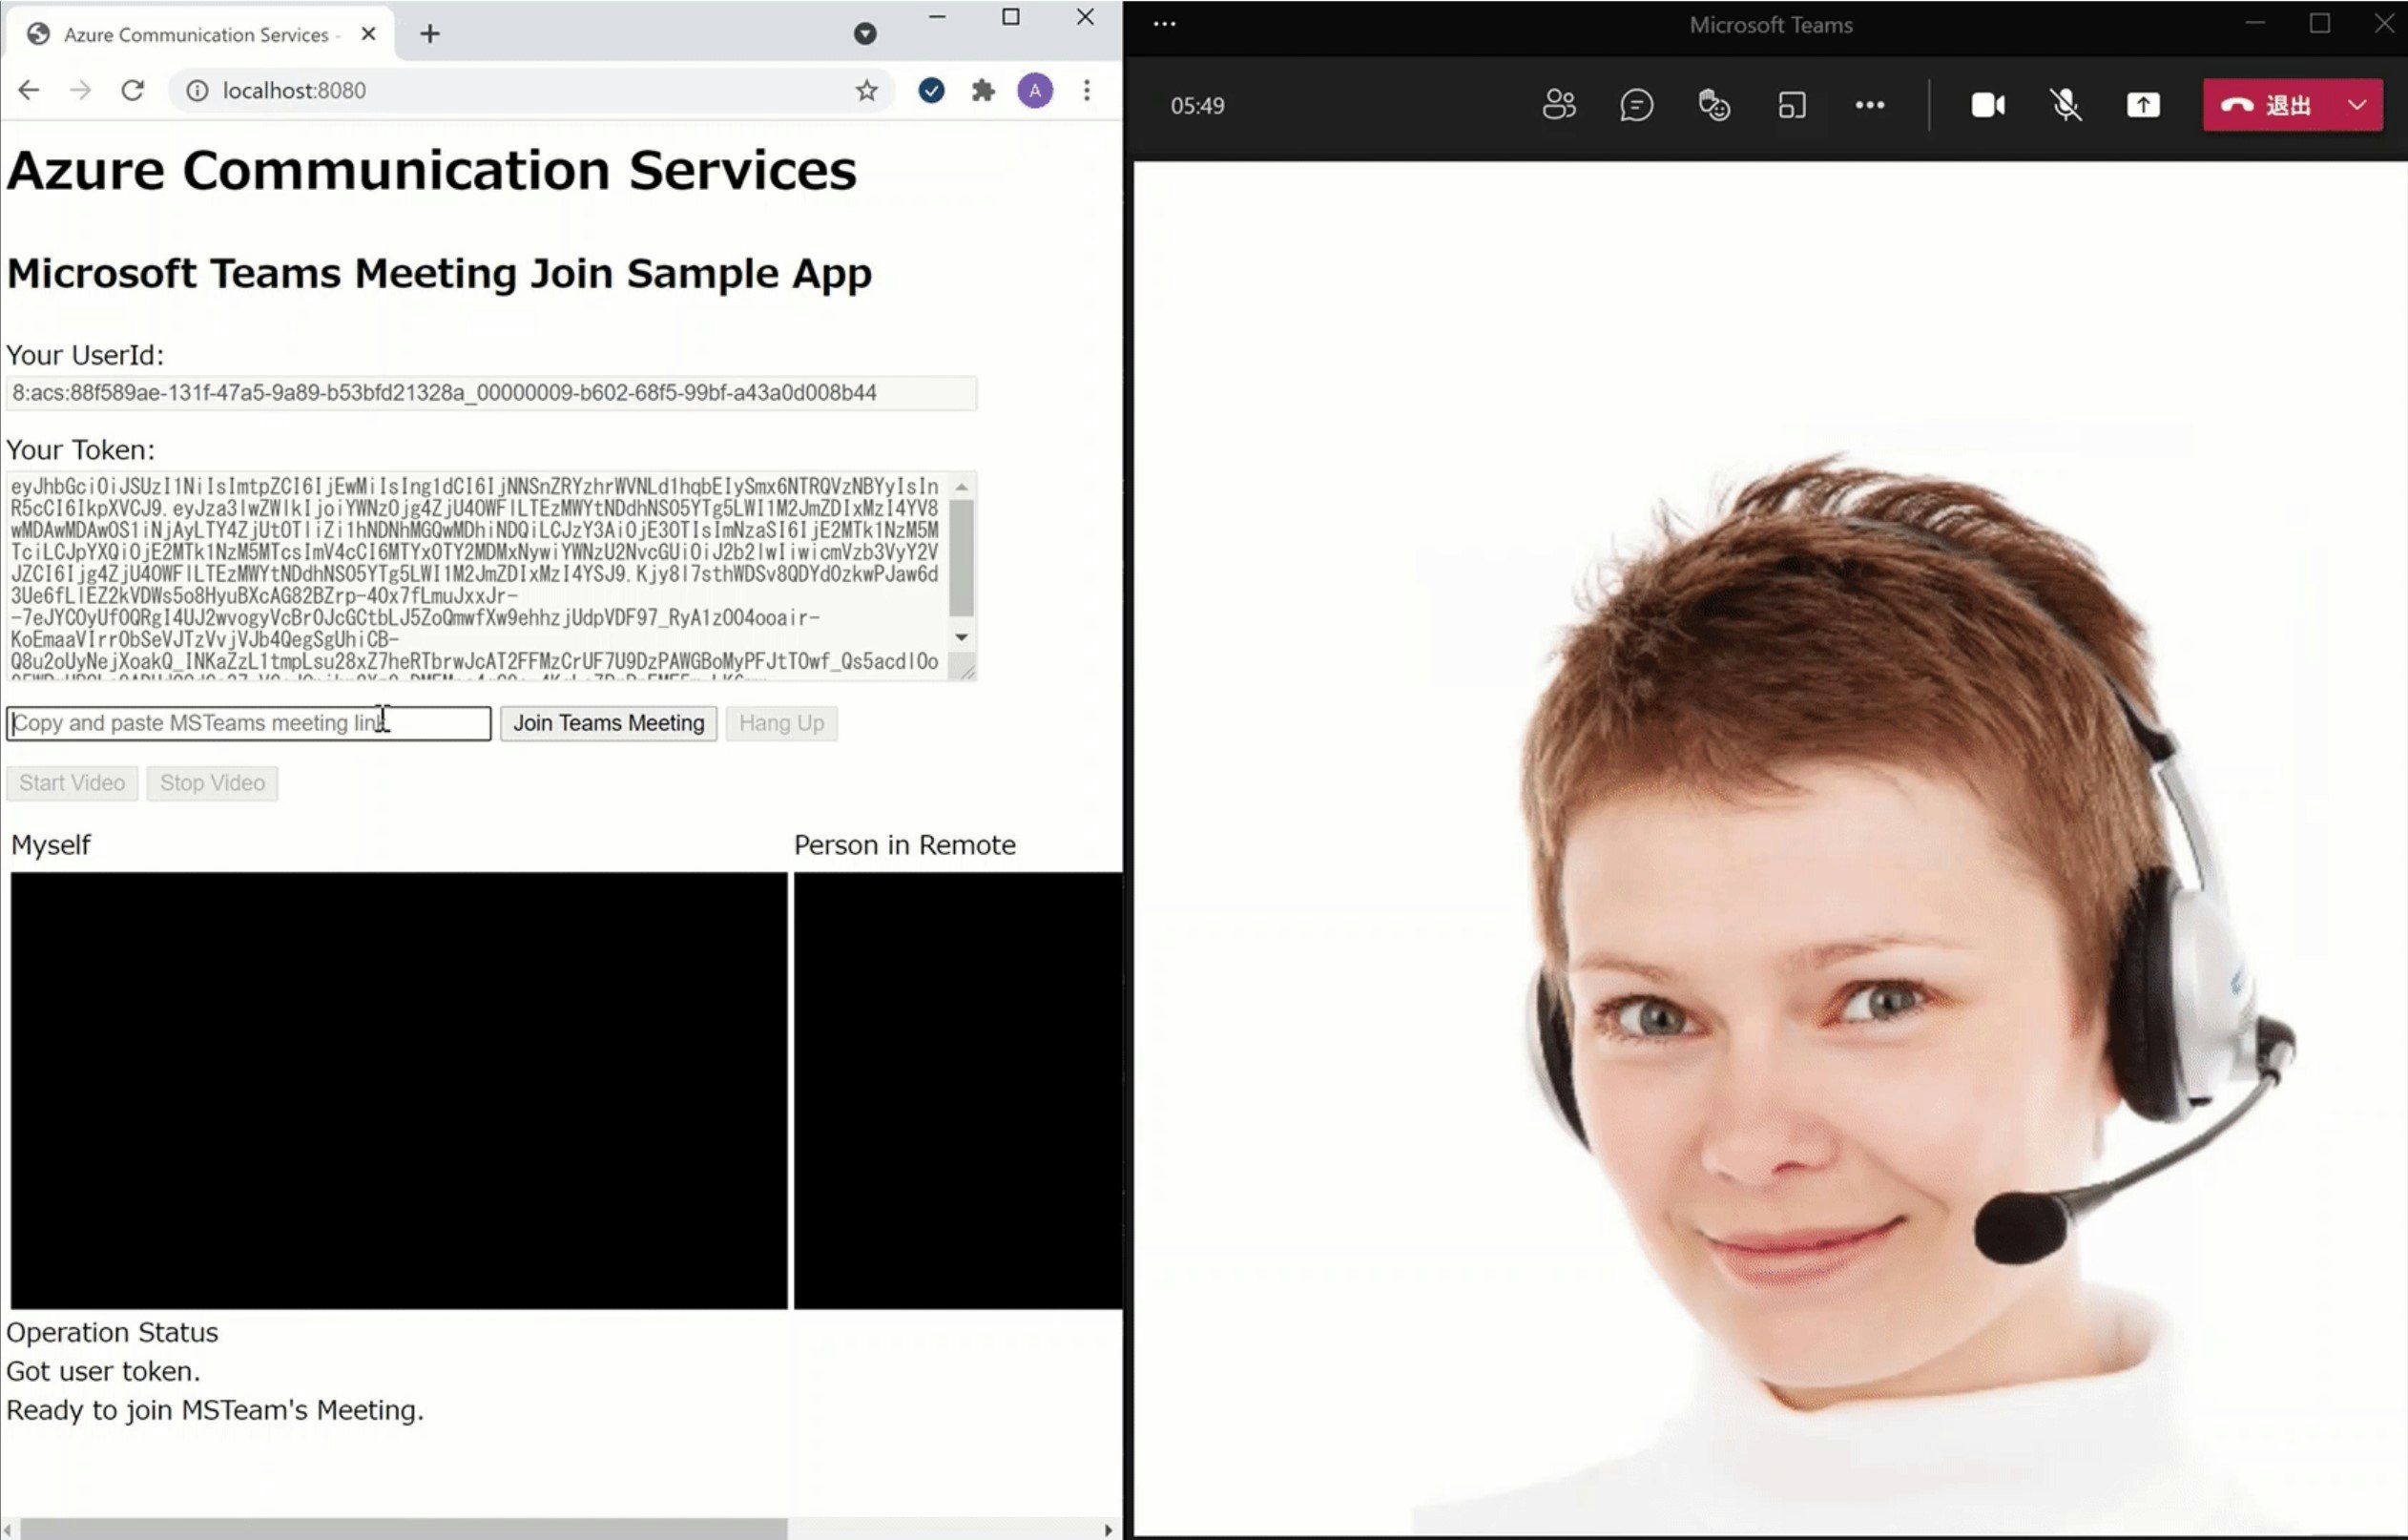
Teams 会議へのビデオ通話参加のチェック
Teams 会議を作成し、参加 URL を取得します。
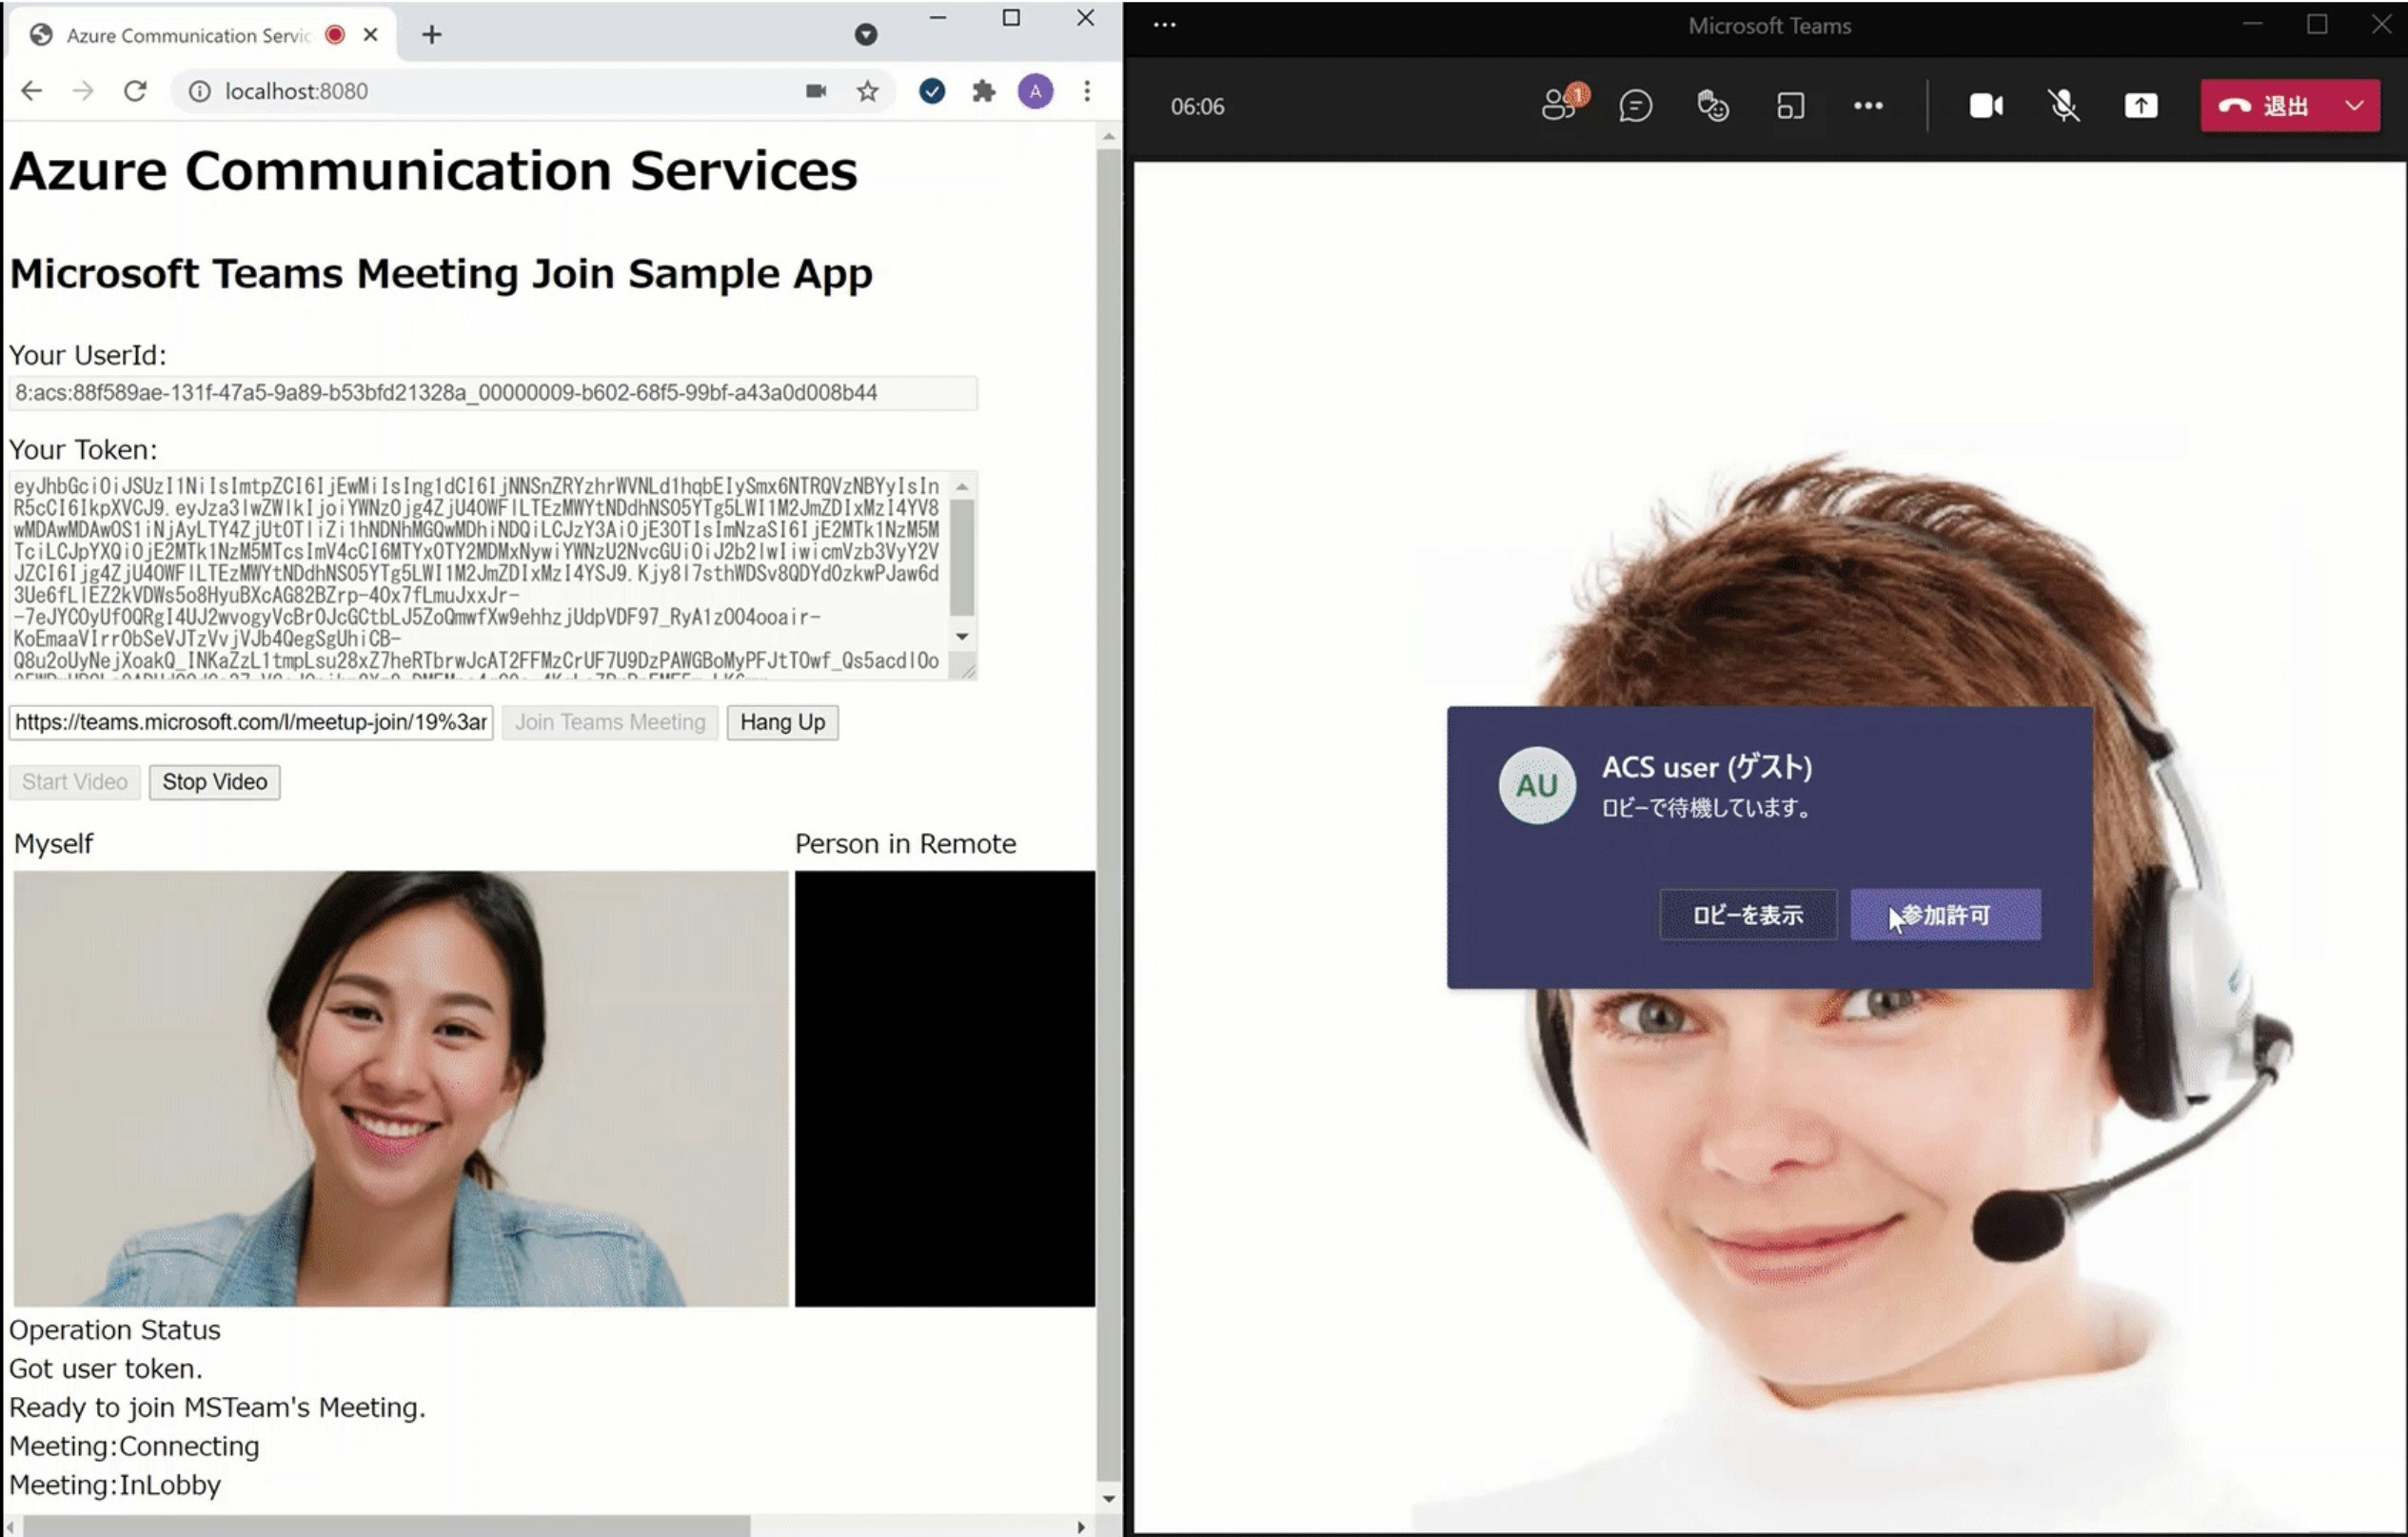
Teams 会議参加 URL を入力して Join Team's Meeting をクリックします。
Teams 会議(主催者側)に参加リクエストが表示されたら許可します。
会議に接続され、お互いに双方のカメラ画面が表示されます。
[Hang Up] をクリックすると会議から退出します。