Custom Vision を利用すると、最小で画像5枚から画像解析モデルを作成し、Web API や CoreML、TensorFlow、ONNX のフォーマットで Export して利用できるほか、そのままお手持ちの Docker 環境で Image Build して Web API サービスとして利用できる Dockerfile としても Export 可能です。
Custom Vision には画像分析モデルを作成、管理するための GUI が用意されており、画像や検証結果などを確認しながら操作できます。ただ、画像を追加して再学習させるなど、GUI を使わずにほかのツールから操作したい場面もあります。このような操作を含め、モデル作成~公開、ステータスの確認などすべての操作を REST API で行うことができる Training API が用意されています。
今回はこの Training API を用いて、新規プロジェクト1を作成し、画像をアップロードしてタグ付け、画像のクラス分類を行うモデル2を学習させて、公開するまでのプロセスを行う手順を紹介します。
-
Cognitive Services Custom Vision を REST API のみで使いこなす シリーズ
- (1) 新規プロジェクトを作成してモデルを学習、公開 (←この記事)
- (2) 既存プロジェクトの作成済みモデルに追加学習
準備
Custom Vision のサブスクリプション
Microsoft Azure & Cognitive Services 利用準備 を参考に作成しておきます。(無料版でOKです。)
Training Key、Resource Id、Location の取得
Azure Portal or Custom Vision Portal から Training Key、Resource Id を(サブスクリプションを作成したロケーションが不明の場合は Location も合わせて) 取得しておきます。
Azure Portal から取得する場合
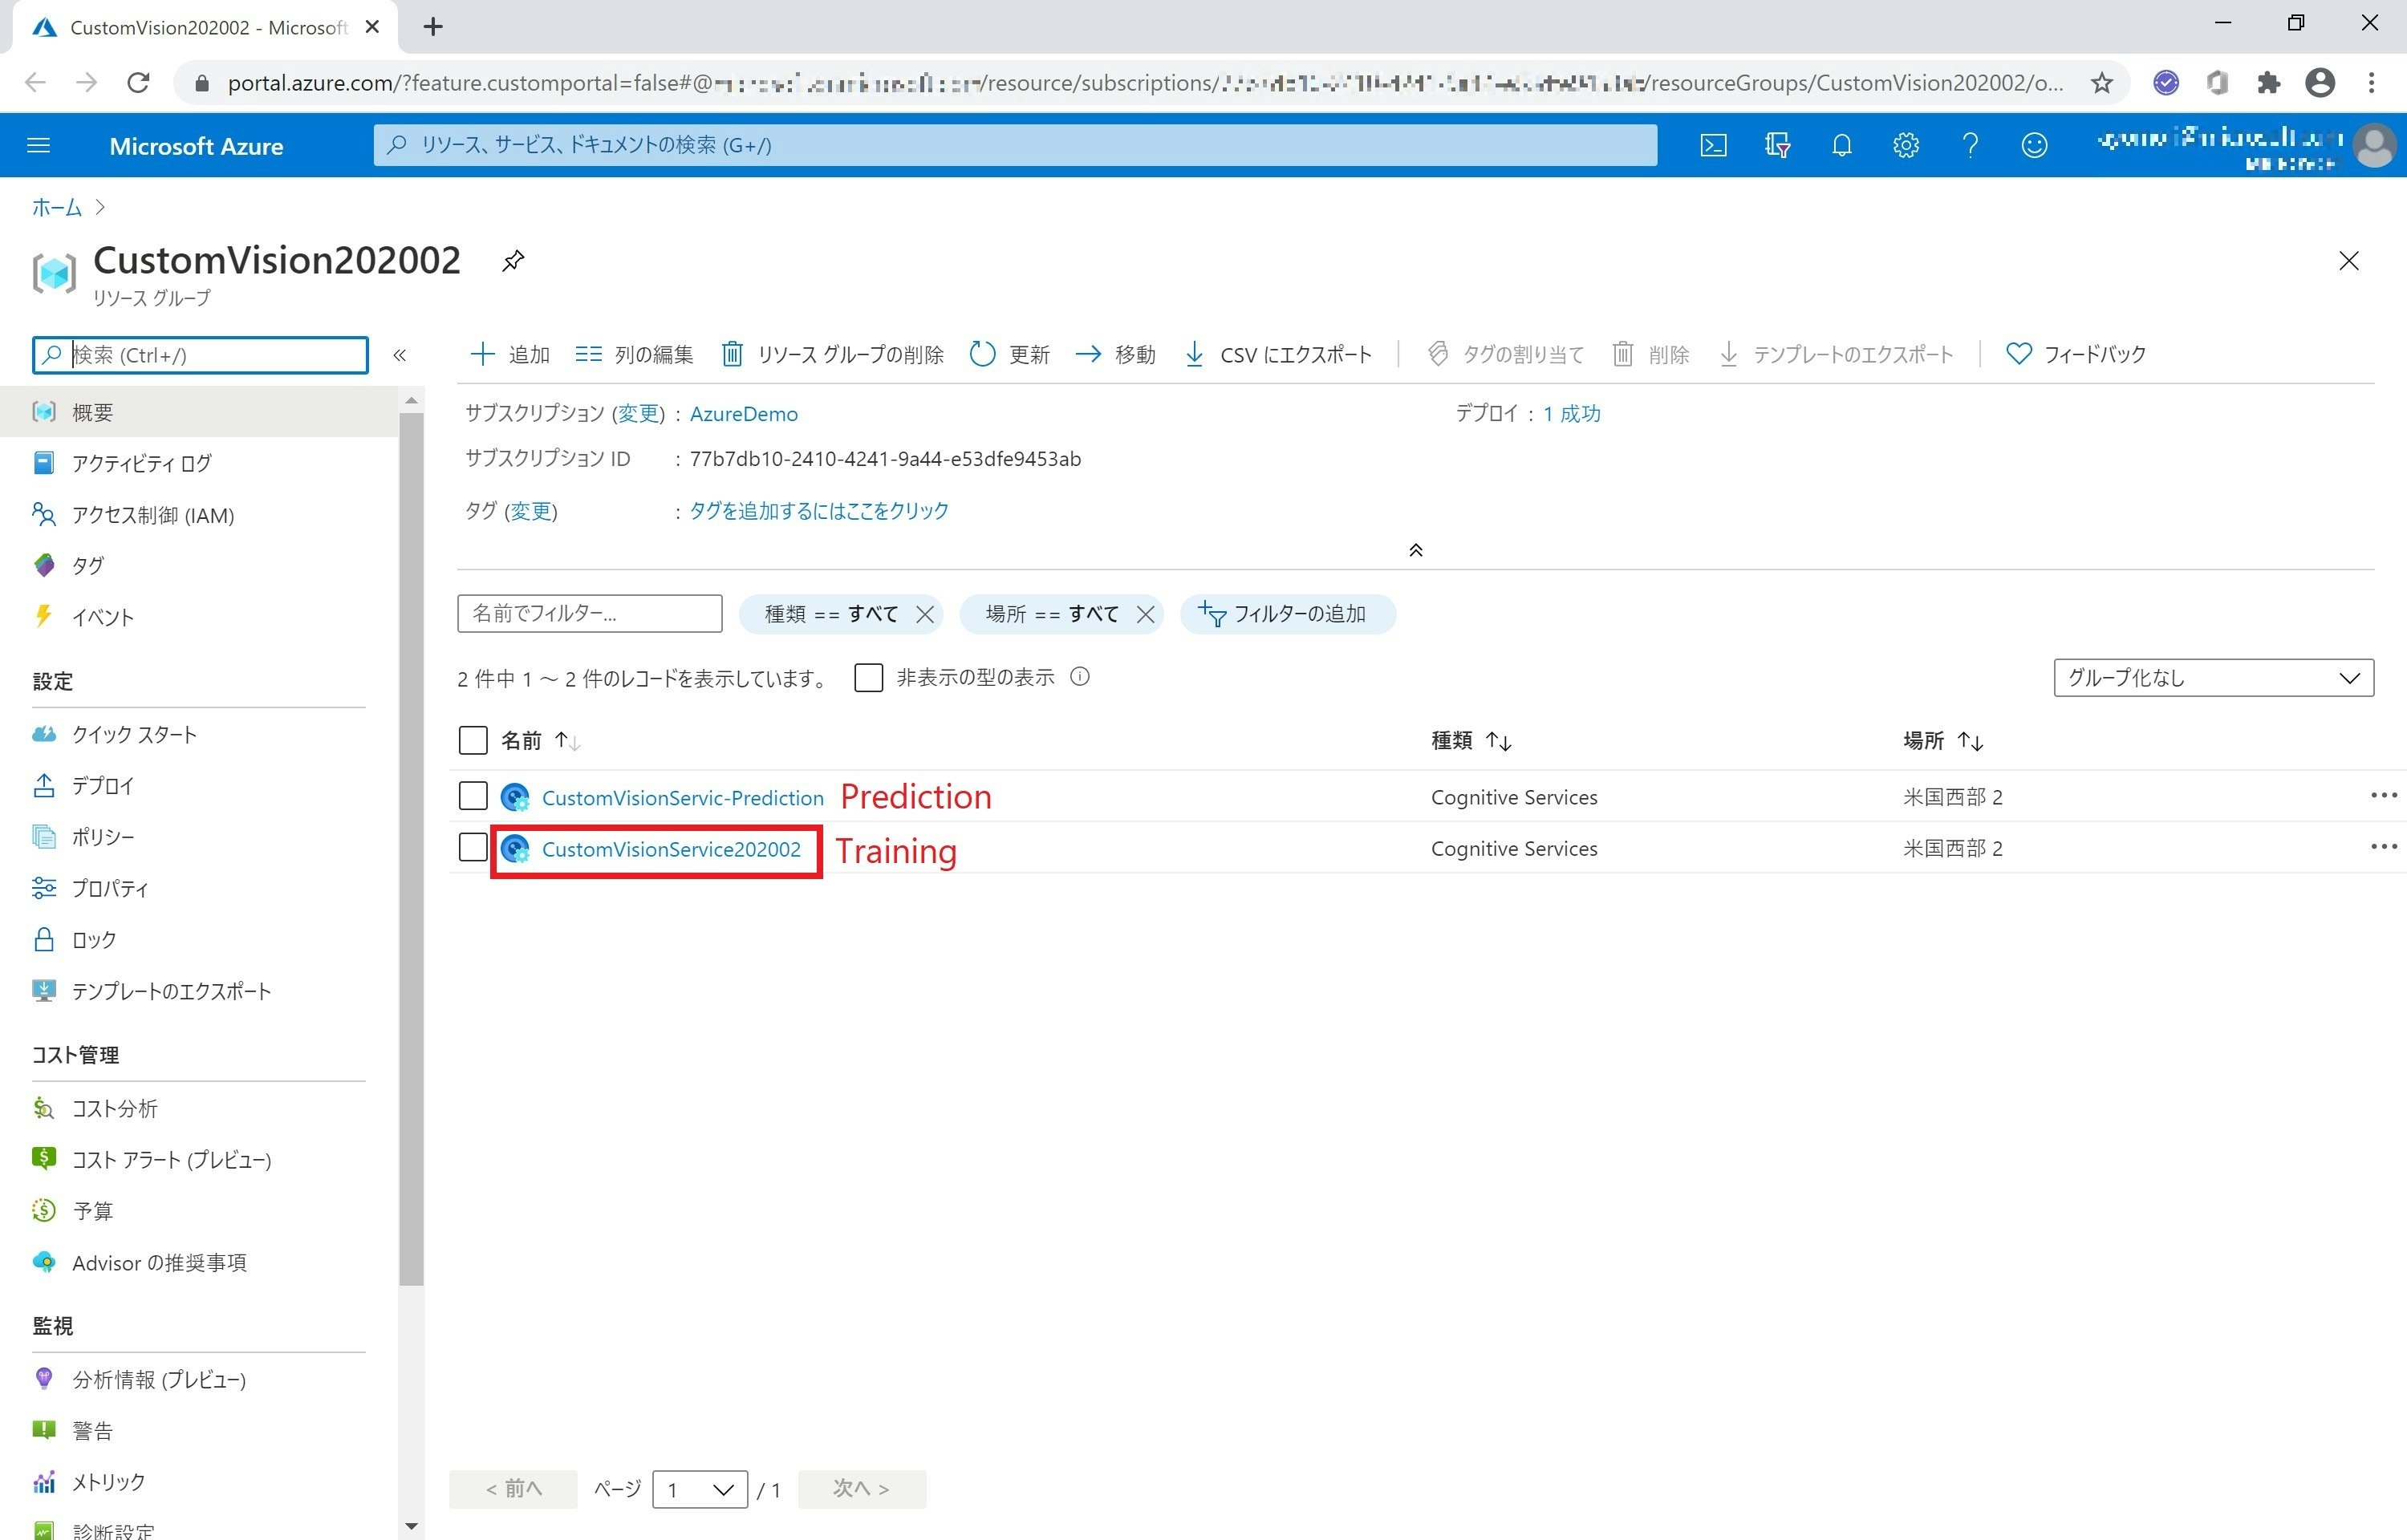
Azure Portal にサインインして作成した Custom Vision のサービスを開きます。
Training と Prediction の2つのサービスが作成されていますので、Training をクリックして開きます。
左列メニューから キーとエンドポイント をクリックして開きます。キー1 の右側にある青いアイコンをクリック or キーの表示をクリックしてキーを表示してからコピーして、Training Key としてローカルに保存しておきます。
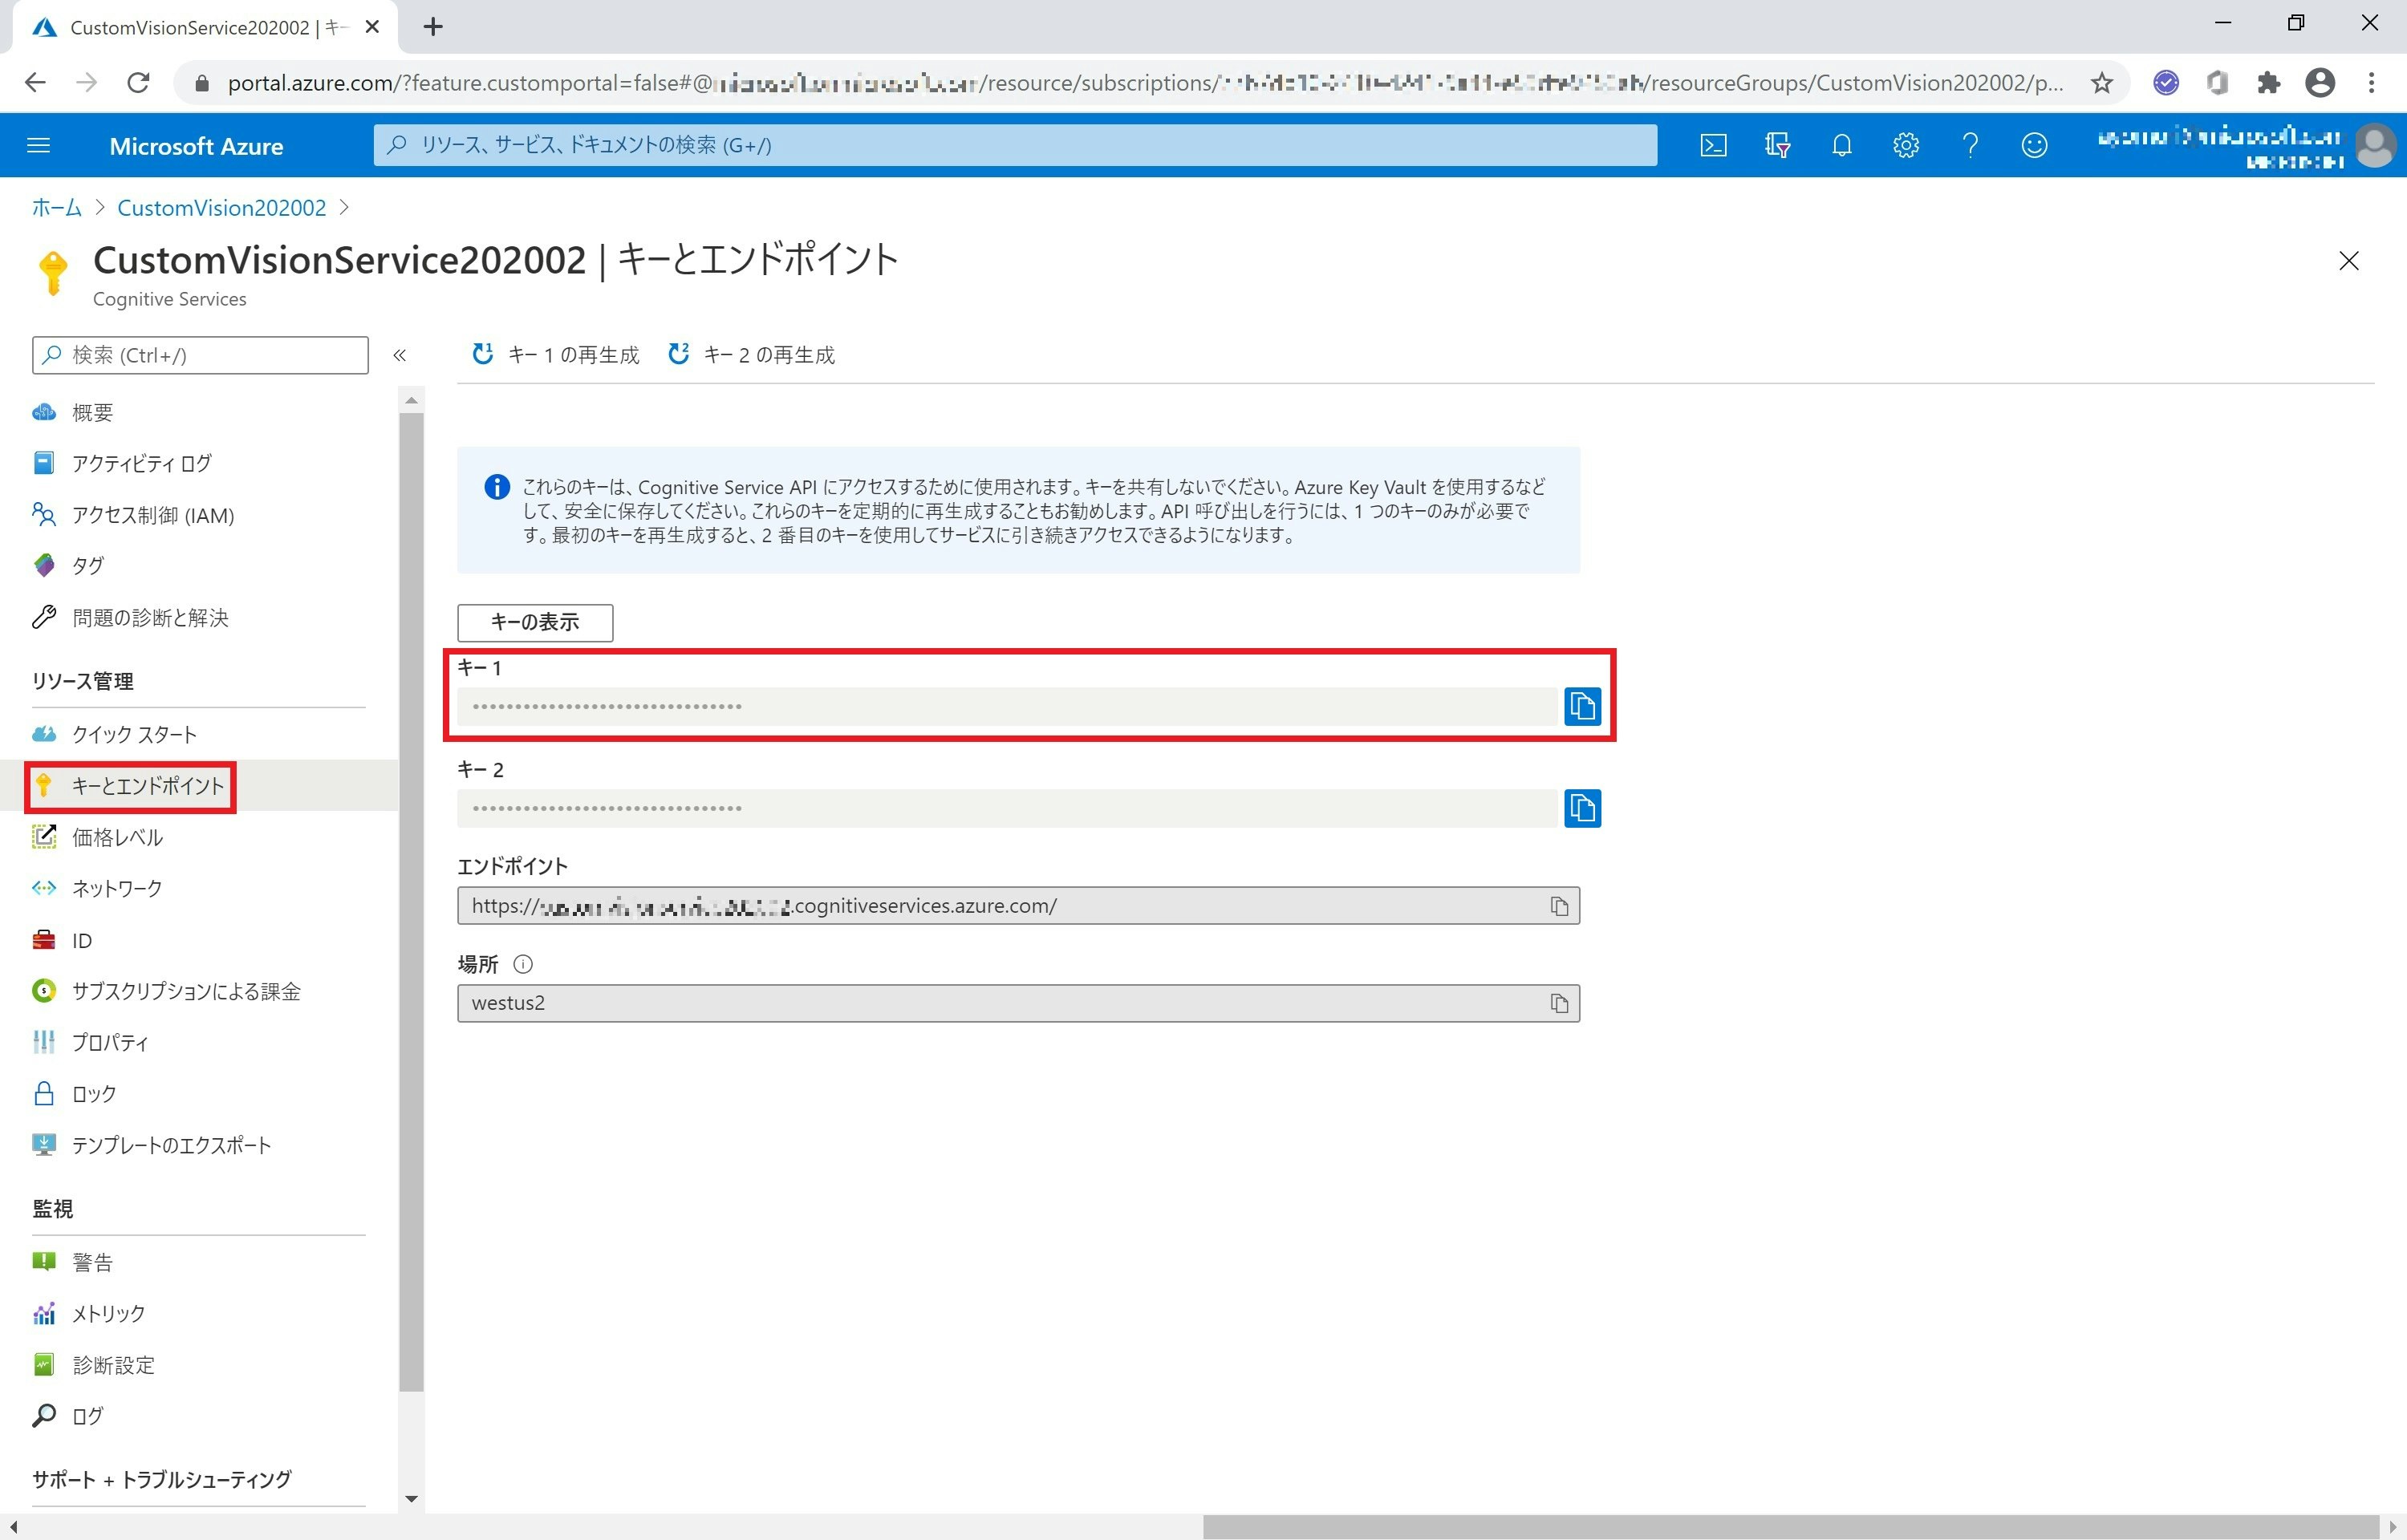
サブスクリプションが作成したロケーションが不明の場合でも 場所 に表示されますので、この値をコピーして Location として保存しておきます。
Custom Vision Portal から取得する場合
Custom Vision Portal にサインインして、画面右上の ⚙ (設定アイコン)をクリックします。
表示されるリソースで Training の方 (Prediction ではない方) をクリックして表示し、Key と Resource Id をコピーしてローカルに保存しておきます。

サブスクリプションが作成したロケーションが不明の場合、Endpoint に表示される文字列の api.cognitive.microsoft.com の前 (ex: https://southcentralus.api.cognitive.microsoft.com と表示されている場合は southcentralus) を Location としてローカルに保存しておきます。
なお、Endpoint にロケーションが表示されない場合は Azure Portal からご確認ください。
手順
1. 新規プロジェクトの作成
CreateProject を利用します。
パラメーター、ヘッダーは以下のように設定します。
- URL
-
https://YOUR_LOCATION.api.cognitive.microsoft.com/customvision/v3.3/Training/projects
- YOUR_LOCATION → サブスクリプションを作成したロケーション (JapanEast, SouthCentralUS など) に入れ替えます
-
https://YOUR_LOCATION.api.cognitive.microsoft.com/customvision/v3.3/Training/projects
- パラメーター
- name: 新規プロジェクトの名前
-
classificationType:
- Classification の場合は Multiclass
- Object Detection の場合は Multilabel
- ヘッダー
- Content-type: application/json
- Training-key: ローカルに保存しておいた Training Key
POST https://YOUR_LOCATION.api.cognitive.microsoft.com/customvision/v3.3/Training/projects?name=NEW_CLASSIFICATION_PJ&classificationType=Multiclass
Content-Type: application/json
Training-key: ••••••••••••••••••••
Response 200 が戻り、status に Succeeded と表記されていればプロジェクト作成は完了です。
この時に表示される id の値を projectId としてローカルに保存しておきます。
{
    "id": "xxxxxxxx-xxxx-xxxx-xxxx-xxxxxxxxxxxxxx",
    "name": "NEW_CLASSIFICATION_PJ",
    "description": "",
    "settings":{
        "domainId": "ee85a74c-405e-4adc-bb47-ffa8ca0c9f31",
        "classificationType": "Multiclass",
        "targetExportPlatforms":[],
        "useNegativeSet": true,
            :
        },
        "created": "2020-07-10T01:19:18.073Z",
        "lastModified": "2020-07-10T01:19:18.073Z",
        "thumbnailUri": null,
        "drModeEnabled": false,
        "status": "Succeeded"
}
今回は domain の設定を行わず、デフォルトの General が採用され、その domainId (ee85a...) が表示されています。domain 指定を行う場合は domainId を設定する必要があります。利用可能な domain 一覧は GetDomains で取得できます。
2. タグの作成
画像を分類するためのタグを作成します。CreateTag を利用します。
- URL
-
https://YOUR_LOCATION.api.cognitive.microsoft.com/customvision/v3.3/Training/projects/YOUR_PROJECT_ID/tags
- YOUR_LOCATION → サブスクリプションを作成したロケーションに入れ替えます
- YOUR_PROJECT_ID → 保存しておいた projectId に入れ替えます
-
https://YOUR_LOCATION.api.cognitive.microsoft.com/customvision/v3.3/Training/projects/YOUR_PROJECT_ID/tags
- パラメーター
- name: 新規タグ名
- ヘッダー
- Content-type: application/json
- Training-key: ローカルに保存しておいた Training Key
POST https://YOUR_LOCATION.api.cognitive.microsoft.com/customvision/v3.3/Training/projects/YOUR_PROJECT_ID/tags?name=Eagle
Content-Type: application/json
Training-key: ••••••••••••••••••••
Response 200 が戻り、status に Succeeded と表記されていれば新規タグ作成は完了です。
この時に表示される id の値を tagId としてローカルに保存しておきます。
{
    "id": "xxxxxxxx-xxxx-xxxx-xxxx-xxxxxxxxxxxxxx",
    "name": "Eagle",
    "description": null,
    "type": "Regular",
    "imageCount": 0
}
必要なタグの数だけこの操作を繰り返します。
3. 画像アップロード&タグ付け
学習データをして利用する画像をアップロードして、タグ付けを行います。
直接バイナリーで画像をアップロードする場合は CreateImagesFromFiles、クラウドなどのストレージに置いて画像URLで取得させる場合は CreateImagesFromUrls を使います。
CreateImagesFromUrls を利用すると以下のようになります。
- Url
-
https://YOUR_LOCATION.api.cognitive.microsoft.com/customvision/v3.3/Training/projects/YOUR_PROJECT_ID/images/urls
- YOUR_LOCATION → サブスクリプションを作成したロケーションに入れ替えます
- YOUR_PROJECT_ID → 保存しておいた projectId に入れ替えます
-
https://YOUR_LOCATION.api.cognitive.microsoft.com/customvision/v3.3/Training/projects/YOUR_PROJECT_ID/images/urls
- パラメーター
- name: 新規プロジェクトの名前
-
classificationType:
- Classification の場合は Multiclass
- Object Detection の場合は Multilabel
- ヘッダー
- Content-type: application/json
- Training-key: ローカルに保存しておいた Training Key
POST https://YOUR_LOCATION.api.cognitive.microsoft.com/customvision/v3.3/Training/projects/YOUR_PROJECT_ID/images/urls
Content-Type: application/json
Training-key: ••••••••••••••••
Request Body は、画像URLとタグ付けしたい tagId を以下のように設定します。(YOUR_TAG_ID_x をローカルに保存しておいた tagId と差し替えます。)
{
  "images": [
    {
      "url": "https://YOUR_STORAGE_BLOB/photo01",
      "tagIds": ["YOUR_TAG_ID_1"],
    },
    {
      "url": "https://YOUR_STORAGE_BLOB/photo02",
      "tagIds": ["YOUR_TAG_ID_1"],
    },
    {
      "url": "https://YOUR_STORAGE_BLOB/photo03",
      "tagIds": ["YOUR_TAG_ID_2"],
    }
  ],
  "tagIds": [
    "YOUR_TAG_ID_1","YOUR_TAG_ID_2"
  ]
}
Response 200 が戻り、isBatchSuccessful に true と表記され、アップロードした画像に それぞれ idが発行されて、指定したタグが表示されていれば、画像アップロード&タグ付けは完了です。
{
    "isBatchSuccessful": true,
    "images":[
        {
            "sourceUrl": "https://YOUR_STORAGE_BLOB/photo01.jpg",
            "status": "OK",
            image":{
                "id": "1bb8855e-1040-4271-a1a3-d98830f32394",
                "created": "2020-07-10T02:55:33.2608194",
                "width": 960,
                 :
                "tags":[
                    {
                        "tagId": "YOUR_TAG_ID_1",
                        "tagName": Eagle,
                        "created": "2020-07-10T02:55:33.273123"
                    }
                ]
        },
        {
            "sourceUrl": "https://YOUR_STORAGE_BLOB/photo02.jpg",
            "status": "OK",
            "image":{"id": "YOUR_TAG_ID_1", "created": "2020-07-10T02:55:32.727445", "width": 541, ...}
        },
        {
            "sourceUrl": "https://YOUR_STORAGE_BLOB/photo03.jpg",
            "status": "OK",
            "image":{"id": "YOUR_TAG_ID_2", "created": "2020-07-10T02:55:33.5888916", "width": 1224, ...}
        }
    ]
}
4. モデルの学習
アップロードした学習データを用いて画像解析モデルを構築します。
Train Project を利用します。
- Url
-
https://YOUR_LOCATION.api.cognitive.microsoft.com/customvision/v3.3/Training/projects/YOUR_PROJECT_ID/train
- YOUR_LOCATION → サブスクリプションを作成したロケーションに入れ替えます
- YOUR_PROJECT_ID → 保存しておいた projectId に入れ替えます
-
https://YOUR_LOCATION.api.cognitive.microsoft.com/customvision/v3.3/Training/projects/YOUR_PROJECT_ID/train
- ヘッダー
- Content-type: application/json
- Training-key: ローカルに保存しておいた Training Key
POST https://YOUR_LOCATION.api.cognitive.microsoft.com/customvision/v3.3/Training/projects/YOUR_PROJECT_ID/train?forceTrain=True
Content-Type: application/json
Training-key: ••••••••••••••••••••
パラメーターで ForceTrain (変更点がなくても学習を強制)、notificationEmailAddress (学習が終了したらメールで通知する) といった設定を行うことも可能です。
{
    "id": "xxxxxxxx-xxxx-xxxx-xxxx-xxxxxxxxxxxxxx",
    "name": "Iteration 1",
    "status": "Training",
    "created": "2020-07-10T02:25:52.436Z",
    "lastModified": "2020-07-10T02:58:20.958Z",
    "projectId": "YOUR_PROJECT_ID",
        :
Response 200 が戻れば、モデルの学習が開始されます。このとき表示される id の値を iterationId としてローカルに保存しておきます。
GetIteration を利用して、学習の完了を確認します。
- Url
-
https://YOUR_LOCATION.api.cognitive.microsoft.com/customvision/v3.3/Training/projects/YOUR_PROJECT_ID/iterations/YOUR_ITERATION_ID
- YOUR_LOCATION → サブスクリプションを作成したロケーションに入れ替えます
- YOUR_PROJECT_ID → 保存しておいた projectId に入れ替えます
- YOUR_ITERATION_ID → 保存しておいた iterationId に入れ替えます
-
https://YOUR_LOCATION.api.cognitive.microsoft.com/customvision/v3.3/Training/projects/YOUR_PROJECT_ID/iterations/YOUR_ITERATION_ID
- ヘッダー
- Training-key: ローカルに保存しておいた Training Key
GET https://YOUR_LOCATION.api.cognitive.microsoft.com/customvision/v3.3/Training/projects/YOUR_PROJECT_ID/iterations/YOUR_ITERATION_ID
Response 200 が戻り、status に Completed と表記されていれば学習は終了しています。
status が Training の場合は学習中ですのでしばらく待って再確認します。
{
    "id": "YOUR_ITERATION_ID",
    "name": "Iteration 2",
    "status": "Completed",
    "created": "2020-07-10T02:25:52.436Z",
    "lastModified": "2020-07-10T02:58:26.591Z",
    "trainedAt": "2020-07-10T02:58:26.591Z",
    "projectId": "YOUR_PROJECT_ID",
      :
GetIterationPerformance でモデルの評価を取得することもできます。
5. モデルのテスト
直接バイナリーで画像をアップロードする場合は QucikTestImage、クラウドなどのストレージに置いて画像URLで取得させる場合は QuickTestImageUrl を利用して、作成したモデルを使って画像分析ができることを確認します。
QuickTestImageUrl を利用すると以下のようになります。
- Url
-
https://YOUR_LOCATION.api.cognitive.microsoft.com/customvision/v3.3/Training/projects/YOUR_PROJECT_ID/quicktest/url
- YOUR_LOCATION → サブスクリプションを作成したロケーションに入れ替えます
- YOUR_PROJECT_ID → 保存しておいた projectId に入れ替えます
-
https://YOUR_LOCATION.api.cognitive.microsoft.com/customvision/v3.3/Training/projects/YOUR_PROJECT_ID/quicktest/url
- パラメーター
- iterationId: 保存しておいた iterationId
- ヘッダー
- Content-type: application/json
- Training-key: ローカルに保存しておいた Training Key
POST https://YOUR_LOCATION.api.cognitive.microsoft.com/customvision/v3.3/Training/projects/YOUR_PROJECT_ID/quicktest/url?iterationId=YOUR_ITERATION_ID
Content-Type: application/json
Training-key: ••••••••••••••••••••••••••••••••
Request Body は、分析したい画像URLを以下のように設定します。
{
  "url": "https://YOUR_STORAGE_BLOB/test.jpg"
}
Response 200 が戻り、正しいタグを推測できていることを確認してください。
{
    "id": "xxxxxxxx-xxxx-xxxx-xxxx-xxxxxxxxxxxxxx",
    "project": "YOUR_PROJECT_ID",
    "iteration": "YOUR_ITERATION_ID",
    "created": "2020-07-10T09:10:42.794Z",
    predictions":[
        {
            "probability": 0.9992485,
            "tagId": "YOUR_TAG_ID_1",
            "tagName": "Eagle",
            "tagType": "Regular"
        },
        {
            "probability": 0.0007515198,
            "tagId": "YOUR_TAG_ID_2",
            "tagName": "Dove",
              :
6. モデルの公開
Prediction API として作成した画像分析モデルを利用できるように公開します。
PublishIteration を利用します。
- Url
-
https://YOUR_LOCATION.api.cognitive.microsoft.com/customvision/v3.3/Training/projects/YOUR_PROJECT_ID/iterations/YOUR_ITERATION_ID/publish
- YOUR_LOCATION → サブスクリプションを作成したロケーションに入れ替えます
- YOUR_PROJECT_ID → 保存しておいた projectId に入れ替えます
- YOUR_ITERATION_ID → 保存しておいた iterationId に入れ替えます
-
https://YOUR_LOCATION.api.cognitive.microsoft.com/customvision/v3.3/Training/projects/YOUR_PROJECT_ID/iterations/YOUR_ITERATION_ID/publish
- パラメーター
- publishName: 公開する名前 (※Prediction URLの一部になります)
- predictionId: ローカルに保存しておいた ResourceId
- ヘッダー
- Content-type: application/json
- Training-key: ローカルに保存しておいた Training Key
POST https://YOUR_LOCATION.api.cognitive.microsoft.com/customvision/v3.3/Training/projects/YOUR_PROJECT_ID/iterations/YOUR_ITERATION_ID/publish?publishName=v1&predictionId=YOUR_RESOURCE_ID
Content-Type: application/json
Training-key: ••••••••••••••
Response 200 が戻れば公開完了です。
パラメーターで overwrite=true を追加することで、これまでと同じ名前で上書き公開することが可能です (=Prediction URLも同じになります)。
但し、同じモデル(再学習などの変更点ナシ)を同じ名前で上書き公開することはできません (400 Bad Request になります)。