はじめに
特定のOSに依存せず、特定のディレクトリ内の変更を検知して処理を実行するプログラムを実装したかったので調査しました。
Electron の導入まで考えましたが、 Node.js だけで実現出来そうだったので、コアとなる処理を実装した時のメモをまとめます。
作るもの
今回の実装するアプリケーションの概要をまとめます。
前提条件
前提として、以下の npm と node がインストール済みであるものとします。
> node -v
v10.16.0

> npm -v
6.10.1
動作仕様
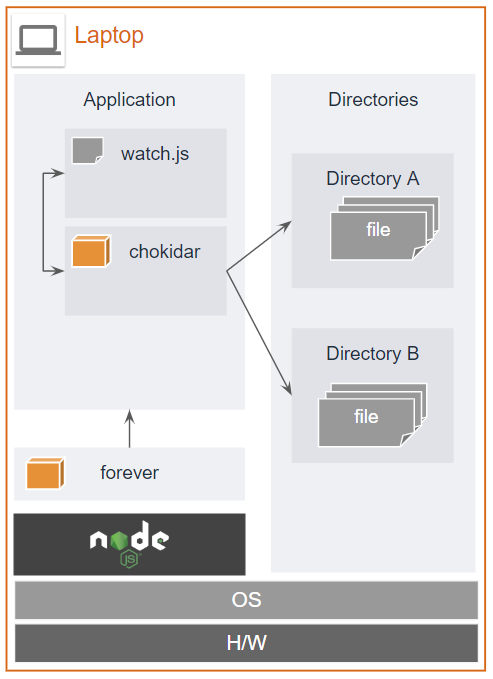
今回のアプリケーションは次のような構成で動作することを想定します。
アプリケーションは次のような機能を持ちます。
- デバッグの際は、
node watch.jsで起動します。 - 実際の運用では、
forever start watch.jsで起動します。 - ファイルの変更検知は
chokidarを使用します。 - 変更検知する対象ディレクトリは 複数の異なるディレクトリ です。
- 「ファイル」と「ディレクトリ」の両方を変更検知(作成、更新、削除)の対象とします。
- 変更の情報はログ出力します。
実装
実装に関する情報をまとめます。
バージョン
関連モジュールのバージョンは次の通りです。
- node : v10.16.0
- npm : 6.10.1
- chokidar : 3.0.2
- fs : 0.0.1-security
- forever : 1.0.0
初期設定
まず、リポジトリを作成し、必要なモジュールをインストールします。
# プロジェクトフォルダの作成
> mkdir node-app && cd $_

# リポジトリの初期化
> npm init -y

# 関連モジュールのインストール
> npm install --save chokidar
> npm install fs

# Global Install.
> sudo npm install -g forever
最終的には次のようなディレクトリ構成になります。
矢印で示した資源は自分で作成します。
> tree -L 2
node-app
  ├── data               <-- 監視対象のディレクトリ(1)
  ├── data-002           <-- 監視対象のディレクトリ(2)
  ├── node_modules
  ├── package-lock.json
  ├── package.json
  └── watch.js           <-- アプリケーション本体
コード
完成版のコードは次の通りです。
記載内容はほとんど「paulmillr/chokidar - GitHub」の README.md の通りです。
// require
var chokidar = require("chokidar");

// Constants
// ________________________________
// Monitoring Target Directory
const target_directory_01 = 'data/';
const target_directory_02 = 'data-001/';

// Something to use when events are received.
const log = console.log.bind(console);

// Initialize
// ________________________________
// initialize chokidar
var watcher = chokidar.watch(target_directory_01, {
    ignored: /[\/\\]\./,
    persistent: true
});
// Add monitoring target.
watcher.add(target_directory_02);

// Monitoring
// ________________________________
// Ready for changes
watcher.on('ready', function () {

    // ready
    log('Initial scan complete. Ready for changes');

    // watched Paths
    var watchedPaths = watcher.getWatched();
    log("watchedPaths :", watchedPaths);

    // Files
    // _ _ _ _ _ _ _ _ _ _ _ _ _ _
    // Detect File added
    watcher.on('add', function (path, stats) {
        log(`File ${path} has been added`);
        if (stats) console.log(`File ${path} changed size to ${stats.size}`, stats);

        var watchedPaths = watcher.getWatched();
        log("watchedPaths :", watchedPaths);
    });

    // Detect File changed
    watcher.on('change', function (path, stats) {
        log(`File ${path} has been changed`);
        if (stats) console.log(`File ${path} changed size to ${stats.size}`, stats);
    });

    // Detect File removed
    watcher.on('unlink', function (path) {
        log(`File ${path} has been removed`);
    });

    // Directories
    // _ _ _ _ _ _ _ _ _ _ _ _ _ _
    // Detect Directory added
    watcher.on('addDir', function (path) {
        log(`Directory ${path} has been added`);
    });

    // Detect Directory removed
    watcher.on('unlinkDir', function (path) {
        log(`Directory ${path} has been removed`);
    });

    // Error
    // _ _ _ _ _ _ _ _ _ _ _ _ _ _
    // Detect Watcher Error
    watcher.on('error', function (path) {
        log(`Watcher error: ${error}`);
    });

});
cf. paulmillr/chokidar - GitHub
デバッグ
動作確認は次のように行います。
node watch.js でアプリケーションを起動したら、監視対象のフォルダ配下で適当な操作をしてみましょう。
> node watch.js
Initial scan complete. Ready for changes
watchedPaths : {}

Directory data/新しいフォルダー has been added    <-- ディレクトリの追加

Directory data/新しいフォルダー has been removed  <-- ディレクトリの削除

File data/test - コピー.txt has been added       <-- ファイルの追加
File data/test - コピー.txt added size to 5 Stats {     <-- ファイル追加結果
  dev: 12,
  mode: 33279,
  nlink: 1,
  uid: 1000,
  gid: 1000,
  rdev: 0,
  blksize: 512,
  ino: 13510798882489840,
  size: 5,
  blocks: 0,
  atimeMs: 1563174366871.4685,
  mtimeMs: 1563173471128.5984,
  ctimeMs: 1563173471128.5984,
  birthtimeMs: 1563173471128.5984,
  atime: 2019-07-15T07:06:06.871Z,
  mtime: 2019-07-15T06:51:11.129Z,
  ctime: 2019-07-15T06:51:11.129Z,
  birthtime: 2019-07-15T06:51:11.129Z }

File data/test.txt has been changed       <-- ファイルの更新
File data/test.txt changed size to 0 Stats {     <-- ファイル更新結果
  dev: 12,
  mode: 33279,
  nlink: 1,
  uid: 1000,
  gid: 1000,
  rdev: 0,
  blksize: 512,
  ino: 45598946227504590,
  size: 0,
  blocks: 0,
  atimeMs: 1563171389606.2122,
  mtimeMs: 1563174613548.453,
  ctimeMs: 1563174613548.453,
  birthtimeMs: 1563174613548.453,
  atime: 2019-07-15T06:16:29.606Z,
  mtime: 2019-07-15T07:10:13.548Z,
  ctime: 2019-07-15T07:10:13.548Z,
  birthtime: 2019-07-15T07:10:13.548Z }

File data/test_001.txt has been removed       <-- ファイルの削除
起動
forever を使用した起動は次のようにします。
# forever による起動
> forever start watch.js
warn:    --minUptime not set. Defaulting to: 1000ms
warn:    --spinSleepTime not set. Your script will exit if it does not stay up for at least 1000ms
info:    Forever processing file: watch.js

# forever で起動しているプロセスの一覧
> forever list
info:    Forever processes running
data:        uid  command             script   forever pid id logfile                           uptime
data:    [0] UML_ /usr/local/bin/node watch.js 291     298    /home/user/.forever/UML_.log 0:0:0:22.141

# ログの確認
# `forever list` で出力される `logfile` を `tail -f` した方が便利かもしれない。
> forever logs watch.js

# foreverで起動したアプリの停止
> forever stop watch.js
info:    Forever stopped process:
    uid  command             script   forever pid id logfile                           uptime
[0] UML_ /usr/local/bin/node watch.js 291     298    /home/user/.forever/UML_.log 0:0:10:19.34400000000005
まとめ
想定していた以上に、簡単に実装することが出来ました。
関連情報を調査すると、2016年前後の記事が多く、2018~2019年の情報が少なかったのですが、他にメジャーなやり方などがあるかもしれません。
参考
今回の記事で参考にしたサイトを記載します。
chokidar
- paulmillr/chokidar - GitHub
- node.jsでファイル監視して、変更があったらSFTPして、さらにその機能をデーモン化?する。 - Qiita
- node.jsでファイルの変更を検出して何かする - Qiita
