要約
- VS Code の Remote Development で Xdebug する時は、
remote_hostの向き先を ローカルホストにする。 - Remote Development の接続先の VS Code に PHP Debug を導入する。
-
.vscode/launch.jsonで Xdebug からの情報を Listen する。
はじめに
VS Code の 拡張機能 「 Remote Development 」は、これまでもどかしく感じていたローカル開発環境の構成を改善してくれそうで色々と試しています。
前回の記事 では、Vagrant で構築した仮想環境の上にある Docker コンテナに対して、 Remote Development で接続する方法を記載しました。
今回は、前回構築した環境に追加する形で、 PHP の Xdebug を用いた開発が出来るように設定方法をまとめてみます。
概要
書くこと
- Docker コンテナの起動時の Xdebug の設定方法
- VS Code Server で Xdebug のデータを Listen する方法
書かないこと
- Vagrant で構築する仮想環境に Docker や docker-compose を導入する方法。
想定環境
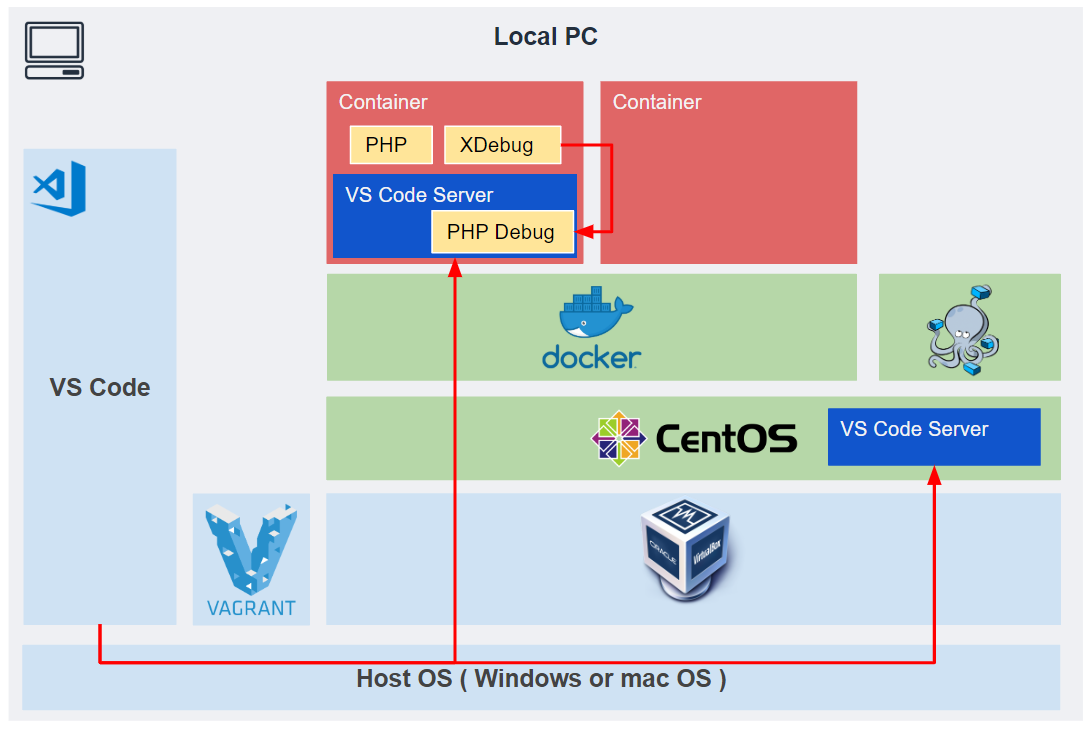
この記事で実現するシステムの構成は下図の通りです。
Remote Development の有無による違い
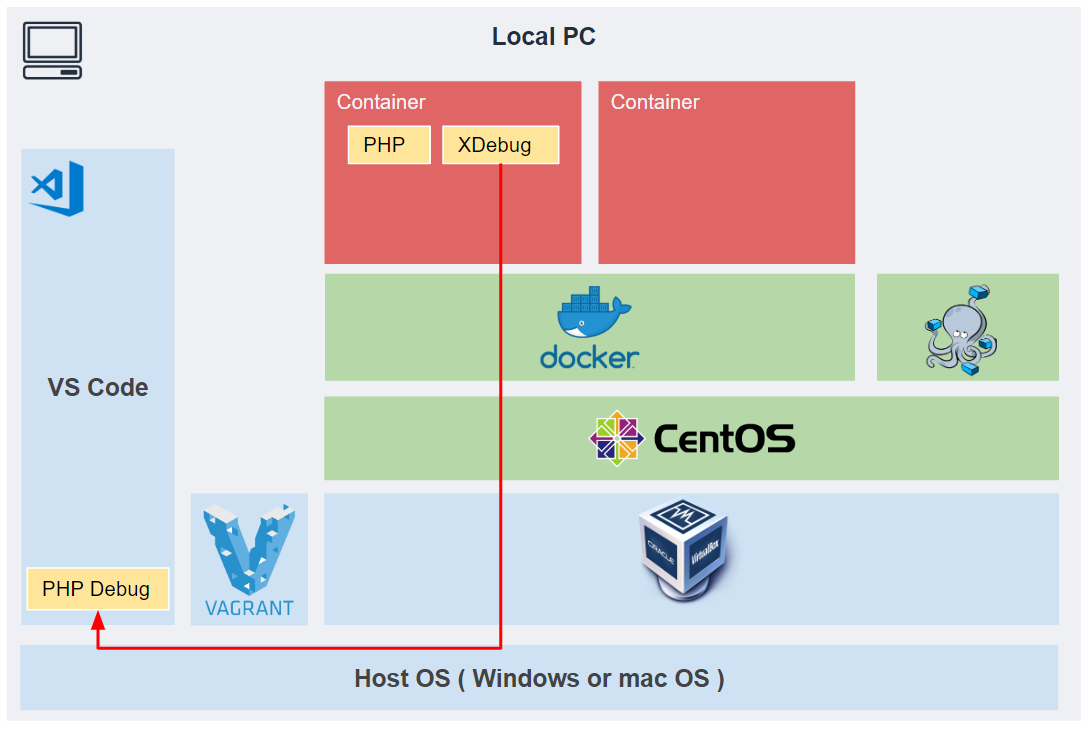
Remote Development を使用しない場合
Remote Development を使用せず、 Xdebug のデータを HostOS 上の VS Code で Listen する場合は以下のような構成でした。
この構成を実現するためには、 Xdebug の設定ファイルで remote_host の IP アドレスを指定する必要がありました。
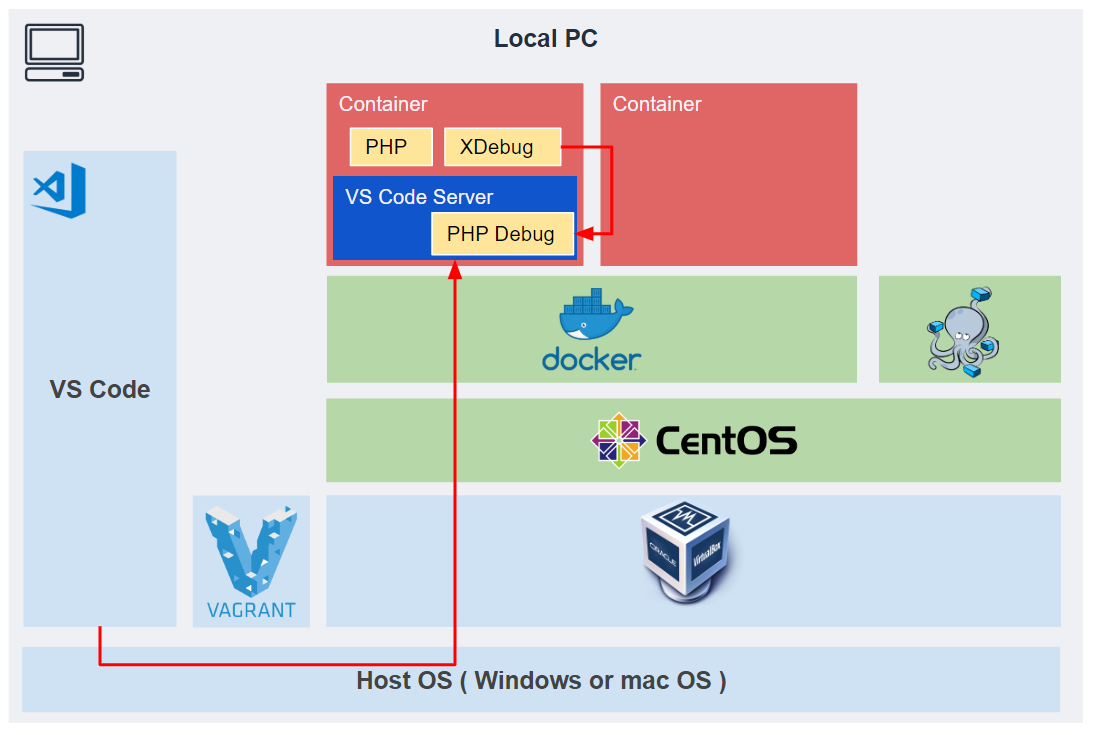
Remote Development を使用する場合
Remote Development を使用する場合の構成は以下の構成になります。
Xdebug の remote_host は localhost を指定すればよく、送信先の IP をいちいち気にする必要がありません。
設定手順
0. 基本設的な設定手順
この記事で実現している構成の基本的な要素は以下の記事で解説しています。
1. XDebug が有効化された Docker コンテナの構築
Docker コンテナの構築に必要なリソースは以下の通りです。
## Dockerfile
## authorized_keys   : 公開鍵認証に使用する公開鍵。Dockerコンテナ内に配置する。
## php/20-xdebug.ini : Xdebug の設定ファイル。Dockerコンテナ内に配置する。
$ tree
.
├── Dockerfile
├── authorized_keys
└── php
    └── 20-xdebug.ini
Dockerfile は次のように記載します。
# image
FROM php:7.0.15-fpm

ENV LANG C.UTF-8

RUN apt-get update -qq && \
    apt-get install -y \
        zlib1g-dev \
        libfreetype6-dev \
        libjpeg62-turbo-dev \
        libpng-dev \
        && docker-php-ext-install zip \
        && yes "" | pecl install xdebug \
        && docker-php-ext-enable xdebug \
        && docker-php-ext-configure gd --with-freetype-dir=/usr/include/ --with-jpeg-dir=/usr/include/ \
        && docker-php-ext-install -j$(nproc) gd

RUN apt-get update \
    && apt-get install -y libpq-dev \
    && docker-php-ext-install pdo_mysql pdo_pgsql

RUN apt-get update \
    && apt-get install -my wget gnupg

WORKDIR /opt/

# ここから最後までがポイント
RUN apt-get update && apt-get install -y openssh-server
RUN mkdir /var/run/sshd

RUN sed -i 's/PermitRootLogin without-password/PermitRootLogin yes/' /etc/ssh/sshd_config
RUN sed -i 's/#PasswordAuthentication yes/PasswordAuthentication no/' /etc/ssh/sshd_config

# SSH login fix. Otherwise user is kicked off after login
RUN sed 's@session\s*required\s*pam_loginuid.so@session optional pam_loginuid.so@g' -i /etc/pam.d/sshd

ENV NOTVISIBLE "in users profile"
RUN echo "export VISIBLE=now" >> /etc/profile

# 手元の公開鍵をコピー
COPY authorized_keys /root/authorized_keys

EXPOSE 22

# 公開鍵を使えるようにする (パーミッション変更など)
CMD mkdir ~/.ssh && \
    mv ~/authorized_keys ~/.ssh/authorized_keys && \
    chmod 0600 ~/.ssh/authorized_keys &&  \
    # 最後に ssh を起動
    /usr/sbin/sshd -D

# Xdebug の設定ファイルを Docker コンテナに配置
COPY php/20-xdebug.ini /usr/local/etc/php/conf.d/20-xdebug.ini
XDebug の設定を以下のようにします。
xdebug.remote_enable = 1
xdebug.remote_autostart = 1
xdebug.remote_connect_back = 1
xdebug.remote_host= "localhost"
xdebug.remote_port = 9001
xdebug.remote_log = /var/log/xdebug.log
Docker コンテナを以下のコマンドで構築します。
$ pwd
/vagrant/docker-sample

$ tree
.
├── Dockerfile
├── authorized_keys
└── php
    └── 20-xdebug.ini

# build
$ docker build ./ -t example

# Docker Container を起動
# Port:10000 を Port:22 に転送
$ docker run -d -p 10000:22 example

# Docker Container に SSH 接続
$ ssh root@127.0.0.1 -p 10000 -i ~/.ssh/private_key
2. .ssh/config の設定
Host OS から 仮想環境(GuestOS、Dockerコンテナ)に SSH接続するために、以下の設定を行います。
# Vagrant で起動した仮想環境への SSH接続設定
Host vagrant-os
  HostName 127.0.0.1
  User vagrant
  Port 2222
  UserKnownHostsFile /dev/null
  StrictHostKeyChecking no
  PasswordAuthentication no
  IdentityFile C:/Users/<username>/work/vagrant/centos-7-docker/.vagrant/machines/default/virtualbox/private_key
  IdentitiesOnly yes
  LogLevel FATAL

# Docker で起動した仮想環境への SSH接続設定
Host docker-os
  Hostname 127.0.0.1
  User root
  Port 10000
  ProxyCommand C:\Windows\System32\OpenSSH\ssh.exe -W %h:%p vagrant-os
  IdentityFile C:/Users/<username>/work/vagrant/centos-7-docker/.vagrant/machines/default/virtualbox/private_key
3. Visual Studio Code の設定
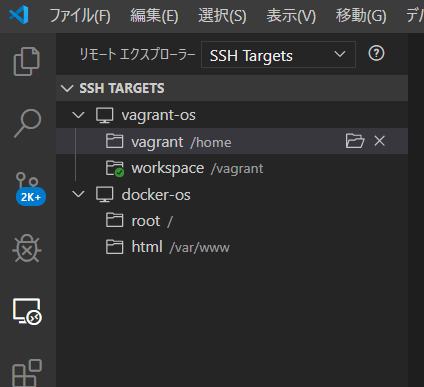
1.) と 2.) の設定をすることで、 VS Code の Remote Development の SSH Target には以下のように接続先候補が表示されるようになります。
上図のうち、docker-os の方にアクセスした際の画面が下図です。
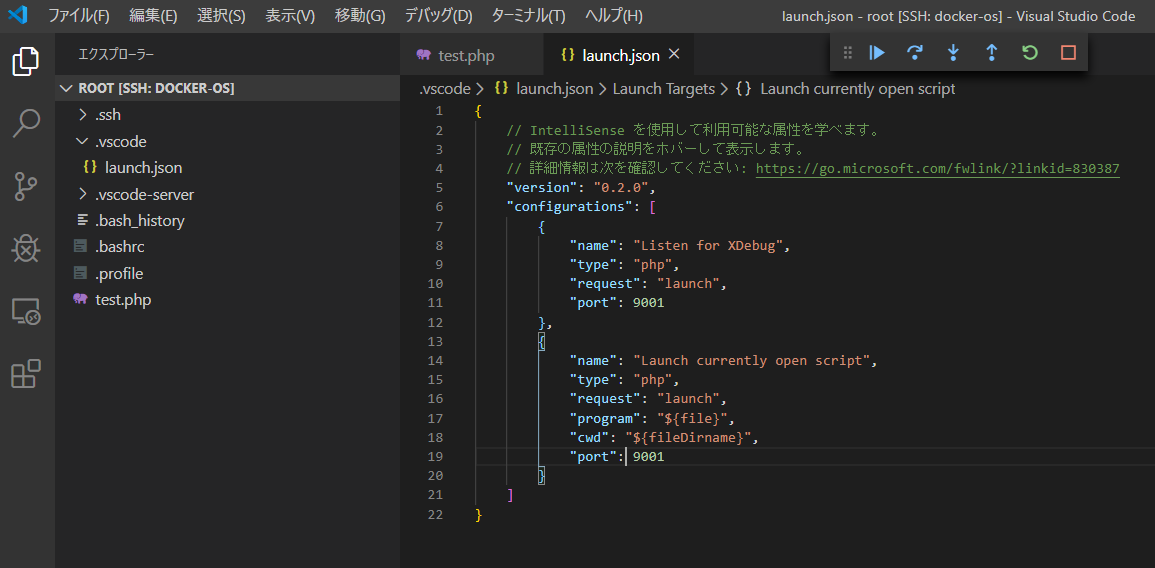
ここで、 .vscode/launch.json を作成して、 Xdebug からのデータを Listen 出来るよう設定しています。
.vscode/launch.json の設定は以下の通りです。
php/20-xdebug.ini の xdebug.remote_port で指定した Port と番号を合わせて設定します。
Docker コンテナ上の VSCode に PHPDebug 機能拡張 をインストールすることも忘れず行います。
{
    // IntelliSense を使用して利用可能な属性を学べます。
    // 既存の属性の説明をホバーして表示します。
    // 詳細情報は次を確認してください: https://go.microsoft.com/fwlink/?linkid=830387
    "version": "0.2.0",
    "configurations": [
        {
            "name": "Listen for XDebug",
            "type": "php",
            "request": "launch",
            "port": 9001
        },
        {
            "name": "Launch currently open script",
            "type": "php",
            "request": "launch",
            "program": "${file}",
            "cwd": "${fileDirname}",
            "port": 9001
        }
    ]
}
4. 動作確認
3.) までの手順で設定した内容が正しく設定されているか確認してみます。
Docker コンテナ内で適当な PHP プログラムを作成します。
<?php

echo "test";
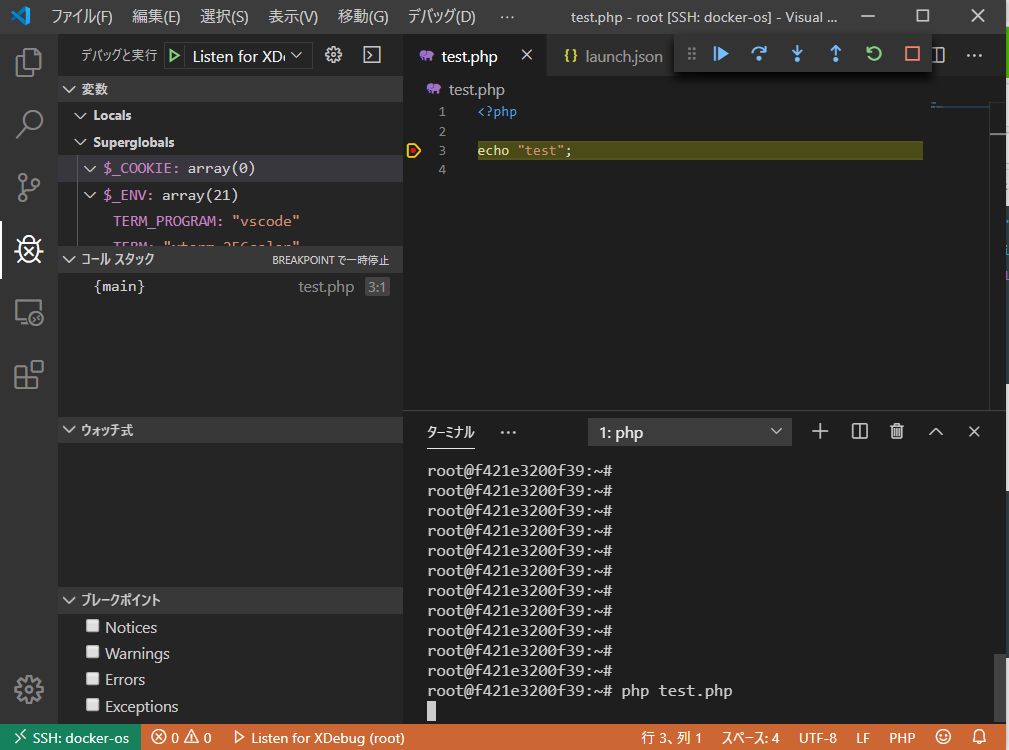
PHPDebug で Listen しながら、適当な箇所でブレイクポイントを設定して テストプログラムを実行します。
$ pwd
/root

$ ls
test.php

# テストプログラムの実行
$ php test.php
test
実行結果は以下のようになりました。
おわりに
書いたあとで見返してみると、なんのことは無い、普通の Xdebug の設定でした。
リモートの仮想環境に VS Code Server があり、そこと HostOS の VSCode がやり取りすることによって、リッチな VSCode の UI を使用して仮想環境上のリソースが編集出来るので、ひじょ~~~に便利です。
参考
今回の記事を作成するにあたって参考した記事です。
