概要
CLoud Armorを使って送信元IPでGCPへのアクセス制限している環境があり、
外部アクセスからのIP以外にも、内部通信用としてGCEやGKEノードのグローバルIPも登録をしてますが、
GKEノードはマネージドなので、障害等で自動的にノードの入れ替えが行われます。
そこでIPの登録を自動化したいというのが目的です。
構成
- Operations loggingでgkeノードのinsert/deleteのログが出力されるので、そのフィルターをかけたログのsink先をpub/subに向ける。
- pub/subからcloud functionを起動してcloud armorへ登録/削除を行う。
Operations logging(sink) => cloud pub/sub => cloud function => cloud armor
※ stack driver loggingから Operations loggingに名前が変わった様です。
※ sinkとはエクスポートのことで、syncではなくsinkで、sink先はgcsと、pub/subと、big queryです。
Operations logging
ログのフィルターの掛け方とsinkのやり方
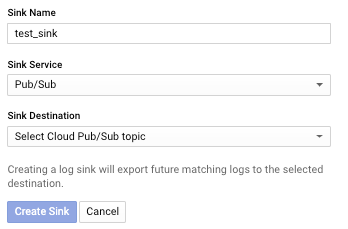
Operations logging => Logs Router => CCREATE SINK
ログのフィルターを以下のようにかけると、GKE Nodeのinset/deleteのみに絞れました。
resource.type="gce_instance"
protoPayload.requestMetadata.callerSuppliedUserAgent="GCE Managed Instance Group for GKE" AND
(protoPayload.methodName="v1.compute.instances.insert" OR protoPayload.methodName="v1.compute.instances.delete")
sinkするpub/subを指定する。
※事前にcloud pub/subの topicの作成が必要です(2クリックで作成可能)
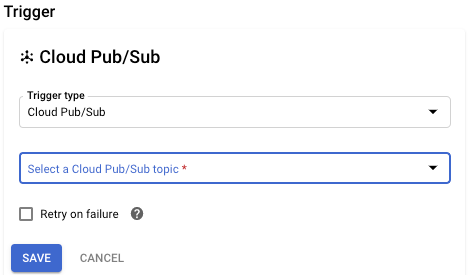
cloud function
cloud pub/subとの連携部分
cloud function設定のtrigger部分で、pub/subを選択するだけです。
cloud puc/subからログ情報をもらうところ
https://cloud.google.com/functions/docs/calling/logging?hl=ja
ここの公式にサンプルがありますが、今回必要な情報、リソース名 、メソッド名(insert or delete) 、zoneを以下で取得します。
def process_log_entry(data, context):
    data_buffer = base64.b64decode(data['data'])
    log_entry = json.loads(data_buffer)['protoPayload']
    print(f"# resourceName is: {log_entry['resourceName']}")
    print(f"# method is: {log_entry['methodName']}")
    print(f"# zone is: {log_entry['resourceLocation']['currentLocations']}")
結果

google-api-python-client
gcpのpython用ライブラリは、以下のオフィシャルを使うのが良さそうです。
https://cloud.google.com/compute/docs/tutorials/python-guide?hl=ja
https://github.com/googleapis/google-api-python-client
ローカルで使う場合
- Cloud SDKのインストール
-
gcloud auth application-default loginで認証 - ライブラリのインストール
$ pip install --upgrade google-api-python-client
- api 初期化
import googleapiclient.discovery
compute = googleapiclient.discovery.build('compute', 'v1')
cloud functionsで使う場合
- パッケージ指定
google-api-python-client==1.9.3
oauth2client == 4.1.3
- api 初期化
cache_discovery=Falseを入れないとエラーになる様です。
buildの使い方はここ
    credentials = GoogleCredentials.get_application_default()
    compute = googleapiclient.discovery.build(
        'compute', 'v1', credentials=credentials, cache_discovery=False)
後はリファレンスを見て好きな様に操作するだけです。
Library reference documentation by API.
https://github.com/googleapis/google-api-python-client/blob/master/docs/dyn/index.md#compute
compute v1のapiリファレンス
http://googleapis.github.io/google-api-python-client/docs/dyn/compute_v1.html
instanceの情報取得
policy登録に必要なグローバルIPの取得します。
resourceName はpub/sub経由のログから取得したinstance名を使用します。
※ どこかに書いてありましたが、関数の実行にはお尻に .execute() を付けないと実行されません。
project = "test-project"
zone = "asia-northeast1-a"

compute = googleapiclient.discovery.build('compute', 'v1')
getinstance = compute.instances().get(project=project, zone=zone,
                                      instance=resourceName).execute()
print(f"natIP is: {getinstance['networkInterfaces'][0]['accessConfigs'][0]['natIP']}")
結果
natIP is: xx.xx.xx.xx
cloud armorへの登録削除
既存のpolicy内容を取得
project = "test-project"
securityPolicy = "test-policy"

compute = googleapiclient.discovery.build('compute', 'v1')
getpolicy = compute.securityPolicies().get(
    project=project, securityPolicy=securityPolicy).execute()

for i in getpolicy["rules"]:
    print(f"rules: {i}")
結果
rules: {'description': '', 'priority': 1, 'match': {'versionedExpr': 'SRC_IPS_V1', 'config': {'srcIpRanges': ['xxx.xxx.xxx.xxx']}}, 'action': 'allow', 'preview': False, 'kind': 'compute#securityPolicyRule'}
rules: {'description': 'Default rule, higher priority overrides it', 'priority': 2147483647, 'match': {'versionedExpr': 'SRC_IPS_V1', 'config': {'srcIpRanges': ['*']}}, 'action': 'deny(403)', 'preview': False, 'kind': 'compute#securityPolicyRule'}
ruleの登録
resourceName はpub/sub経由のログから取得したinstance名を使用します。
set_priority の指定に少し工夫が必要です。
priority は 1 ~ 2147483647まで指定可能で、どの範囲を使うか事前に決める必要があるのと、
連番で付与していく場合、空きをどうするかなど。
今回は1,000,000,000(10億)~ 2,147,483,646までを使用可能として、既存の最大値に1インクリメントするようにしました。
(仮に1日100台入れ替わったとしても、上限達するには30,000年かかるので問題ないと思います。多分)
※ 以下はサンプルなので、そのロジックは省いています。
project = "test-project"
securityPolicy = "test-policy"
set_ip = getinstance['networkInterfaces'][0]['accessConfigs'][0]['natIP']

body = {"description": resourceName,
        "priority": str(set_priority),
        "match": {"versionedExpr": "SRC_IPS_V1",
                  "config": {"srcIpRanges": [set_ip]}},
        "action": "allow",
        "preview": "False",
        "kind": "compute#securityPolicyRule"}

addResult = compute.securityPolicies().addRule(
    project=project, securityPolicy=securityPolicy, body=body).execute()
print(f"addResult is: {addResult}")
結果

ruleの削除
instance名をdescriptionに登録しているので、マッチしたpriorityを消す様にしてます。
project = "test-project"
securityPolicy = "test-policy"

getpolicy = compute.securityPolicies().get(
    project=project, securityPolicy=securityPolicy).execute()
for i in getpolicy["rules"]:
    if i["description"] == resourceName:
        delResult = compute.securityPolicies().removeRule(
            project=project, securityPolicy=securityPolicy, priority=i['priority']).execute()