Serverless Meetup Tokyo #16 (オンライン開催) を拝見していて、ちょうど今、AWS への各種リソースのデプロイの自動化が課題だったので、よい機会と思い Serverless Framework を使ってみた。
尚、Serlverless Framwork については知っていたが、offline-start しか使ったことがなかった程度の人間です。
やったこと
弊社では Webシステムを、
- フロントエンド: SPA(Angular)
- バックエンド:
- REST っぽいAPI: Lambda + API Gateway
- DB: PostgreSQL 他
で組むことが増えてきていて、プロジェクトの取っ掛かり時の環境構築を手動でやっているのがダルくなってきた。
今回は、「REST っぽいAPI: Lambda + API Gateway」のところを Serverless Framework で自動化してみた。
手順
1. 環境構築用 IAM の作成
IAM コンソールで「serverless_deployment」という名前で作成。以下のポリシーをアタッチした。
- AWSLambdaFullAccess
- AmazonS3FullAccess
- AmazonAPIGatewayAdministrator
- AWSCloudFormationFullAccess
さらに、以下のようなインラインポリシーを追加した。
{
    "Version": "2012-10-17",
    "Statement": [
        {
            "Sid": "VisualEditor0",
            "Effect": "Allow",
            "Action": [
                "iam:DeleteRolePolicy",
                "iam:CreateRole",
                "iam:DeleteRole",
                "iam:PutRolePolicy"
            ],
            "Resource": "*"
        }
    ]
}
IAMFullAccess はさすがにヤバいかなと思い必要な権限だけ抽出したものだが、たぶん他の xxxFullAccess も必要なものだけにした方がよいだろう。
作成した IAM のアクセスキーなどを自PCの ~/.aws/credentials に追加した。ちなみに環境は Windows 10 内の WSL(Ubuntu)。
.aws/credentials
[serverless-deployment]
aws_access_key_id = AKIAxxxxx
aws_secret_access_key = 49s9xxxxxxxxxxxxxxxxxxxxxxxxxxxx
2. ツールのインストール
awscli は現在最新の v2 をインストール
node は 12.14.1
そして Serverless Framework をインストールする。
npm install serverless -g

source ~/.bash_profile
serverless --version

> Framework Core: 1.65.0
> Plugin: 3.4.1
> SDK: 2.3.0
> Components: 2.22.3
global じゃなくてもいいけど、パス通すのが面倒なので。
3. テンプレートからプロジェクトの作成
serverless create --template aws-nodejs
で、nodejs のテンプレートから Serverless Framework のプロジェクトを作成。
また、npm init で適当に package.json を作って、
npm install --save-dev serverless-plugin-custom-binary
を実行しておく。これは後に必要になるプラグイン。
ls すると以下のようなファイルとディレクトリがある。
handler.js node_modules package-lock.json package.json serverless.yml
4. serverless.yml を編集する
serverless.yml を開いて次のように編集する(これだと最早テンプレートの意味ないが)。
service: my-awesome-service

plugins:
  - serverless-plugin-custom-binary

custom:
  apiGateway:
    binaryMediaTypes:
      - image/jpeg

provider:
  name: aws
  runtime: nodejs12.x
  stage: ${opt:stage, 'dev'}
  region: ap-northeast-1
  apiName: ${self:service}-${self:provider.stage}

functions:
  api:
    handler:  handler.hello
    name: ${self:service}-api-${self:provider.stage}
    events:
      - http:
          path: /{proxy+}
          method: get
          integration: lambda
まず service: my-awesome-service、これが AWS に作成されるリソース名の元になるのでちゃんと考えて命名しよう。重複したらどうなちゃうのかは不明。 kebab-case を採用しておくと良いと思われる。例えばサービス名で S3 Bucket を作りたいとき、Bucket 名は CamelCase(大文字) を許可してないため。
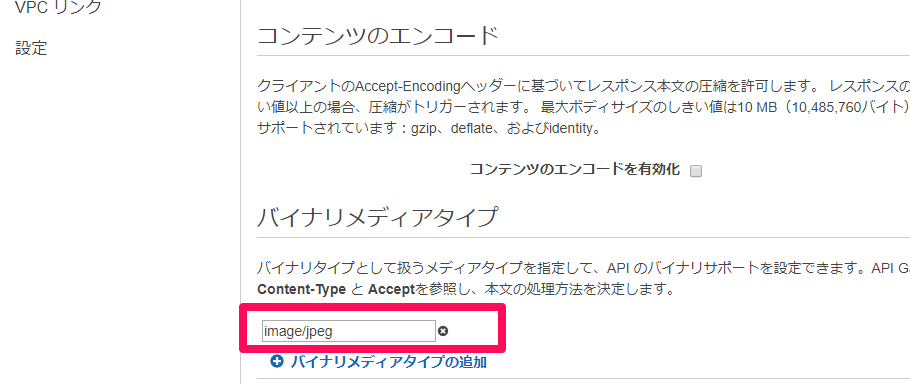
次に Plugins と binaryMediaTypes。これを行うために先に serverless-plugin-custom-binary をインストールしておいた。
provider-apiName。これは API Gateway の名前なんだけど、これをしない場合 <stage名>-<service名> になる。Lambda とかは <service名>-<stage名> となり逆で気持ち悪いので、他の同じになるように直している。
stage: ${opt:stage, 'dev'}。単純に stage: dev とするだけだと、 --stage prod を引数で指定された値が ${self:provider.stage} に代入されないので注意。
functions-api。Labmda に <service名>-<stage名>-api という名前の関数が作成される。"api" は任意の名称で ok。
functions-api-name。既定だと <service名>-<stage名>-api になるが、<service名>-api-<stage名>にしたい(stage名は最後尾に統一したい) ので name: ${self:service}-api-${self:provider.stage} とした。
handler: handler.hello。 handles.js の hello 関数を呼び出すの意。
path: /{proxy+}。呼び出し URL のパス部分を全てスルーする。https://hoge.net/dev/fuga/piyo/gege とか。
integration: lambda。既定で ON ぽいので要らないかも。
5. AWS にデプロイする
serverless deploy --aws-profile serverless-deployment
を実行する。--aws-profile serverless-deployment で AWSプロファイルを指定している事に注意。
Serverless: Packaging service...
Serverless: Excluding development dependencies...
Serverless: Creating Stack...
Serverless: Checking Stack create progress...
........
Serverless: Stack create finished...
Serverless: Uploading CloudFormation file to S3...
Serverless: Uploading artifacts...
Serverless: Uploading service MyAwesomeService.zip file to S3 (1.13 KB)...
Serverless: Validating template...
Serverless: Updating Stack...
Serverless: Checking Stack update progress...
...............................
Serverless: Stack update finished...
Service Information
service: MyAwesomeService
stage: dev
region: ap-northeast-1
stack: MyAwesomeService-dev
resources: 11
api keys:
  None
endpoints:
  GET - https://xxxx.execute-api.ap-northeast-1.amazonaws.com/dev/{proxy+}
functions:
  api: MyAwesomeService-dev-api
layers:
  None
Serverless: Run the "serverless" command to setup monitoring, troubleshooting and testing.
なんやかんや実行されてデプロイされたみたい。
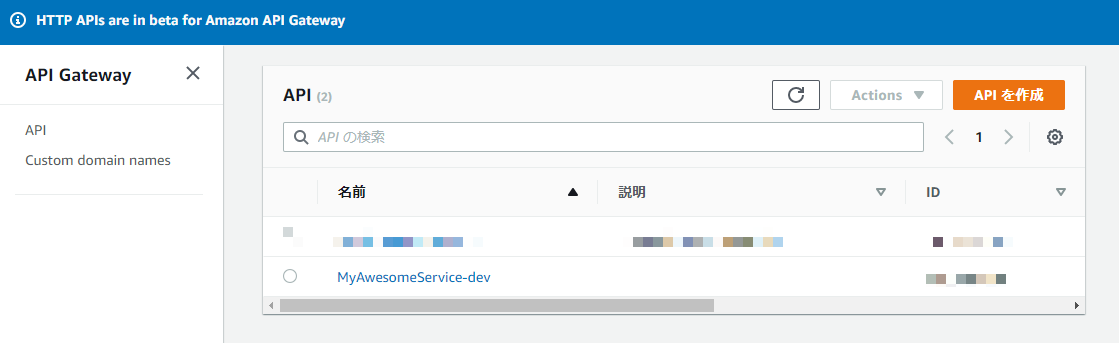
6. デプロイされたか確認
API Gateway
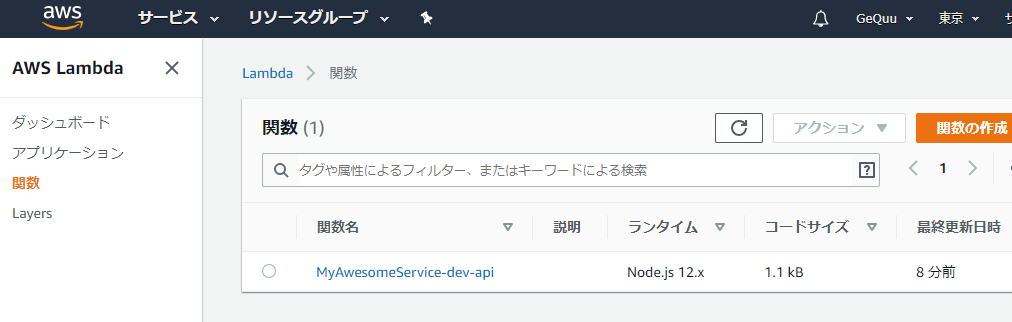
Lambda
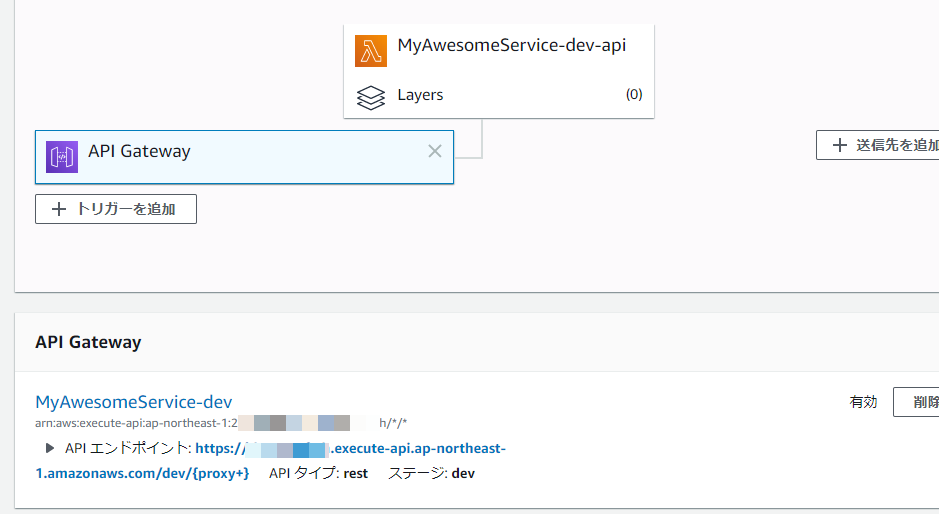
cURL で呼び出してみる。
curl https://xxxx.execute-api.ap-northeast-1.amazonaws.com/dev/aaa/bbb/ccc
{"statusCode":200,"body":"{\n \"message\": \"Go Serverless v1.0! Your function executed successfully!\"...
うまくいったみたい。
7. 後片付け(削除)
serverless remove --aws-profile serverless-deployment
ですべてのリソースがキレイさっぱり消えます。これはこれで怖いので IAM の権限で制限したほうが良さそう。
トラブルシューティング
Q: デプロイが全然終わらない
A: Console から CloudFormation の該当スタックを削除してリトライ
Q: sls deploy や remove が「S3 のバケットが無い」とかでエラーになる
A: 該当バケット(my-awesome-service-veri-serverlessdeploymentbucke-rzr9e2jjdrlv のようなごちゃごちゃしたやつ) を手動作成するか、Console から CloudFormation の該当スタックを削除してリトライ
今後やりたいこと
- Lambda へ VPC の設定
- Lambda タイムアウト値の設定
- スクリプトでビルドとか Webpack した結果を Serverless でデプロイ
- S3 Bucket の作成
- S3 に SPA をデプロイ
- リソース権限周りをもっと深堀り
参考
- Serverless Framework - AWS Lambda Guide - Introduction
- Serverless Variables
- Serverless FlameworkでAPI Gatewayのバイナリメディアタイプを設定する方法 - Qiita
- Serverless Framework で API Gateway & Lambda を構築する - Qiita
- Serverlessで任意のディレクトリ配下に、関数毎にディレクトリを切ってソースを配置する with webpack building - Qiita
- 一時的にPATHを追加する(Linux) - Qiita
- ServerlessFrameworkでS3の静的サイトのホスティングをする - マコーの日記