Advent Calendar 最終日が空いていたので、また リクエストもあった ので埋めましょう(Xamarin のカレンダーが半分Webネタで良いのか?は置いといて)。
というわけで、
の続きです。
目次
- 【第1回】日本語入力時の画面高さの調整
- 【第1回】ステータスバー、あるいは SafeArea(ノッチ部)の色
- 【今回】スプラッシュスクリーンおよび初回読み込み時の対応
- 【今回】アプリに必要な権限の許可を要求する
- 【次回以降予定】アプリ情報の Web 側への引き渡し
- 【次回以降予定】
<input type="xxx">への対応 - 【次回以降予定】Back ボタンハンドリングの Web 側への移譲
3. スプラッシュスクリーンおよび初回読み込み時の対応
実体がWebアプリであるため、起動してからアプリが使用可能になるまでに時間がかかるのは、ガワネイティブの弱点の一つです。
これはなんとかごまかしてユーザーに不快感を与えないようにしたいです。
ガワネイティブの起動にかかるプロセスは大きくわけて2つです。
- ネイティブアプリとしての起動から最初の画面が表示されるまで
- 最初の画面が表示されてから Web ページの読み込みが完了するまで
1 は通常のアプリでも必要なプロセス、2 はガワネイティブ特有の要件です。
まずは 1 を対応します。
Android の場合
こちらを参考にします。
Android 側プロジェクトの Resources/drawable/splash.xml を追加して、次のように記述します。
splash.axml
<?xml version="1.0" encoding="utf-8"?>
<layer-list
    xmlns:android="http://schemas.android.com/apk/res/android"
    android:opacity="opaque"
    android:layout_width="match_parent"
    android:layout_height="match_parent">

    <item
        android:drawable="@color/colorPrimaryDark"/>
</layer-list>
次に、Resources/values/colors.xml の colorPrimaryDark の色を Web アプリのテーマ色に合わせます。
この例では #66BB6A とします。
<?xml version="1.0" encoding="utf-8"?>
<resources>
    <color name="launcher_background">#FFFFFF</color>
    <color name="colorPrimary">#3F51B5</color>
    <color name="colorPrimaryDark">#66BB6A</color>
    <color name="colorAccent">#FF4081</color>
</resources>
前述のリンクでは、スプラッシュスクリーン用の Theme と Activity を作るよう書かれていますが、ガワネイティブの場合少しサボることができます。
Resources/values/styles.xml を開き、MainTheme.Base に android:windowBackground を追加します。
styles.xml
<?xml version="1.0" encoding="utf-8"?>
<resources>
    <style name="MainTheme" parent="MainTheme.Base">
    </style>
    <!-- Base theme applied no matter what API -->
    <style name="MainTheme.Base" parent="Theme.AppCompat.Light.DarkActionBar">
        <item name="android:windowBackground">@drawable/splash</item>
        <!--If you are using revision 22.1 please use just windowNoTitle. Without android:-->
        <item name="windowNoTitle">true</item>
        <!--We will be using the toolbar so no need to show ActionBar-->
        <item name="windowActionBar">false</item>
        <!-- Set theme colors from https://aka.ms/material-colors -->
        <!-- colorPrimary is used for the default action bar background -->
        <item name="colorPrimary">#2196F3</item>
        <!-- colorPrimaryDark is used for the status bar -->
        <item name="colorPrimaryDark">#66BB6A</item>
        <!-- colorAccent is used as the default value for colorControlActivated
         which is used to tint widgets -->
        <item name="colorAccent">#FF4081</item>
        <!-- You can also set colorControlNormal, colorControlActivated
         colorControlHighlight and colorSwitchThumbNormal. -->
        <item name="windowActionModeOverlay">true</item>
        <item name="android:datePickerDialogTheme">@style/AppCompatDialogStyle</item>
    </style>
    <style name="AppCompatDialogStyle" parent="Theme.AppCompat.Light.Dialog">
        <item name="colorAccent">#FF4081</item>
    </style>
</resources>
これでアプリ起動時に緑のスプラッシュスクリーンが表示されるようになります。
iOS の場合
iOS プロジェクトには、最初から LaunchScreen.storyboard がスプラッシュスクリーンとして使用されるよう設定されていますが、色が青になっているので、これを変更します。
Resources/LaunchScreen.storyboard を開いて、Background の色を #66BB6A に変更しました。
次に 「2. 最初の画面が表示されてから Web ページの読み込みが完了するまで」の対応です。
こちらはベタに、 WebView の読み込みが完了するまで、WebView を隠しておく ことにします。
これは Xamarin.Forms の共通プロジェクトで対応できます。
MainPage.xaml を次のように修正します。
MainPage.xaml
<?xml version="1.0" encoding="utf-8"?>
<ContentPage
    xmlns="http://xamarin.com/schemas/2014/forms"
    xmlns:x="http://schemas.microsoft.com/winfx/2009/xaml"
    xmlns:d="http://xamarin.com/schemas/2014/forms/design"
    xmlns:mc="http://schemas.openxmlformats.org/markup-compatibility/2006"
    mc:Ignorable="d"
    xmlns:local="clr-namespace:GawaNativeGettingStarted;assembly=GawaNativeGettingStarted"
    xmlns:effect="clr-namespace:GawaNativeGettingStarted"
    x:Class="GawaNativeGettingStarted.MainPage">
    <StackLayout
        Orientation="Vertical"
        VerticalOptions="FillAndExpand"
        BackgroundColor="#66BB6A">
        <StackLayout.Effects>
            <effect:SafeAreaPaddingEffect />
        </StackLayout.Effects>
        <WebView
            x:Name="webView"
            IsVisible="false"
            HorizontalOptions="FillAndExpand"
            VerticalOptions="FillAndExpand"
            Source="https://8440f155.ngrok.io"/>
        <FlexLayout
            x:Name="progressView"
            Direction="Column"
            JustifyContent="Center"
            VerticalOptions="FillAndExpand">
            <ActivityIndicator
                IsRunning="True"
                Color="White"
                VerticalOptions="Center" />
            <Label
                FontSize="Large"
                TextColor="White"
                HorizontalTextAlignment="Center"
                Text="Launching..." />
        </FlexLayout>
    </StackLayout>
</ContentPage>
そしてコードビハインドの MainPage.xaml.cs に次のように記述します。
MainPage.xaml.cs
// 略
public partial class MainPage : ContentPage
{
    public MainPage()
    {
        InitializeComponent();
        webView.Navigated += (s, e) =>
        {
            progressView.IsVisible = false;
            webView.IsVisible = true;
        };
    }
}
WebView の読み込みが完了すると Navigated イベントが発生するので、それが発生するまでは、WebView は非表示、代わりにプログレス的な View を表示しておきます。
Web アプリ側が真に SPA(Single Page Application) であるなら、Navigated イベントは一度しか発生しないはずですね。
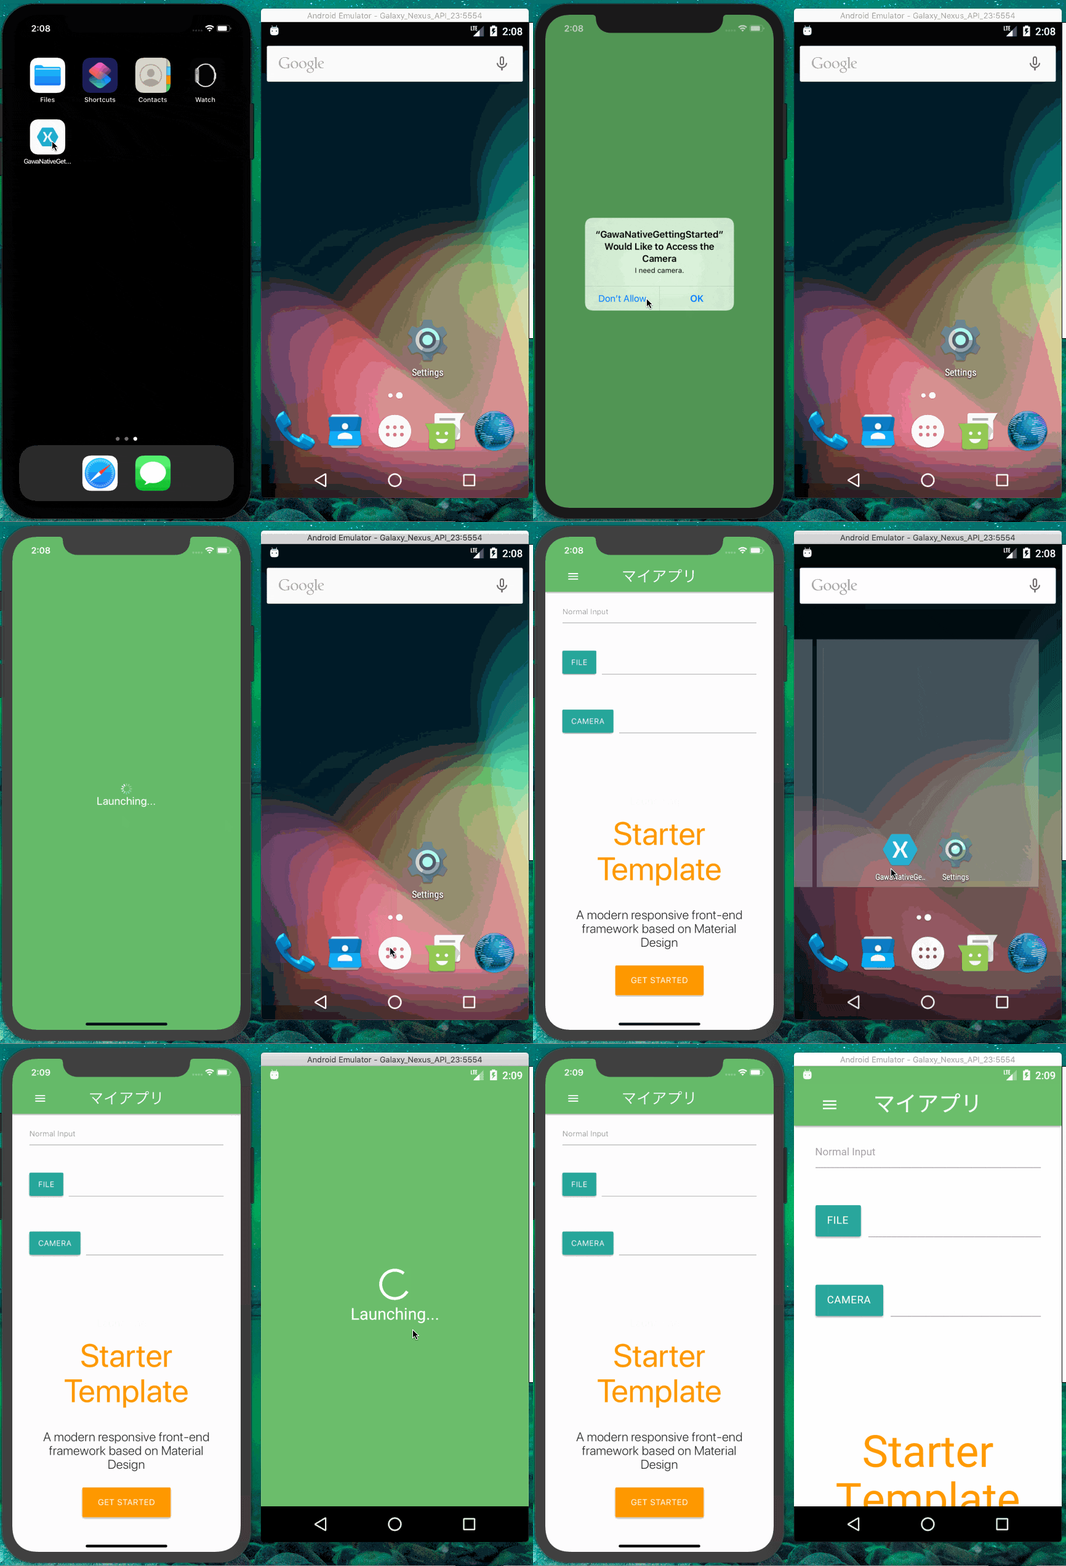
ここまでの成果を実行すると、次のような見た目になります。
(Xamarin.Forms アプリとしての起動遅っそ。そして iOS シミュレータ早っや!)
4. アプリに必要な権限の許可を要求する
例えば Web アプリ側の JavaScript で Geolocation API を使用する場合も、ガワの方でその許可を得ておく必要があります(Chrome などのブラウザアプリが実装していることをやらなければならない)。
さて、Xamarin.Forms アプリとして作成したプロジェクトには Xamarin Essentials が標準で組み込まれており、それらの機能を使う際には、必要な権限の許可が Xamarin Essentials から要求されるようです。
しかし、JavaScript 側で呼び出された機能に必要な許可要求は、自力で行う必要があります 1。
そのために、
を使用します。
バージョンが Stable で最新の 3.0.0.12、この nuget パッケージを共通、Android、iOS のすべてのプロジェクトにそれぞれ追加します。
Android プロジェクトには、 Setup に書かれているように、 MainActivity.cs に数行のコードを足す必要があります。
MainActivity.cs
<省略>

public class MainActivity : global::Xamarin.Forms.Platform.Android.FormsAppCompatActivity
{
    protected override void OnCreate(Bundle savedInstanceState)
    {
        <省略>

        Xamarin.Forms.Application.Current.On<Xamarin.Forms.PlatformConfiguration.Android>()
            .UseWindowSoftInputModeAdjust(WindowSoftInputModeAdjust.Resize);

        // ココ!
        Plugin.CurrentActivity.CrossCurrentActivity.Current.Init(this, savedInstanceState);
    }

    public override void OnRequestPermissionsResult(int requestCode, string[] permissions, [GeneratedEnum] Android.Content.PM.Permission[] grantResults)
    {
        // ココ!
        PermissionsImplementation.Current.OnRequestPermissionsResult(requestCode, permissions, grantResults);
        Xamarin.Essentials.Platform.OnRequestPermissionsResult(requestCode, permissions, grantResults);

        base.OnRequestPermissionsResult(requestCode, permissions, grantResults);
    }
}
iOS の方はここでは特にする事はありません。
準備が整ったところで、実際に必要な権限の許可を求める処理を書いてみます。
例として
- 位置情報の取得
- カメラの使用
の権限を求めてみます。
Android/iOS プロジェクトの設定
位置情報の取得
Xamarin.Essentials: Geolocation に書かれているように、
Android プロジェクトでは、 AssemblyInfo.cs と AndroidManifest.xml に数行ずつ追加します。
iOS プロジェクト側は、Info.plist を編集します。
カメラの使用
Android 側は、AndroidManifest.xml に、
<uses-permission android:name="android.permission.CAMERA" />
を追加します。
iOS プロジェクトは、Info.plist を開き、新しいエントリ「Privacy - Camera Usage Description」を追加し、Value に適当な説明文を入力します。
その他の権限に必要な設定は、
Android は、
iOS では、
が詳しいです。
共通プロジェクトでの記述
では、いよいよ、許可を求めるコードを書いていきます。
共通プロジェクトの MainPage.xaml.cs に次のように記述します。
MainPage.xaml.cs
public partial class MainPage : ContentPage
{
    <省略>

    async protected override void OnAppearing()
    {
        base.OnAppearing();

        // 許可を求める権限群
        var permissions = new []
        {
            Permission.Location,
            Permission.Camera,
        };

        // 許可を得ていない権限群
        var notPermitteds = new List<Permission>();
        foreach (var perm in permissions)
        {
            var status = await CrossPermissions.Current.CheckPermissionStatusAsync(perm);
            if (status != PermissionStatus.Granted)
            {
                notPermitteds.Add(perm);
            }
        }

        // 許可を求めるダイアログボックスを出す
        var statusMap = await CrossPermissions.Current.RequestPermissionsAsync(notPermitteds.ToArray());
        var permitted = statusMap.Values.All(x => x == PermissionStatus.Granted);

        if (!permitted)
        {
            await DisplayAlert("許可求む", "すべての権限が許可されていないので、一部の機能が使用できないかもしれません。", "閉じる");
        }

        // 許可されたら Web アプリ起動
        webView.Source = "https://5ce07f72.ngrok.io";
    }
}
これは、アプリの起動時に、必要な権限群 permissions について、
-
CheckPermissionStatusAsyncで許可が得られているかを取得 - 許可が得られていない権限群について
RequestPermissionsAsyncで許可を求めるダイアログボックスを表示 - ユーザーが許可しなかったら、注意喚起するアラートを表示
- WebView に URL を設定し、Webアプリを起動
という流れです。
このコードを動かすと、次の図のようになります。
ハマりポイントとしては、iOS で pinfo.list へ追加し忘れると RequestPermissionsAsync を呼んだ瞬間にアプリが落ちる、があります。
権限の取得は最小限、且つユーザーに納得感の強いタイミングで行うべきなので、起動時にまとめて行うのは、あまりお行儀の良いアプリとは言えません。
次回以降で解説する内容は、ネイティブアプリの情報を Webアプリ に引き渡す方法や、Webアプリのアクションをネイティブ側に処理させる方法などです。
これらを駆使して、必要なタイミングで必要な許可を求めるコードを書くこともできます。
2020年も「Xamarin.Forms+ガワネイティブ」推しでゆくべく、この連載は続けていきたいと思います。
では 2020年 にお会いしましょう。
-
Xamarin Essentials の GitHub で master ブランチの
Permissions.csを見ると、Permissionsクラスがpublicになっているので、今後のバージョンアップで、権限機能が個別に使用できるようになるのかも知れません。 ↩


