


はじめに
watchOS のアプリを作ってみようかな?と思って調べているとほぼ記事がなかったので watchOS のアプリで使う Storyboard の Objects についてまとめました。
UIKit ではなく WatchKit を使います(もしかしたら SwiftUI 使えるかも??)。基本的にはコードでインスタンス生成(init'())ができない模様。ほぼ Storyboard で設定するみたいです。
だいたい WKInterfaceObject を継承しており、func setHidden(_ hidden: Bool) のようにセッターは用意されているがゲッターがないものが多い。Storyboard での初期設定のみでコードで値を設定できないものも多い。現在値が知りたい場合は別で変数を用意するしかない模様。
基本的にサブクラスをつくることもできない(たぶんそんな複雑なことすることもない)。
(今からなら SwiftUI 使うべきかもしれないけど気にしない![]() )
)
ソースはこちら![]() GitHub
GitHub
WKInterfaceController
ほぼ UIViewController(これはいつか別記事にまとめたい)。ScrollView のようなものはなくこの中にパーツいっぱい置いていったら勝手にスクロールする模様。
class WKInterfaceController : NSObject
画面表示とかのときに下記メソッドが呼ばれる。
The super implementation of this method does nothing.
とあるのでとくに super.willActivate() とかを中で呼ぶ必要はない模様(デフォで記述がないですし。。。)。
func awake(withContext: Any?)

func willActivate()
func didDeactivate()

func didAppear()
func willDisappear()
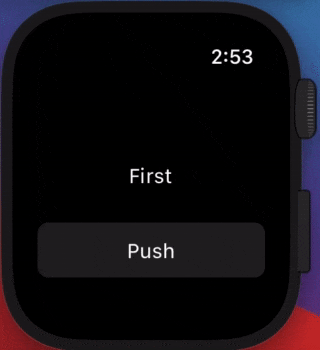
画面遷移には push, modal, next page の3つがある(Storyboard で設定する場合 push と modal は Button か Table からしか接続できない)。
| Push | Modal | Next Page |
|---|---|---|
 |
 |
 |
first -> second に push 遷移して戻ると下記のように呼ばれました。
first awake
first willActivate
first didAppear
second awake
first willDisappear
second willActivate
first didDeactivate
second didAppear
second willDisappear
first willActivate
second didDeactivate
first didAppear
first -> second に modal 遷移して戻ると下記のように呼ばれました。
first awake
first willActivate
first didAppear
second awake
first willDisappear
second willActivate
second didAppear
first didDeactivate
second willDisappear
first willActivate
first didAppear
second didDeactivate
next page を設定して first -> second -> first と遷移すると下記のように呼ばれました。
first awake
first willActivate
first didAppear
second awake
second willActivate
first willDisappear
first didDeactivate
second didAppear
first willActivate
second willDisappear
second didDeactivate
first didAppear
WKUserNotificationInterfaceController
通知用のやつ。ちょっとまだよくわかってない。。。(こちらをみるといいかも![]() Apple Watchのアプリを開発してみた)
Apple Watchのアプリを開発してみた)
class WKUserNotificationInterfaceController : WKInterfaceController
ドキュメント:WKUserNotificationInterfaceController
WKHostingController
SwiftUI 用。今回は割愛。。。
class WKHostingController<Body> where Body : View
StoryboardReference
複数の Storyboard をつなぐやつ。iOS のやつと同じ。
WKInterfaceGroup
UIStackView のようなやつ。
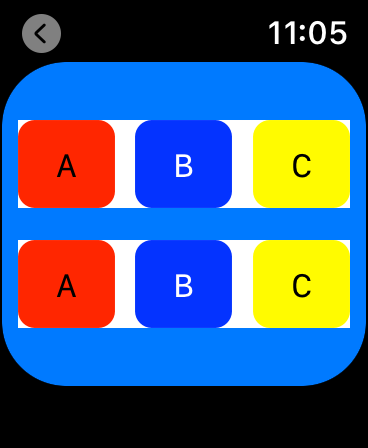
class WKInterfaceGroup : WKInterfaceObject
| Attribute | Description |
|---|---|
| Layout | horizontally, vertically, overlap の3つ |
| Insets | パディング |
| Spacing | 子 View 同士の余白 |
| Background | 背景画像 |
| Mode | 背景画像のコンテンツモード |
| Animate | 背景画像がアニメーションするかどうか |
| Color | 背景色 |
| Radius | 角丸(デフォルトは 6 pt) |
WKInterfaceLabel
だいたい UILabel と同じ。

class WKInterfaceLabel : WKInterfaceObject
WKInterfaceDate
現在日付を表示するラベル。
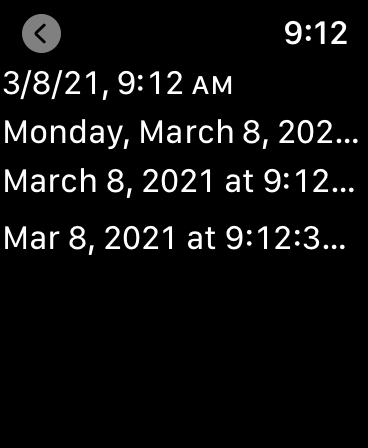
class WKInterfaceDate : WKInterfaceObject
| Attribute | Description |
|---|---|
| Format | 日付のフォーマット |
| Date | 日付の DateFormatter.Style
|
| Time | 時刻の DateFormatter.Style
|
| Preview | プレビュー用の日付 |
コードで設定できるのは下記。
func setTextColor(_ color: UIColor?)
func setTimeZone(_ timeZone: TimeZone?)
func setCalendar(_ calendar: Calendar?)
WKInterfaceTimer
カウントダウン(アップ)用のラベル(秒数を表示する)。
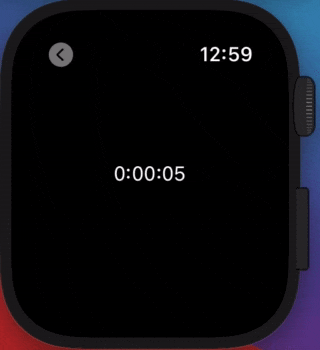
class WKInterfaceTimer : WKInterfaceObject
| Attribute | Description |
|---|---|
| Format | 表示のフォーマット |
| Enabled | 表示後すぐに開始するかどうか |
| Units | 表示する単位(秒、分、時間、日、週、月、年) |
| Preview Secs | プレビュー用の秒数 |
コードで設定できるのは下記。
func setTextColor(_ color: UIColor?)
func setDate(_ date: Date)

func start()
func stop()
WKInterfaceButton
ほぼ UIButton。

class WKInterfaceButton : WKInterfaceObject
下記のように IBAction に sender はない。
@IBAction func buttonAction() {}
selected などの state はない。image もないが Content を Group に変更すると中に色々置けるようになる。
WKInterfaceTextField
ほぼ UITextField。

class WKInterfaceTextField : WKInterfaceObject
IBAction で入力イベントをとれる。
@IBAction func textFieldAction(_ value: NSString?) {}
入力画面を閉じたときに呼ばれ、キャンセル時は value が nil になる。
WKInterfaceSwitch
ほぼ UISwitch(ラベル付き)。
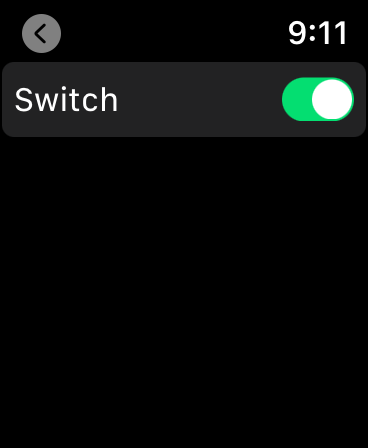
class WKInterfaceSwitch : WKInterfaceObject
IBAction で入力イベントをとれる。
@IBAction func switchAction(value: Bool) {}
WKInterfaceSlider
ほぼ UISlider。
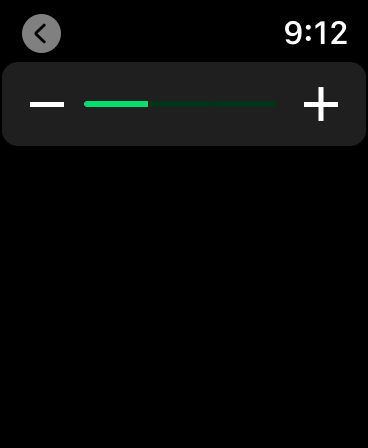
class WKInterfaceSlider : WKInterfaceObject
IBAction で入力イベントをとれる。
@IBAction func sliderAction(_ value: Float) {}
WKInterfaceMap
地図表示するやつ。MKMapView 簡易版(とくにイベントは取得できなさそう??)。
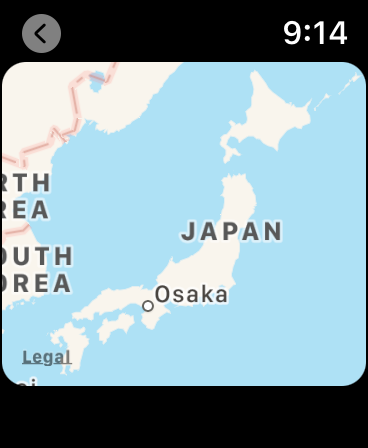
class WKInterfaceMap : WKInterfaceObject
一度に5つまでアノテーション表示ができる。
メソッド一覧。
func setShowsUserLocation(_ showsUserLocation: Bool)
func setShowsUserHeading(_ showsUserHeading: Bool)
func setUserTrackingMode(_ mode: WKInterfaceMap.UserTrackingMode, animated: Bool)
func setVisibleMapRect(_ mapRect: MKMapRect)
func setRegion(_ coordinateRegion: MKCoordinateRegion)

func addAnnotation(_ location: CLLocationCoordinate2D, with image: UIImage?, centerOffset offset: CGPoint)
func addAnnotation(_ location: CLLocationCoordinate2D, withImageNamed name: String?, centerOffset offset: CGPoint)
func addAnnotation(_ location: CLLocationCoordinate2D, with pinColor: WKInterfaceMapPinColor)
func removeAllAnnotations()
WKInterfaceSeparator
境界線。色の設定だけできる。
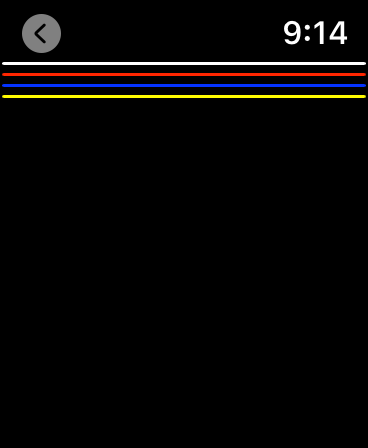
class WKInterfaceSeparator : WKInterfaceObject
WKInterfaceTable
テーブル。
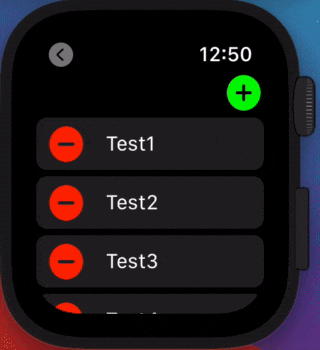
class WKInterfaceTable : WKInterfaceObject
メソッドとプロパティ一覧。
func setRowTypes(_ rowTypes: [String])
func setNumberOfRows(_ numberOfRows: Int, withRowType rowType: String)
var numberOfRows: Int { get }
func rowController(at index: Int) -> Any?

func insertRows(at rows: IndexSet, withRowType rowType: String)
func removeRows(at rows: IndexSet)

func scrollToRow(at index: Int)

func performSegue(forRow row: Int)

var curvesAtTop: Bool
var curvesAtBottom: Bool
選択時は WKInterfaceController の下記が呼ばれる。
override func table(_ table: WKInterfaceTable, didSelectRowAt rowIndex: Int) {}
簡易実装。
final class TableInterfaceController: WKInterfaceController {

    @IBOutlet private weak var table: WKInterfaceTable!
    private var tableDataList = ["Test1", "Test2", "Test3", "Test4", "Test5"]

    override func awake(withContext context: Any?) {
        // RowTypeがたぶんRowのID(Storyboardで設定)
        table.setNumberOfRows(tableDataList.count, withRowType: "Row")
        tableDataList.enumerated().forEach { index, value in
            let row = table.rowController(at: index) as! TableRowController
            row.setText(value)
        }
    }

    override func table(_ table: WKInterfaceTable, didSelectRowAt rowIndex: Int) {
        print("didSelect")
    }
}

// UITableViewCellのようなやつ
final class TableRowController: NSObject {

    @IBOutlet private weak var label: WKInterfaceLabel!

    func setText(_ text: String) {
        label.setText(text)
    }
}
WKInterfacePicker
ピッカー(画像と文字列が表示できる)。
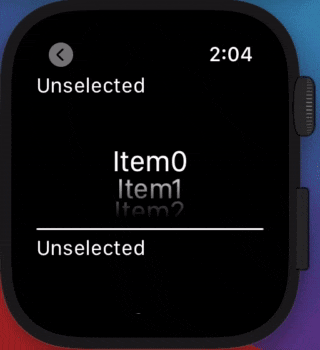
class WKInterfacePicker : WKInterfaceObject
IBAction で選択イベントを取得できる。
@IBAction func pickerAction(_ index: Int) {}
メソッド一覧。
func focus()
func resignFocus()

func setSelectedItemIndex(_ itemIndex: Int)
func setItems(_ items: [WKPickerItem]?)
func setCoordinatedAnimations(_ coordinatedAnimations: [WKInterfaceObject & WKImageAnimatable]?)
func setEnabled(_ enabled: Bool)
setItems で WKPickerItem を設定する。
WKPickerItem には下記が設定できる。
var title: String?
var caption: String?
var accessoryImage: WKImage?
var contentImage: WKImage?
WKInterfaceImage
ほぼ UIImageView。複数画像用意するとパラパラ漫画みたいにアニメーションできる。
class WKInterfaceImage : WKInterfaceObject
WKInterfaceActivityRing
HealthKit のアクティビティ表示のやつ。
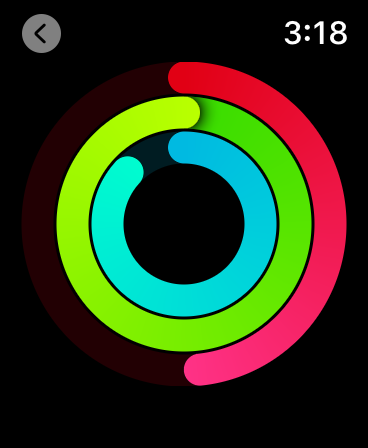
class WKInterfaceActivityRing : WKInterfaceObject
ドキュメント:WKInterfaceActivityRing
簡易実装。
import WatchKit
import Foundation
import HealthKit

final class ActivityRingInterfaceController: WKInterfaceController {

    @IBOutlet private weak var activityRing: WKInterfaceActivityRing!

    override func awake(withContext context: Any?) {
        let activitySummary = HKActivitySummary()
        activitySummary.activeEnergyBurned = HKQuantity(unit: .kilocalorie(), doubleValue: 1500)
        activitySummary.activeEnergyBurnedGoal = HKQuantity(unit: .kilocalorie(), doubleValue: 3000)
        activitySummary.appleExerciseTime = HKQuantity(unit: .minute(), doubleValue: 30)
        activitySummary.appleExerciseTimeGoal = HKQuantity(unit: .minute(), doubleValue: 30)
        activitySummary.appleStandHours = HKQuantity(unit: .count(), doubleValue: 9)
        activitySummary.appleStandHoursGoal = HKQuantity(unit: .count(), doubleValue: 10)

        activityRing.setActivitySummary(activitySummary, animated: true)
    }
}
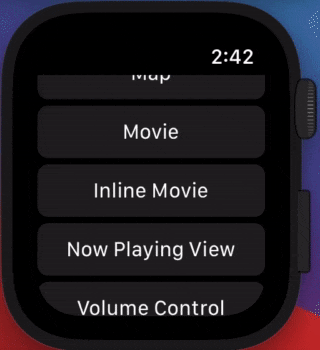
WKInterfaceMovie
動画表示するやつ(とくにイベントは取得できなさそう??)。再生ボタン押下で動画再生用のモーダルが表示される。
class WKInterfaceMovie : WKInterfaceObject
メソッド一覧。
func setMovieURL(_ URL: URL)
func setVideoGravity(_ videoGravity: WKVideoGravity)
func setLoops(_ loops: Bool)
func setPosterImage(_ posterImage: WKImage?)
簡易実装。
@IBOutlet private weak var movie: WKInterfaceMovie!

override func awake(withContext context: Any?) {
    let url = Bundle.main.url(forResource: "sample", withExtension: "mov")
    movie.setMovieURL(url!)
}
WKInterfaceInlineMovie
動画表示するやつ(とくにイベントは取得できなさそう??)。WKInterfaceMovie と違い再生用のモーダルは表示せずそのままの画面で動画を再生する。
class WKInterfaceInlineMovie : WKInterfaceObject
メソッド一覧。
func setMovieURL(_ URL: URL)
func setVideoGravity(_ videoGravity: WKVideoGravity)
func setLoops(_ loops: Bool)
func setAutoplays(_ autoplays: Bool)
func setPosterImage(_ posterImage: WKImage?)

func play()
func playFromBeginning()
func pause()
簡易実装(再生ボタンがないので自分で用意して play を呼ぶ)。
@IBOutlet private weak var inlineMovie: WKInterfaceInlineMovie!

override func awake(withContext context: Any?) {
    let url = Bundle.main.url(forResource: "sample", withExtension: "mov")
    inlineMovie.setMovieURL(url!)
    inlineMovie.play()
}
WKInterfaceNowPlayingView
再生中のオーディオを操作する View。
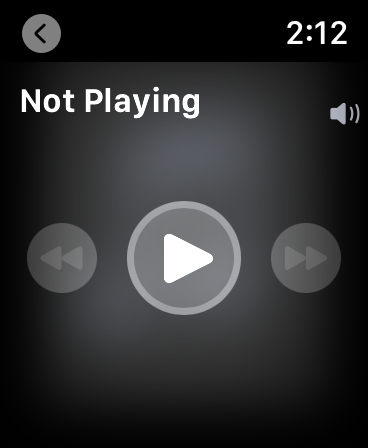
インターフェースは存在しない模様。Storyboard に置くだけでとくに制御はできない。
ドキュメント:Adding a Now Playing View
WKInterfaceVolumeControl
音量操作するやつ??ちょっと使い方わからない。。。

class WKInterfaceVolumeControl : WKInterfaceObject
ドキュメント:WKInterfaceVolumeControl
WKInterfaceMenu
watchOS 7 で deprecated。Force touch 時に表示されるメニュー。
watchOS 7 で Force touch が廃止された。
WKInterfaceMenuItem
watchOS 7 で deprecated。Force touch 時に表示されるメニューのアイテム。
watchOS 7 で Force touch が廃止された。
WKInterfaceHMCamera
なにかわかってないので割愛。。。
class WKInterfaceHMCamera : WKInterfaceObject
WKInterfaceSKScene
SpriteKit 用のやつ。割愛。。。
class WKInterfaceSKScene : WKInterfaceObject
WKInterfaceSCNScene
SceneKit 用のやつ。割愛。。。
class WKInterfaceSCNScene : WKInterfaceObject
WKInterfaceAuthorizationAppleIDButton
「Sign in with Apple」用のボタン。これは割愛。。。
class WKInterfaceAuthorizationAppleIDButton : WKInterfaceObject
ドキュメント:WKInterfaceAuthorizationAppleIDButton
WKInterfacePaymentButton
「Buy with Apple Pay」用のボタン。これは割愛。。。
class WKInterfacePaymentButton : WKInterfaceObject
ドキュメント:WKInterfacePaymentButton
ジェスチャ
ジェスチャは4つ。
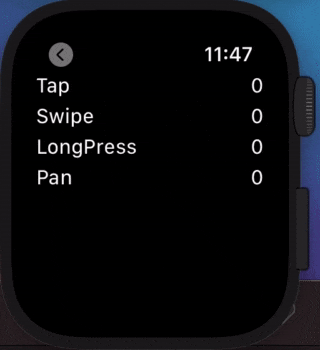
WKLongPressGestureRecognizer
ほぼ UILongPressGestureRecognizer。
class WKLongPressGestureRecognizer : WKGestureRecognizer
ドキュメント:WKLongPressGestureRecognizer
IBAction でイベントを取得する。
@IBAction func handleLongPress(_ gesture: WKLongPressGestureRecognizer) {}
WKPanGestureRecognizer
ほぼ UIPanGestureRecognizer。
class WKPanGestureRecognizer : WKGestureRecognizer
IBAction でイベントを取得する。
@IBAction func handlePan(_ gesture: WKPanGestureRecognizer) {}
WKSwipeGestureRecognizer
ほぼ UISwipeGestureRecognizer。
class WKSwipeGestureRecognizer : WKGestureRecognizer
ドキュメント:WKSwipeGestureRecognizer
IBAction でイベントを取得する。
@IBAction func handleSwipe(_ gesture: WKSwipeGestureRecognizer) {}
WKTapGestureRecognizer
ほぼ UIPanGestureRecognizer。
class WKTapGestureRecognizer : WKGestureRecognizer
IBAction でイベントを取得する。
@IBAction func handleTap(_ gesture: WKTapGestureRecognizer) {}
おわりに
これで watchOS 用アプリのレイアウトはだいたいできるはず!
SwiftUI 使えるなら使うべきな気もするけど気にしない![]()
ソースみてね![]() GitHub
GitHub