2021/7/3 追記
providerの上位版ライブラリであるRiverpodで書き換えたサンプルも作りました!
Null安全でも(一応)動くように修正してあります。
StateNotifierの宣言もファイル内に書くだけという簡単仕様になるなど、色々とメリットがあるため、今後はこちらで書いたほうが良さそうですね!
https://github.com/alpha2048/riverpod_test
こんにちは、Flutter民です![]()
概要
ここ最近でFlutterで熱いパッケージとして、以下のパッケージがあります
-
freezed
- いわゆるdataクラス的なものをサクッと作れるパッケージ
- json周りのコードを自動生成してくれるのでAPIの受け皿にも使えます
-
state_notifier
- 状態管理をやってくれるパッケージ
- 参照しやすいViewModel的なものを簡単に作れます
これらを使い、実際にGoogle Books APIを叩いて情報を表示するアプリを作りました。
(巷にはカウンターアプリのサンプルはたくさんあるのに、なんでAPI呼ぶようなサンプルはないんや・・と思いながら作りました。。
前提
各パッケージの細かい説明は省略しましたが、以下の記事が参考になります
- Flutter freezedパッケージいい感じかも
- state_notifier と freezed を使って、Flutterのカウンターアプリをつくるよ
- FlutterのStateNotifierパターンでカウントアップアプリ作ってみた
- Flutter state_notifierいい感じなので使ったほうが良いですよ
Sample
https://github.com/alpha2048/StateNotifierTest
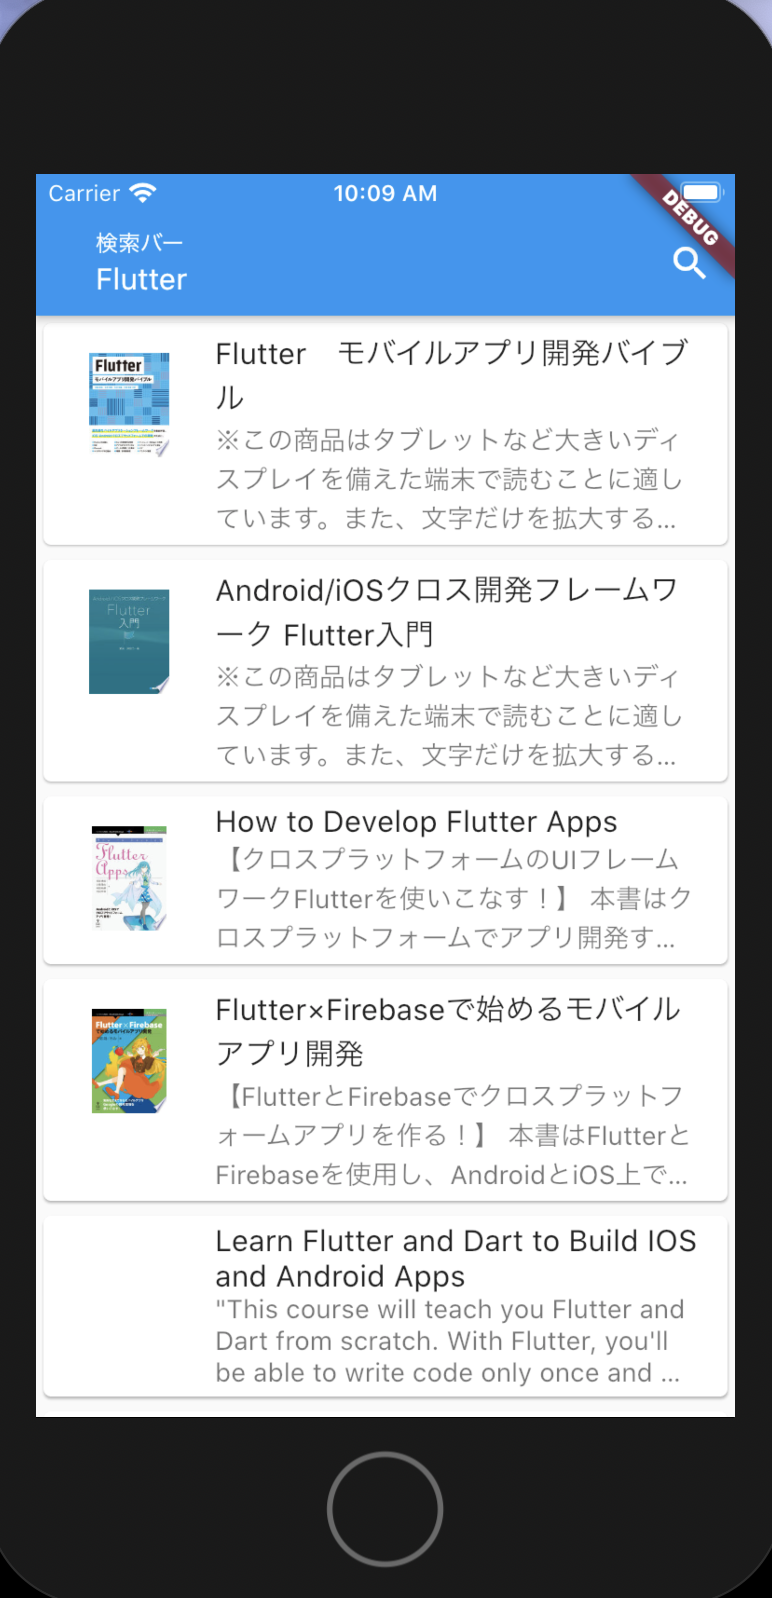
↓ iOSの表示例

解説
パッケージ類のインストール
なにはともあれパッケージ類のインストールです。
ここでflutter_state_notifierとproviderも一緒にインストールすることで、より快適にstate_notifierを使えるようになります。
API呼び出しを行うため、httpも入れます。
dependencies:
  flutter:
    sdk: flutter
  cupertino_icons: ^0.1.3

  state_notifier: ^0.5.0
  flutter_state_notifier: ^0.4.2
  freezed_annotation: ^0.11.0
  provider: ^4.3.1
  json_annotation: ^3.0.1
  http: ^0.12.2
  url_launcher: ^5.5.0

dev_dependencies:
  flutter_test:
    sdk: flutter
  json_serializable: ^3.3.0
  build_runner: ^1.10.0
  freezed: ^0.11.4
model
Response
freezedで作っていきます。
作り終わったら、flutter pub run build_runner build を叩いてbuildしましょう。
import 'package:flutter/foundation.dart';
import 'package:freezed_annotation/freezed_annotation.dart';
import 'package:state_notifier_test/model/GoogleBookResponse.dart';
part 'GoogleBooksResponse.freezed.dart';
part 'GoogleBooksResponse.g.dart';

@freezed
abstract class GoogleBooksResponse with _$GoogleBooksResponse {
  const factory GoogleBooksResponse({
    String kind,
    int totalItems,
    List<GoogleBookResponse> items
  }) = _GoogleBooksResponse;

  factory GoogleBooksResponse.fromJson(Map<String, dynamic> json) => _$GoogleBooksResponseFromJson(json);
}
API
httpで呼び出し、先程freezedで作ったResponseクラスでdecodeします。
import 'dart:convert' as convert;
import 'package:http/http.dart' as http;
import 'package:state_notifier_test/model/GoogleBooksResponse.dart';

Future<GoogleBooksResponse> getBooks(String keyword) async {

  var url = 'https://www.googleapis.com/books/v1/volumes?q=$keyword';
  print(url);

  final response = await http.get(url);
  if (response.statusCode == 200) {
    return GoogleBooksResponse.fromJson(convert.jsonDecode(response.body));
  } else {
    throw Exception('Failed to connect to webservice');
  }
}
ViewModel
State
StateNotifierが管理するStateです。
こちらも作り終わったらbuildしましょう。
実際にView側で使うレスポンスの他、状態を通知するEnumを定義しています。
import 'package:freezed_annotation/freezed_annotation.dart';
import 'package:state_notifier_test/model/GoogleBooksResponse.dart';

part 'MainViewModelData.freezed.dart';

enum MainViewModelState { normal, loading, error }

@freezed
abstract class MainViewModelData with _$MainViewModelData {
  const factory MainViewModelData({
    GoogleBooksResponse response,
    MainViewModelState viewModelState
  }) = _MainViewModelData;
}
StateNotifier
StateNotifierの実装です。
シンプルでわかりやすいですね。
import 'package:state_notifier/state_notifier.dart';
import 'package:state_notifier_test/model/GoogleBooksAPIService.dart';
import 'package:state_notifier_test/view/MainViewModelData.dart';

class MainViewModel extends StateNotifier<MainViewModelData> {
  MainViewModel(): super(MainViewModelData());

  void fetch(String keyword) {
    state = state.copyWith(viewModelState: MainViewModelState.loading);
    getBooks(keyword)
        .then((res) {
          state = state.copyWith(response: res, viewModelState: MainViewModelState.normal);
        }).catchError((_) {
          state = state.copyWith(response: null, viewModelState: MainViewModelState.error);
        });
  }
}
View
StateNotifier生成
ViewModelを使うWidgetの親側のどこかで、StateNotifierを生成します。
いろんなWidgetで参照したい場合は、なるべく上層側で定義してあげましょう。
class MyApp extends StatelessWidget {
  // This widget is the root of your application.
  @override
  Widget build(BuildContext context) {
    return MaterialApp(
      title: 'Google Book State Notifier Sample',
      theme: ThemeData(
        primarySwatch: Colors.blue,
        visualDensity: VisualDensity.adaptivePlatformDensity,
      ),
      home: StateNotifierProvider<MainViewModel, MainViewModelData>(
        create: (_) => MainViewModel(),
        child: MyHomePage(title: 'Google Book State Notifier Sample'),
      ),
    );
  }
}
StateNotifierのStateを読む
context.select<Data, T>でデータを読み出します。
selectを使うと、データに変化があった場合に自動でrebuildしてくれます。
final response = context.select<MainViewModelData, GoogleBooksResponse>((data) => data.response);
final state = context.select<MainViewModelData, MainViewModelState>((data) => data.viewModelState);
final List<GoogleBookResponse> bookList = response != null ? response.items : [];
あとは読みだしたデータを参考にViewを作っていくだけです!
おわりに
FlutterはBLoCパターンなどアーキテクチャ周りがやや難しいな、という印象がありましたが、state_notifierを使えばMVVMパターンをスッキリ書けるようになり、個人的にはとても嬉しい進化を遂げています。
今後はstate_notifierが一般的になっていくのでしょうか?