毎日投稿59日目
毎日記事を更新しているのですが、意外とネタは尽きないものです。
さて今回は、タイトルの通りStripeでクレジットカードの変更を行っていきます。
StripeのAPIについてはそこまで詳しく説明は致しません!
恐らくクレジットカードの情報を変更したいなと思った方は、Stripeの基礎的な部分は理解していると思うので。
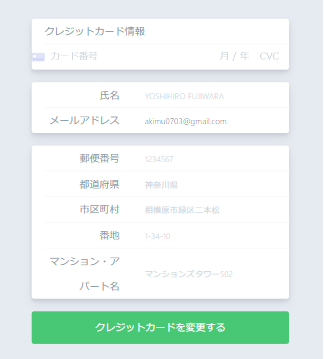
イメージとしてはこんな感じです。
また、HTMLやCSSの記述が多いのでここらへんはコピペしてください。
話はこの辺にして早速説明を見ていきましょう!
StripeElementsの設置#
Stripeでクレジットカードの情報を変更するには、カード番号、有効期限、セキュリティコードを入力してもらいトークンを作成します。
そのトークンを使ってクレジットカードの情報を変更します。
とりあえずStripeElementsの設置
<template>
   <div class="group">
      <label for="card-element"> クレジットカード情報 </label>
      <div id="card-element"></div>
   </div>
</template>

<script>
export default {
  data() {
    return {
      stripe: null,
      card: null,
      token: ''
    }
  },
  async mounted() {
    this.stripe = window.Stripe(process.env.VUE_APP_STRIPE_PUBLIC_KEY)
    const elements = this.stripe.elements()
    this.card = await elements.create('card', {
      hidePostalCode: true,
      style: {
        base: {
          iconColor: '#666EE8',
          color: '#31325F',
          lineHeight: '40px',
          fontWeight: 300,
          fontFamily: 'Helvetica Neue',
          fontSize: '15px',

          '::placeholder': {
            color: '#CFD7E0'
          }
        }
      }
    })
    this.card.mount('#card-element')
  },
}
</script>
これでクレジットカードを入力する要素が表示されると思います。
必要項目の入力#
次に、住所や名前を入力してもらうフォームを作成します。
ここに関しては先ほどの記述を一旦消してコピペしてください。
CSSの記述も多いので。
<template>
  <div class="creditcard-change">
    <div class="cell">
          <form>
            <div class="group">
              <label for="card-element"> クレジットカード情報 </label>
              <div id="card-element"></div>
            </div>
            <div class="group">
              <label>
                <span>氏名</span>
                <input
                  id="name"
                  name="name"
                  type="text"
                  class="field"
                  placeholder="YOSHIHIRO FUJIWARA"
                  autocomplete="name"
                />
              </label>
              <label>
                <span>メールアドレス</span>
                <input
                  id="email"
                  v-model="email"
                  type="email"
                  name="email"
                  class="field"
                  placeholder="zaemonia@example.com"
                  autocomplete="email"
                />
              </label>
            </div>
            <div class="group">
              <label>
                <span>郵便番号</span>
                <input
                  id="postal-code"
                  name="address_line1"
                  type="text"
                  class="field"
                  placeholder="1234567"
                  maxlength="7"
                  autocomplete="postal-code"
                />
              </label>
              <label>
                <span>都道府県</span>
                <input
                  id="address-state"
                  name="address_state"
                  type="text"
                  class="field"
                  placeholder="神奈川県"
                  autocomplete="address-level1"
                />
              </label>
              <label>
                <span>市区町村</span>
                <input
                  id="address-city"
                  name="address_city"
                  type="text"
                  class="field"
                  placeholder="相模原市緑区二本松"
                  autocomplete="address-level2"
                />
              </label>
              <label>
                <span>番地</span>
                <input
                  id="address-line1"
                  name="address-line1"
                  type="text"
                  class="field"
                  placeholder="1-34-10"
                  autocomplete="address-line1"
                />
              </label>
              <label>
                <span>マンション・アパート名</span>
                <input
                  id="address-line2"
                  name="address-line2"
                  type="text"
                  class="field"
                  placeholder="マンションズタワー502"
                  autocomplete="address-line2"
                />
              </label>
            </div>
            <b-button
              class="recaptcha-button-v3"
              type="is-success"
              disabled="true"
              style="width: 100%; padding: 25px 0"
              @click="submit"
            >
              クレジットカードを変更する
            </b-button>
          </form>
        </div>
  </div>
</template>

<script>
export default {
  data() {
    return {
      stripe: null,
      card: null,
      token: ''
    }
  },
  async mounted() {
    this.stripe = window.Stripe(process.env.VUE_APP_STRIPE_PUBLIC_KEY)
    const elements = this.stripe.elements()
    this.card = await elements.create('card', {
      hidePostalCode: true,
      style: {
        base: {
          iconColor: '#666EE8',
          color: '#31325F',
          lineHeight: '40px',
          fontWeight: 300,
          fontFamily: 'Helvetica Neue',
          fontSize: '15px',

          '::placeholder': {
            color: '#CFD7E0'
          }
        }
      }
    })
    this.card.mount('#card-element')
  },
  methods: {
    submit() {
      const options = {
        name: document.getElementById('name').value,
        email: document.getElementById('email').value,
        address_line1: document.getElementById('address-line1').value,
        address_line2: document.getElementById('address-line2').value,
        address_city: document.getElementById('address-city').value,
        address_state: document.getElementById('address-state').value,
        address_zip: document.getElementById('postal-code').value,
        address_country: 'JP'
      }
      Object.keys(options).forEach((value) => {
        if (value === '') {
          alert('未入力の項目があります')
        }
      })
      this.stripe.createToken(this.card, options).then((result) => {
        // エラーの場合
        if (result.error) {
          alert(result.error.message)
          // 成功の場合
        } else {
          this.token = result.token.id
        }
      })
    },
  }
}
</script>

<style scoped>
.creditcard-change {
  padding: 120px 0;
  display: flex;
  align-items: center;
  justify-content: center;
  flex-wrap: wrap;
  min-height: 100%;
  width: 550px;
  margin: 0 auto;
}
.creditcard-change > div {
  flex: 0 0 100%;
}
/* クレジットカード入力欄 */
.cell {
  margin-top: 30px;
  background: #e6ebf1;
  padding: 30px;
}
.group {
  background: white;
  box-shadow: 0 7px 14px 0 rgba(49, 49, 93, 0.1), 0 3px 6px 0 rgba(0, 0, 0, 0.08);
  border-radius: 4px;
  margin-bottom: 20px;
}

.cell label {
  position: relative;
  color: #8898aa;
  font-weight: 300;
  height: 100%;
  line-height: 40px;
  margin-left: 20px;
  display: flex;
  flex-direction: row;
}

.group label:not(:last-child) {
  border-bottom: 1px solid #f0f5fa;
}

label > span {
  width: 120px;
  text-align: right;
  margin-right: 30px;
}

.field {
  background: transparent;
  font-weight: 300;
  border: 0;
  color: #31325f;
  outline: none;
  flex: 1;
  padding-right: 10px;
  padding-left: 10px;
  cursor: text;
}

.field::-webkit-input-placeholder {
  color: #cfd7e0;
}

.field::-moz-placeholder {
  color: #cfd7e0;
}

.outcome {
  float: left;
  width: 100%;
  padding-top: 8px;
  min-height: 24px;
  text-align: center;
}
</style>
b-button初めて気になった方はこちらの記事をご覧ください。
初心者必見!サイト制作は楽してなんぼ。CSSフレームワークBuefyの紹介!!
Buefyはほんとにおススメなのでぜひ使ってください!
クレジットの更新#
submitで取得したresult.token.idをバックエンドに送ってください。
適当にaxiosとかで。
そしたら、Laravelのコントローラーでクレジットカードを更新します。
        public function creditUpdate(Request $request) {
        // ユーザーのクレジットカード情報の更新
        require_once(__DIR__.'/../../../vendor/autoload.php');

        $secret_key = config('app.STRIPE_SECRET_KEY');

        $stripe = new \Stripe\StripeClient($secret_key);

        // カスタマーID、トークンの取得
        $customer_id = $request->id;
        $token = $request->token;

        $customer = $stripe->customers->retrieve(
            $customer_id,
            []
        );

        // クレジットを登録していない場合、処理を終了
        if(!$customer) {
            return response()->json([
                'message' => 'The customer is undefiend',
            ], 400);
        }

        // ソースの作成
        $new_card = $stripe->customers->createSource(
            $customer_id,
            ['source' => $token]
        );
        $customer->default_source = $new_card->id;
        $customer->save();

        return response()->json([
            'data' => $new_card,
            'message' => 'Updating customer`s paymentmethods is success',
        ], 200);
    }
$stripe->customers->createSourceに先ほど取得したトークンをソースとして登録することでクレジットカードの情報を更新することができます。
save()忘れないように!!
実際に変更をされているかはStripeの画面から確認して見て下さい!
いかがだったでしょうか??
記述が多いので嫌かもしれないですが、本当にコピペしてもらって結構です。
むしろコピペしてください!
また、クレジットカードの情報を取得したい場合はStripeの公式ドキュメントを参照してください!
以上、「VueとLaravelでStripeElementsを使ってクレジットカード情報を更新する方法」でした!
良ければ、LGTM、コメントお願いします。
また、何か間違っていることがあればご指摘頂けると幸いです。
他にも初心者さん向けに記事を投稿しているので、時間があれば他の記事も見て下さい!!
Thank you for reading