これはなに?
外形監視のUptime Robotの設定をTerraformを使ってやってみた、というお話しです。
今回は、terraform-provider-uptimerobot を使って試しています!
やりたいこと
前回書いた記事 で、Redmineのテーマを作成したのですが、Heroku上にそのデモ環境を立ててみることにしました。
今回は、このデモ環境に外形監視を組み込みたい、というものです。
なぜやるの?
30分アクセスがないとスリープしてしまう
デモ環境はHerokuの無償プランを使っています。
Herokuのアプリケーションは無償プランだと30分アクセスがない(とか動きがない)と、スリープしてしまいます。
Applications that use the free dyno type will sleep after 30 minutes of inactivity. Scaling to multiple web dynos, or a different dyno type, will avoid this.
実際はDockerのイメージからコンテナを立ち上げているのですが、このコンテナがスリープしてしまいます。
30分以上経過した後にアクセスすると、前のコンテナでなく、あたらしくイメージをもとにコンテナが起動するので、初回の起動も遅くなります。
また、アプリケーションにアップした画像やデータは外部に永続化しておかないと、消えてしまいます。
対応はアプリケーションの数を増やす(スケールさせる)か、プランを変えるといった方法や、アドオンを使ったりする方法があります。
定期アクセスのついでに監視もしよう
今回は、「なにかしら定期的にアクセスを発生させればいいよね?」と思い立ち、「ついでに外形監視までやってみるといいよね!」ということで、Uptime Robotを設定することにしました。
(監視まで行わず、cronで外部から適度にアクセスを設定というのでも、スリープ回避はできます)
まずはUptime Robotのアカウント作成
Uptime Robotはシンプルな外形監視のサービスです。
無料プランでも基本的なものは利用できます。
Qiitaの記事にもいくつかHeroku & Uptime Robotの組み合わせの記事がいくつかあるので、Web UIからの設定の場合はご参考に。
-
HEROKU_URL が効かず Hubot がアイドル状態になる問題の対策(
@uasiさま) -
Herokuでアイドルさせないようにした際のメモ (
@udon242さま)
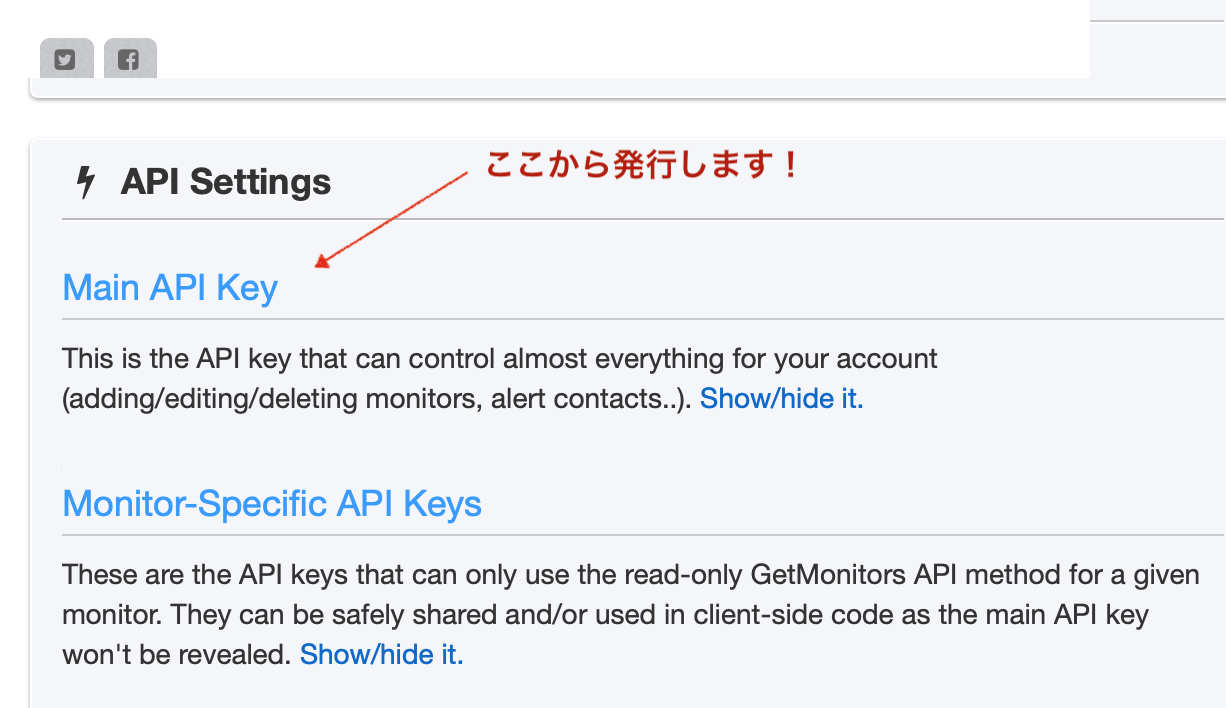
APIキーを取得
設定はWeb UIではなくTerraformを使って試すため、まずはMAIN APIキーを取得します。
Terraformのプロバイダ用意
terraform-provider-uptimerobot を利用する
まずは terraform-provider-uptimerobot のREADMEの通りに、設定ファイルを追加してみます。
設定ファイル
こんな感じになります。
provider "uptimerobot" {
  api_key = "${var.UPTIMEROBOT_API_KEY}"
}

data "uptimerobot_account" "account" {}

data "uptimerobot_alert_contact" "default_alert_contact" {
  friendly_name = "${data.uptimerobot_account.account.email}"
}

variable "UPTIMEROBOT_API_KEY" {
  type = string
  description = "API key for Uptime Robot."
}

variable "SLACK_WEBHOOK_URL" {
  type = string
  description = "Webhook url for slack"
}

resource "uptimerobot_alert_contact" "slack" {
  friendly_name = "Slack #精神と時の部屋"
  type          = "slack"
  value         = "${var.SLACK_WEBHOOK_URL}"
}

resource "uptimerobot_monitor" "main" {
  friendly_name = "Kodomo Redmine Midori Monitor"
  type          = "http"
  url           = "https://kodomo-redmine-midori.herokuapp.com"
  # pro allows 60 seconds / free plan 5min
  interval      = 300

  alert_contact {
    id = "${uptimerobot_alert_contact.slack.id}"
    # threshold  = 0  # pro only
    # recurrence = 0  # pro only
  }

  alert_contact {
    id = "${data.uptimerobot_alert_contact.default_alert_contact.id}"
  }
}

# Status Pageも作ってみよう!
resource "uptimerobot_status_page" "main" {
  friendly_name  = "Kodomo Redmine Midori Status Page"
  sort           = "down-up-paused"
  monitors       = ["${uptimerobot_monitor.main.id}"]
}
実行してみると....?
SlackのWebhook URLとUptime RobotのAPI Keyは、環境変数で渡すことにします。
export TF_VAR_SLACK_WEBHOOK_URL='https://hooks.slack.com/services/xxxxx'
export TF_VAR_UPTIMEROBOT_API_KEY='xxxxxxxxxxxxx'

# とりあえず通知先のslack設定を追加してみます
terraform plan -target=uptimerobot_alert_contact.slack
結果、プラグインがないとエラーが出ました!
Error: Could not satisfy plugin requirements


Plugin reinitialization required. Please run "terraform init".

Plugins are external binaries that Terraform uses to access and manipulate
resources. The configuration provided requires plugins which can't be located,
don't satisfy the version constraints, or are otherwise incompatible.

Terraform automatically discovers provider requirements from your
configuration, including providers used in child modules. To see the
requirements and constraints from each module, run "terraform providers".


Error: provider.uptimerobot: no suitable version installed
  version requirements: "(any version)"
  versions installed: none
terraform-provider-uptimerobot を追加する
このプラグインはまだ公式サイトにエントリされていないため、自分でローカル環境に配置しないといけないようです。
やってみて初めて気がついたのですが、
- GitHubのリポジトリからソースコードをとってくるのではダメ
- 実際はGo言語なのでコンパイルしてOSに合ったバイナリをプラグインとして組み込まないといけない
というあたりでした。
配置手順: リリースのページへ
まずは、以下のリリースのページへ。
バイナリが添付されているので、私の場合は terraform-provider-uptimerobot_0.4.3_darwin_amd64.tar.gz をダウンロードしました。
- terraform-provider-uptimerobot_0.4.3_darwin_amd64.tar.gz
を展開 - Terraformの作業用フォルダに terraform.d というディレクトリを作成
- plugins 以下に展開したファイルを配置
tree terraform.d/
terraform.d/
└── plugins
    └── darwin_amd64
        ├── CHANGELOG.md
        ├── LICENSE
        ├── README.md
        └── terraform-provider-uptimerobot

2 directories, 4 files

# バイナリです
file terraform-provider-uptimerobot
terraform-provider-uptimerobot: Mach-O 64-bit executable x86_64

# 動かしてみると、「これはプラグインだよ!」というメッセージが
./terraform-provider-uptimerobot
This binary is a plugin. These are not meant to be executed directly.
Please execute the program that
配置した上で、再度 terraform planしてみます。
こんどはうまくいったようです!!
terraform plan -target=uptimerobot_alert_contact.slack
Refreshing Terraform state in-memory prior to plan...
The refreshed state will be used to calculate this plan, but will not be
persisted to local or remote state storage.


------------------------------------------------------------------------

An execution plan has been generated and is shown below.
Resource actions are indicated with the following symbols:
  + create

Terraform will perform the following actions:

  # uptimerobot_alert_contact.slack will be created
  + resource "uptimerobot_alert_contact" "slack" {
      + friendly_name = "Slack #精神と時の部屋"
      + id            = (known after apply)
      + status        = (known after apply)
      + type          = "slack"
      + value         = "https://hooks.slack.com/services/xxxxxxxxx"
    }

Plan: 1 to add, 0 to change, 0 to destroy.

------------------------------------------------------------------------

Note: You didn't specify an "-out" parameter to save this plan, so Terraform
can't guarantee that exactly these actions will be performed if
"terraform apply" is subsequently run.

Releasing state lock. This may take a few moments...
順番に適用してみる
うまく動きそうなので、順番に適用してみます。
ターゲットのリソース1つ1つに対し実行していきます。
- uptimerobot_alert_contact.slack (Slackの通知設定追加)
- uptimerobot_monitor.main (Herokuのアプリケーションの監視追加)
- uptimerobot_status_page.main (StatusPageの追加)
terraform apply -target=uptimerobot_alert_contact.slack
terraform apply -target=uptimerobot_monitor.main
terraform apply -target=uptimerobot_status_page.main

....

# うまくいった模様
uptimerobot_status_page.main: Creating...
uptimerobot_status_page.main: Creation complete after 1s [id=180831]

Apply complete! Resources: 1 added, 0 changed, 0 destroyed.
できたか確認してみます
Uptime Robot側に出来上がっているか確認してみます。
Slack通知設定
表示では文字化けしていますが、出来ています!

監視設定
こちらも追加されました!

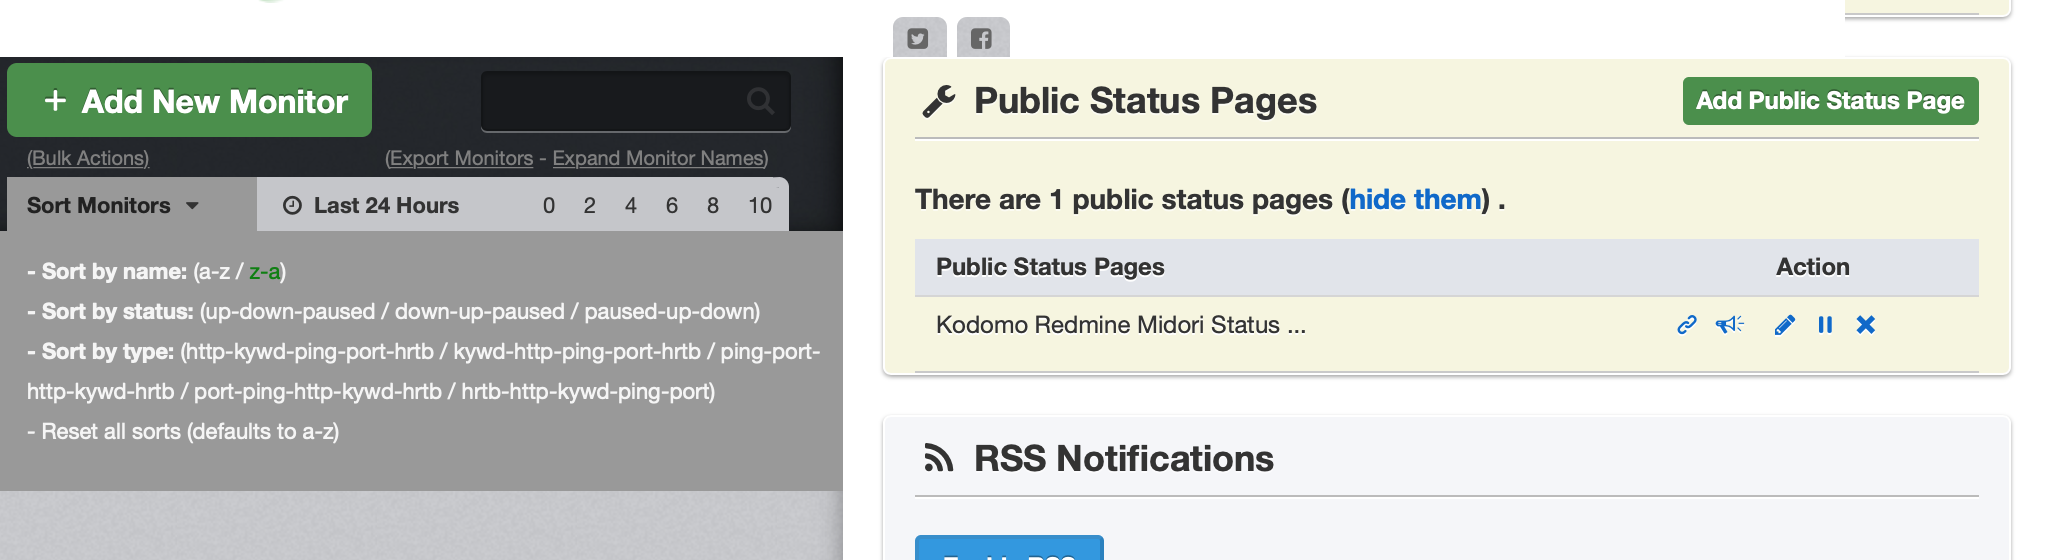
Status Page
同じく出来た模様!
Heroku側を確認
Heroku側で、対象のアプリケーションにアクセスがあるか確認してみます。
heroku logs -t  -a kodomo-redmine-midori

.... [中略] ....

2020-05-27T04:29:08.396035+00:00 heroku[router]: at=info method=HEAD path="/" host=kodomo-redmine-midori.herokuapp.com request_id=xxxxx fwd="xxxxx" dyno=web.1 connect=0ms service=60ms status=200 bytes=865 protocol=https
2020-05-27T04:29:37.309943+00:00 heroku[router]: at=info method=HEAD path="/" host=kodomo-redmine-midori.herokuapp.com request_id=xxxxx fwd="xxxxx"  dyno=web.1 connect=1ms service=32ms status=200 bytes=865 protocol=https
Uptime Robotのフリープランでは、HEADメソッドを使ってのアクセスになります。
ちゃんとアクセスが来ているのがわかります。
Herokuのアプリをダウンさせてみる
監視が正しく動いているか、通知が来るかの確認のため、Herokuのアプリをダウンさせてみます。
heroku maintenance:on -a kodomo-redmine-midori
Enabling maintenance mode for ⬢ kodomo-redmine-midori... done
通知が来たよ!
ダウン(メンテナンスモード)に切り替えると、Herokuのアプリケーションは503を返します。
しばらくして、Slackに通知が届きました!

画面はどうなった?
Slackの通知も届いたので、画面を確認するとDownになっています。
今度はメンテナンスモードをoffにしてアプリケーションを再開します。
heroku maintenance:on -a kodomo-redmine-midori
Enabling maintenance mode for ⬢ kodomo-redmine-midori... done
しばらくすると、画面も Down -> Upが表示されました!

再開の場合も、設定次第ですがSlackで通知してくれます。
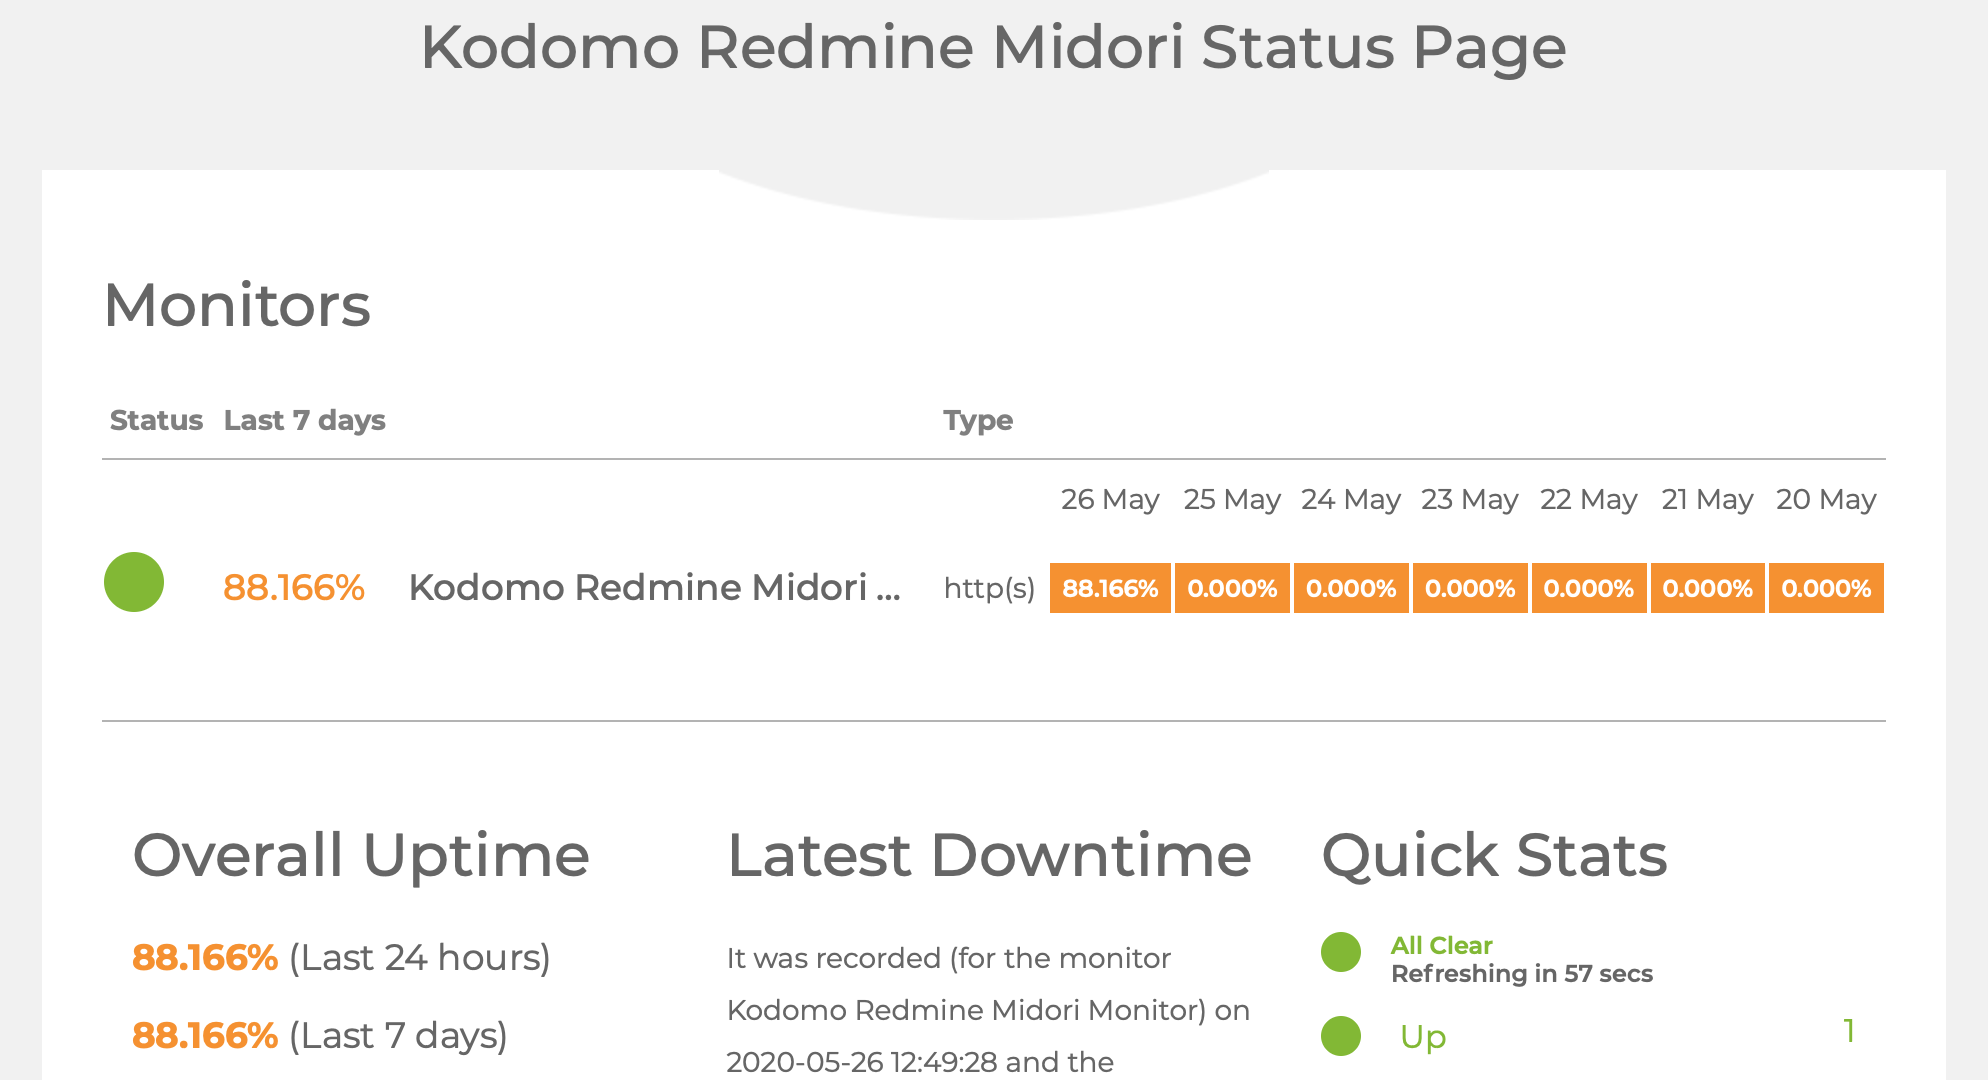
Status Pageを表示してみる
パブリックアクセスできるStatus Pageはこんな感じです。
うまくデータも取れている模様。
ありがたいですね!
結果的に
定期的なアクセスが発生するおかげで、スリープすることもなく稼働してくれているようで、なによりです!
ソースを眺める
動くのは確認できましたが、どうやって作っているのか、どんなAPIを叩いているのかが気になります。
まずはこの辺を眺めます。
Uptime RobotのAPIはv2を使っているようです。
- https://github.com/louy/terraform-provider-uptimerobot/blob/cdb6af763b95e39a82c1aa2830f807187d4fb900/uptimerobot/api/client.go#L27
- https://uptimerobot.com/api
ほとんど機能としてカバーしていて、メンテナンスウィンドウの設定だけはカバーしていないようですが、そこまで重要じゃないみたいなのと、OSS参加のビギナー向けに取り組む良い課題 (good first issue) だとして、プルリクエストを受けつけているようです!
次やりたいこと
「やってみた」だけの記事ではありますが、結果的にバイナリの配置の件も含めて、新たに覚えることも出てきました。
リポジトリを作ってくださった作者の方の応援とか、できればissueへのお手伝いなどを通して、もう少し学んで行けたらなと思います!