nodemailerをNextJS上で実装する際に少し詰まったため記事にしました。
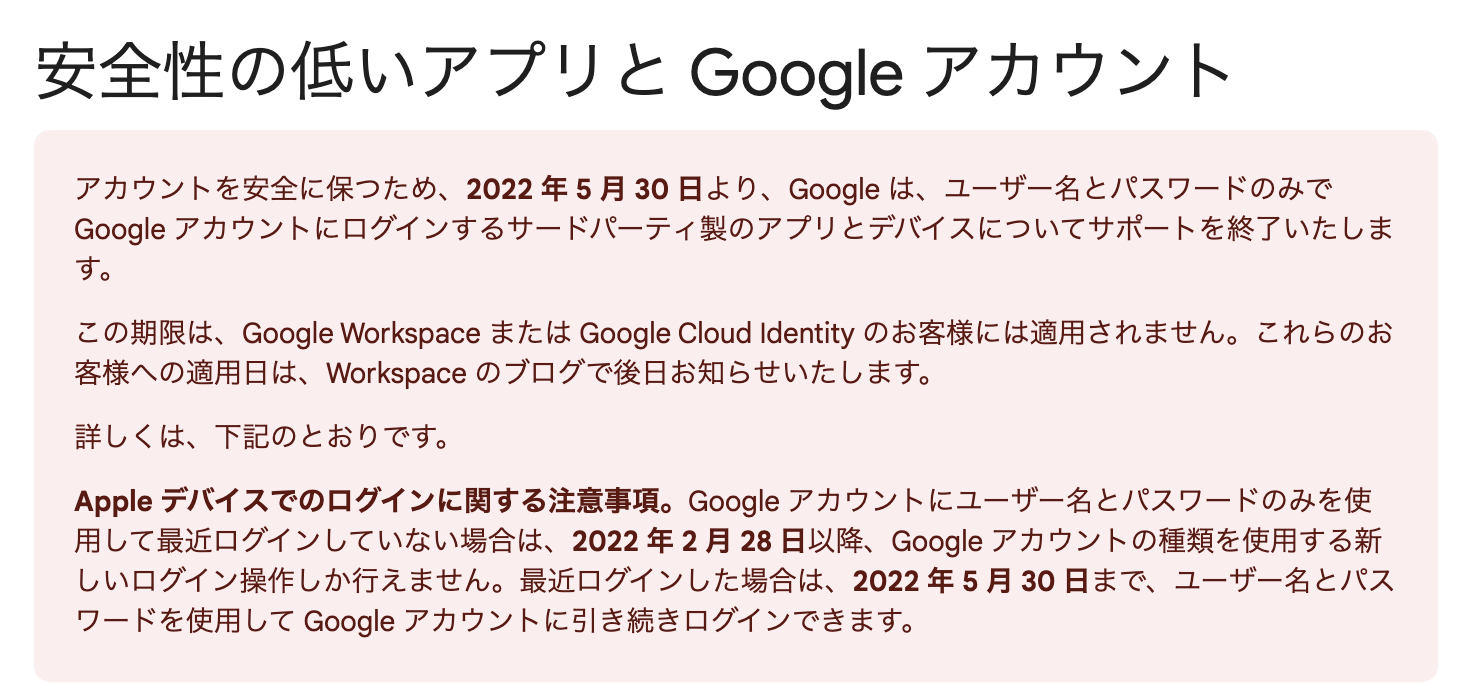
gmailをAPI叩いて使うために必要な"安全性の低いアプリ"の設定でしたが2022年5月から"安全性の低いアプリ"の設定ができなくなるため、他の設定が必要でしたが必要な設定がわからなくて少し詰まりました。
この記事を書いているのは4/20ですが自分のGoogleアカウント管理画面からはすでに設定する項目がなくなっていました。
ソース:https://support.google.com/accounts/answer/6010255?hl=ja
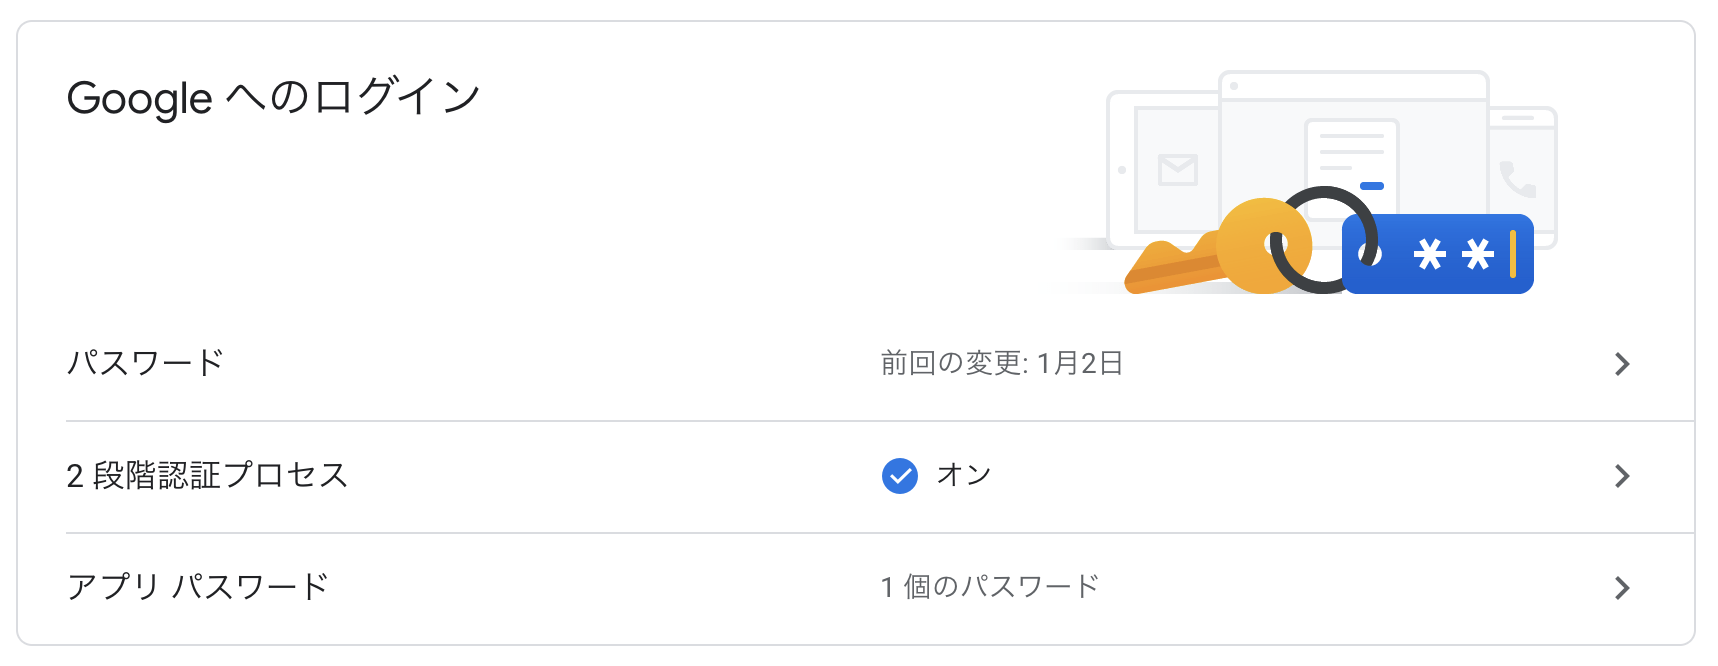
結論からいうと "Googleアカウント管理画面HOME > セキュリティ > Googleへのログイン > アプリパスワード" で
設定して取得したシークレットキーを利用すれば使うことができました。
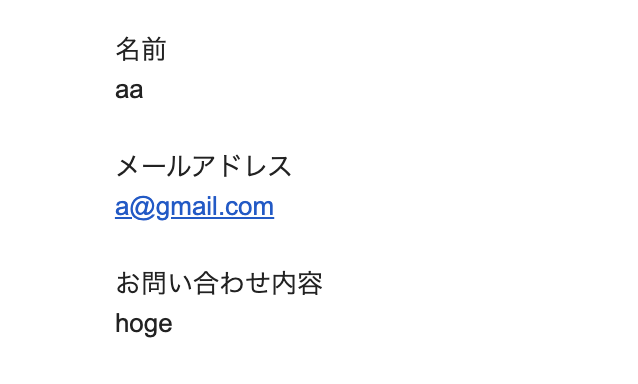
成果物
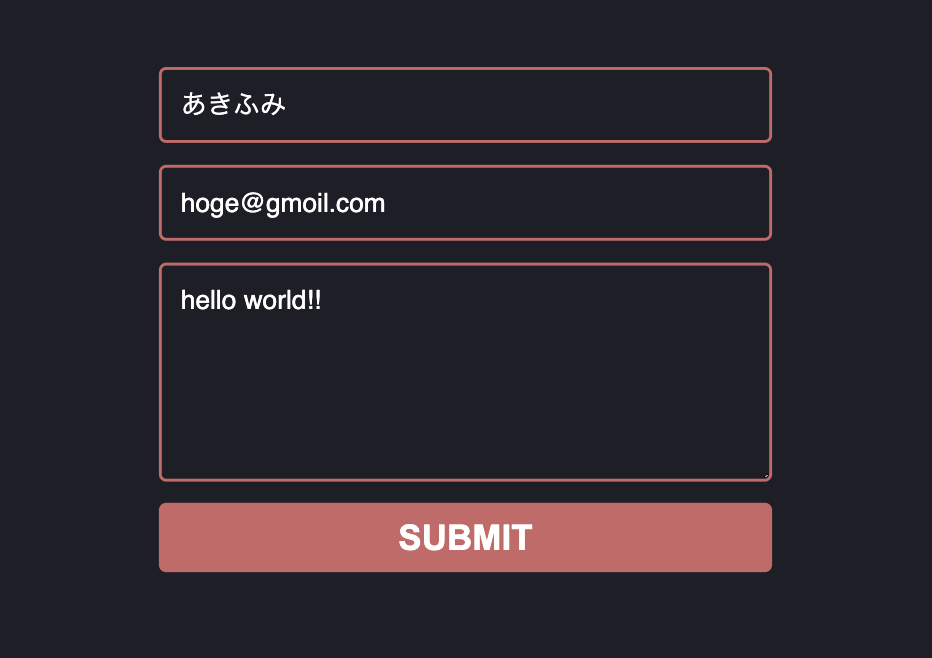
最低限の項目だけを備えた簡易的なお問合せフォームです。
環境用意
NextJSの準備
npx create-next-app gmail-app --typescript
環境変数の準備
NEXT_PUBLIC_MAIL_USER=hoge@gmail.com
NEXT_PUBLIC_MAIL_PASS=hogehoge
セキュリティページへ飛びます。
https://myaccount.google.com/security?hl=ja
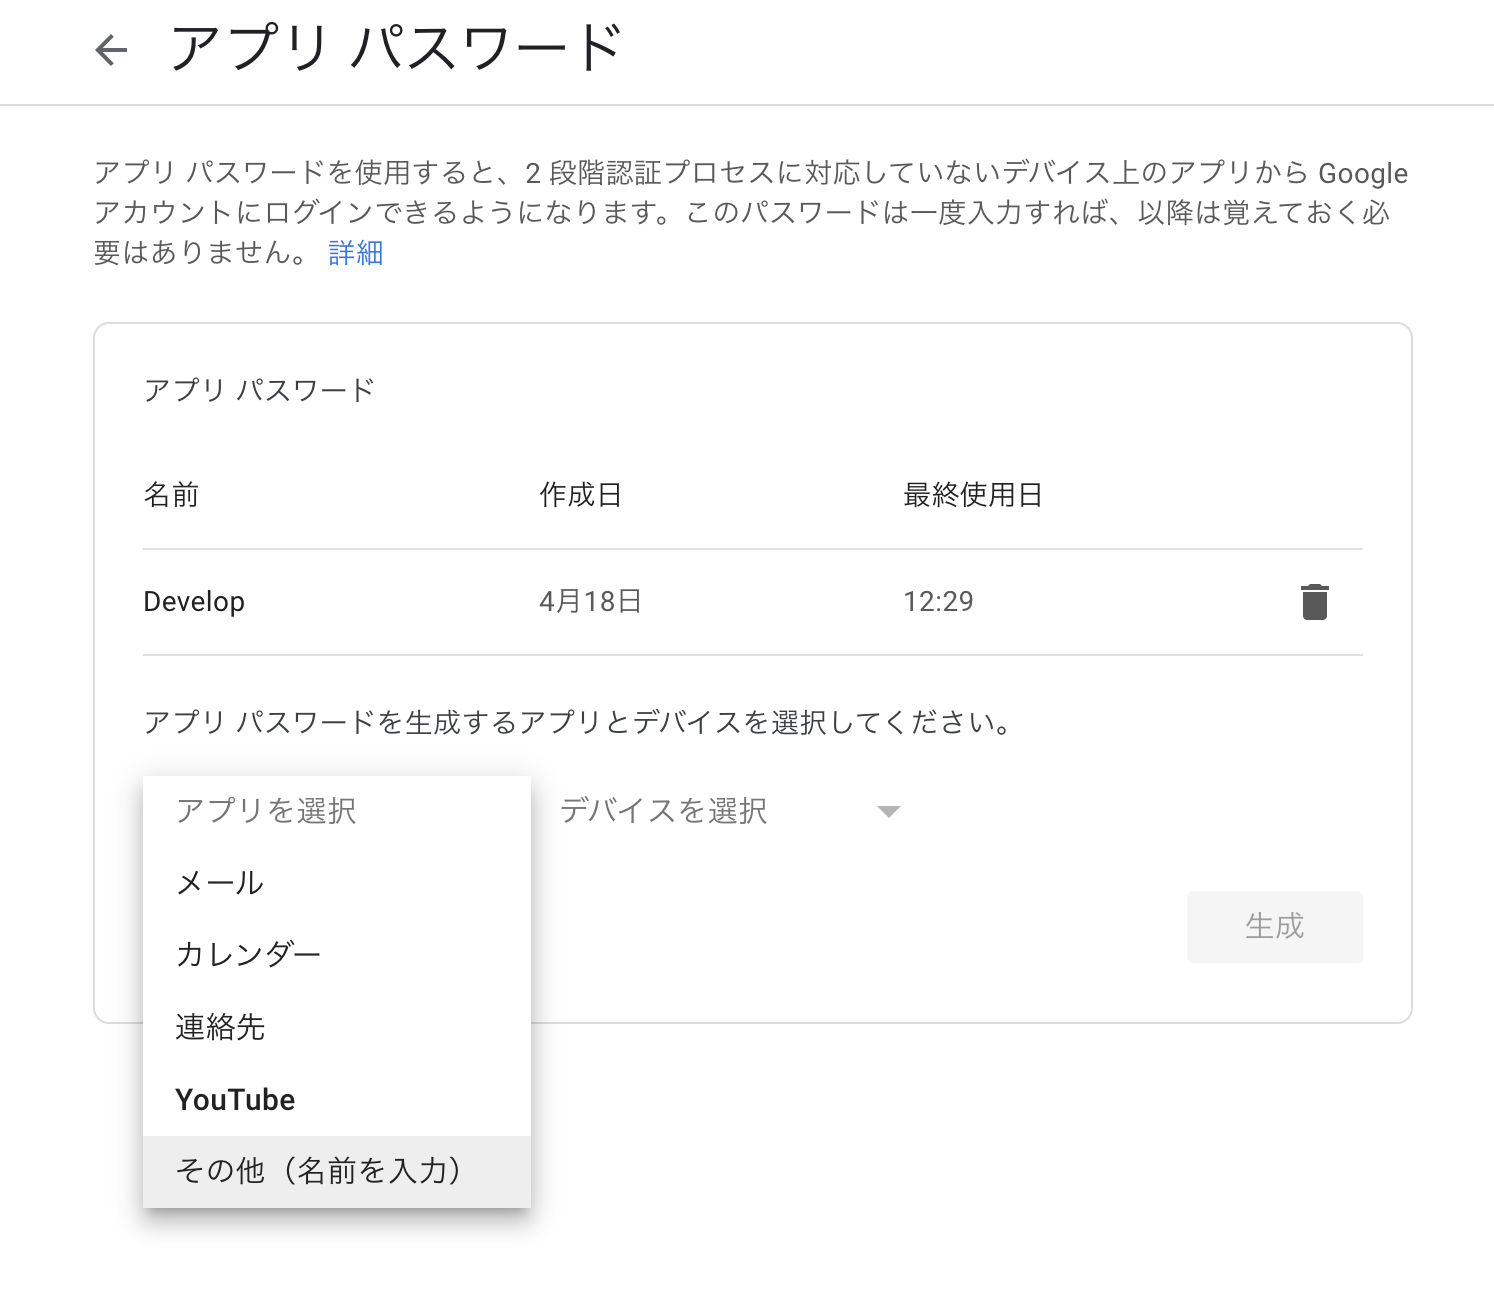
その他(名前を入力)を選んで後は適当に設定したら"生成"をクリックするとシークレットキーが4文字区切りで出てくるのでそのままコピペして "NEXT_PUBLIC_MAIL_PASS=" に設定します
ライブラリの準備
npm i nodemailer
npm i -D @types/nodemailer
cssの追加
適当にスタイルを拾ってきて当てます
14 CSS Contact Forms よりZach Saucier氏のスタイルを利用させていただきました。
globalCSSに適当に追加しました。
html,
body {
  padding: 0;
  margin: 0;
  font-family: -apple-system, BlinkMacSystemFont, Segoe UI, Roboto, Oxygen,
    Ubuntu, Cantarell, Fira Sans, Droid Sans, Helvetica Neue, sans-serif;
}

a {
  color: inherit;
  text-decoration: none;
}

* {
  box-sizing: border-box;
}

@import url(https://fonts.googleapis.com/css?family=Montserrat:400,700);

.feedback-input {
  color: white;
  font-family: Helvetica, Arial, sans-serif;
  font-weight: 500;
  font-size: 18px;
  border-radius: 5px;
  line-height: 22px;
  background-color: transparent;
  border: 2px solid #cc6666;
  transition: all 0.3s;
  padding: 13px;
  margin-bottom: 15px;
  width: 100%;
  box-sizing: border-box;
  outline: 0;
}

.feedback-input:focus {
  border: 2px solid #cc4949;
}

body {
  background: rgb(30, 30, 40);
}
form {
  max-width: 420px;
  margin: 50px auto;
}
textarea {
  height: 150px;
  line-height: 150%;
  resize: vertical;
}

[type='submit'] {
  font-family: 'Montserrat', Arial, Helvetica, sans-serif;
  width: 100%;
  background: #cc6666;
  border-radius: 5px;
  border: 0;
  cursor: pointer;
  color: white;
  font-size: 24px;
  padding-top: 10px;
  padding-bottom: 10px;
  transition: all 0.3s;
  margin-top: -4px;
  font-weight: 700;
}
[type='submit']:hover {
  background: #cc4949;
}
View側の準備
import { useState } from 'react';
import type { NextPage } from 'next';

const Home: NextPage = () => {
  const [form, setForm] = useState({
    name: '',
    email: '',
    msg: '',
  });

  const handleSubmit = (e: React.FormEvent<HTMLInputElement>) => {
    e.preventDefault();

    fetch('/api/mail', {
      method: 'POST',
      body: JSON.stringify({
        name: form.name,
        email: form.email,
        msg: form.msg,
      }),
    })
      .then((res) => {
        console.log('Response received');
        if (res.status === 200) {
          console.log('Response succeeded!');
        } else {
          console.log(`Error: Status Code ${res.status}`);
        }
      })
      .catch((e) => {
        console.log(`Error: ${e}`);
      });
  };

  return (
    <form>
      <input
        onChange={(e) => {
          const val = e.currentTarget.value;
          setForm((props) => ({
            ...props,
            name: val !== null ? val : '',
          }));
        }}
        value={form.name}
        name="name"
        type="text"
        className="feedback-input"
        placeholder="Name"
      />
      <input
        onChange={(e) => {
          const val = e.currentTarget.value;
          setForm((props) => ({
            ...props,
            email: val !== null ? val : '',
          }));
        }}
        name="email"
        type="text"
        className="feedback-input"
        placeholder="Email"
      />
      <textarea
        onChange={(e) => {
          const val = e.currentTarget.value;
          setForm((props) => ({
            ...props,
            msg: val !== null ? val : '',
          }));
        }}
        name="text"
        className="feedback-input"
        placeholder="Comment"
      ></textarea>
      <input
        onClick={async (e) => {
          await handleSubmit(e);
        }}
        type="submit"
        value="SUBMIT"
      />
    </form>
  );
};

export default Home;
API側の準備
import { createTransport } from 'nodemailer';
import type { NextApiRequest, NextApiResponse } from 'next';

export default async (req: NextApiRequest, res: NextApiResponse) => {
  const transporter = createTransport({
    port: 465,
    host: 'smtp.gmail.com',
    secure: true,
    auth: {
      user: process.env.NEXT_PUBLIC_MAIL_USER,
      pass: process.env.NEXT_PUBLIC_MAIL_PASS,
    },
  });

  const data = JSON.parse(req.body);
  await transporter.sendMail({
    from: process.env.NEXT_PUBLIC_MAIL_USER,
    to: data.email,
    subject: '以下の内容でお問い合わせを受け付けました',
    text: `
    名前
    ${data.name}

    メールアドレス
    ${data.email}

    お問い合わせ内容
    ${data.msg}
    `,
  });

  res.status(200).json({
    success: true,
  });
};
完成
あとは npm run dev で立ち上げて適当に項目を入れてSubmitすればメールの送信履歴ができているはず。
Statusコードで500エラーが生じた場合は何かしらの設定を間違えている可能性があります。
Googleセキュリティページで2段階認証を設定してみるとか環境変数に誤りがないかなど色々と探ってみてください。
備考
今回はReact初心者の方も想定しているので使っていませんが自分が参考にした記事ではuseMailなどの名前でhookを作成している方もいました。
関数を切り分けた方が使い回しはしやすくなるかと。