Herokuでslackbot(python)を動かしてみました。
Windows Subsystem for Linux(Ubuntu)で開発しています。
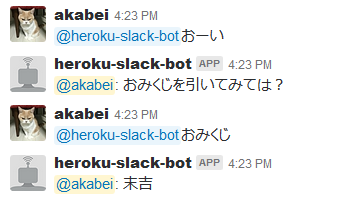
おみくじメッセージを送るとおみくじが引けるBOTを作ってみました。

環境
Windows 10 Fall Creators Update(バージョン 1709)
Ubuntu 16.04.3 LTS
Python 3.5.2
heroku-cli/6.15.18
slackbot 0.5.1 → https://github.com/lins05/slackbot
Herokuアカウント作成
Herokuアカウントを作成してください。
https://www.heroku.com/
Windows Subsystem for Linux(Ubuntu)インストール
下記サイトを参考にWindows Subsystem for Linux(Ubuntu)をインストール
Windows10にUbuntuをインストールする方法(Fall Creators Update版)
https://ygkb.jp/7291
Python3インストール
Windows Subsystem for Linux(Ubuntu)にPython3をインストールします。
インストールしたらpipを更新しておきます。
$ sudo apt install -y python3 python3-pip python3-venv
$ sudo pip3 install --upgrade pip
Heroku CLIインストール
Windows Subsystem for Linux(Ubuntu)にHeroku CLIをインストールします。
$ wget -qO- https://cli-assets.heroku.com/install-ubuntu.sh | sh
Slack Bot作成
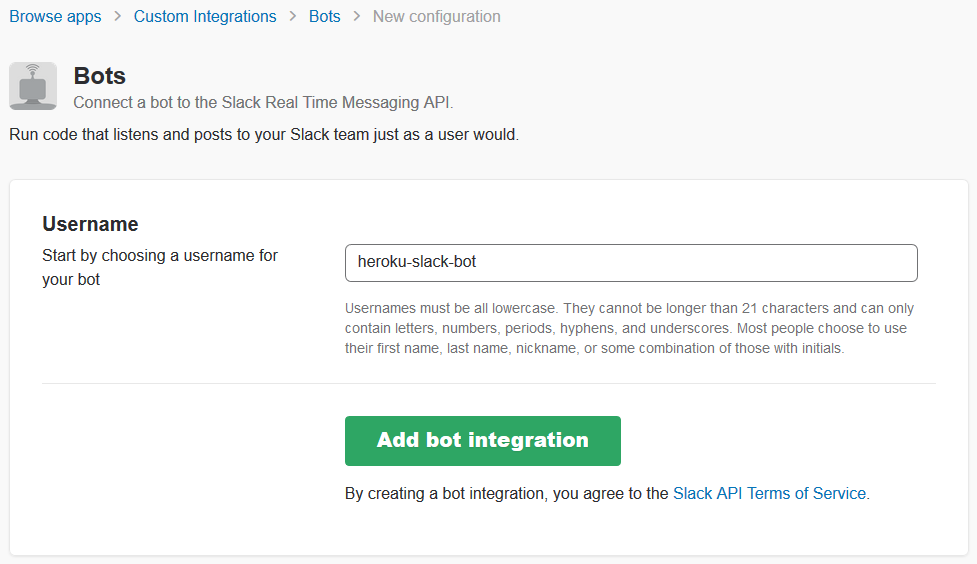
Slackへログインし以下のサイトからBOTを作成します。
https://my.slack.com/services/new/bot
UsernameにBOTの名前を入力して「Add bot integration」ボタンを押します。
今回はBOTの名前を「heroku-slack-bot」としました。
表示されたAPI Tokenをメモしておきます。
メモしたらページ下の「Save Integration」ボタンを押します。
仮想環境作成
venvを使って仮想環境を作成して、「slackbot」パッケージをインストールします。
$ mkdir heroku-slack-bot
$ cd heroku-slack-bot
$ python3 -m venv venv
$ source venv/bin/activate
$ pip install --upgrade pip
$ pip install slackbot
実装
このような構成になるようにします。
heroku-slack-bot
├── slackbot_settings.py
├── run.py
├── plugins
│   ├── __init__.py
│   └── my_mention.py
└── venv
「slackbot_settings.py」にさきほど取得したAPI Tokenを設定します。
API_TOKEN = '<API Token>'
DEFAULT_REPLY = 'おみくじを引いてみては?'
PLUGINS = ['plugins']
「run.py」を作成します。
from slackbot.bot import Bot

def main():
    bot = Bot()
    bot.run()

if __name__ == '__main__':
    main()
pluginsディレクトリを作成して空の「__init__.py」を作成します。
$ mkdir plugins
$ touch plugins/__init__.py
BOTの機能を「plugins/my_slackbot.py」に作成します。
from slackbot.bot import respond_to
import random

@respond_to('おみくじ')
def omikuji(message):
    message.reply(random.choice(['大吉', '吉', '中吉', '小吉', '末吉', '凶', '大凶']))
動作確認
チャンネルにBOTを招待します。
ローカルでBOTを起動します。(終了するときは「Ctrl+C」です)
$ python run.py
BOTにメッセージを送信してみます。メッセージが返ってきたら成功です。
デプロイ
Herokuの設定ファイル「Procfile」と「requirements.txt」を作成します。
worker: python run.py
slackbot
Gitから「__pycache__」と「venv」を除外します。
__pycache__
venv
最終的に次のような構成になります。
heroku-slack-bot
├── .gitignore
├── slackbot_settings.py
├── run.py
├── Procfile
├── requirements.txt
├── plugins
│   ├── __init__.py
│   └── my_mention.py
└── venv
できたらコミットします。
$ git init
$ git add .
$ git commit -m "create new"
Herokuに「heroku-slack-bot」アプリケーションを作成します。
すでに同じ名前が使われていたら適当な名前に変更して下さい。
Herokuにpushします。
$ heroku login
$ heroku create heroku-slack-bot
$ git push heroku master
まだBOTは起動していません。
起動
Herokuダッシュボードから作成したアプリケーションを選択します。
https://dashboard.heroku.com/apps
workerが「OFF」になっています。「Resources」タブから設定を変更します。
workerのスイッチを「ON」にします。
これでBOTが起動されます。
ローカルで確認したときと同じようにBOTにメッセージを送信してください。
おみくじが引けたら完成です!「大吉」が引けたら大成功です!
うまくいかなかったらログを確認してみましょう。
$ heroku logs --tail
参考
以下のサイトを参考にさせていただきました。
[Slack]Botkitをherokuの無料プランで動かす方法
https://qiita.com/biga816/items/148a1156cd8b1a964b91
PythonのslackbotライブラリでSlackボットを作る
https://qiita.com/sukesuke/items/1ac92251def87357fdf6


