概要
Google Ads APIのサンプルコードを動かすまで。
このAPIは、Google広告(Google AdWords)のアカウントや広告を管理するために利用するものです。
以前から提供されていたAdWords APIの次世代版として、2018年に発表されました。
QuickStartガイドはありますが、 ライブラリのインストールに手間取ったり、いろんなページを行ったり来たり、迷子になったのでメモ。
環境
- Google Ads API Beta v0.6.0
- gRPC 1.17.0
- MacOS Mojave 10.14.2
- PHP 7.1.25
- PEAR 1.10.5
手順
QuickStart に沿って進めていきます。
1. 開発者トークンを取得
- ここからMCCアカウントを作成する
- Developer tokenを取得するにはMCCアカウントが必要です。
- MCCアカウントにログインする
-
ツール>設定>APIセンターから必要事項を記入して申し込む
- サンプルを動かすだけならアクセス権は
テストアカウントで大丈夫です。
- 登録できたら以下のように開発者トークンを取得できる

参考
2. クライアントライブラリを取得
2018-12-17現在、クライアントライブラリは5言語で用意されていますが、今回はPHPを使います。
-
gRPC PHP extensionをインストールする
$ sudo pecl install grpc
```
-
以下のようなログが出たら成功です。
Build process completed successfully Installing '/usr/local/Cellar/php@7.1/7.1.25/pecl/20160303/grpc.so' install ok: channel://pecl.php.net/grpc-1.17.0 Extension grpc enabled in php.ini -
以下のようなエラーが出る場合は失敗です。ここで失敗していると、3.でエラーが発生します。(PHP 7.3ではうまくいかなかったので、PHP 7.1でやり直しました。。)
Build process completed successfully
Installing '/usr/local/Cellar/php/7.3.0/pecl/20180731/grpc.so'

Warning: mkdir(): File exists in System.php on line 294

Warning: mkdir(): File exists in /usr/local/Cellar/php/7.3.0/share/php/pear/System.php on line 294
ERROR: failed to mkdir /usr/local/Cellar/php/7.3.0/pecl/20180731
-
GithubからGoogle Ads APIのクライアントライブラリをダウンロードする
$ git clone https://github.com/googleads/google-ads-php.git
```
-
composer installする
$ cd google-ads-php
$ composer install
```
-
以下のようなログが出たら成功です。
$ composer install Loading composer repositories with package information Updating dependencies (including require-dev) Package operations: 52 installs, 0 updates, 0 removals - Installing ralouphie/getallheaders (2.0.5): Downloading (100%) (省略) - Installing squizlabs/php_codesniffer (3.3.2): Downloading (100%) grpc/grpc suggests installing ext-protobuf (For better performance, install the protobuf C extension.) react/event-loop suggests installing ext-event (~1.0 for ExtEventLoop) monolog/monolog suggests installing aws/aws-sdk-php (Allow sending log messages to AWS services like DynamoDB) (省略) monolog/monolog suggests installing sentry/sentry (Allow sending log messages to a Sentry server) symfony/yaml suggests installing symfony/console (For validating YAML files using the lint command) sebastian/global-state suggests installing ext-uopz (*) phpunit/php-code-coverage suggests installing ext-xdebug (^2.5.1) phpunit/phpunit suggests installing phpunit/php-invoker (~1.1) phpunit/phpunit suggests installing ext-xdebug (*) Writing lock file Generating autoload files -
以下のようなエラーが出る場合は失敗です。1.でgRPC PHP extensionのインストールが成功しているか確認してみてください。
$ composer install
Loading composer repositories with package information
Updating dependencies (including require-dev)
Your requirements could not be resolved to an installable set of packages.

  Problem 1
    - The requested PHP extension ext-grpc * is missing from your system. Install or enable PHP's grpc extension.
参考
3. OAuth2 クライアントIDとクライアントシークレットを取得
-
Google API Consoleにログインする
-
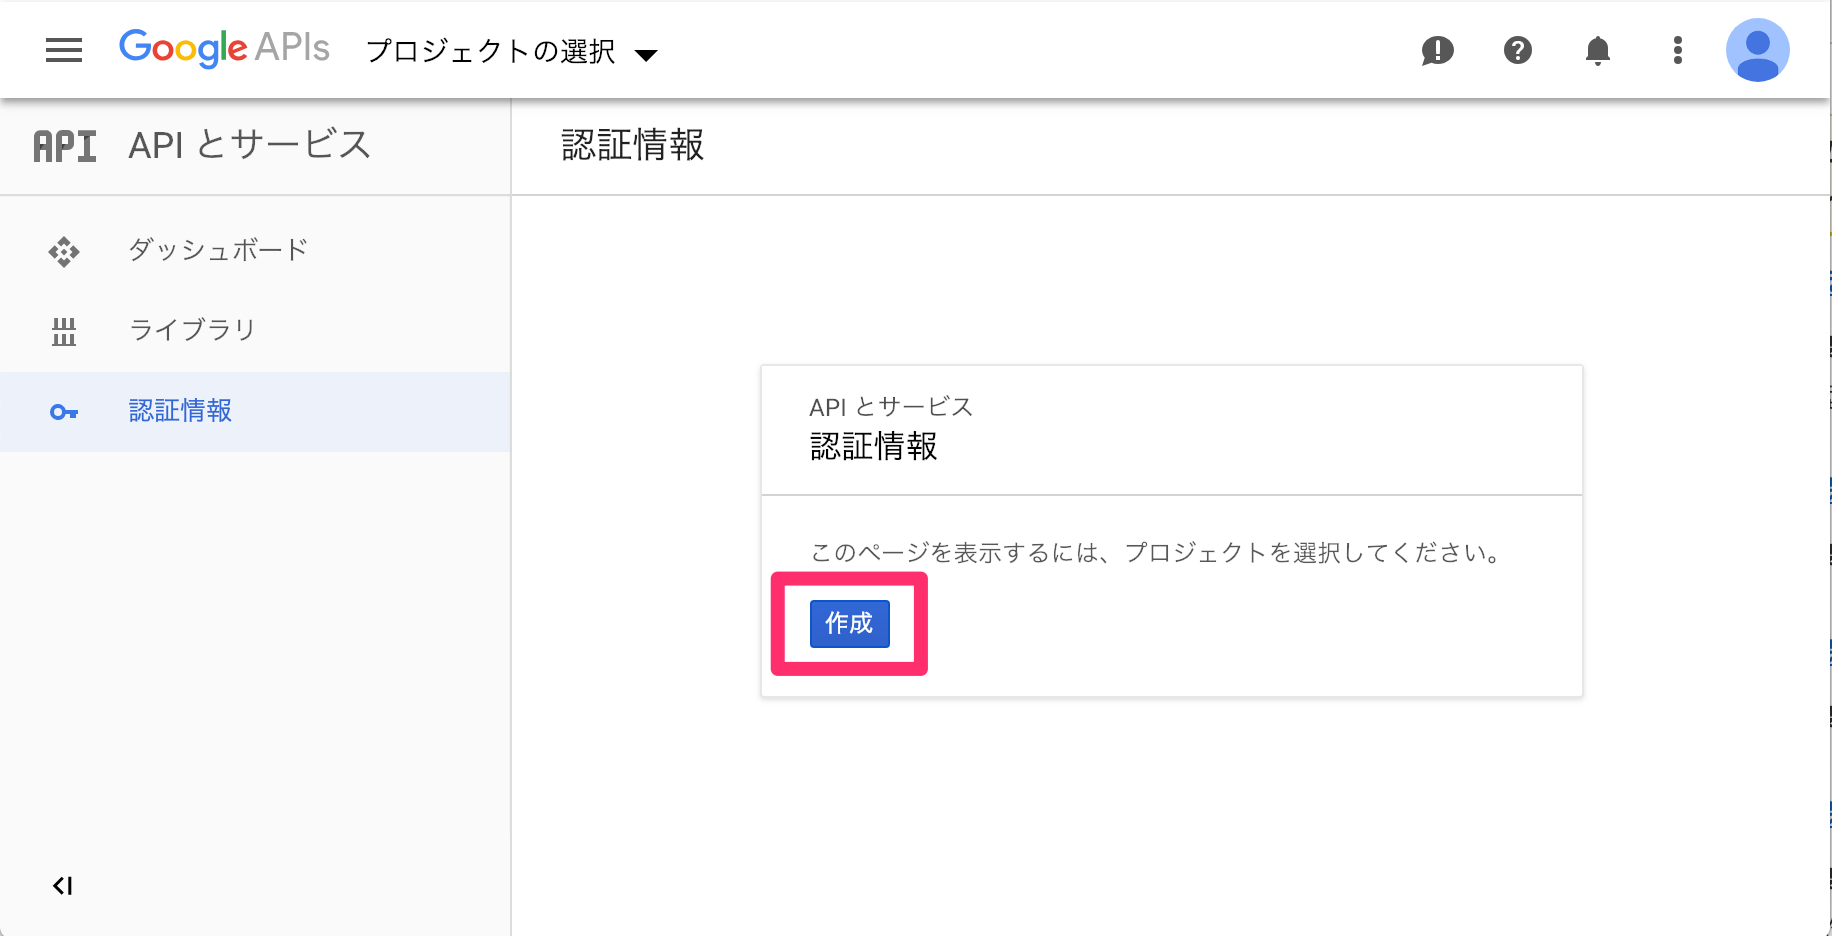
プロジェクトを作成する
-
作成ボタンを押す
 2. プロジェクト名を入力する
3. 下部の`作成`ボタンを押す
2. プロジェクト名を入力する
3. 下部の`作成`ボタンを押す

-
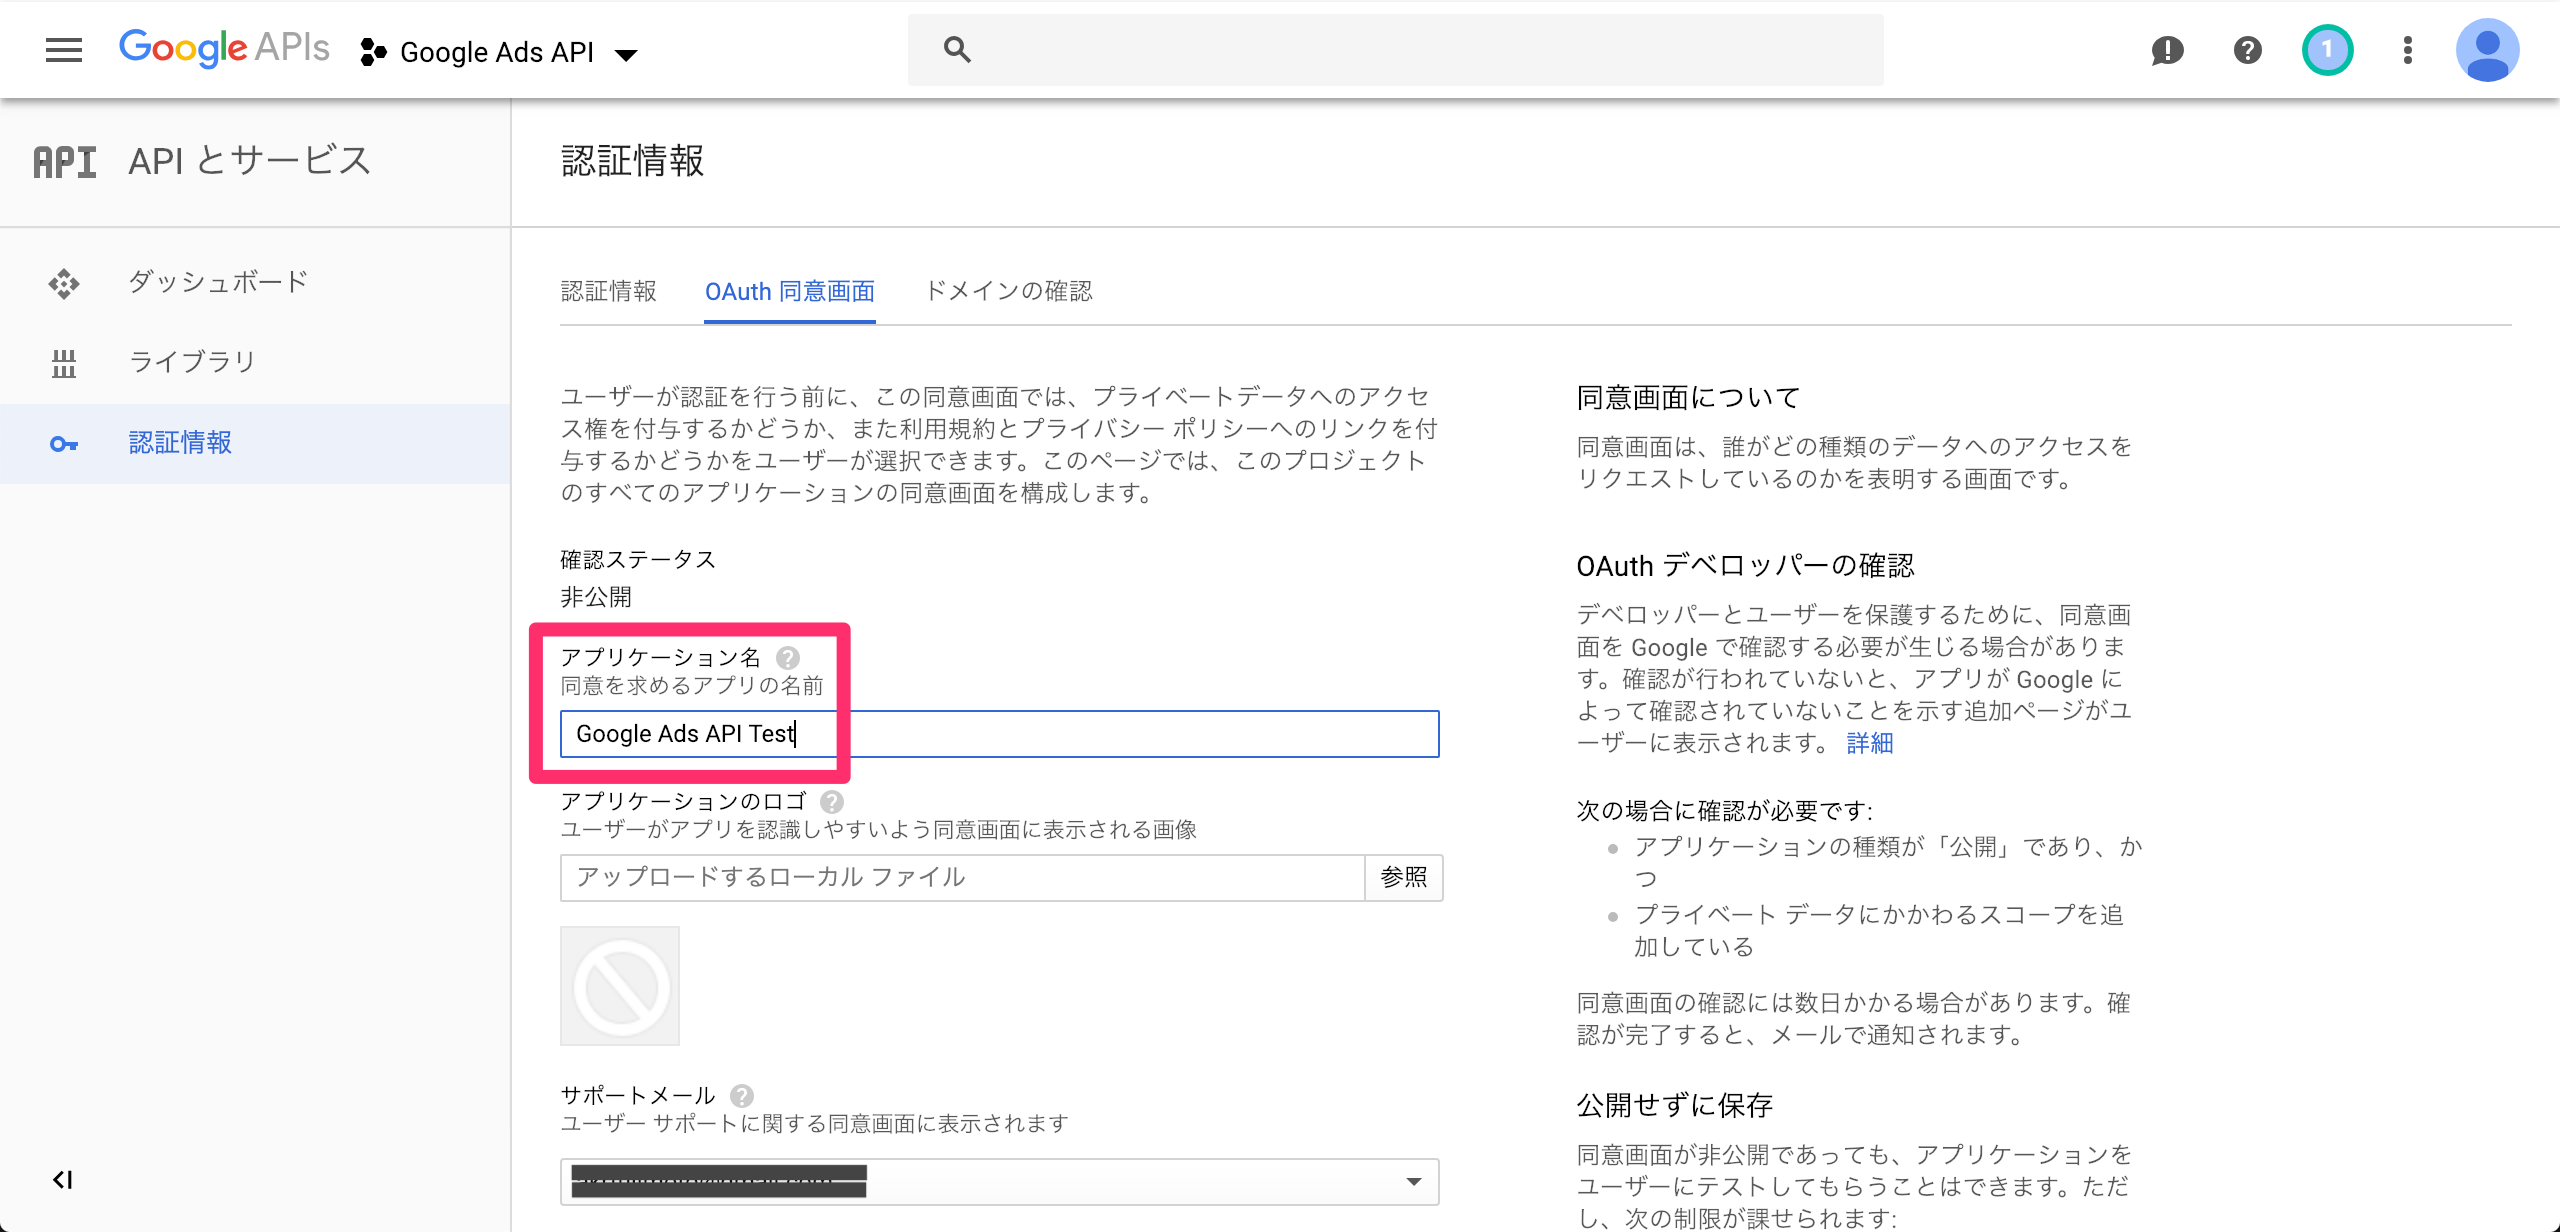
OAuth 同意画面を作成する -
OAuth 同意画面タブを開く - アプリケーション名を入力する
-
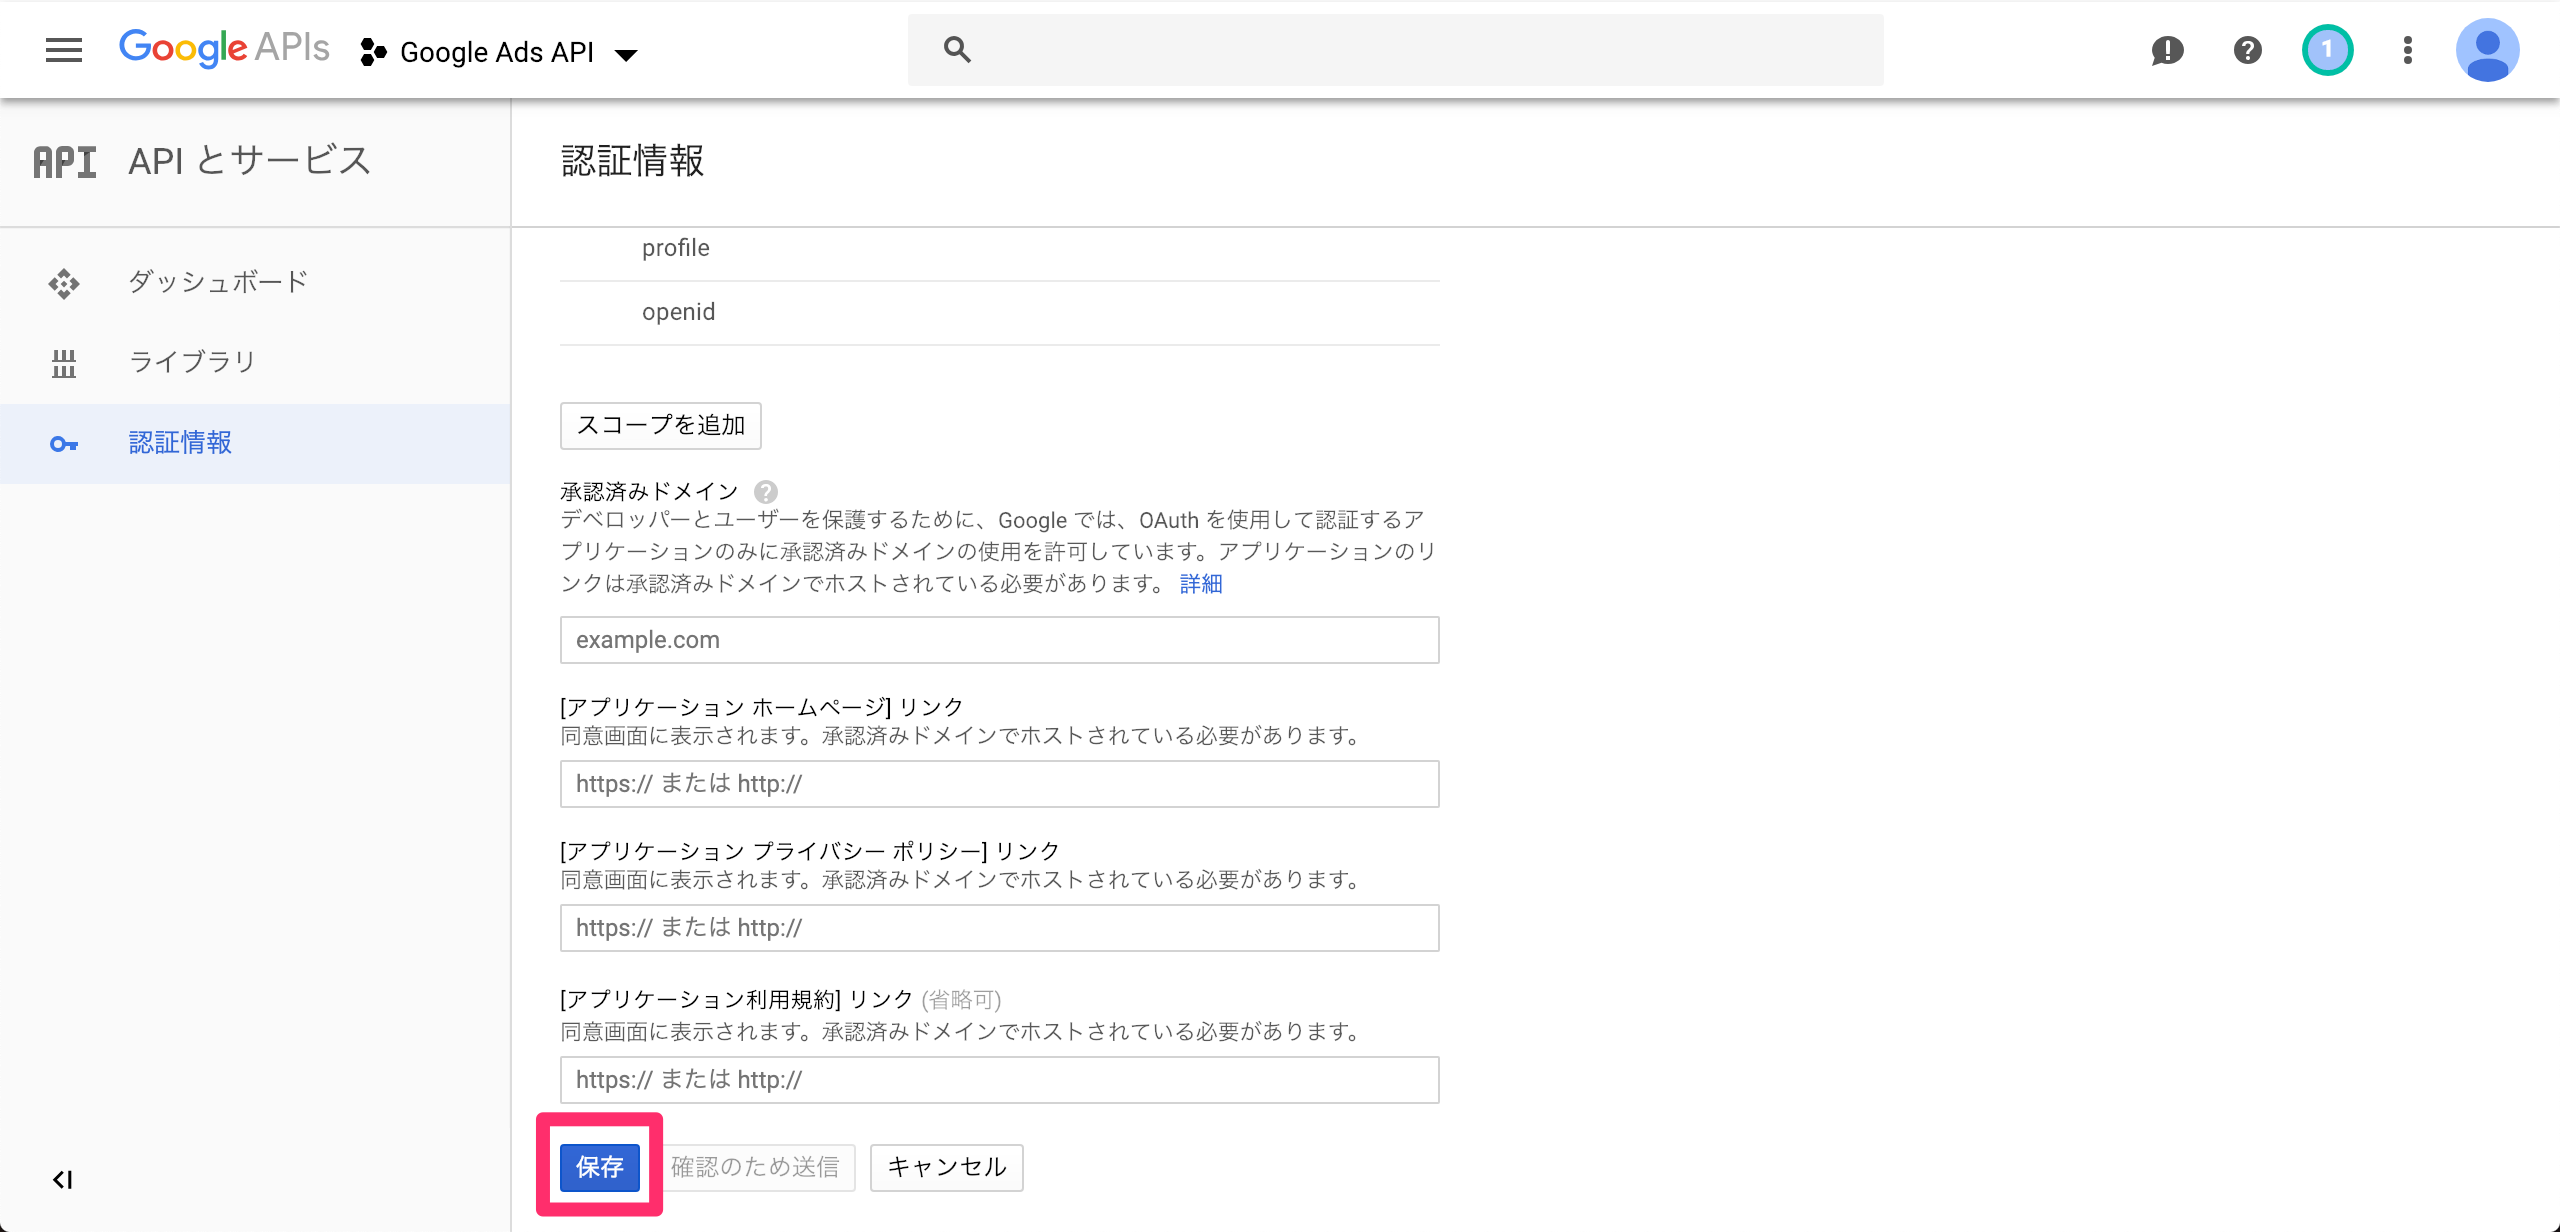
保存ボタンを押す
- OAuth2 クライアントIDとクライアントシークレットを取得する
-
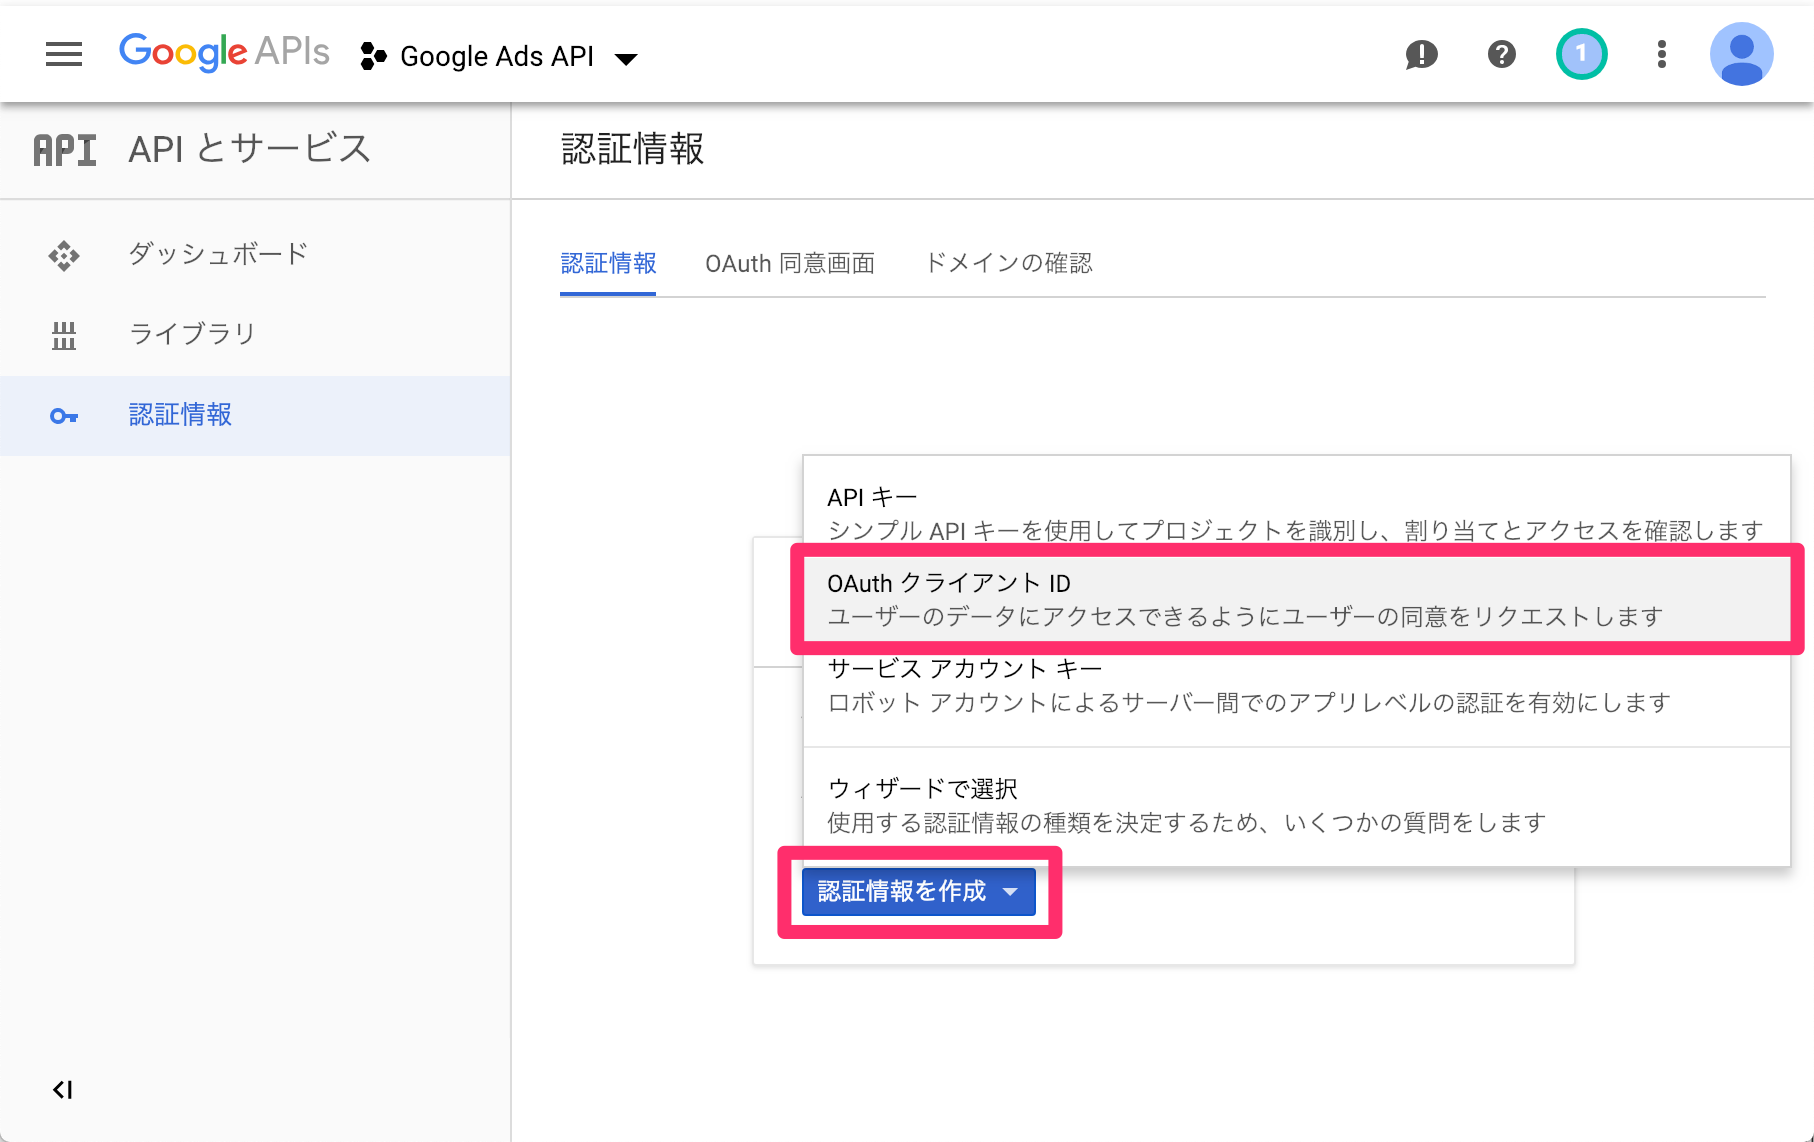
認証情報を作成>OAuth クライアント IDを選択する
- アプリケーションの種類は
その他を選択する1 -
作成ボタンを押すとクライアントIDとクライアントシークレットが表示される

4. リフレッシュトークンを取得
- JSONをダウンロードする

```json
{
  "installed": {
    "client_id": "hoge.apps.googleusercontent.com",
    "project_id": "precise-rite-999999",
    "auth_uri": "https://accounts.google.com/o/oauth2/auth",
    "token_uri": "https://www.googleapis.com/oauth2/v3/token",
    "auth_provider_x509_cert_url": "https://www.googleapis.com/oauth2/v1/certs",
    "client_secret": "fuga",
    "redirect_uris": [
      "urn:ietf:wg:oauth:2.0:oob",
      "http://localhost"
    ]
  }
}
```
-
以下のフォーマットに1.で取得したJSONの内容を当てはめ、改行を削除してブラウザからアクセスする
# フォーマット {auth_uri} ?client_id={client_id} &redirect_uri={redirect_uris(httpの方)} &scope=https://www.googleapis.com/auth/adwords &access_type=offline &response_type=code # URL https://accounts.google.com/o/oauth2/auth?client_id=hoge.apps.googleusercontent.com&redirect_uri=http://localhost&scope=https://www.googleapis.com/auth/adwords&access_type=offline&response_type=code -
以下のような画面が表示されるので許可する

- リダイレクトされるので、リダイレクト先のURLを取得する
- URLの取得が目的なので、リダイレクト先のページがエラーになっていてもOKです。
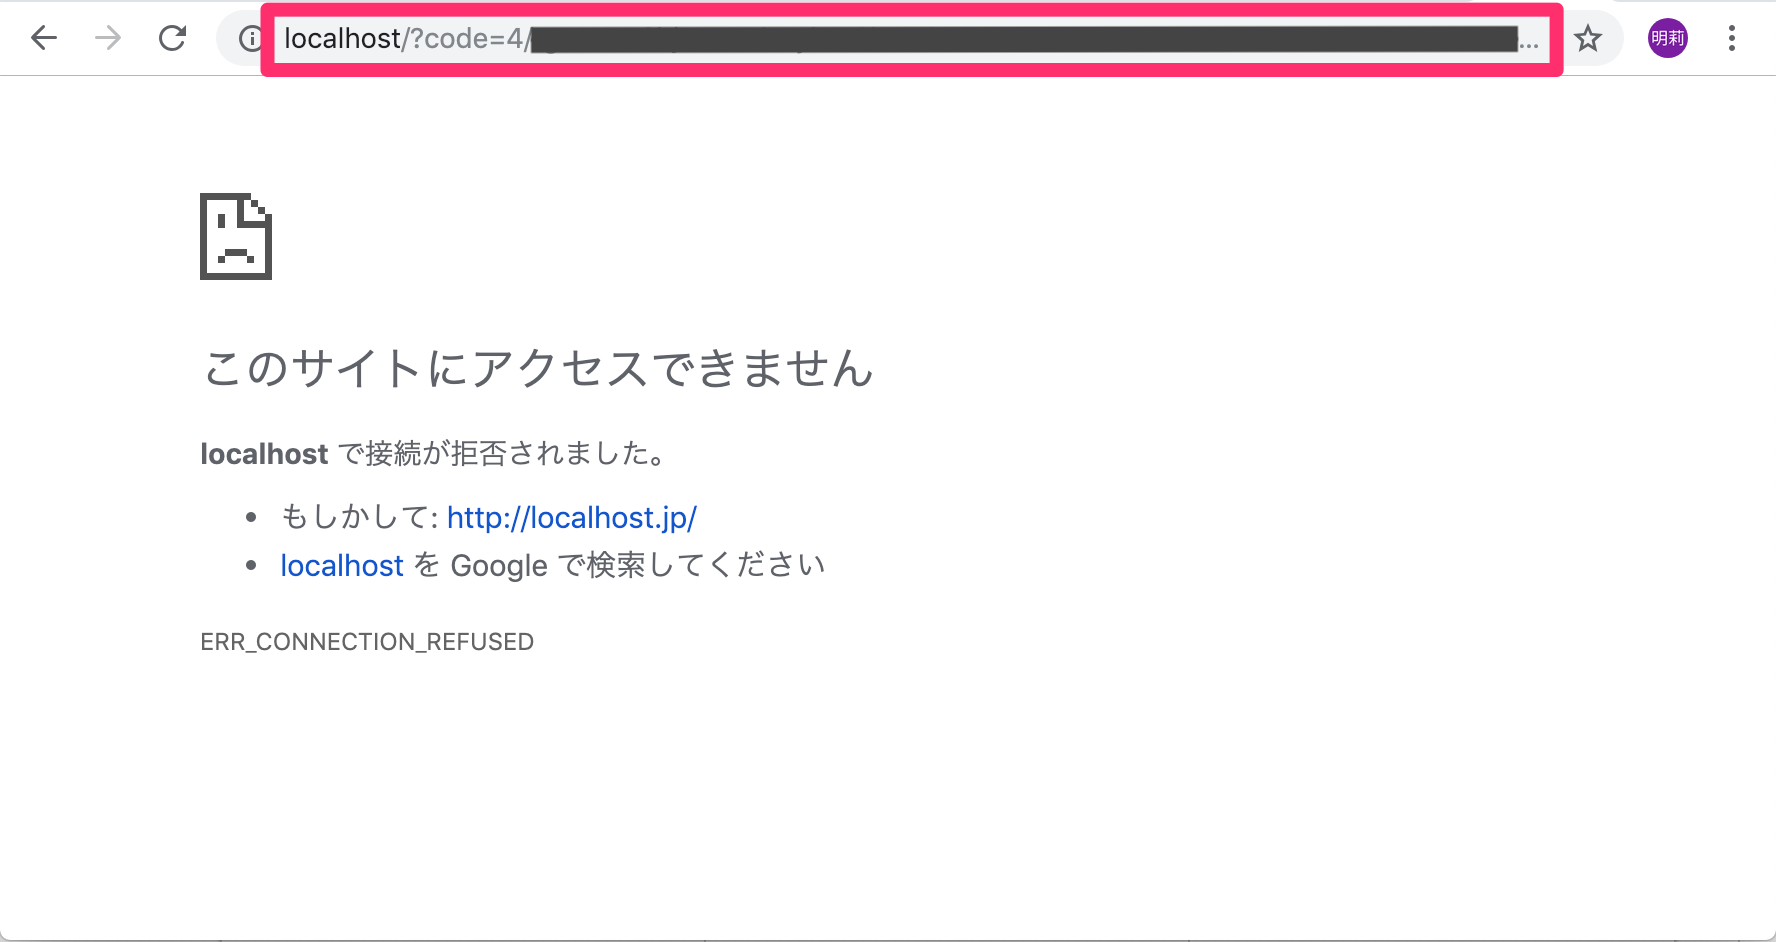
```
http://localhost/?code=4/poyo&scope=https://www.googleapis.com/auth/adwords
```
-
以下のコマンドでリフレッシュトークンを取得する
# フォーマット
# curl -d client_id={client_id} -d client_secret={client_secret} -d redirect_uri={redirect_uris(httpの方)} -d grant_type=authorization_code -d code={認証コード(4.で取得したURLのcodeパラメータ)} https://accounts.google.com/o/oauth2/token

$ curl -d client_id=hoge.apps.googleusercontent.com -d client_secret=fuga -d redirect_uri=http://localhost -d grant_type=authorization_code -d code=4/poyo https://accounts.google.com/o/oauth2/token
{
  "access_token": "nyaaa",
  "expires_in": 3600,
  "refresh_token": "1/piyo",
  "scope": "https://www.googleapis.com/auth/adwords",
  "token_type": "Bearer"
}
参考
5. キャンペーンを取得する
やっとサンプルを動かします、、!
-
google_ads_php.iniに今まで取得した値を入れる$ cd google-ads-php # ここにいる場合は不要 $ cp examples/Authentication/google_ads_php.ini ./ $ vim google_ads_php.ini # 4箇所を実際の値に変更する [GOOGLE_ADS] developerToken = "INSERT_DEVELOPER_TOKEN_HERE" # 1-4.で取得した開発者トークン [OAUTH2] clientId = "INSERT_OAUTH2_CLIENT_ID_HERE" # 4ー1.で取得したclient_id clientSecret = "INSERT_OAUTH2_CLIENT_SECRET_HERE" # 4ー1.で取得したclient_secret refreshToken = "INSERT_OAUTH2_REFRESH_TOKEN_HERE" # 4ー5.で取得したrefresh_token -
GetCampaigns.php36行目あたりのCUSTOMER_IDに実際の値に変更する$ vim examples/BasicOperations/GetCampaigns.phpclass GetCampaigns { //const CUSTOMER_ID = 'INSERT_CUSTOMER_ID_HERE'; const CUSTOMER_ID = '9999999999'; // ここ const PAGE_SIZE = 1000; -
キャンペーンを取得できました!
$ php examples/BasicOperations/GetCampaigns.php
[2018-12-17 14:00:17] google-ads.INFO: Request made: Host: "googleads.googleapis.com", Method: "/google.ads.googleads.v0.services.GoogleAdsService/Search", ClientCustomerId: 9999999999, RequestId: "stuH5sXJeVEsb-dCAQj2Iw", IsFault: 0, FaultMessage: "None"
[2018-12-17 14:00:17] google-ads.DEBUG: Request
-------
Method Name: /google.ads.googleads.v0.services.GoogleAdsService/Search
Host: googleads.googleapis.com
Headers: {
    "developer-token": "REDACTED",
    "x-goog-api-client": "gl-php\/7.1.25 gapic\/ gax\/0.35.0 grpc\/1.17.0"
}
Request: {"customerId":"9999999999","query":"SELECT campaign.id, campaign.name FROM campaign ORDER BY campaign.id","pageSize":1000}

Response
-------
Headers: {
    "content-disposition": "attachment",
    "request-id": "stuH5sXJeVEsb-dCAQj2Iw",
    "date": "Mon, 17 Dec 2018 14:00:17 GMT",
    "alt-svc": "quic=\":443\"; ma=2592000; v=\"44,43,39,35\""
}
Response: {"results":[{"campaign":{"resourceName":"customers\/9999999999\/campaigns\/1381374713","id":"1381374713","name":"test #1"}}],"totalResultsCount":"1","fieldMask":"campaign.id,campaign.name"}
Campaign with ID 1381374713 and name 'test #1' was found.
参考
-
他のアプリケーションを選ぶと、WEBサイトのURLやアプリのIDの入力が必要です。それらは自分のPCで検証する際には不要のため、今回は一番簡単な
その他を利用します。 ↩