はじめに
Ruby on Railsで画像を投稿する機能を作っている友人が、途中でハマっていたので、自分でも最小限の機能を実装してみました。
途中の過程で色々な記事を往復しましたので、条件が同じ人に活用して貰いたく、ここにまとめます。
実装は、以下の流れで試しました。
- local(cloud9)で画像の投稿
- cloud9から画像の保存を S3に行う
- Herokuにデプロイして、S3に画像の保存を行う
今回の記事では以下の内容は、詳しくは説明しません。
[S3でのバケットの作成] (https://docs.aws.amazon.com/ja_jp/AmazonS3/latest/gsg/CreatingABucket.html)
Herokuアカウントの登録
対象となる読者
Rails初学者、半年以内で、自ら小さなプロダクトを作ってみようと考えている方。
操作を行った環境
ruby 2.3.1p112
rails 5.0.6
詳細
1.AWScloud9にImageMagickを導入する
公式にもあるように ImageMagickが動作させる環境に入っていないと、PaperClipは使えないとのこと。まずは ImageMagickを cloud9に導入します。
旧cloud9の記事から流れとしては、 apt-get update を行って sudo apt-get install imagemagick とのことで、この内容に従って進めます。
$ sudo apt-get update
sudo: apt-get: command not found
apt-get というコマンドが見つからないとお叱りを受ける。
親切なことに、cloud9でこのようにアラートメッセージが出力されました。
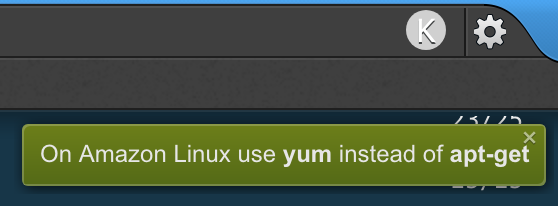
どうやら、Amazon Linuxを使用している場合は、RedHatベースのCentOSベースのため、 apt-get ではなく yum を使用するようです。
$ sudo yum update
~(中略)
Complete!
いけたようなので続いて sudo yum install imagemagick を実行します。
$ sudo yum install imagemagick
Loaded plugins: priorities, update-motd, upgrade-helper
1054 packages excluded due to repository priority protections
No package imagemagick available.
  * Maybe you meant: ImageMagick
Error: Nothing to do
有効な imagemagick というパッケージはないと怒られる。エラーのヒントの通り実行します。
$ sudo yum install ImageMagick
Loaded plugins: priorities, update-motd, upgrade-helper
amzn-main
~(中略)
Complete!
成功したようなので、 convert --version で確認するImageMagickが入っているか確認します。
$ convert --version
Version: ImageMagick 6.7.8-9 2016-06-22 Q16 http://www.imagemagick.org
Copyright: Copyright (C) 1999-2012 ImageMagick Studio LLC
Features: OpenMP
無事に、ImageMagickの導入は完了しました。
2. アプリケーションにpaperclipを導入する
STEP1:ローカルで画像投稿が出来るか確認
※最小限のアプリケーションに今回は画像投稿、表示の機能を付け加えていく。 Message というモデルにカラムを追加し、画像を投稿できるように実装する。
gem "paperclip", "~> 6.0.0"
上記をGemfileに記述し bundle install を行います。
3. Migration, Model, Controller, Viewを準備する
Messageモデルに新しく投稿する画像を imageカラム を追加します。migrationファイルの作成を以下のコマンドで実行します。
rails g migration AddAttachmentImageToMessages
新しく追加されたmigrationファイルを以下のように変更します。
class AddAttachmentImageToMessages < ActiveRecord::Migration[5.0]
  def self.up
    change_table :messages do |t|
      t.attachment :image
    end
  end

  def self.down
    remove_attachment :messages, :image
  end
end
rails db:migrate で変更を schema.rb に反映させます。反映された schema.rb には以下の4つのカラムが追加されています。
  create_table "messages", force: :cascade, options: "ENGINE=InnoDB DEFAULT CHARSET=utf8" do |t|
    ~(中略)
    t.string   "image_file_name"
    t.string   "image_content_type"
    t.integer  "image_file_size"
    t.datetime "image_updated_at"
  end
続いてMessageモデルの中身に以下を追加します。
class Message < ApplicationRecord
  ~(中略)
  has_attached_file :image,
                    :styles => { medium: "300x300>", thumb: "100x100>" },
                    :default_url => "/images/:style/missing.png"
  validates_attachment_content_type :image, content_type: /\Aimage\/.*\z/
end
Contollerを変更
def create
  @message = Message.create(message_params)
end

def message_params
  params.require(:message).permit(:image)
end
必要な記述を対象のViewページに付け加えます。
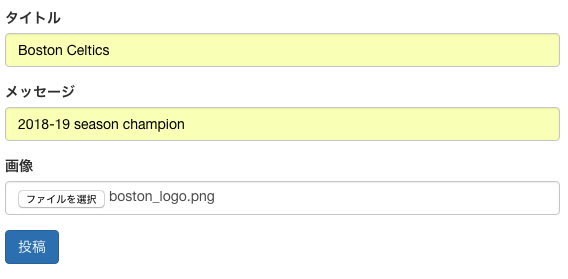
rails s -b $IP -p $PORT でサーバーを起動して、画像を投稿してみると、、、
ローカルでの画像投稿完成!
投稿された画像はどこに保存されるかというと、 application名/public/system/ というディレクトリが新しく作成されており、その中に保存されています。
4. アプリケーションにaws-sdk-s3を導入する。
STEP2:ローカルからS3に画像を保存する
ParperClipの公式ページに以下のように記述があります。
You may also choose to store your files using Amazon's S3 service. To do so, include the aws-sdk-s3 gem in your Gemfile:
gem 'aws-sdk-s3'
bundle install を行います。
gem 'aws-sdk-s3'
bundle install 後にこのようなNoteが表示されました。
##################################################
#  NOTE FOR UPGRADING FROM 4.3.0 OR EARLIER      #
##################################################

Paperclip is now compatible with aws-sdk >= 2.0.0.

If you are using S3 storage, aws-sdk >= 2.0.0 requires you to make a few small
changes:

* You must set the `s3_region`
* If you are explicitly setting permissions anywhere, such as in an initializer,
  note that the format of the permissions changed from using an underscore to
  using a hyphen. For example, `:public_read` needs to be changed to
  `public-read`.

For a walkthrough of upgrading from 4 to 5 and aws-sdk >= 2.0 you can watch
http://rubythursday.com/episodes/ruby-snack-27-upgrade-paperclip-and-aws-sdk-in-prep-for-rails-5
Paperclipは aws-sdk >= 2.0.0. と互換性があり、 S3 storageを使うなら、 aws-sdk >= 2.0.0 は s3_region の設定が必要不可欠で、アクセス許可の形式で - を使っている箇所は _ に書き換えないといけないとのこと。
Paperclip with Amazon S3 によると
storage, s3_host_name, :bucket を設定するとのこと。加えて access_key_id, secret_access_key を追記します。
  config.paperclip_defaults = {
  :storage        => :s3,
  :s3_host_name   => 's3-ap-southeast-1.amazonaws.com',
  :bucket         => ENV['S3_BUCKET_NAME'],
  :s3_credentials => {
      access_key_id: ENV['AWS_ACCESS_KEY_ID'],
      secret_access_key: ENV['AWS_SECRET_ACCESS_KEY']
    }
  }
大事な内容は .bash_profile に環境変数に設定してそこから参照するようにします。
echo export S3_BUCKET_NAME="S3のBucket Name" >> ~/.bash_profile
echo export AWS_ACCESS_KEY_ID="AWSのaccess_key_id" >> ~/.bash_profile
echo export AWS_SECRET_ACCESS_KEY="AWSのsecret_access_key" >> ~/.bash_profile

# 書き込んだ .bash_profileの内容を読み込む
source ~/.bash_profile
サーバーを立ち上げ、画像を投稿するとエラーが発生しました。
undefined method match for nil:NilClass Did you mean? catch
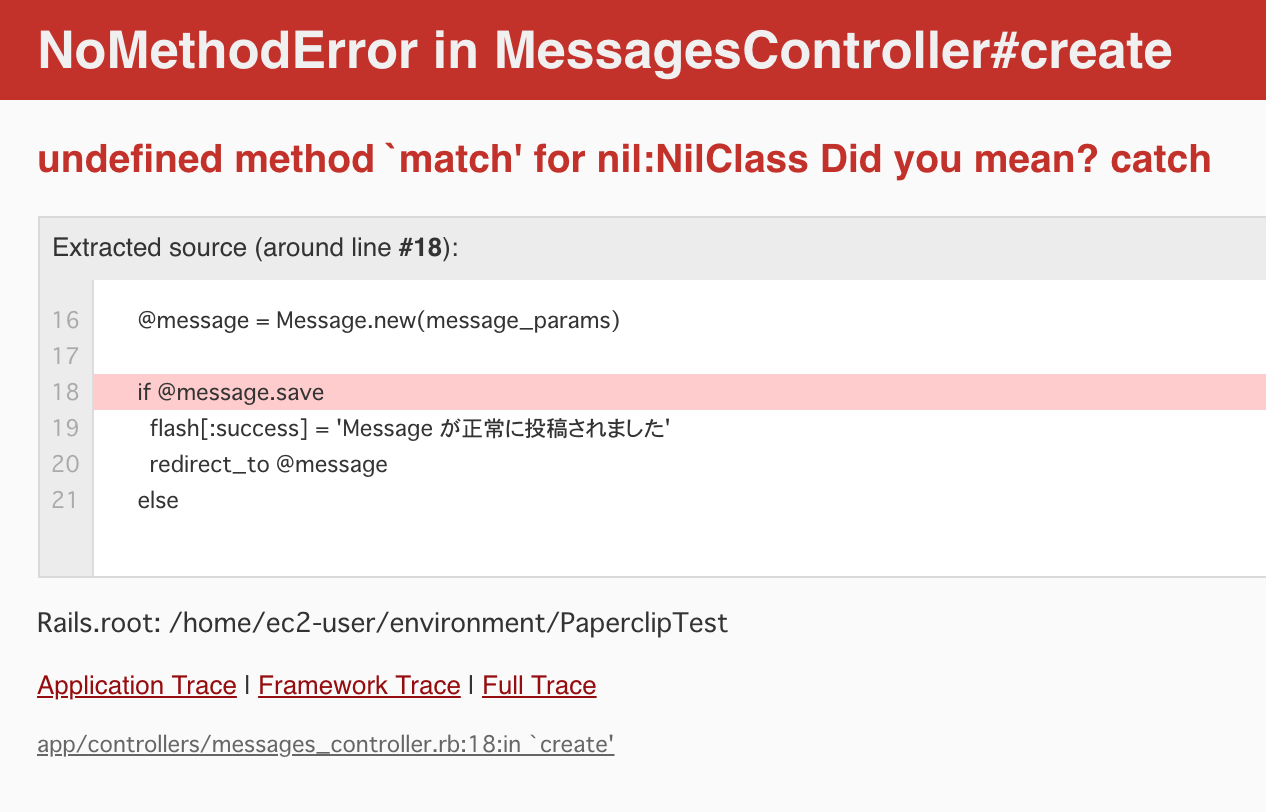
調べると、これは S3のregionの設定がされていないことが原因。そういえば、 aws-sdk-s3 を導入したときに Noteで You must set the s3_region と書いてあったのを忘れていたので、記述します。
  config.paperclip_defaults = {
  :storage        => :s3,
  :s3_host_name   => 's3-ap-southeast-1.amazonaws.com',
  :bucket         => ENV['S3_BUCKET_NAME'],
  :s3_region      => ENV['AWS_REGION'], #追記
  :s3_credentials => {
      access_key_id: ENV['AWS_ACCESS_KEY_ID'],
      secret_access_key: ENV['AWS_SECRET_ACCESS_KEY']
    }
  }
再度 .bash_profile に環境変数に設定してそこから参照するようにします。
echo export AWS_REGION="S3のRegion" >> ~/.bash_profile

# 書き込んだ .bash_profileの内容を読み込みます。
source ~/.bash_profile
※Regionがよくわからない場合はこちらの公式ページを参照。
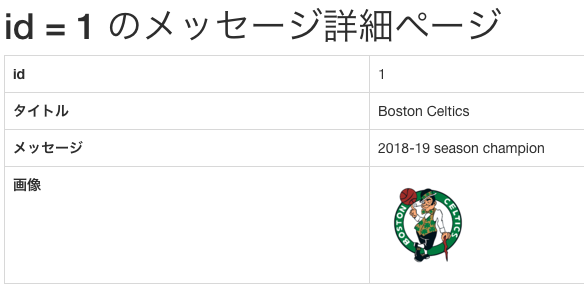
実際に投稿してみる。
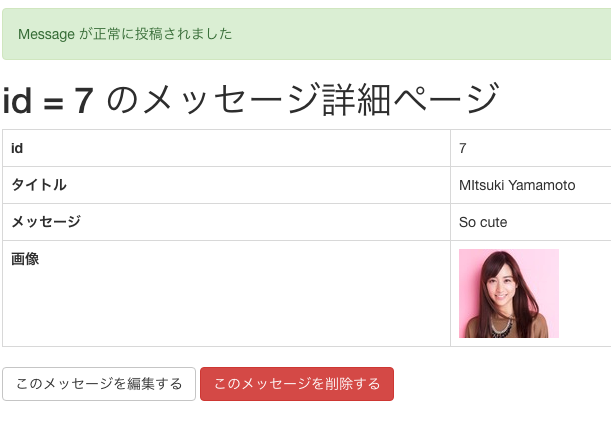
無事に投稿完了!!
5. Herokuにアプリをupしてから画像をS3に保存
STEP3:HerokuからS3に画像を保存する
まずは、production環境に以下の記述を追記します。
  config.paperclip_defaults = {
  :storage        => :s3,
  :s3_host_name   => 's3-ap-southeast-1.amazonaws.com',
  :bucket         => ENV['S3_BUCKET_NAME'],
  :s3_region      => ENV['AWS_REGION'],
  :s3_credentials => {
      access_key_id: ENV['AWS_ACCESS_KEY_ID'],
      secret_access_key: ENV['AWS_SECRET_ACCESS_KEY']
    }
  }
続いてCloud9に Heroku CLIが導入されていない場合は、CLIを導入していきます。
wget https://cli-assets.heroku.com/heroku-cli/channels/stable/heroku-cli-linux-x64.tar.gz -O heroku.tar.gz

sudo mkdir -p /usr/local/lib/heroku

sudo tar --strip-components 1 -zxvf heroku.tar.gz -C /usr/local/lib/heroku

sudo ln -s /usr/local/lib/heroku/bin/heroku /usr/local/bin/heroku
ターミナルから Heroku にログインしましょう。Herokuに登録してある mailとpasswordをターミナルから打ち込みます。
heroku login
Enter your Heroku credentials.
Email: Herokuに登録したメールアドレスを入力
Password: Herokuに登録したパスワードを入力
ログインに成功した場合は Logged in as 登録したmailアドレス が表示されます。
続いて、 Heroku にアプリケーションを作成しましょう。
heroku create 作成するHerokuアプリケーション名
※アプリケーション名は Heroku上で一意 である必要があるため、他の人と重複したアプリケーション名は命名出来ません。
念のためアプリケーションが作成されたかを確認します。
heroku apps
Herokuの DB は PostgreSQL のため、 mysqlなど他の DBを使っている場合は以下の追加が必要です。
group :production do
  gem 'pg', '0.21.0'
end
Development環境でbundle installする必要はないので以下のコマンドで bundle install します。
bundle install --without production
今までの変更を、忘れずに commit しておきましょう。
ここまで出来たら、デプロイ作業に入ります。以下のコマンドでデプロイ。
git push heroku master
続いて heroku run コマンドでマイグレーションを実行していく。
heroku run rails db:migrate
それでは、 Herokuアプリ で画像を投稿してみます。
無事成功!? かと思いきや、S3を確認すると、対象の画像は保存されていません。
これは、HerokuにAWSの設定を追加してないからです。
公式に従って、必要な設定を登録していきます。
heroku config:set S3_BUCKET_NAME=your_bucket_name
heroku config:set AWS_ACCESS_KEY_ID=your_access_key_id
heroku config:set AWS_SECRET_ACCESS_KEY=your_secret_access_key
heroku config:set AWS_REGION=your_aws_region
再度 Herokuアプリを開き画像を投稿!
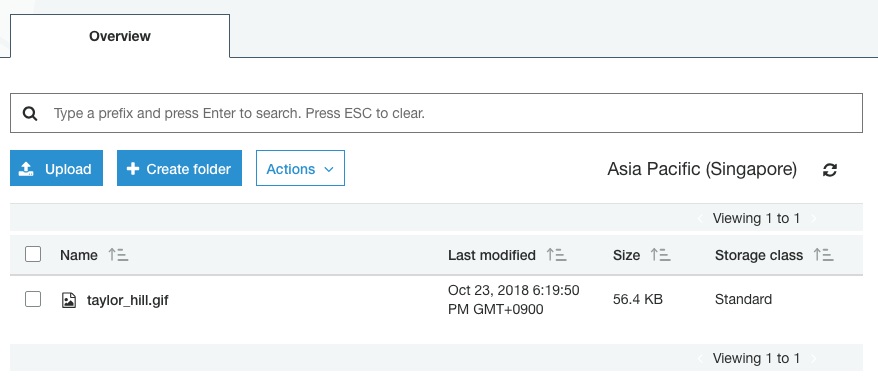
無事S3の中に対象の画像が保存されました!