iOSアプリを作るようになったら、いつの間にかMacアプリも作れるようになっていたみたいです。
RestKitの勉強を行うにあたり、Macアプリ上でライブラリのテストをしたほうが
試し易くないか?と思いました。
CocoaBindingを使うといろいろ楽なので、ライブラリを試す環境としてピッタリです。
ということで、Restkitとの連携を試してみました。
##CocoaBindingとは
感覚的にはよりMVCフレームワークっぽくなったって感じです。
ModelとViewのつながりをInterfaceBuilderで設定すると
Viewの変更にあわせてModelの情報が書き換わる。
逆のパターンも有り、Modelの情報が変化すると、該当するViewのUIの情報が追従して変化してくれる機能です。
iOSだとActionでOutletに設定したViewのオブジェクトの値を書き換えてーとか
頑張って記述していた箇所が減り、疎結合な感じになります。
##RestKitを試す
実際にMacアプリを使ってみてRestKitとCocoaBidingが連携しているところを確認します。
###インストール
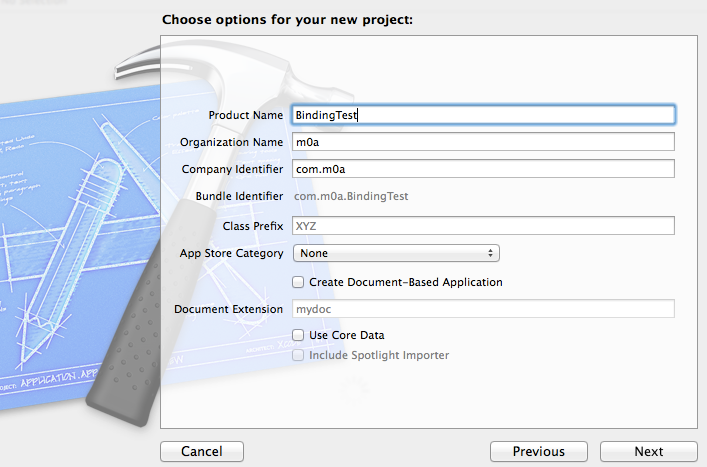
OSXのApplication ->CocoaApplicationを選択しNextへ
ProductNameを設定しNextへ。
保存先を選択してプロジェクトを作成します。
前提としてcocoapodsを導入済みだと仮定します。
CocoaPodsを使ってRestKitをインストールします。
Terminalで保存先に移動し、その後に pod init でPodfileのひな形を作成します。以下のように修正
# Uncomment this line to define a global platform for your project
# platform :ios, "6.0"
platform :osx, "10.9" #<--追記箇所1

target "BindingTest" do
pod 'RestKit' #<--追記箇所2
end

target "BindingTestTests" do #<--プロジェクト名にTestはまずかった

end
pod install でインストール開始
xcodeで開いているプロジェクトを一旦閉じて.xcworkspace側で立ち上げ直します。
open BindingTest.xcworkspace
###画面を作成
Macの場合はInterfaceBuilderを使います。
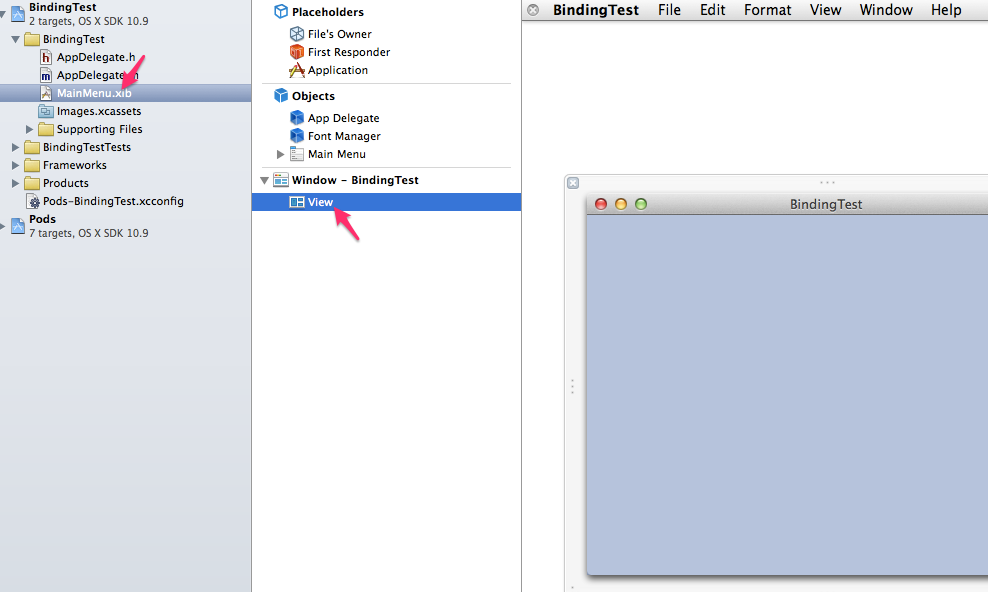
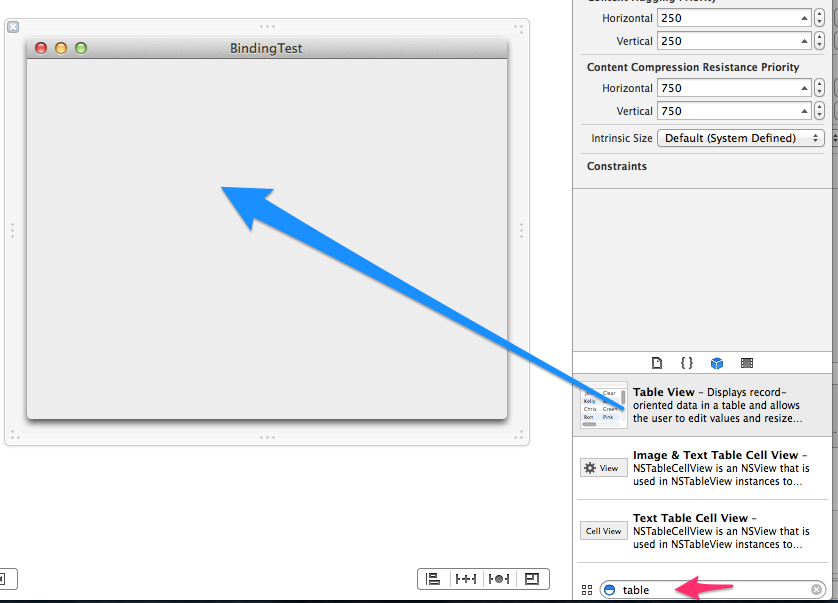
MainMenu.xibを選びWindow->viewを選ぶとWindowが表示されます。
NSTableViewを追加します。
(右下の検索窓にtableとか入れると候補が絞れますよね)
TableViewをドラッグして追加します。
大きさを調整します。
Column数を一つにします
DocumentOutLineからtableViewを選んでAttributeInspectorの
Columnsを1 に変更します。
更に幅も調整
TableColumnを選んでwidthを1000に

###RestKit
RestKitのExampleのRkTwitterからコードをパクります。
⌘N で'RKTweet'と'RKTUser'という名前でclassを追加
以下のように修正ください
@interface RKTUser : NSObject

@property (nonatomic, copy) NSNumber *userID;
@property (nonatomic, copy) NSString *name;
@property (nonatomic, copy) NSString *screenName;

@end
#import "RKTUser.h"

@implementation RKTUser
@end
#import "RKTUser.h"

@interface RKTweet : NSObject

/**
 * The unique ID of this Status
 */
@property (nonatomic, copy) NSNumber *statusID;

/**
 * Timestamp the Status was sent
 */
@property (nonatomic, copy) NSDate *createdAt;

/**
 * Text of the Status
 */
@property (nonatomic, copy) NSString *text;

/**
 * String version of the URL associated with the Status
 */
@property (nonatomic, copy) NSString *urlString;

/**
 * The screen name of the User this Status was in response to
 */
@property (nonatomic, copy) NSString *inReplyToScreenName;

/**
 * Is this status a favorite?
 */
@property (nonatomic, copy) NSNumber *isFavorited;

/**
 * The User who posted this status
 */
@property (nonatomic, strong) RKTUser *user;

@end
#import "RKTweet.h"

@implementation RKTweet

- (NSString *)description
{
    return [NSString stringWithFormat:@"%@ (ID: %@)", self.text, self.statusID];
}

@end
AppDelegate.mも書き換えます。
iOSと違って必ずViewと対応してViewControllerを用意する必要はないみたいです。
loadTimelineメソッドを追加しています。
#import "AppDelegate.h"
#import <RestKit/RestKit.h>
#import "RKTUser.h"
#import "RKTweet.h"

@interface AppDelegate()
@property (weak) IBOutlet NSArrayController *statuses;
@end


@implementation AppDelegate

- (void)applicationDidFinishLaunching:(NSNotification *)aNotification
{
    // Insert code here to initialize your application
    RKLogConfigureByName("RestKit/Network*", RKLogLevelTrace);
    RKLogConfigureByName("RestKit/ObjectMapping", RKLogLevelTrace);

    // Initialize HTTPClient
    NSURL *baseURL = [NSURL URLWithString:@"https://twitter.com"];
    AFHTTPClient* client = [[AFHTTPClient alloc] initWithBaseURL:baseURL];

    // HACK: Set User-Agent to Mac OS X so that Twitter will let us access the Timeline
    [client setDefaultHeader:@"User-Agent" value:[NSString stringWithFormat:@"%@/%@ (Mac OS X %@)", [[[NSBundle mainBundle] infoDictionary] objectForKey:(NSString *)kCFBundleExecutableKey] ?: [[[NSBundle mainBundle] infoDictionary] objectForKey:(NSString *)kCFBundleIdentifierKey], [[[NSBundle mainBundle] infoDictionary] objectForKey:@"CFBundleShortVersionString"] ?: [[[NSBundle mainBundle] infoDictionary] objectForKey:(NSString *)kCFBundleVersionKey], [[NSProcessInfo processInfo] operatingSystemVersionString]]];

    //we want to work with JSON-Data
    [client setDefaultHeader:@"Accept" value:RKMIMETypeJSON];

    // Initialize RestKit
    RKObjectManager *objectManager = [[RKObjectManager alloc] initWithHTTPClient:client];

    // Setup our object mappings
    RKObjectMapping *userMapping = [RKObjectMapping mappingForClass:[RKTUser class]];
    [userMapping addAttributeMappingsFromDictionary:@{
                                                      @"id" : @"userID",
                                                      @"screen_name" : @"screenName",
                                                      @"name" : @"name"
                                                      }];

    RKObjectMapping *statusMapping = [RKObjectMapping mappingForClass:[RKTweet class]];
    [statusMapping addAttributeMappingsFromDictionary:@{
                                                        @"id" : @"statusID",
                                                        @"created_at" : @"createdAt",
                                                        @"text" : @"text",
                                                        @"url" : @"urlString",
                                                        @"in_reply_to_screen_name" : @"inReplyToScreenName",
                                                        @"favorited" : @"isFavorited",
                                                        }];
    RKRelationshipMapping* relationShipMapping = [RKRelationshipMapping relationshipMappingFromKeyPath:@"user"
                                                                                             toKeyPath:@"user"
                                                                                           withMapping:userMapping];
    [statusMapping addPropertyMapping:relationShipMapping];

    // Update date format so that we can parse Twitter dates properly
    // Wed Sep 29 15:31:08 +0000 2010
    NSDateFormatter *dateFormatter = [NSDateFormatter new];
    dateFormatter.dateFormat = @"E MMM d HH:mm:ss Z y";
    dateFormatter.timeZone = [NSTimeZone timeZoneForSecondsFromGMT:0];
    [[RKValueTransformer defaultValueTransformer] insertValueTransformer:dateFormatter atIndex:0];

    // Register our mappings with the provider using a response descriptor
    RKResponseDescriptor *responseDescriptor = [RKResponseDescriptor responseDescriptorWithMapping:statusMapping
                                                                                            method:RKRequestMethodGET
                                                                                       pathPattern:@"/status/user_timeline/:username"
                                                                                           keyPath:nil
                                                                                       statusCodes:[NSIndexSet indexSetWithIndex:200]];
    [objectManager addResponseDescriptor:responseDescriptor];
    [self loadTimeline];

}

- (void)loadTimeline
{
    // Load the object model via RestKit
    RKObjectManager *objectManager = [RKObjectManager sharedManager];

    [objectManager getObjectsAtPath:@"/status/user_timeline/RestKit"
                         parameters:nil
                            success:^(RKObjectRequestOperation *operation, RKMappingResult *mappingResult) {
                                NSArray* statuses = [mappingResult array];
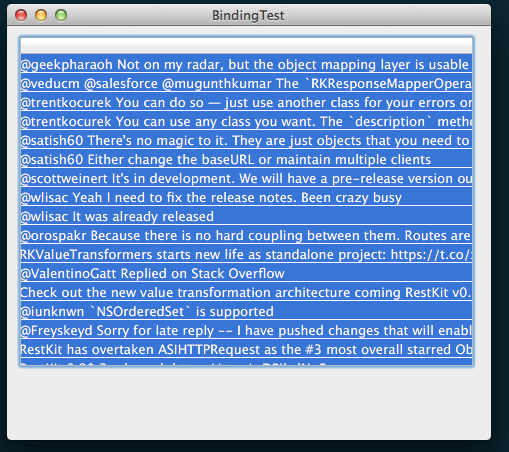
                                [self.statuses addObjects:statuses]; //ここで追加していくだけでTableに反映される
                            }
                            failure:^(RKObjectRequestOperation *operation, NSError *error) {
                                NSLog(@"Hit error: %@", error);
                            }];
}
@end
###CocoaBinding設定
再びInterfaceBuilderへ
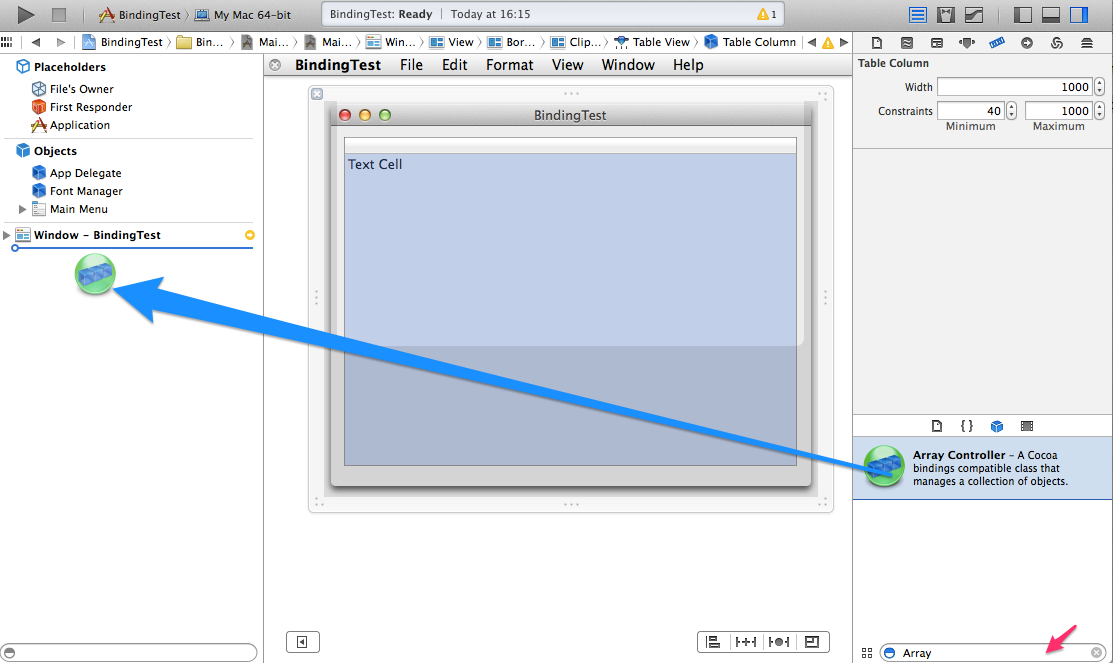
ArrayControllerを追加します。
登録したArraycontrollerとコード上(AppDelegate.m)のoutletと紐付けます。
(Ctrlを押しながらArraycontrollerからコード上のOutletへドラッグ)
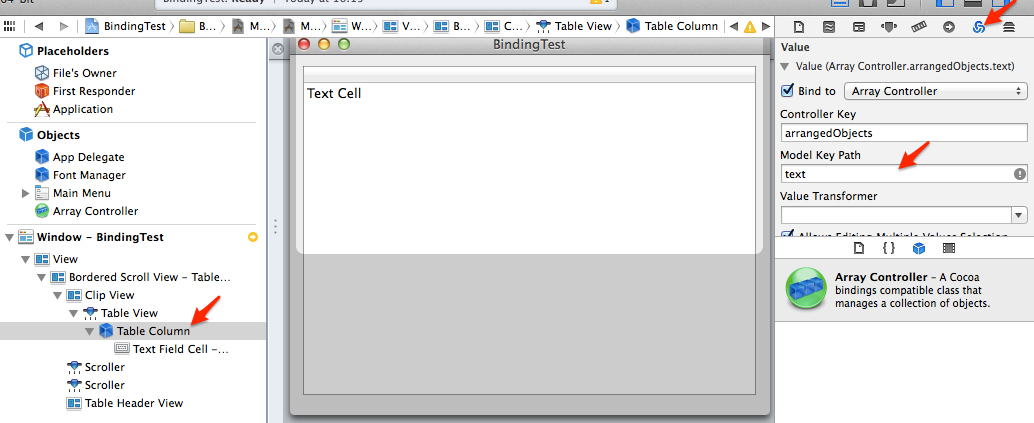
DocumentOutlineのTableColumnを選び
BidingInspectorのModel Key Pathにtext と入れます
このtextという記述により
RKTweet内のtextプロパティを勝手に参照してくれるようになります。
iosの時のようにUITableViewDataSourceのdelegateを設定するのより楽じゃないでしょうか?
MacにしかないCocoaBindingの力を見てみるとすごく便利っぽくて、この機能iOSに入らないだろうか・・と思いました。
また、この例だと双方向性がないのであんまりcocoaBindingの魅力は伝えられないですね。
ぜひ、参考のチュートリアルもお試しください。
以上です。
##参考情報
バインディングを使った Cocoa アプリケーションチュートリアル抄訳

