概要
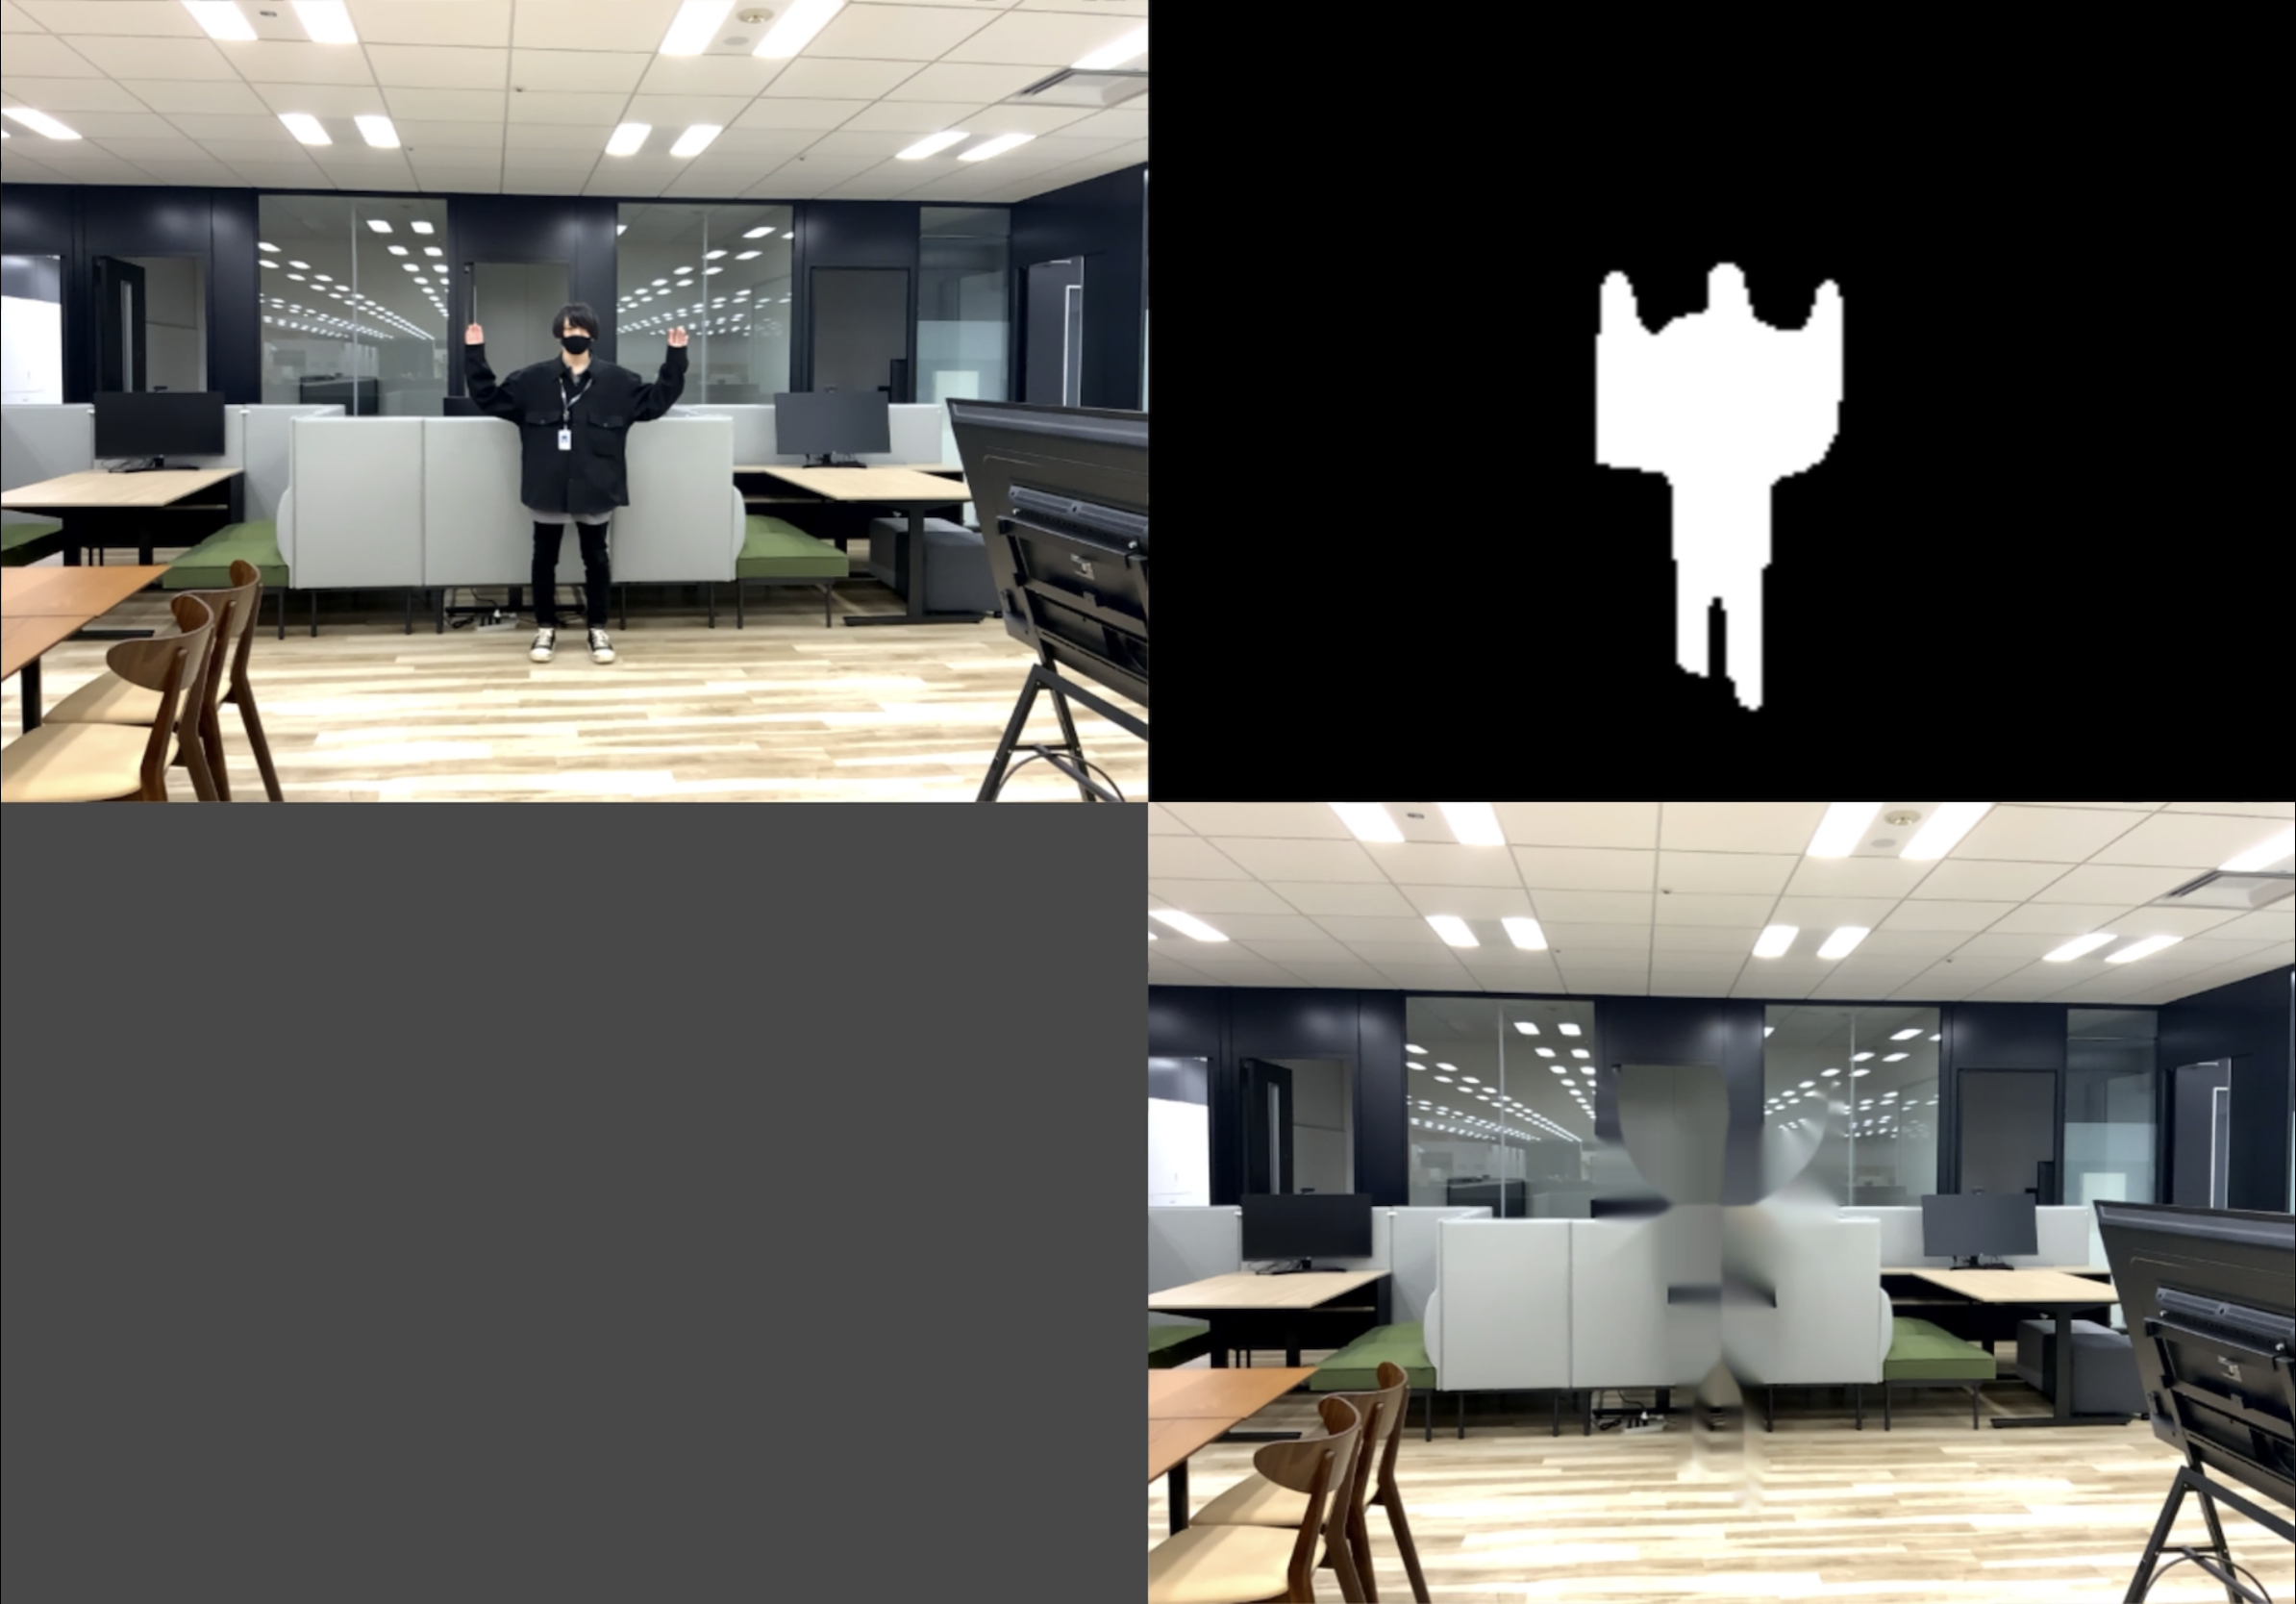
左上:カメラ画像 / 右上:マスク画像 / 左下:加工後画像
HumanStencilの取得はARFoundationを、画像の加工にはOpenCV plus Unityを使用しています。
手順としては以下3ステップです。
- ARFoundationからカメラ画像を取得する
- ARFoundationからHumanStencilを取得する
- 画像を加工して人を消す
ソースコード公開しています:https://github.com/AzetaTakuya/InvisibleHuman
環境
- iPad Pro 11インチ(第2世代)
- Unity 2021.2.0a8
- ARFoundation 4.1.0
- OpenCV plus Unity
実装
1. ARFoundationからカメラ画像を取得する
ARCameraManagerのコールバックから、カメラ画像を取得します
参考:https://docs.unity3d.com/Packages/com.unity.xr.arfoundation@4.1/manual/cpu-camera-image.html
[SerializeField] private ARCameraManager CameraManager;
private Texture2D RGB_Texture;

private void Start()
{
    CameraManager.frameReceived += OnARCameraFrameReceived;
}

unsafe void OnARCameraFrameReceived(ARCameraFrameEventArgs eventArgs)
{
    if (!CameraManager.TryAcquireLatestCpuImage(out XRCpuImage image)) return;

    var conversionParams = new XRCpuImage.ConversionParams
    {
        inputRect = new RectInt(0, 0, image.width, image.height),
        outputDimensions = new Vector2Int(image.width / 2, image.height / 2),
        outputFormat = TextureFormat.RGBA32,
        transformation = XRCpuImage.Transformation.MirrorY
    };

    int size = image.GetConvertedDataSize(conversionParams);
    var buffer = new NativeArray<byte>(size, Allocator.Temp);
    image.Convert(conversionParams, new IntPtr(buffer.GetUnsafePtr()), buffer.Length);
    image.Dispose();

    if (RGB_Texture == null)
    {
        var x = conversionParams.outputDimensions.x;
        var y = conversionParams.outputDimensions.y;
        RGB_Texture = new Texture2D(x, y, conversionParams.outputFormat, false);
    }

    RGB_Texture.LoadRawTextureData(buffer);
    RGB_Texture.Apply();

    buffer.Dispose();
}
2. ARFoundationからHuman Stencilを取得する
手順は以下の通りです。
- AROcclusionManagerのhumanStencilTextureを取得
- humanStencilTextureをGraphics.Blitで加工し、RenderTextureに出力
- 出力したRenderTextureをTexture2Dに変換
[SerializeField] private AROcclusionManager OcclusionManager;
[SerializeField] private Material HumanStencil_Material;
private RenderTexture HumanStencil_RT;
private Texture2D Stencil_Texture;

private void Update()
{
    var currentStencil = OcclusionManager.humanStencilTexture;

    if (currentStencil == null) return;

    if (HumanStencil_RT == null)
    {
        HumanStencil_RT = RenderTexture.GetTemporary(currentStencil.width, currentStencil.height, 0, RenderTextureFormat.ARGB32, RenderTextureReadWrite.Linear);
        HumanStencil_RT.Create();
    }
    if (Stencil_Texture == null)
    {
        Stencil_Texture = new Texture2D(currentStencil.width, currentStencil.height);
    }

    Graphics.Blit(currentStencil, HumanStencil_RT, HumanStencil_Material);

    var currentRT = RenderTexture.active;
    RenderTexture.active = HumanStencil_RT;
    Stencil_Texture.ReadPixels(new UnityEngine.Rect(0, 0, Stencil_Texture.width, Stencil_Texture.height), 0, 0);
    Stencil_Texture.Apply();
    RenderTexture.active = currentRT;
}
3. 画像を加工して人を消す!!
手順は以下の通りです。
- HumanStencil
- グレースケール化
- 人物部分拡張
- 画像サイズ変更
- カメラ画像
- サイズ変更
- 画像反転
- 出力画像
- マスク画像を使ったカメラ画像の修正
[SerializeField] private RawImage RGB_Image;
[SerializeField] private RawImage HumanStencil_Image;
[SerializeField] private RawImage Inpaint_Image;

private int width = 640, height = 480;
private CancellationTokenSource tokenSource;

private void Start()
{
    tokenSource = new CancellationTokenSource();
    var cancelToken = tokenSource.Token;
    _ = CaptureLoop(cancelToken);
}

private async Task CaptureLoop(CancellationToken cancelToken)
{
    byte[] dilateArray =
        {   1, 1, 1, 1, 1,
            1, 1, 1, 1, 1,
            1, 1, 1, 1, 1,
            1, 1, 1, 1, 1,
            1, 1, 1, 1, 1, };

    Texture2D stencilViewTexture = new Texture2D(width,height);
    Texture2D rgbViewTexture = new Texture2D(width, height);
    Texture2D inpaintViewTexture = new Texture2D(width, height);

    HumanStencil_Image.texture = stencilViewTexture;
    RGB_Image.texture = rgbViewTexture;
    Inpaint_Image.texture = inpaintViewTexture;

    while (!cancelToken.IsCancellationRequested)
    {
        await Task.Delay(20);

        if (RGB_Texture == null || Stencil_Texture == null) continue;

        using (Mat stencilMat = OpenCvSharp.Unity.TextureToMat(Stencil_Texture))
        using (Mat rgbMat = OpenCvSharp.Unity.TextureToMat(RGB_Texture))
        using (Mat inpaintMat = new Mat())
        {
            #region stencil texture
            Cv2.CvtColor(stencilMat, stencilMat, ColorConversionCodes.BGR2GRAY);
            Cv2.Dilate(stencilMat, stencilMat, InputArray.Create(dilateArray));
            Cv2.Resize(stencilMat, stencilMat, new OpenCvSharp.Size(width, height));
            stencilViewTexture = OpenCvSharp.Unity.MatToTexture(stencilMat, stencilViewTexture);
            #endregion

            #region rgb texture
            Cv2.Resize(rgbMat, rgbMat, new OpenCvSharp.Size(width, height));
            Cv2.Flip(rgbMat, rgbMat, FlipMode.Y);
            rgbViewTexture = OpenCvSharp.Unity.MatToTexture(rgbMat, rgbViewTexture);
            #endregion

            #region inpaint
            Cv2.Inpaint(rgbMat, stencilMat, inpaintMat, 3, InpaintMethod.NS);
            inpaintViewTexture = OpenCvSharp.Unity.MatToTexture(inpaintMat, inpaintViewTexture);
            #endregion

            stencilMat.Dispose();
            rgbMat.Dispose();
            inpaintMat.Dispose();
        }
    }
}
InpaintMethodはNSとTeleaがありますが、NSの方が高速だった為NSを採用しています。
※ usingステートメントを使用してもMatのメモリが解放されないらしいので、加えてDispose()を読んでいます。実際はDispose()だけで良いと思います。
まとめ
AR×OpenCVは楽しい
参考
- #OpenCV Sharpでメモリリークが起きる