JavaScriptで生成した画像配列をHTMLのimgタグで表示してみます。
これが全コードです。
<!DOCTYPE html>
<html lang="en">
  <head>
    <meta charset="utf-8">
    <title>Dispaly image array using HTML img tag</title>
  </head>
  <body>
    <script>
      // 画像の幅、高さ
      const width = 256;
      const height = 256;

      // 一次元配列に各ピクセルのRGBA値を格納する
      const array = new Array(width * height * 4); // 4 = RGBA
      for (let y = 0; y < height; ++y) {
        for (let x = 0; x < width; ++x) {
          const index = (x + (y * width)) * 4;
          array[index] = x; // Red
          array[index + 1] = y; // Green
          array[index + 2] = 0; // Blue
          array[index + 3] = 255; // Alpha
        }
      }

      // 配列をImageDataに変換する
      const image = new ImageData(new Uint8ClampedArray(array), width, height);

      // canvasにImageDataを描画する
      const canvas = document.createElement('canvas');
      canvas.width = width;
      canvas.height = height;
      const context = canvas.getContext('2d');
      context.putImageData(image, 0, 0);
      // document.body.appendChild(canvas); // 確認用

      // canvasからBlobを作成する
      canvas.toBlob((blob) => {
        // BlobのURLを作成してimgタグのsrc属性に設定する
        const img = document.createElement('img');
        img.src = URL.createObjectURL(blob);
        document.body.appendChild(img);
      }, 'image/png');
    </script>
  </body>
</html>
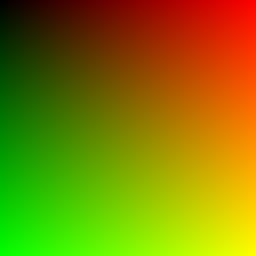
このHTMLで以下のような画像が表示されます。
ステップごとに解説します。
まず、画像配列を作成します。ここでは、横方向に赤色に、縦方向に緑色になるようにしています。RGBAの各値を8bitで表現するので、最小値が0、最大値が255になります。
// 一次元配列に各ピクセルのRGBA値を格納する
const array = new Array(width * height * 4); // 4 = RGBA
for (let y = 0; y < height; ++y) {
  for (let x = 0; x < width; ++x) {
    const index = (x + (y * width)) * 4;
    array[index] = x; // Red
    array[index + 1] = y; // Green
    array[index + 2] = 0; // Blue
    array[index + 3] = 255; // Alpha
  }
}
canvasに描画するために、ImageDataに変換します。先ほどの配列をUint8ClampedArrayに変換して引数として渡します。
// 配列をImageDataに変換する
const image = new ImageData(new Uint8ClampedArray(array), width, height);
canvas要素を作成して、先ほど生成したImageDataをputImageDataを用いて描画します。
// canvasにImageDataを描画する
const canvas = document.createElement('canvas');
canvas.width = width;
canvas.height = height;
const context = canvas.getContext('2d');
context.putImageData(image, 0, 0);
// document.body.appendChild(canvas); // 確認用
canvasの描画結果をtoBlobを用いてBlobに変換します。img要素を作成して、そのsrc属性にURL.createObjectURLで作成したURLを設定します。
// canvasからBlobを作成する
canvas.toBlob((blob) => {
  // BlobのURLを作成してimgタグのsrc属性に設定する
  const img = document.createElement('img');
  img.src = URL.createObjectURL(blob);
  document.body.appendChild(img);
}, 'image/png');
以下、参考した記事です。