Three.js Advent Calendar 2019 5日目の記事です。
Object3DのcustomDepthMaterialを使う必要があったのですが、調べても情報がほとんどでてこないので試してみました。
customDepthMaterialプロパティの説明には以下のように書いてあります。
Custom depth material to be used when rendering to the depth map. Can only be used in context of meshes. When shadow-casting with a DirectionalLight or SpotLight, if you are (a) modifying vertex positions in the vertex shader, (b) using a displacement map, (c) using an alpha map with alphaTest, or (d) using a transparent texture with alphaTest, you must specify a customDepthMaterial for proper shadows. Default is undefined.
雑に訳すとこんな感じですかね。
Custom depth materialは深度マップに描画するときに使用されます。メッシュに対してのみ使用できます。平行ライトやスポットライトから影を落とすときにもし(a)頂点シェーダーで頂点位置を変更する、(b) 変位マップを使用する、(c) アルファテストでアルファマップを使用する、(d) アルファテストで透明テクスチャを使用するならば、適切な影を描画するためにcustomDepthMaterialを指定しなければなりません。デフォルト値はundefinedです。
要するに、シェーダー側でメッシュの表示位置を変えたり描画するかどうかを変える場合にはシャドウマッピングで使用するシェーダーにも同じ変更を行うものが必要だよ、ということです。customDepthMaterialプロパティをundefinedのままにしている場合にはMeshDepthMaterialが使用されます(ソースコード的にはこのあたりです)。
というわけでcustomDepthMaterialを使ってみたいと思います。今回は(a)頂点シェーダーで頂点位置を変更するのケースで試します。
three.jsのバージョンはr109です。
まずは、頂点位置を変更するようなマテリアルをShaderMaterialを使って作ります。今回はShaderLibからMeshLambertMaterialで使用されているコードを引っ張ってきて使用します。頂点シェーダーはソースコードからコピペしてきて頂点位置を変更するように改造をしています。
// ShaderLib['lambert'].vertexShaderを改造
// original: https://github.com/mrdoob/three.js/blob/r109/src/renderers/shaders/ShaderLib/meshlambert_vert.glsl.js
const vertexShader = `
# define LAMBERT
varying vec3 vLightFront;
varying vec3 vIndirectFront;
# ifdef DOUBLE_SIDED
	varying vec3 vLightBack;
	varying vec3 vIndirectBack;
# endif
# include <common>
# include <uv_pars_vertex>
# include <uv2_pars_vertex>
# include <envmap_pars_vertex>
# include <bsdfs>
# include <lights_pars_begin>
# include <color_pars_vertex>
# include <fog_pars_vertex>
# include <morphtarget_pars_vertex>
# include <skinning_pars_vertex>
# include <shadowmap_pars_vertex>
# include <logdepthbuf_pars_vertex>
# include <clipping_planes_pars_vertex>

// 追記
// 頂点位置を変更するために使用する関数とuniformを定義
float random(vec3 x){
  return fract(sin(dot(x,vec3(12.9898, 78.233, 39.425))) * 43758.5453);
}
uniform float time;

void main() {
  #include <uv_vertex>
  #include <uv2_vertex>
  #include <color_vertex>
  #include <beginnormal_vertex>
  #include <morphnormal_vertex>
  #include <skinbase_vertex>
  #include <skinnormal_vertex>
  #include <defaultnormal_vertex>
  #include <begin_vertex>

  // 追記
  // 頂点位置を法線方向にsinで移動させる
  // transformedは頂点位置のオブジェクト座標系を表している
  transformed += objectNormal * 0.5 * sin(0.5 * time + 10.0 * random(transformed));

  #include <morphtarget_vertex>
  #include <skinning_vertex>
  #include <project_vertex>
  #include <logdepthbuf_vertex>
  #include <clipping_planes_vertex>
  #include <worldpos_vertex>
  #include <envmap_vertex>
  #include <lights_lambert_vertex>
  #include <shadowmap_vertex>
  #include <fog_vertex>
}
`;

const lambert = ShaderLib['lambert'];
const shaderMaterial = new ShaderMaterial({
  vertexShader: vertexShader,
  fragmentShader: lambert.fragmentShader,
  uniforms: Object.assign(
    lambert.uniforms,
    {
      'diffuse': { value: new Color(0x6699ff) },
      'time': { value: 0 },
    },
  ),
});
shaderMaterial.lights = true;

const sphere = new Mesh(
  new SphereBufferGeometry(),
  shaderMaterial
);
sphere.castShadow = true;
scene.add(sphere);
これを描画すると以下のようになります。メッシュはグニョグニョになっていますが地面に投影される影は球のままになっています。

次にこの球のcustomDepthMaterialプロパティにセットするシャドウマッピング用のマテリアルを作ります。基本的にはMeshDepthMaterialなので先ほどと同様にShaderLibから引っ張ってきて、頂点シェーダーに同じ改造を加えます。
// ShaderLib['depth'].vertexShaderを改造
// original: https://github.com/mrdoob/three.js/blob/r109/src/renderers/shaders/ShaderLib/depth_vert.glsl.js
const depthVertexShader = `
# include <common>
# include <uv_pars_vertex>
# include <displacementmap_pars_vertex>
# include <morphtarget_pars_vertex>
# include <skinning_pars_vertex>
# include <logdepthbuf_pars_vertex>
# include <clipping_planes_pars_vertex>

// 追記
// 頂点位置を変更するために使用する関数とuniformを定義
float random(vec3 x){
  return fract(sin(dot(x,vec3(12.9898, 78.233, 39.425))) * 43758.5453);
}
uniform float time;

void main() {
  #include <uv_vertex>
  #include <skinbase_vertex>
  #ifdef USE_DISPLACEMENTMAP
    #include <beginnormal_vertex>
    #include <morphnormal_vertex>
    #include <skinnormal_vertex>
  #endif
  #include <begin_vertex>

  // 追記
  // 先ほどのシェーダーと同じように頂点を移動させている
  transformed += normal * 0.5 * sin(0.5 * time + 10.0 * random(transformed));

  #include <morphtarget_vertex>
  #include <skinning_vertex>
  #include <displacementmap_vertex>
  #include <project_vertex>
  #include <logdepthbuf_vertex>
  #include <clipping_planes_vertex>
}
`;

const depthMaterial = new ShaderMaterial({
  vertexShader: depthVertexShader,
  fragmentShader: ShaderLib['depth'].fragmentShader,
  uniforms: Object.assign(
    ShaderLib['depth'].uniforms,
    {
      'time': { value: 0 },
    },
  ),
  defines: {
    // シャドウマッピングにMeshDepthMaterialを使用するときにはdepthPackingプロパティにRGBADepthPackingを設定しているので、
    // customDepthMaterialでもRGBADepthPackingを使用するようにする
    // ソースコード的にはこのあたり: https://github.com/mrdoob/three.js/blob/r109/src/renderers/webgl/WebGLShadowMap.js#L84
    'DEPTH_PACKING': RGBADepthPacking,
  },
});

const sphere = new Mesh(
  new SphereBufferGeometry(),
  shaderMaterial
);
sphere.castShadow = true;
sphere.customDepthMaterial = depthMaterial; // customDepthMaterialを適用する
scene.add(sphere);
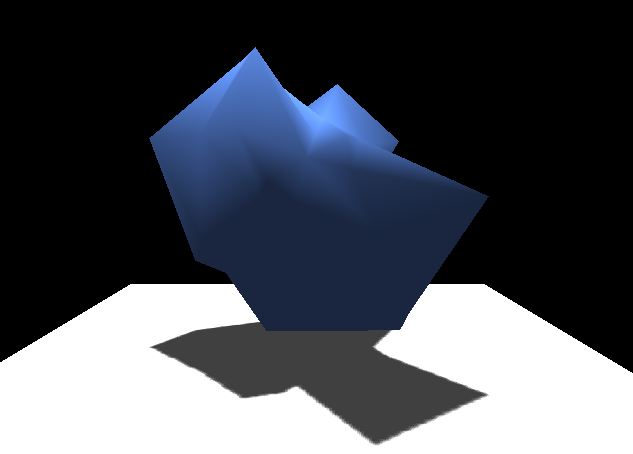
描画すると以下のように、影も同じようにグニョグニョになっていますね。
デモとソースコードはGitHubに置いておきます。
デモ: https://aadebdeb.github.io/Sample_Three_CustomDepthMaterial/
ソースコード: https://github.com/aadebdeb/Sample_Three_CustomDepthMaterial
余談です。Object3DにはcustomDistanceMaterialというプロパティがあり、こっちはポイントライトで影を落とすときに必要になります。何も指定しない場合はMeshDistanceMaterialが使われます。