以前にUnityのVFX Graphで使用するAttribute MapをC#スクリプトで動的に生成する記事を書きました。
UnityのVFX Graphで使用するAttribute Mapを動的に生成する - Qiita
この記事の最後に、サイズの大きいAttribute Mapを動的に生成する場合はCompute Shaderを使った方がいいかもと書いたのですが、それを実際に試してみたいと思います。
といっても、Compute Shaderを普通に使ってRenderTextureに位置と色を書き込むだけなので大した話ではないのですが...。
使用したバージョンは以下のようになっています。
- Unity: 2019.3.10f1 Personal
- Visual Effect Graph: 7.3.1
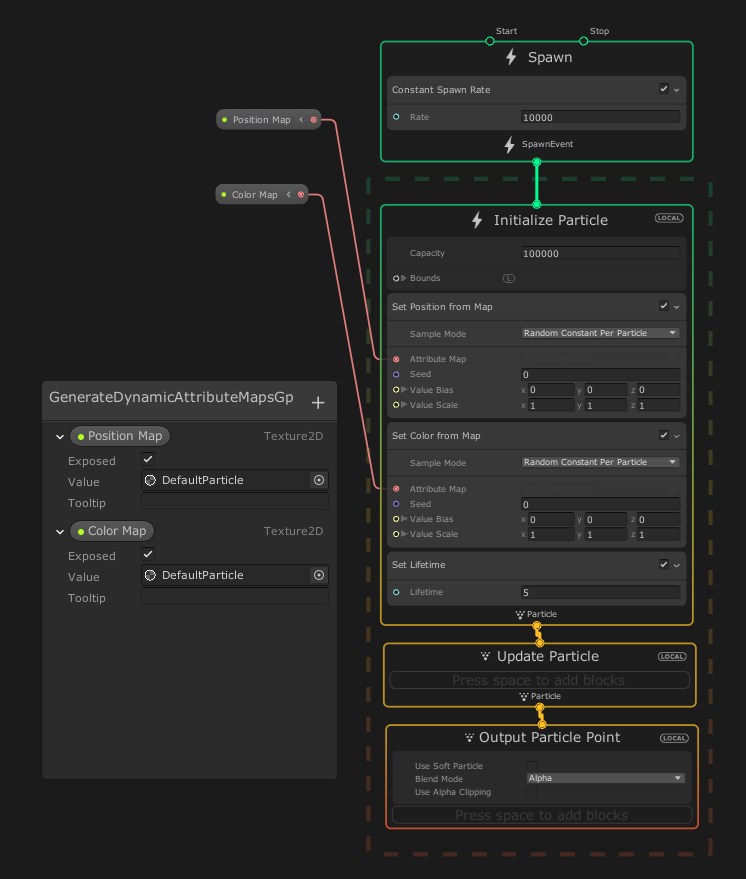
比較してわかりやすいように以下のような前の記事と同じものを作成します。Attribute Mapのサイズを大きくしたので、一度に生成するパーティクルの数を増やしています。

まずはC#スクリプトです。Attribute Mapとして位置と色を保持するRenderTextureをそれぞれ作成して、それをVisualEffectコンポーネントのプロパティに設定しています。そのRenderTextureをCompute Shaderで更新します。
using UnityEngine;
using UnityEngine.VFX;

[ExecuteInEditMode]
[RequireComponent(typeof(VisualEffect))]
public class GenerateDynamicAttributeMapsGpu : MonoBehaviour
{

    struct ThreadSize
    {
        public int x;
        public int y;
        public int z;

        public ThreadSize(uint x, uint y, uint z)
        {
            this.x = (int)x;
            this.y = (int)y;
            this.z = (int)z;
        }
    }

    [SerializeField]
    ComputeShader shader;

    [SerializeField]
    int width = 128;

    [SerializeField]
    int height = 128;

    VisualEffect vfx;
    RenderTexture positionMap;
    RenderTexture colorMap;
    int kernel;
    ThreadSize threadSize;

    void Start()
    {
        if (!SystemInfo.supportsComputeShaders)
        {
            return;
        }
        vfx = GetComponent<VisualEffect>();
        SetupAttributeMaps();
    }

    void Update()
    {
        if (!SystemInfo.supportsComputeShaders)
        {
            return;
        }

        if (width != positionMap.width || height != positionMap.height)
        {
            SetupAttributeMaps();
        }

        UpdateAttributeMaps();
    }

    void SetupAttributeMaps()
    {

        positionMap = new RenderTexture(width, height, 0, RenderTextureFormat.ARGBFloat);
        positionMap.enableRandomWrite = true;
        positionMap.Create();
        colorMap = new RenderTexture(width, height, 0, RenderTextureFormat.ARGBFloat);
        colorMap.enableRandomWrite = true;
        colorMap.Create();

        kernel = shader.FindKernel("GenerateDynamicAttributeMaps");
        uint threadSizeX, threadSizeY, threadSizeZ;
        shader.GetKernelThreadGroupSizes(kernel, out threadSizeX, out threadSizeY, out threadSizeZ);
        threadSize = new ThreadSize(threadSizeX, threadSizeY, threadSizeZ);

        shader.SetTexture(kernel, "PositionMap", positionMap);
        shader.SetTexture(kernel, "ColorMap", colorMap);

        vfx.SetTexture("Position Map", positionMap);
        vfx.SetTexture("Color Map", colorMap);
    }

    void UpdateAttributeMaps()
    {
        shader.SetFloat("Time", Time.time);
        shader.Dispatch(kernel, Mathf.CeilToInt(width / threadSize.x), Mathf.CeilToInt(height / threadSize.y), 1);
    }
}
Attribute Mapの更新に使用するCompute Shaderは次のようになります。このShaderを先ほどのC#スクリプトのshaderプロパティに設定するようにします。位置と色の計算は以前の記事と同じなのですが、HLSLには乱数を生成したりHSVからRGBに変換する組み込み関数がないので自作しています。
# pragma kernel GenerateDynamicAttributeMaps

static const float PI = 3.14159265f;

RWTexture2D<float4> PositionMap;
RWTexture2D<float4> ColorMap;
float Time;

float Random(float3 x)
{
    return frac(sin(dot(x, float3(12.9898, 78.233, 19.521))) * 43758.5453);
}

float3 RandomOnSphere(float3 x)
{
    float z = Random(x) * 2.0 - 1.0;
    float phi = Random(x + float3(11.42, 17.35, 23.79)) * 2.0 * PI;
    float l = sqrt(1.0 - z * z);
    return float3(l * cos(phi), l * sin(phi), z);
}

// ref: http://www.chilliant.com/rgb2hsv.html
float3 HUEToRGB(float h)
{
    float r = abs(h * 6.0 - 3.0) - 1.0;
    float g = 2.0 - abs(h * 6.0 - 2.0);
    float b = 2.0 - abs(h * 6.0 - 4.0);
    return saturate(float3(r, g, b));
}

[numthreads(32,32,1)]
void GenerateDynamicAttributeMaps (uint3 id : SV_DispatchThreadID)
{
    float3 center = 3.0 * float3(cos(Time), sin(Time), 0.0);
    float3 position = center + RandomOnSphere(float3(id.xy, Time));
    float3 color = HUEToRGB((atan2(position.y, position.x) + PI) / (2.0 * PI));
    PositionMap[id.xy] = float4(position, 0.0);
    ColorMap[id.xy] = float4(color, 0.0);
}
VFX Graph側はSpawn ContextのConstant Spawn Rate BlockのRateプロパティを大きくした以外は以前の記事と同じです。