UnityのVFX Graphで使用するAttribute Mapをスクリプトで動的に生成してみます。
使用したバージョンは以下のようになっています。
- Unity: 2019.3.10f1 Personal
- Visual Effect Graph: 7.3.1
今回作成するサンプルは以下のようにXY平面を円状に動く球の表面にパーティクルを生成するシンプルなものです。色は移動する円に対する角度によってHSVの色相を変更することで決定しています。

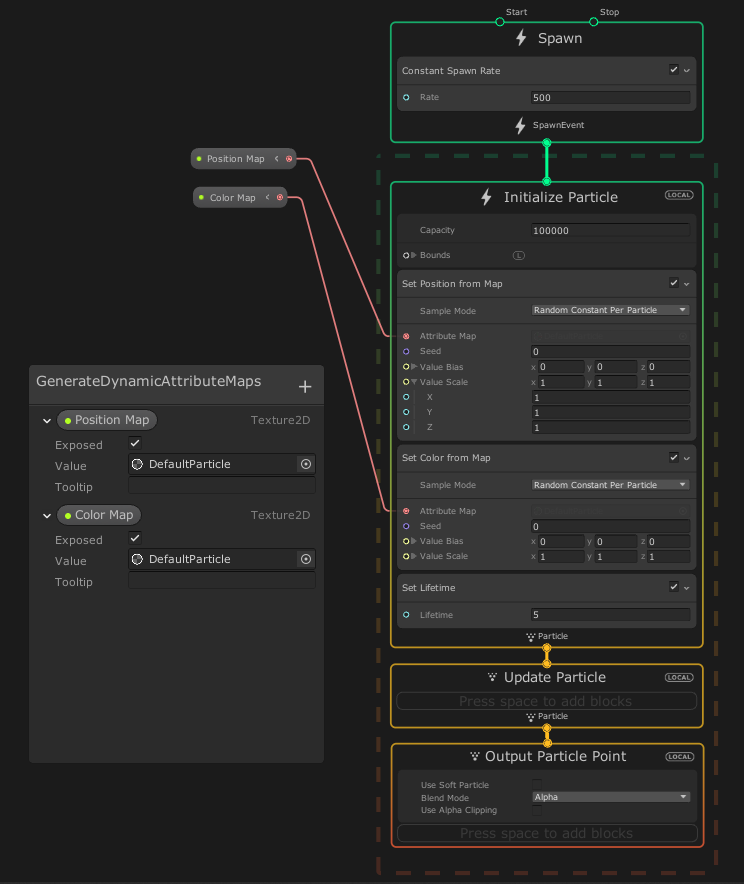
サンプルは単純なので動的にAttribute Mapを生成せずにVFX Graphのノードグラフだけでも組むことができます。ですが、今回は位置と色に関するAttribute Mapをスクリプトで生成して、VFX GraphのInitialize ParticleContextのSet Position from MapBlockとSet Color from MapBlockで位置と色を決定するようにします。
まず、次のような動的にAttribute Mapを生成するスクリプトを作成して、Visual Effectコンポーネントを持つGame Objectに追加します。ここでは、サンプリング候補となる位置と色を持つTexture2Dをそれぞれ作成し、SetTextureメソッドでPosition MapとColor Mapという名前のプロパティに作成したTexture2Dを設定しています。
using UnityEngine;
using UnityEngine.VFX;

[ExecuteInEditMode]
[RequireComponent(typeof(VisualEffect))]
public class GenerateDynamicAttributeMaps : MonoBehaviour
{

    [SerializeField]
    int width = 32;

    [SerializeField]
    int height = 32;

    VisualEffect vfx;
    Texture2D positionMap;
    Texture2D colorMap;

    void Start()
    {
        vfx = GetComponent<VisualEffect>();
        CreateAndSetAttributeMaps();
    }

    void Update()
    {
        if (width != positionMap.width || height != positionMap.height) {
            CreateAndSetAttributeMaps();
        }
        UpdateAttributeMaps();
    }

    void CreateAndSetAttributeMaps()
    {
        positionMap = new Texture2D(width, height, TextureFormat.RGBAFloat, false);
        positionMap.filterMode = FilterMode.Point;
        positionMap.wrapMode = TextureWrapMode.Clamp;
        colorMap = new Texture2D(width, height, TextureFormat.RGBAFloat, false);
        colorMap.filterMode = FilterMode.Point;
        colorMap.wrapMode = TextureWrapMode.Clamp;
        vfx.SetTexture("Position Map", positionMap);
        vfx.SetTexture("Color Map", colorMap);
    }

    void UpdateAttributeMaps()
    {
        Vector3 center = 3.0f * new Vector3(Mathf.Cos(Time.time), Mathf.Sin(Time.time), 0.0f);
        int count = width * height;
        Color[] positions = new Color[count];
        Color[] colors = new Color[count];
        for (int i = 0; i < count; i++)
        {
            Vector3 position = center + Random.onUnitSphere;
            positions[i] = new Color(position.x, position.y, position.z, 0.0f);
            colors[i] = Color.HSVToRGB((Mathf.Atan2(position.y, position.x) + Mathf.PI) / (2.0f * Mathf.PI), 1.0f, 1.0f);
        }
        positionMap.SetPixels(positions);
        positionMap.Apply();
        colorMap.SetPixels(colors);
        colorMap.Apply();
    }
}
VFX Graph側では以下のようにSetTextureメソッドで使用したものと同じPosition MapとColor Mapという名前のTexture2D形式のプロパティを作成して、Exposedにしておきます。
今回のサンプルのように単純なエフェクトの場合、わざわざAttribute Mapを動的に生成するありがたみはないですが、Unityの他の機能や外部データと組み合わせると面白いことができそうです。
また、今回のサンプルでは生成するAttribute Mapはサイズが小さいのでC#スクリプトで生成しましたが、サイズが大きい場合はCompute Shaderを使う必要がありそうです。
以下の記事を参考にさせて頂きました。